
Tutorial | Build a RAG system and turn it into a conversational agent#
Get started#
In this tutorial, you will apply the RAG approach to Dataiku documentation resources and use them to build a conversational assistant that delivers accurate, source-backed answers.
Objectives#
In this tutorial, you will:
Use the Embed documents recipe to extract content from various document formats (.pdf, .docx, .pptx, .txt, .md, .html, .png or .jpg) and create a multimodal knowledge bank.
Implement two approaches to use the knowledge bank:
Augment an LLM with the knowledge bank to generate source-backed answers automatically.
Build a search tool and connect it to a Simple Visual Agent to retrieve and synthesize information.
Test your solutions to ensure they return concise and factual answers.
Prerequisites#
To use the Embed documents recipe, you’ll need:
Dataiku 14.0 or later.
An Advanced Analytics Designer or Full Designer user profile.
Two internal code environments set up by the instance administrator:
One for retrieval augmented generation.
Another for text extraction.
At least one LLM connection to a supported LLM provider, including access to:
A text completion model that supports image input.
An embedding LLM.
Tip
You don’t need previous experience with large language models (LLMs), though it would be useful to read the article Concept | Embed recipes and Retrieval Augmented Generation (RAG) before completing this tutorial.
Create the project#
From the Dataiku Design homepage, click + New Project.
Select Learning projects.
Search for and select RAG with the Embed Documents Recipe.
If needed, change the folder into which the project will be installed, and click Create.
From the project homepage, click Go to Flow (or type
g+f).
Note
You can also download the starter project from this website and import it as a ZIP file.
Extract your knowledge#
Before creating an augmented LLM, you must first create a knowledge bank. This section will guide you through the creation and configuration of the Embed documents recipe.
Create the Embed documents recipe#
First, create the Embed documents recipe from the various types of documents stored in the managed folder.
In the Flow, select the dataiku_doc managed folder.
Go to the Actions (
 ) tab of the right panel, and click Embed documents under the Visual Recipes section.
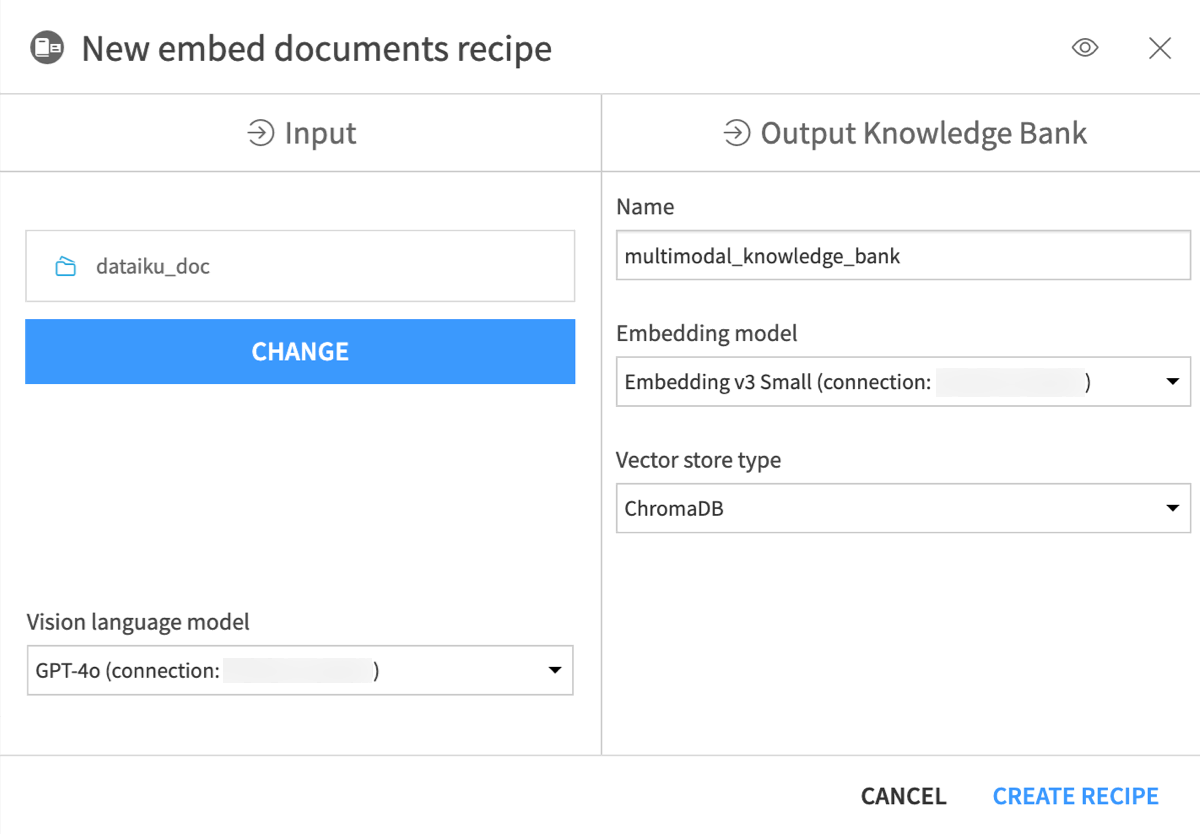
In the New Embed documents recipe window, name the output knowledge bank
knowledge_bank.In the Embedding model field, select an LLM you can use for text embedding (that is, text vectorization, which means encoding the semantic information into a numerical representation).
Keep the default ChromaDB vector store type.
Click Create Recipe.
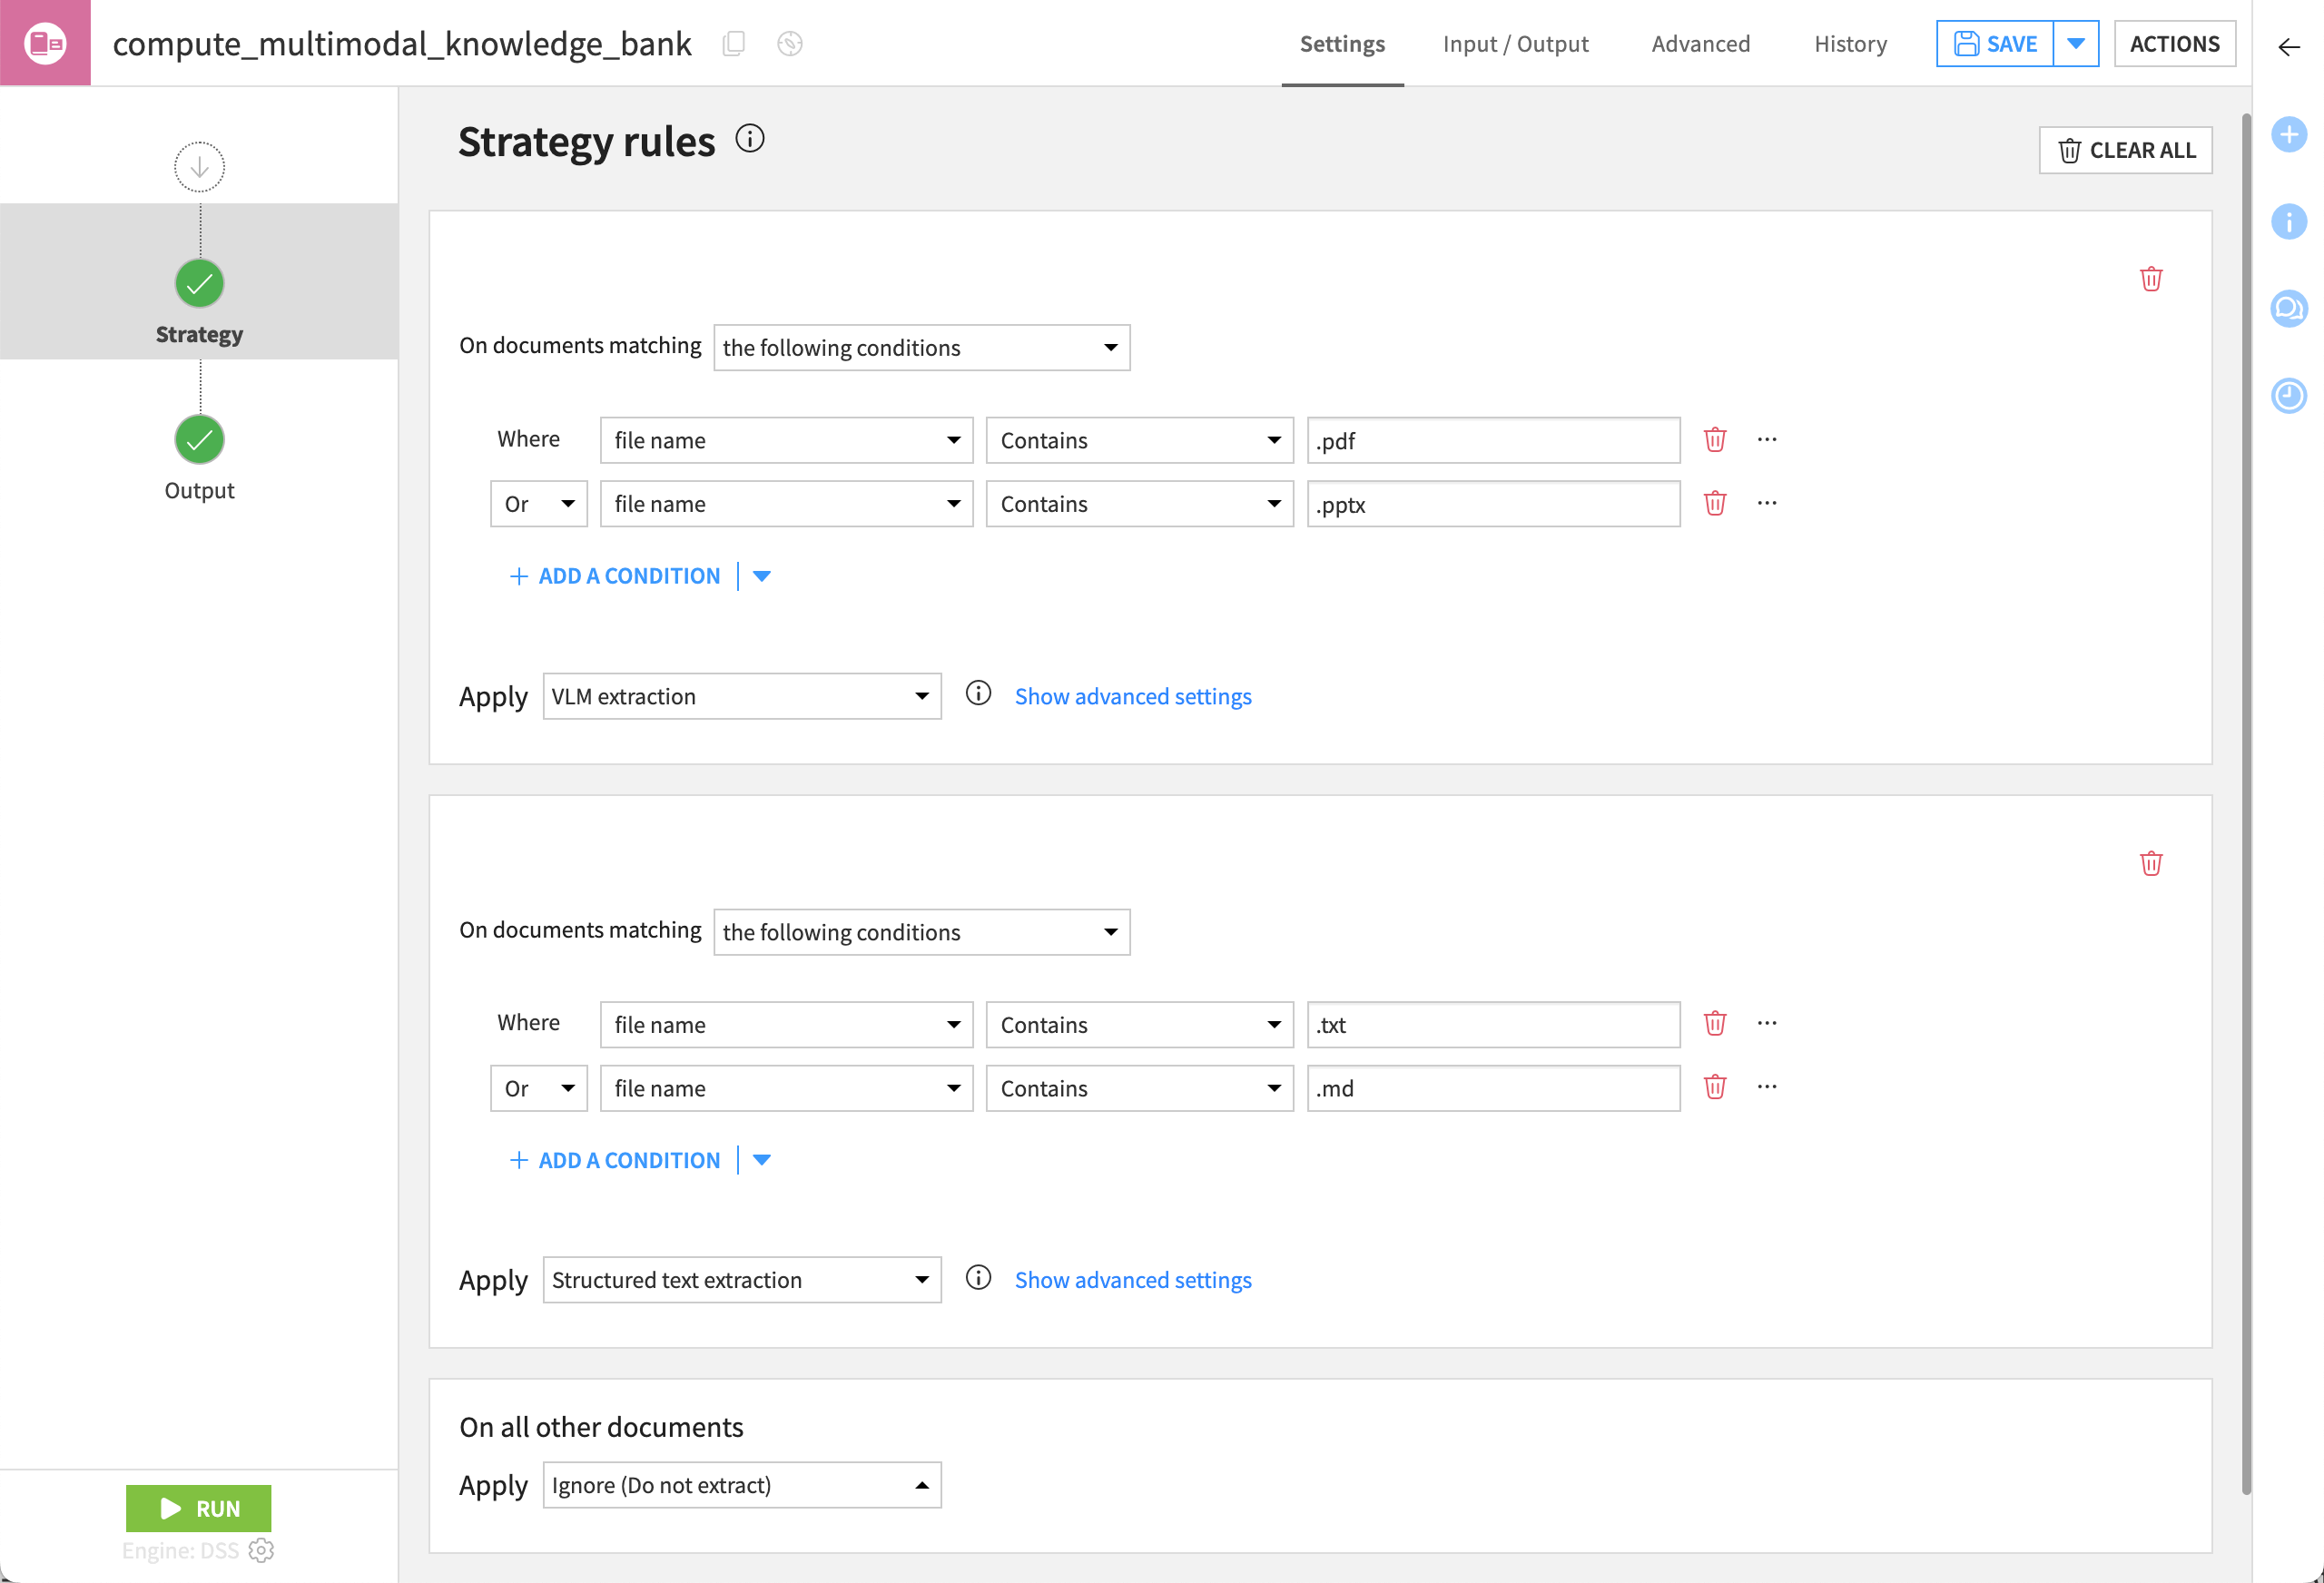
Configure the Embed documents recipe#
The Embed documents recipe can apply different extraction strategies depending on your use case.
Extraction Type |
Description |
|---|---|
Text-first |
Extracts only text, ignoring elements like images. |
Visual-first |
Uses a vision language model (VLM) to transform pages into images that are then summarized. |
Custom |
Takes full control over the extraction process by defining rules for which strategy to apply based on the file extension, name, or path. |
See also
Learn more about Embedding and searching documents in the reference documentation.
In this use case, the dataiku_doc folder includes documents like data-quality-flipbook.pdf, which has important data inside infographics. To extract this information into a knowledge bank, you’ll need to use visual extraction.
In the recipe’s Settings tab, confirm Visual-first Extraction is selected.
Under Visual-first Extraction, confirm the selection of the VLM you wish to use.
In the Output step of the recipe, ensure an output folder for images is set. If not:
Go to the recipe’s Input / Output tab.
Click Set for Images Folder, and name the output folder
dataiku_doc_embedded_images.Return to the Settings tab.
Click Run to execute the recipe.
Once the recipe has finished running, look at the Flow. You’ll see two outputs for the Embed documents recipe:
Output |
Description |
|---|---|
dataiku_doc_embedded_images |
Includes all images taken from the documents, the content of which has been extracted using the VLM extraction. |
knowledge_bank |
Stores the vectorized documents. |
Use the knowledge bank#
Now that you have extracted the content of your documents into a knowledge bank, you can choose to use this knowledge bank:
To augment an LLM and use it in different applications, such as a chat UI.
To create an agent tool that queries the knowledge bank directly. You can then equip an agent with this tool. While an augmented LLM performs a single, fixed search, an agent can reason: it decides if a search is needed, performs multiple queries to gather missing details, and uses logic to solve multi-step problems.
In this tutorial, you will explore both options.
Note
At the top of the knowledge bank page, you can use a search bar to explore the indexed documents. This allows you to:
Test whether documents were correctly embedded.
Validate retrieval quality.
Identify potential gaps in coverage.
This feature is mainly used for validation and exploration.
Option 1: Augment an LLM with your internal knowledge#
In this first approach, you will create an augmented LLM that automatically searches the knowledge bank before generating answers.
This option is well-suited for building a standalone chatbot that provides grounded, source-backed responses based on your internal documentation.
Create an augmented LLM#
To enable an LLM to generate responses based on internal documents, you can augment it with a knowledge bank.
From the Flow, double-click to open the knowledge_bank object.
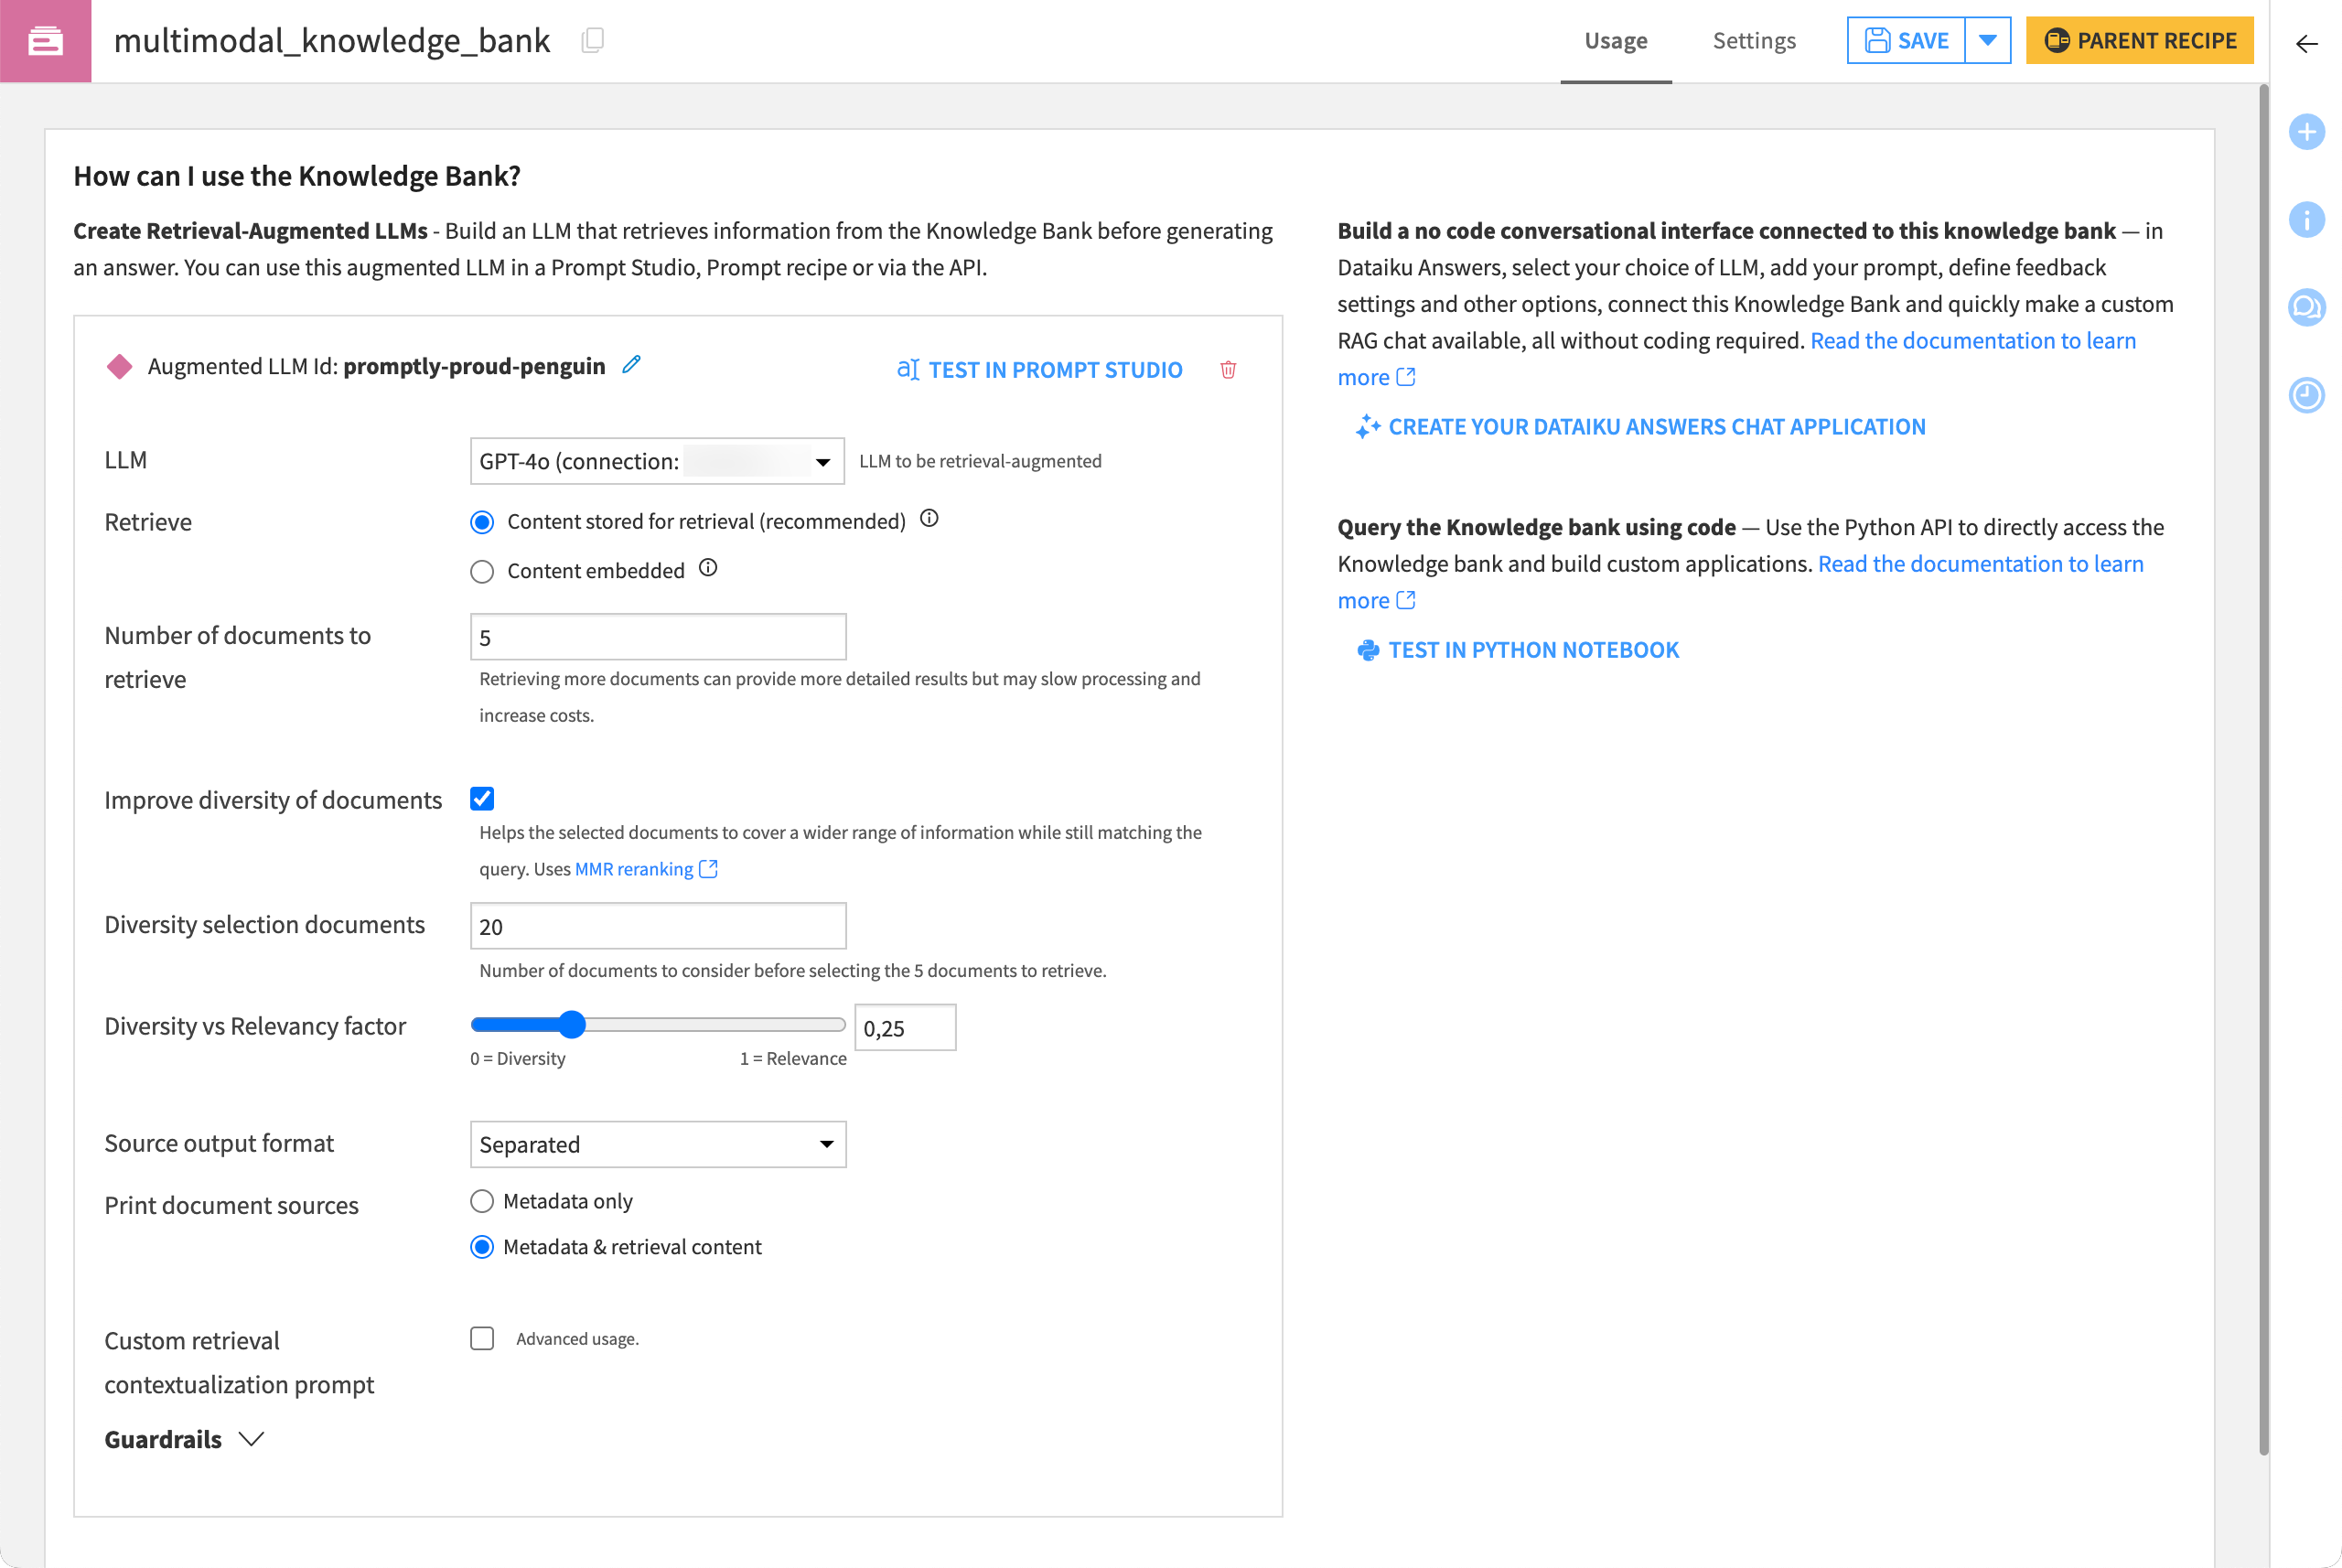
Within the Usage tab of the knowledge bank, click + Create Augmented LLM.
Select your previous LLM.
Click OK to create a new augmented LLM.
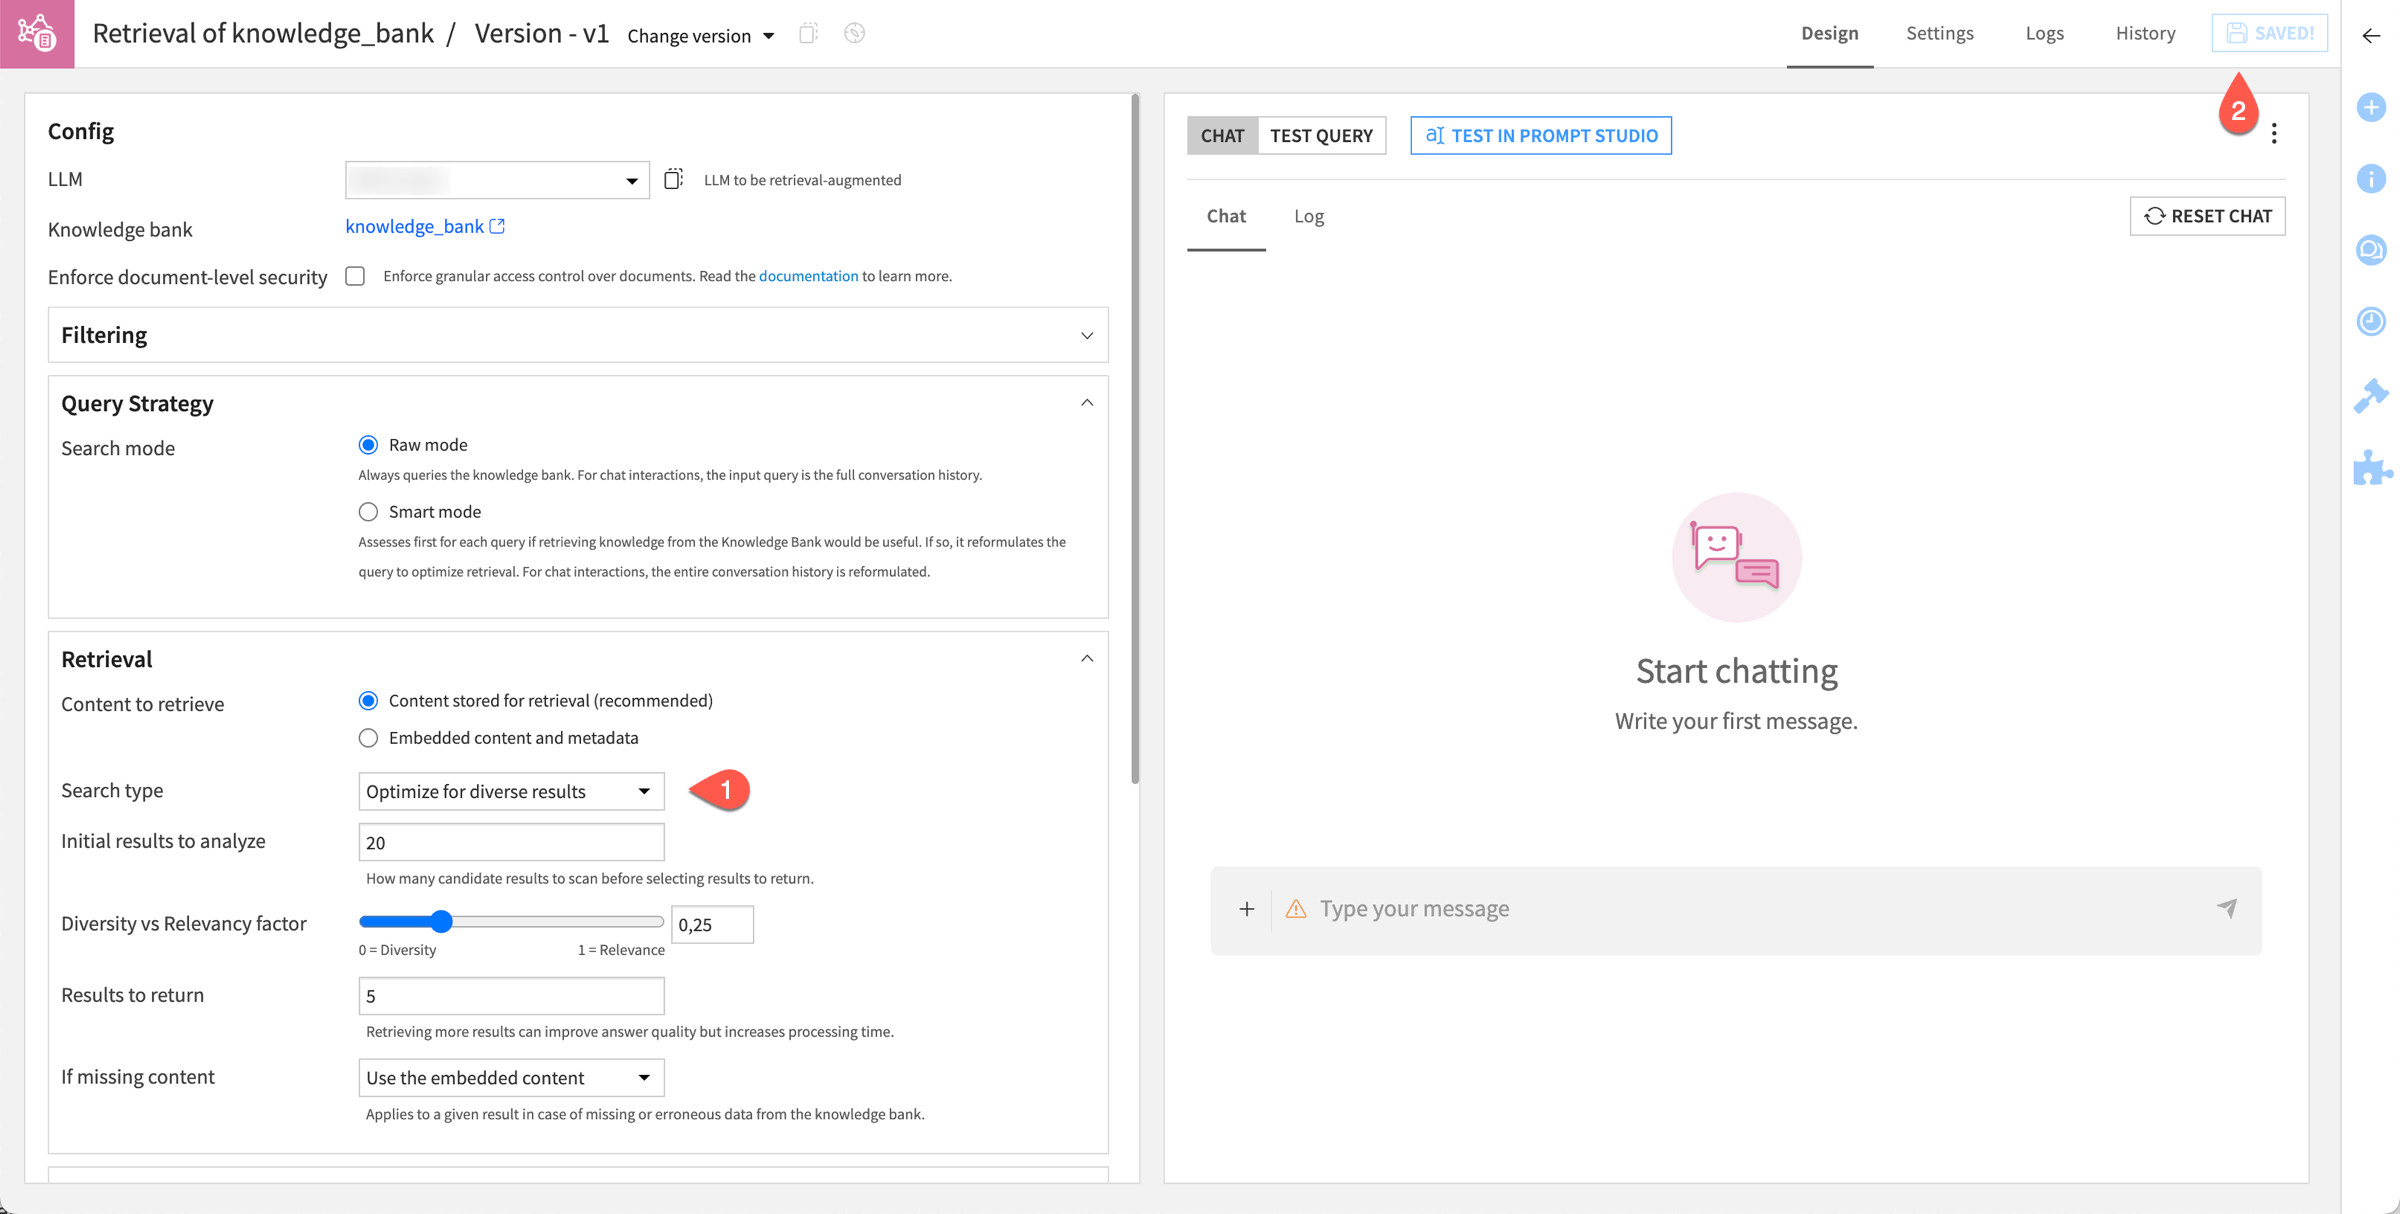
Configure an augmented LLM#
You can further design an augmented LLM in a variety of ways depending on your needs.
In this example, ask the LLM to build an answer in plain text after searching its knowledge bank for the top five documents among the 20 documents closest to the query.
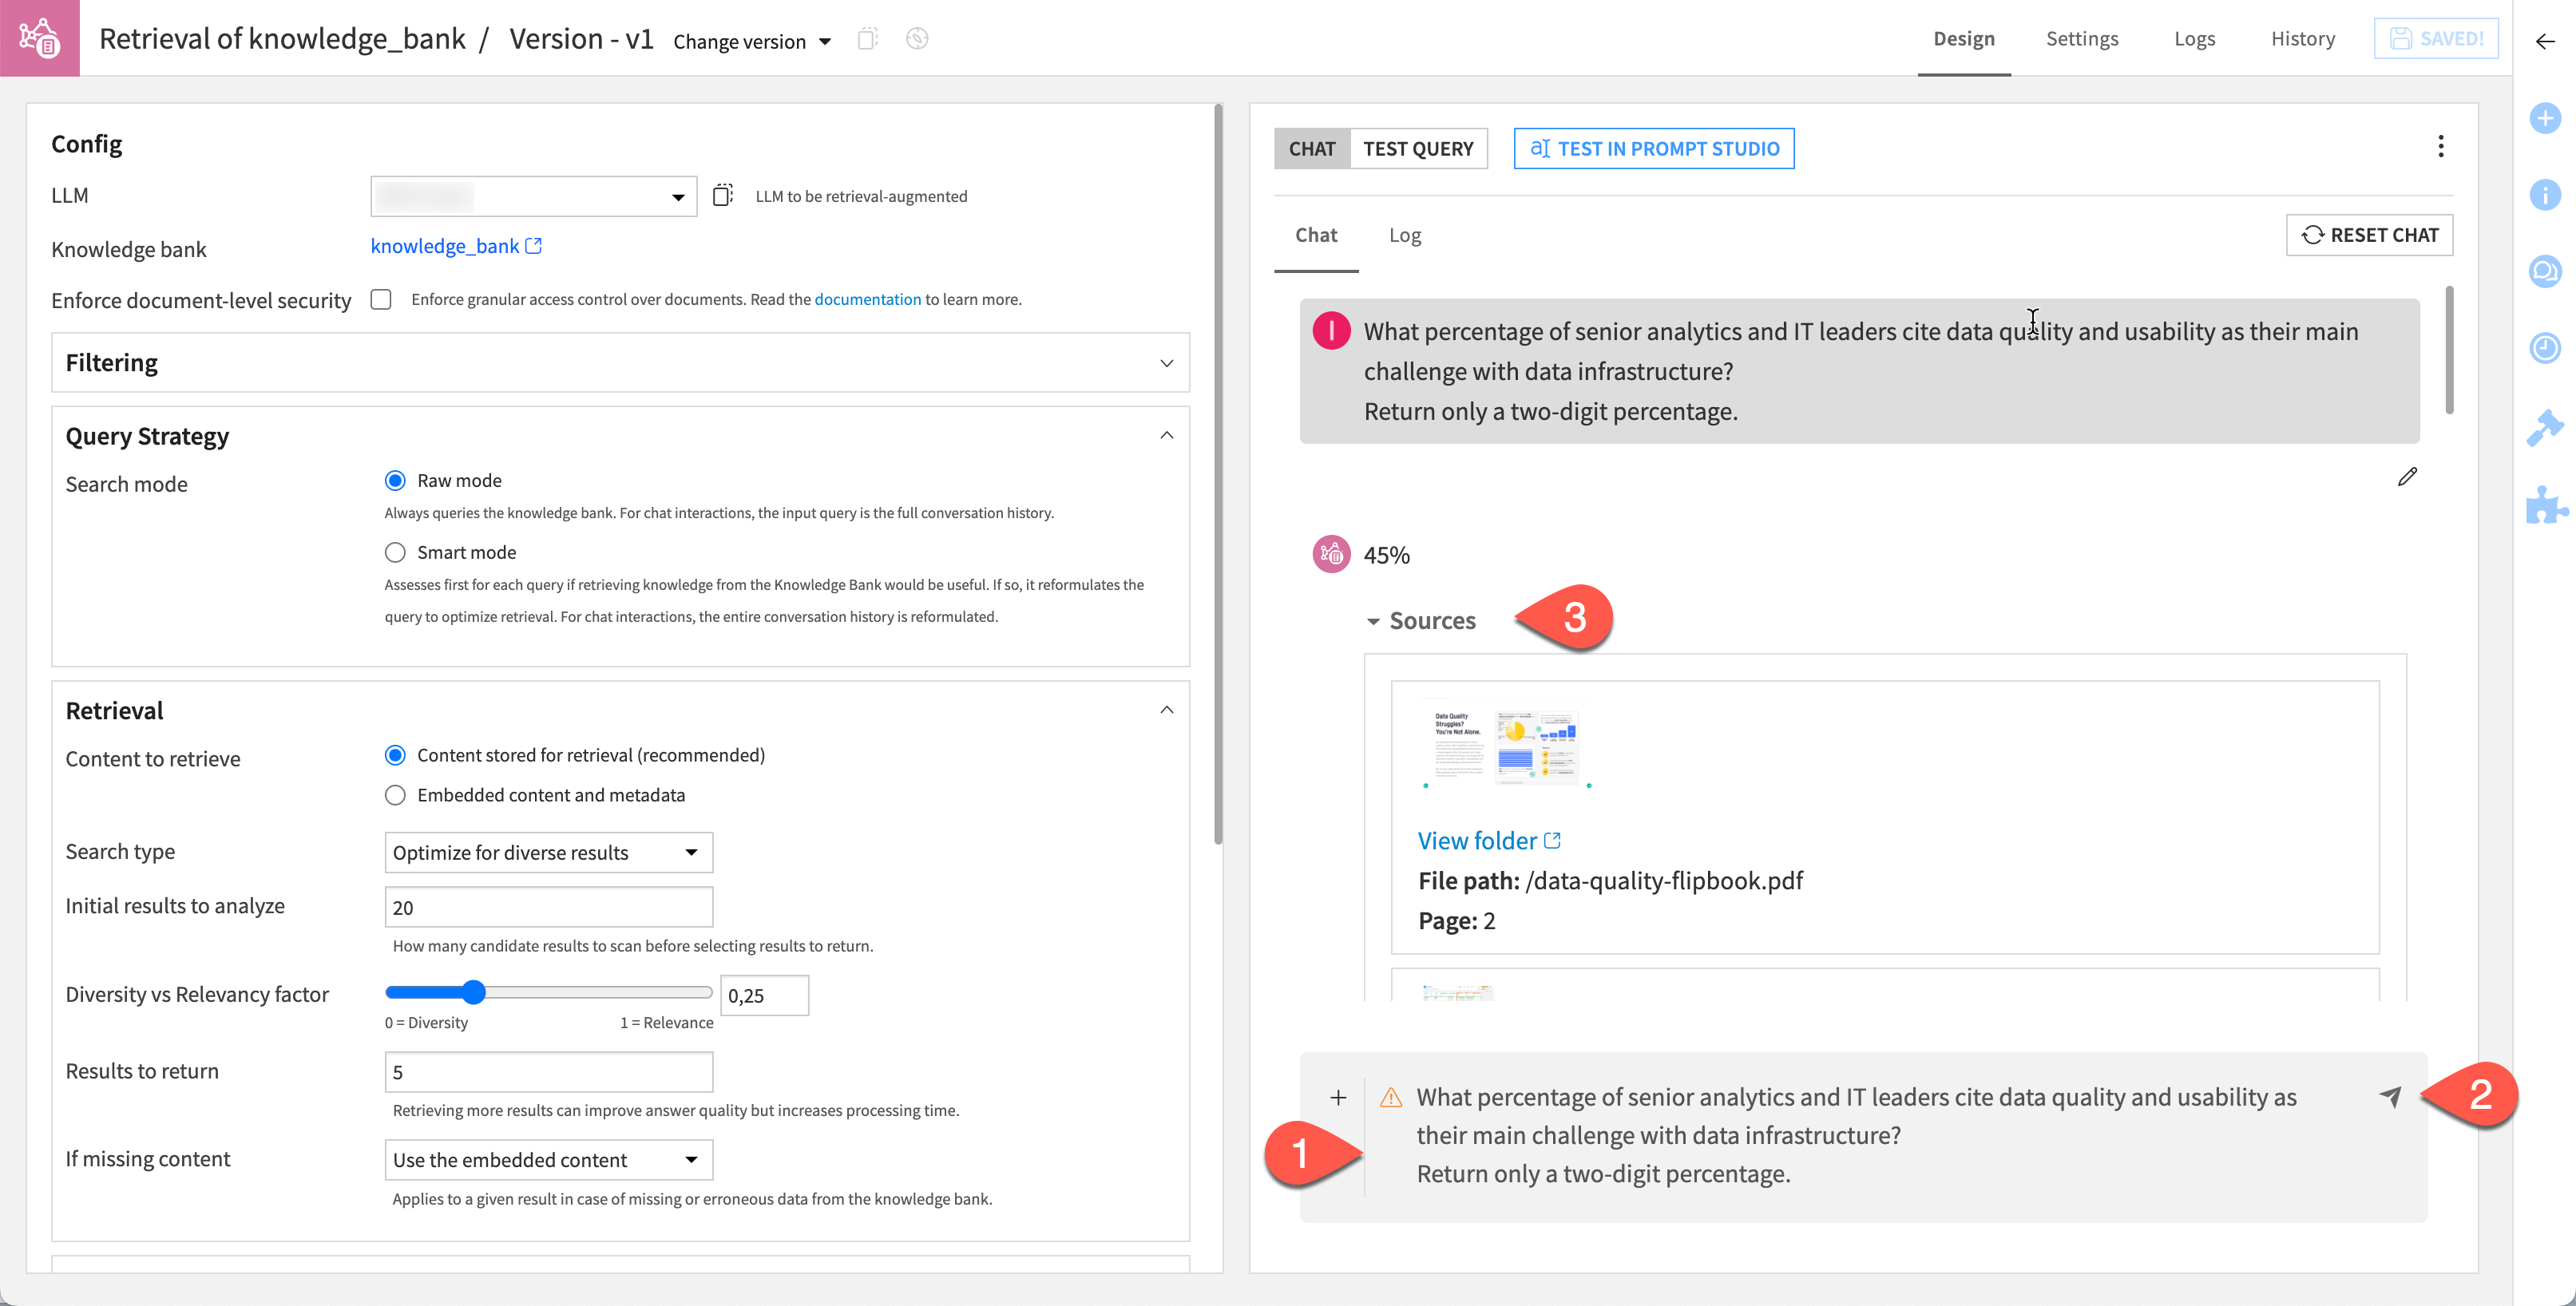
Within the Design tab of the augmented LLM, for the Search type field, select Optimize for diverse results.
Click Save.
See also
You can find more details about the design settings of an augmented LLM in the Search settings section of the reference documentation.
Test the augmented LLM#
In the right panel of the Design tab, in the chat field, copy and paste the following prompt.
What percentage of senior analytics and IT leaders cite data quality and usability as their main challenge with data infrastructure?
Return only a two-digit percentage.
Send the chat.
Confirm that, in addition to a response, the result includes sources.
Note
By nature, Generative AI doesn’t return reproducible results. However, you hopefully received an answer of 45%, citing page 2 of the data-quality-flipbook.pdf as the source.
Deploy a chatbot with the augmented LLM#
Once you have an augmented LLM, it functions much like any other LLM.
To deploy a chatbot, see the options Dataiku offers in the Chat UI reference documentation.
Option 2: Use a knowledge bank search tool to build a conversational agent#
This option relies on the agent’s ability to use tools to query the knowledge bank and synthesize the retrieved information into a response. This allows you to use a regular LLM to answer questions based on the knowledge bank.
Create the Knowledge Bank Search tool#
Let’s first create the tool that will allow the agent to query the knowledge bank directly and answer user questions.
From the Flow, open the knowledge_bank object.
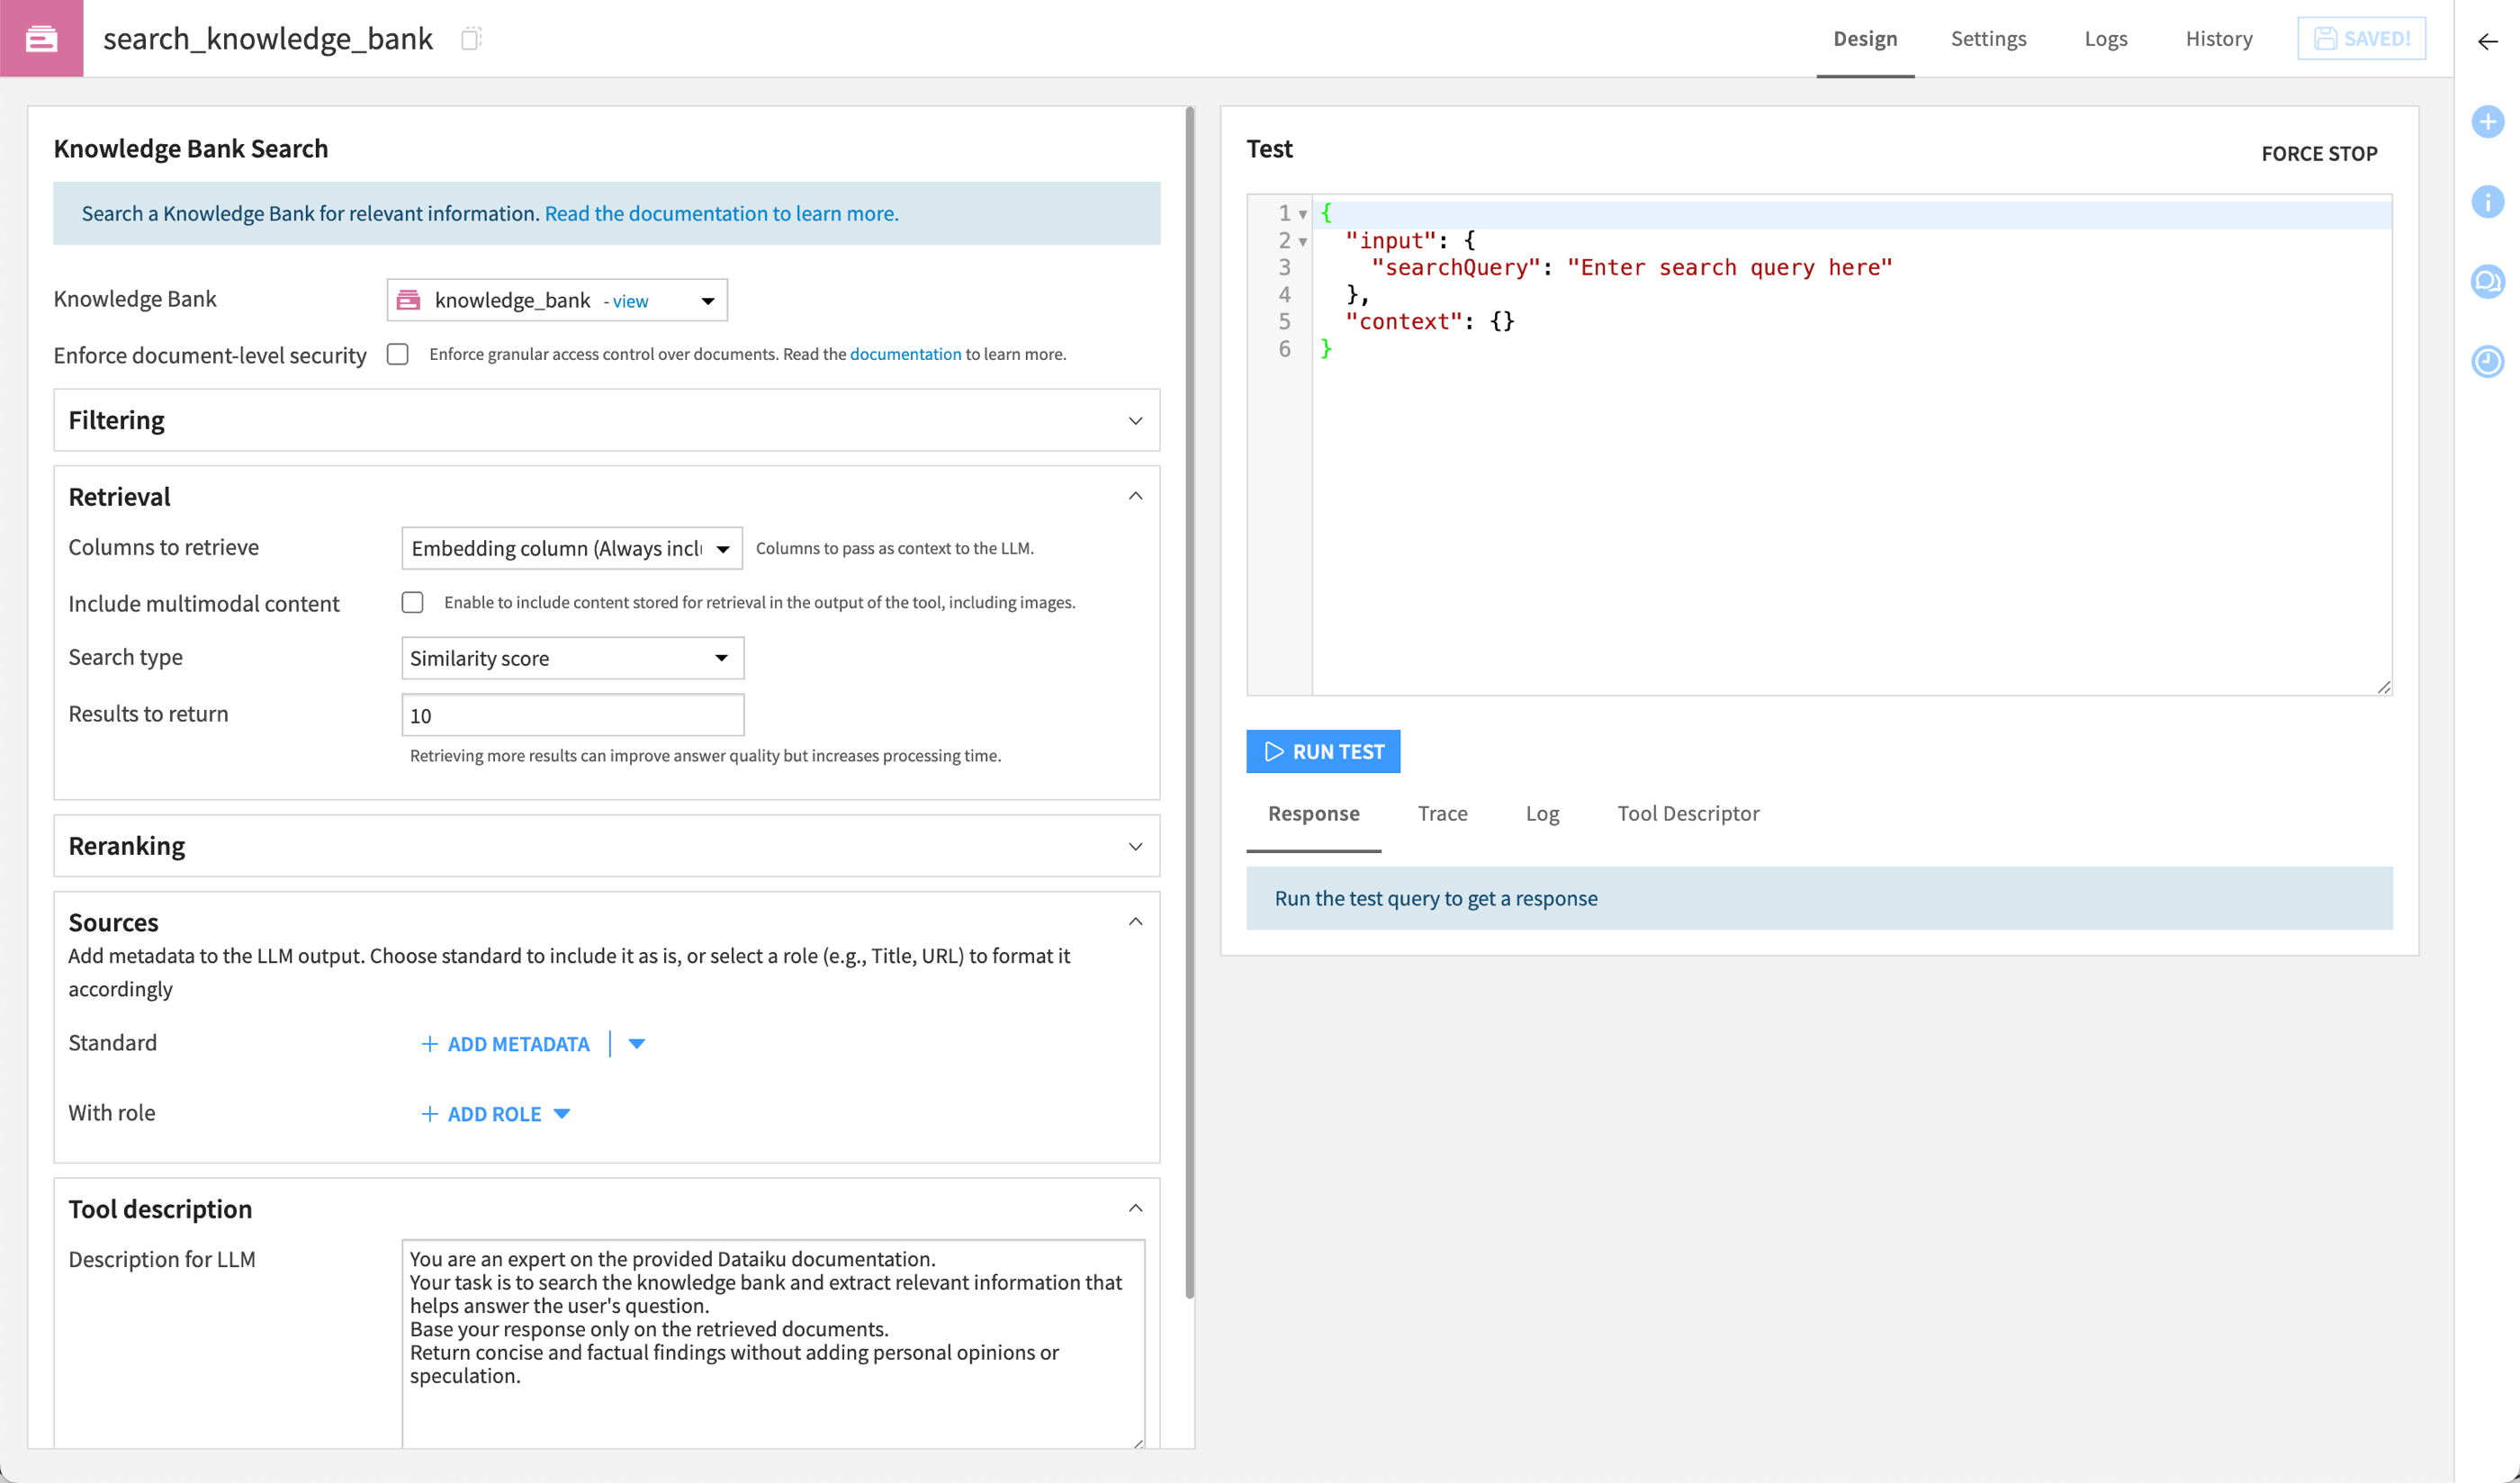
In the Knowledge Bank Search Tools section, click + Create Search Tool.
Name it
search_knowledge_bankand click Create.In the Tool description field, copy and paste the following prompt.
You are an expert on the provided Dataiku documentation.
Your task is to search the knowledge bank and extract relevant information that helps answer the user's question.
Base your response only on the retrieved documents.
Return concise and factual findings without adding personal opinions or speculation.
Click Save.
Create the agent#
Now, you’ll create the agent that will use the tool to answer user questions based on the knowledge bank.
Go to GenAI (
 ) > Agents & GenAI Models.
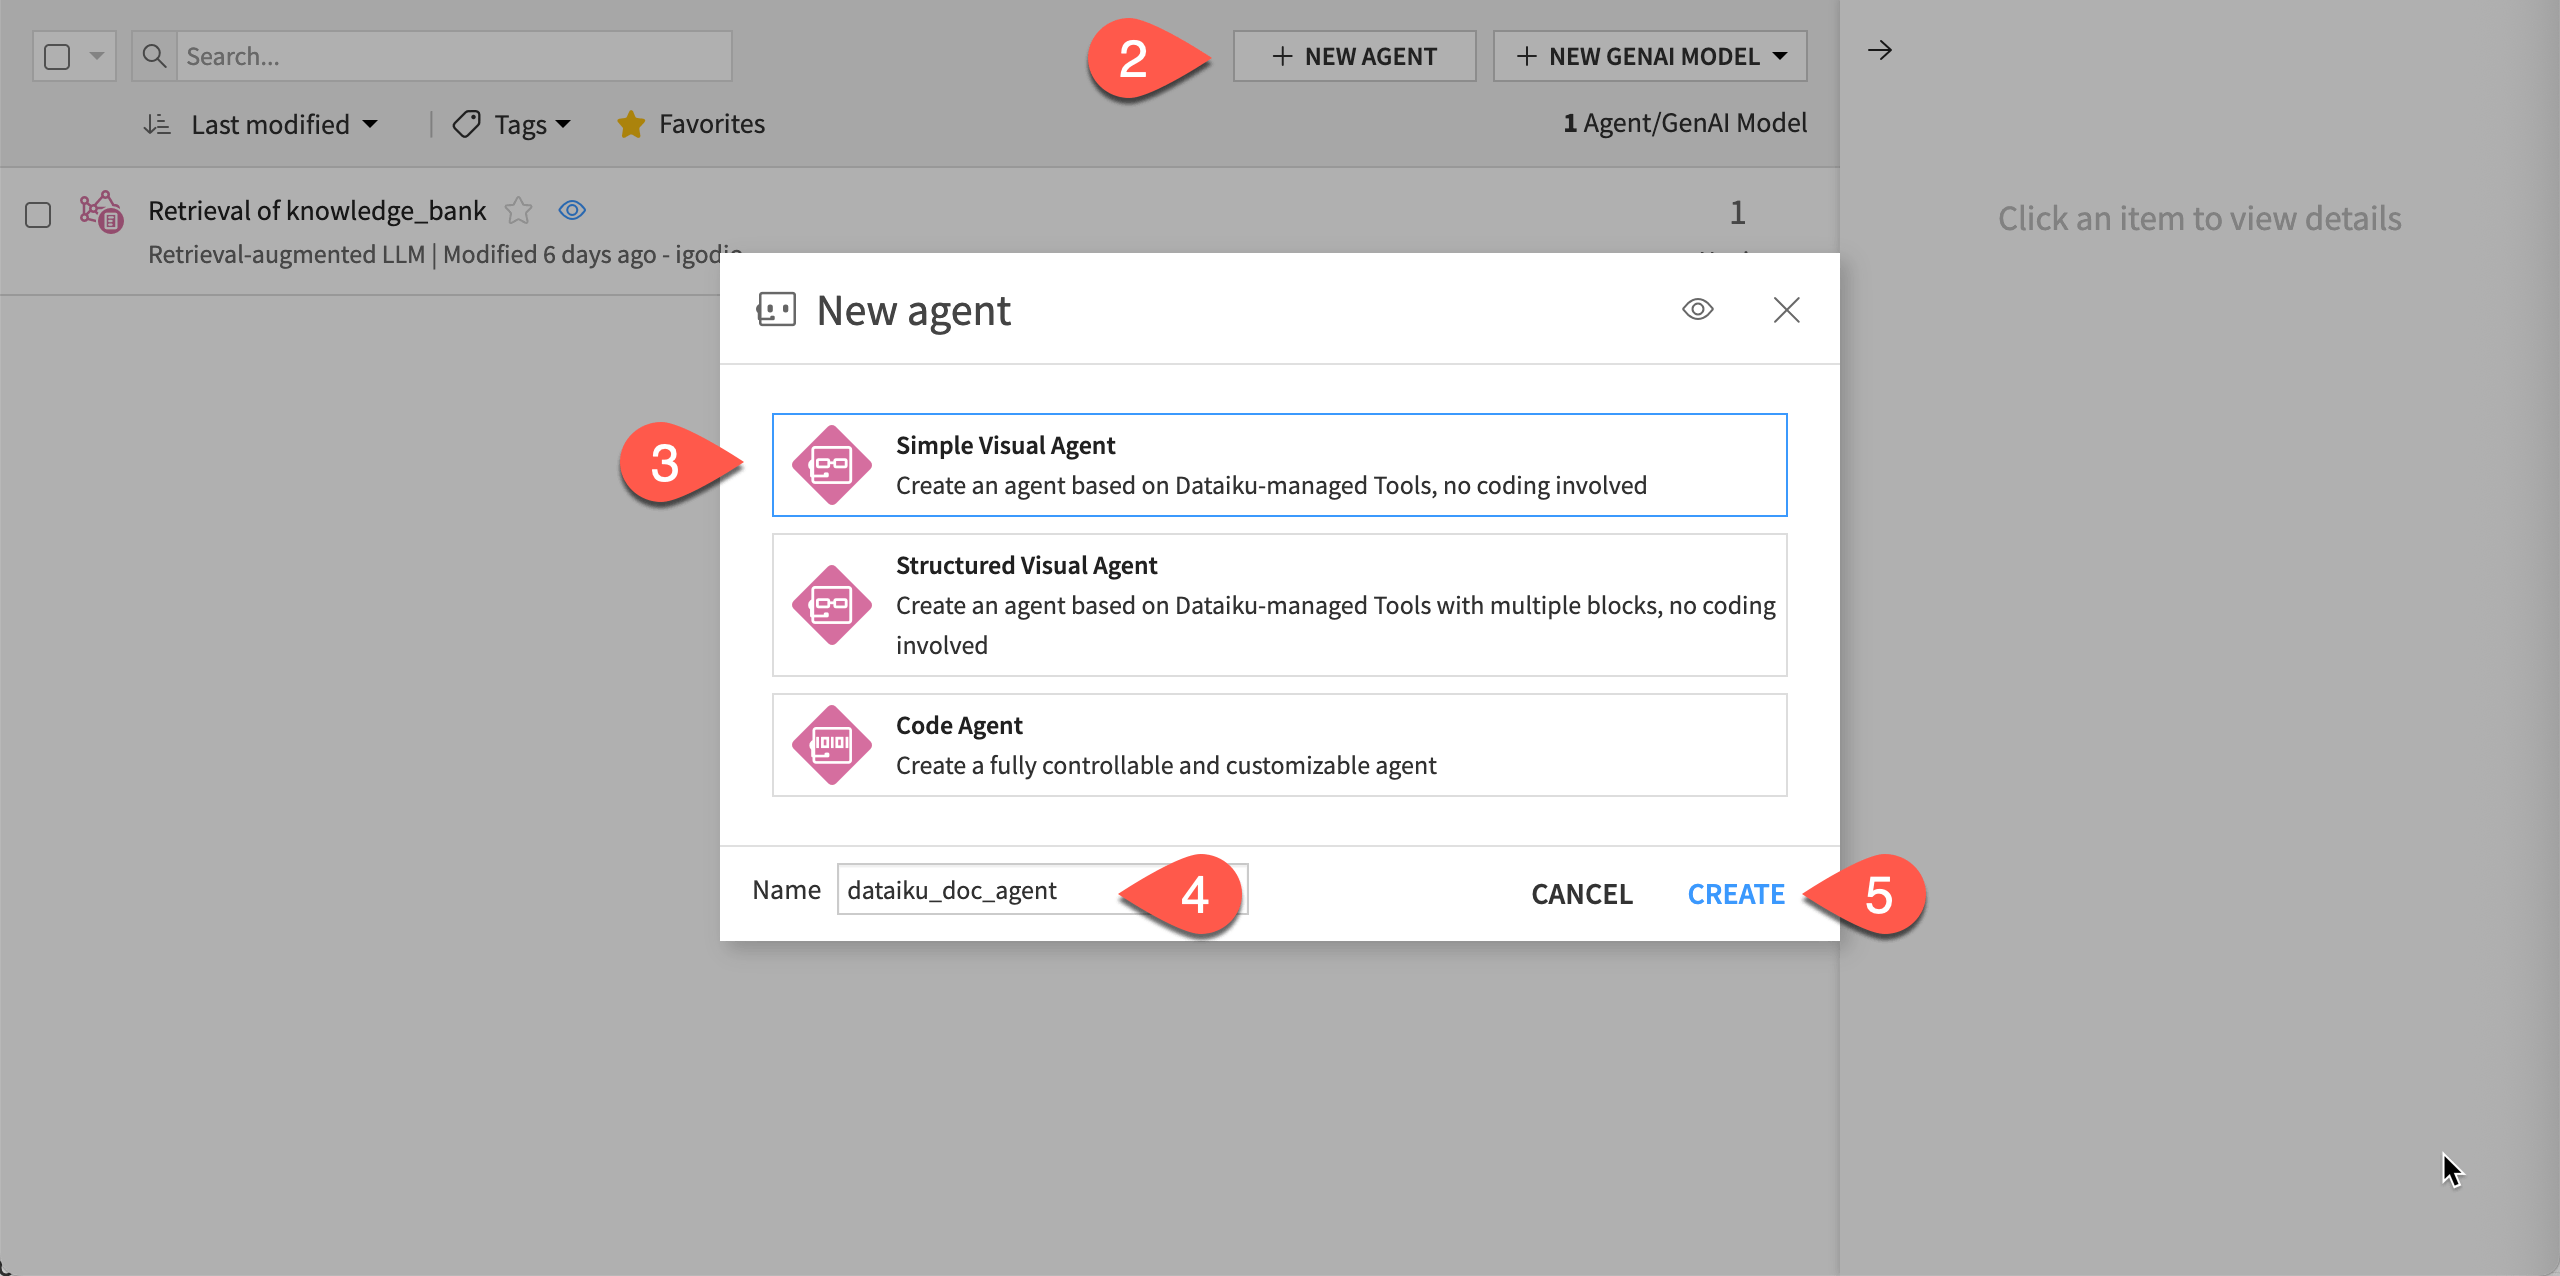
Click + New Agent.
Choose Simple Visual Agent.
Give it the name
dataiku_doc_agent.Click Create.
Configure the agent#
Next, configure the agent.
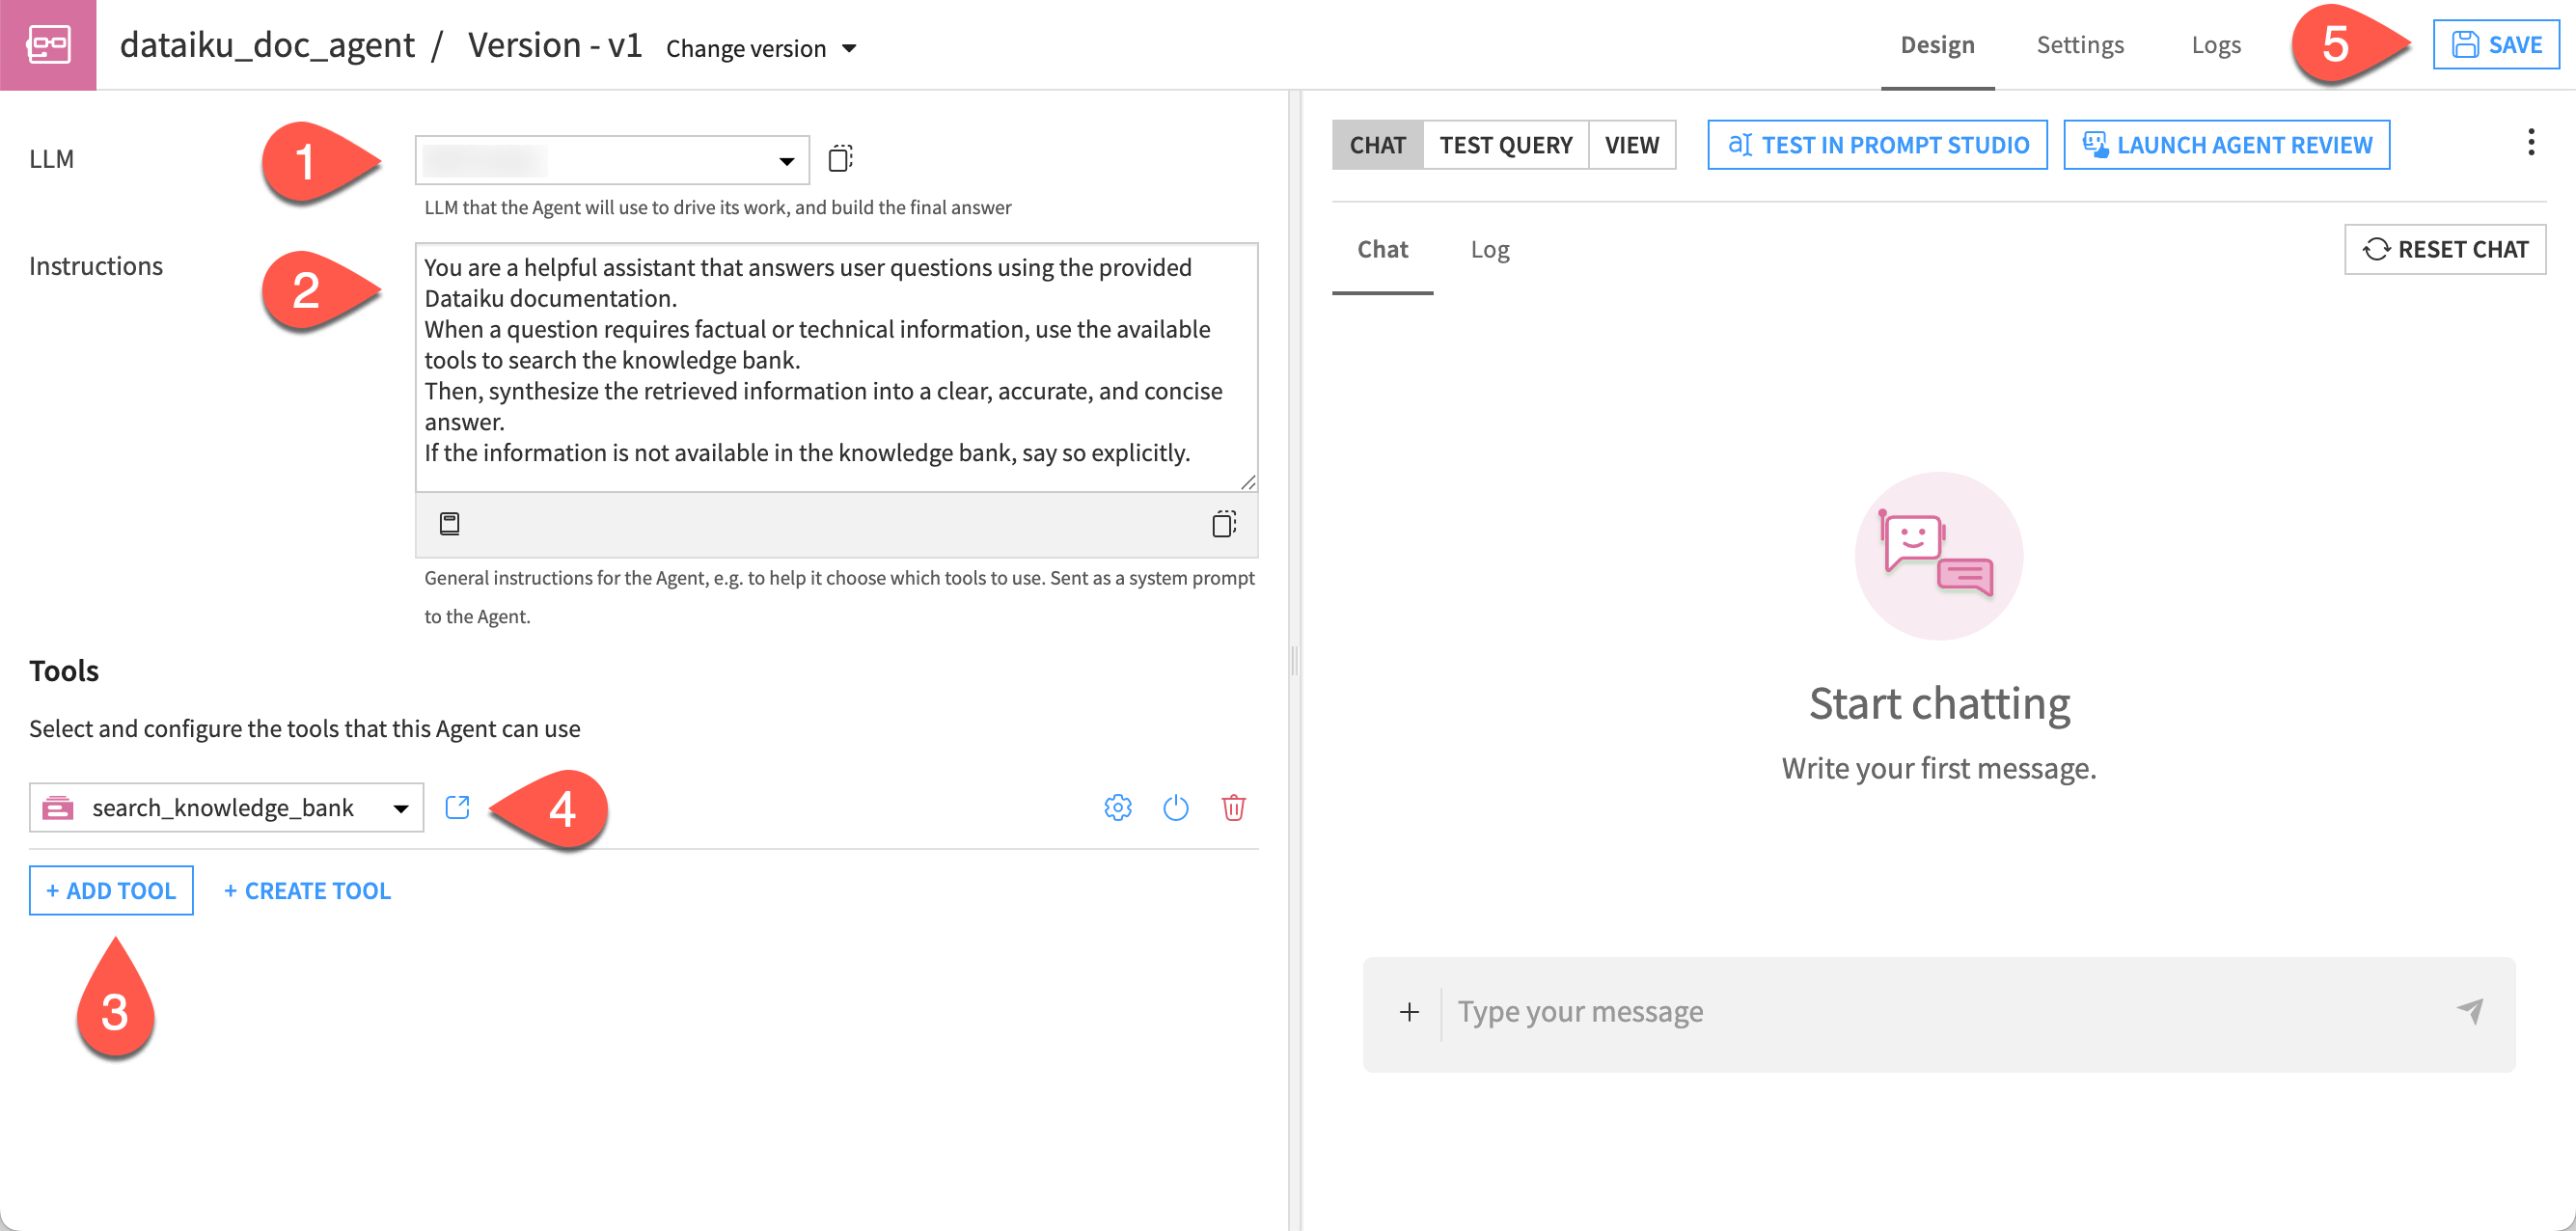
In the agent Design tab, choose a model from available connections in the LLM dropdown.
Copy and paste the following text into the Instructions window:
You are a helpful assistant that answers user questions using the provided Dataiku documentation.
When a question requires factual or technical information, use the available tools to search the knowledge bank.
Then, synthesize the retrieved information into a clear, accurate, and concise answer.
If the information is not available in the knowledge bank, say so explicitly.
Click + Add Tool.
In the dropdown, select the search_knowledge_bank tool. This is what allows the agent to query the knowledge bank and access your internal documentation when needed to answer user questions.
Click Save.
Tip
The agent is now an object in the Flow and is version controlled. You can double-click on the visual agent icon to edit this version, v1, or create new versions and keep a history of your changes.
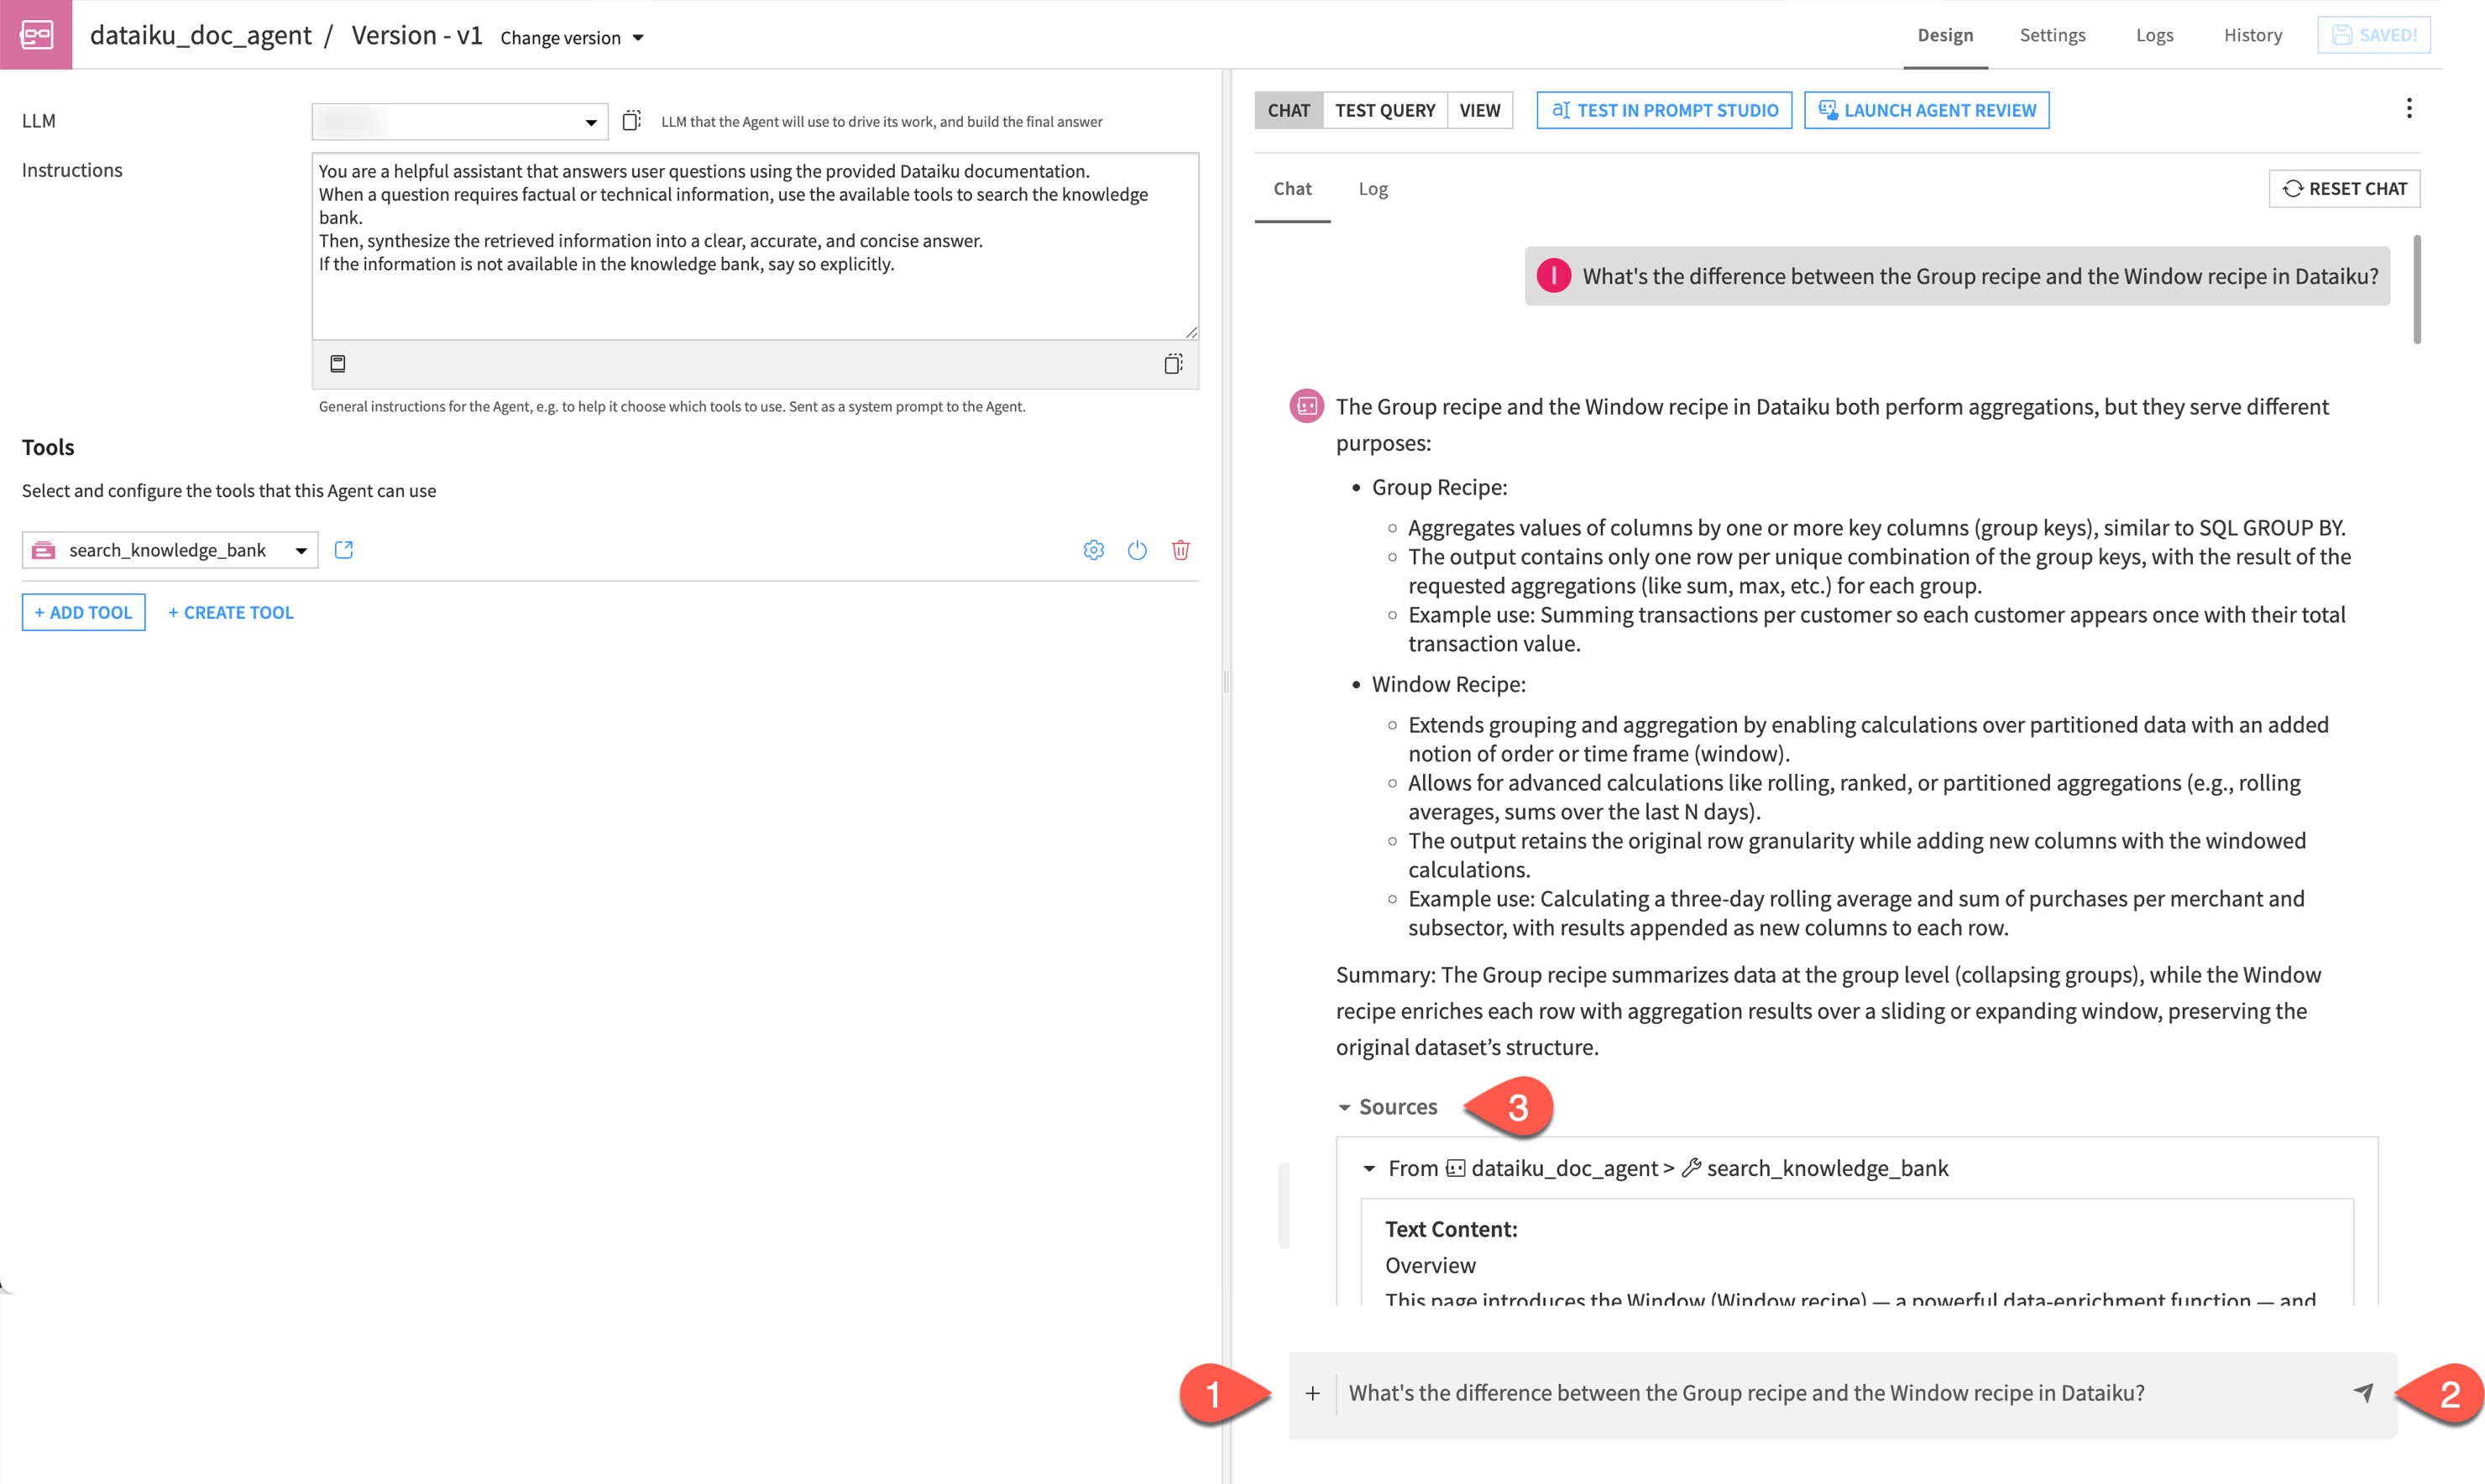
Test the conversational agent#
In this section, you will test the conversational agent by asking a question and verifying that it retrieves relevant information from the knowledge bank.
In the chat window, ask the following question:
What's the difference between the Group recipe and the Window recipe in Dataiku?
Send the chat.
Explore the answer and look at the sources used by the model.
Tip
Always check the Sources section! Clicking on them allows you to verify the transparency of the RAG system and see exactly which part of the documentation the agent used to build its answer.
Note
The responses from your agent might look different depending on the models used and can differ from run to run.
Publish the agent#
You can now make your agent available to other users by publishing it to an Agent Hub. This allows you to centralize, share, and govern conversational agents across projects.
To learn how to publish and manage agents in an Agent Hub, see Tutorial | Agent Hub.
Next steps#
For more information:
On the Embed documents recipe and the RAG approach, see Concept | Embed recipes and Retrieval Augmented Generation (RAG).
On Agents, see Agents.
On LLM evaluation, see Tutorial | LLM evaluation.
On guardrails, see RAG guardrails.