
Tutorial | LLM evaluation#
Get started#
Dataiku capabilities like the LLM Mesh and Prompt Studios enable you to test and select the most efficient combination of LLMs and prompts for a GenAI application. However, evaluating the performance of a GenAI application as a whole requires a more complex pipeline.
Explore how the Evaluate LLM recipe can become a cornerstone of your GenAIOps strategy!
Watch the featurette

Objectives#
In this tutorial, you will:
Use the Evaluate LLM recipe to assess the performance of a GenAI application.
Incorporate this recipe’s output (a model evaluation store) into Dataiku’s existing model lifecycle toolbox.
Recognize how this recipe fits into a broader GenAIOps strategy.
Prerequisites#
Dataiku 13.3 or later.
Advanced LLM Mesh license flag activated.
Full Designer user profile.
LLM connections for computing embeddings and requesting prompts. See the reference documentation for information on LLM connections.
A Python 3.9+ code environment containing the required packages. Use the preset named Agent and LLM Evaluation.
Create the project#
From the Dataiku Design homepage, click + New Project.
Select Learning projects.
Search for and select LLM Evaluation.
If needed, change the folder into which the project will be installed, and click Create.
From the project homepage, click Go to Flow (or type
g+f).
Note
You can also download the starter project from this website and import it as a ZIP file.
Use case summary#
Those familiar with model evaluation and monitoring in Dataiku will be comfortable using the Evaluate recipe and its output, a model evaluation store (MES). The Evaluate recipe requires both a dataset and a saved model as input.
On the other hand, LLM evaluation isn’t the same kind of exercise. The goal isn’t to evaluate the quality of the LLM itself — which is a more suitable task for a Prompt Studio. Rather, the goal is to evaluate a GenAI application as a whole. These GenAI applications may involve multiple LLMs, data transformations, and other traditional analytics and ML components.
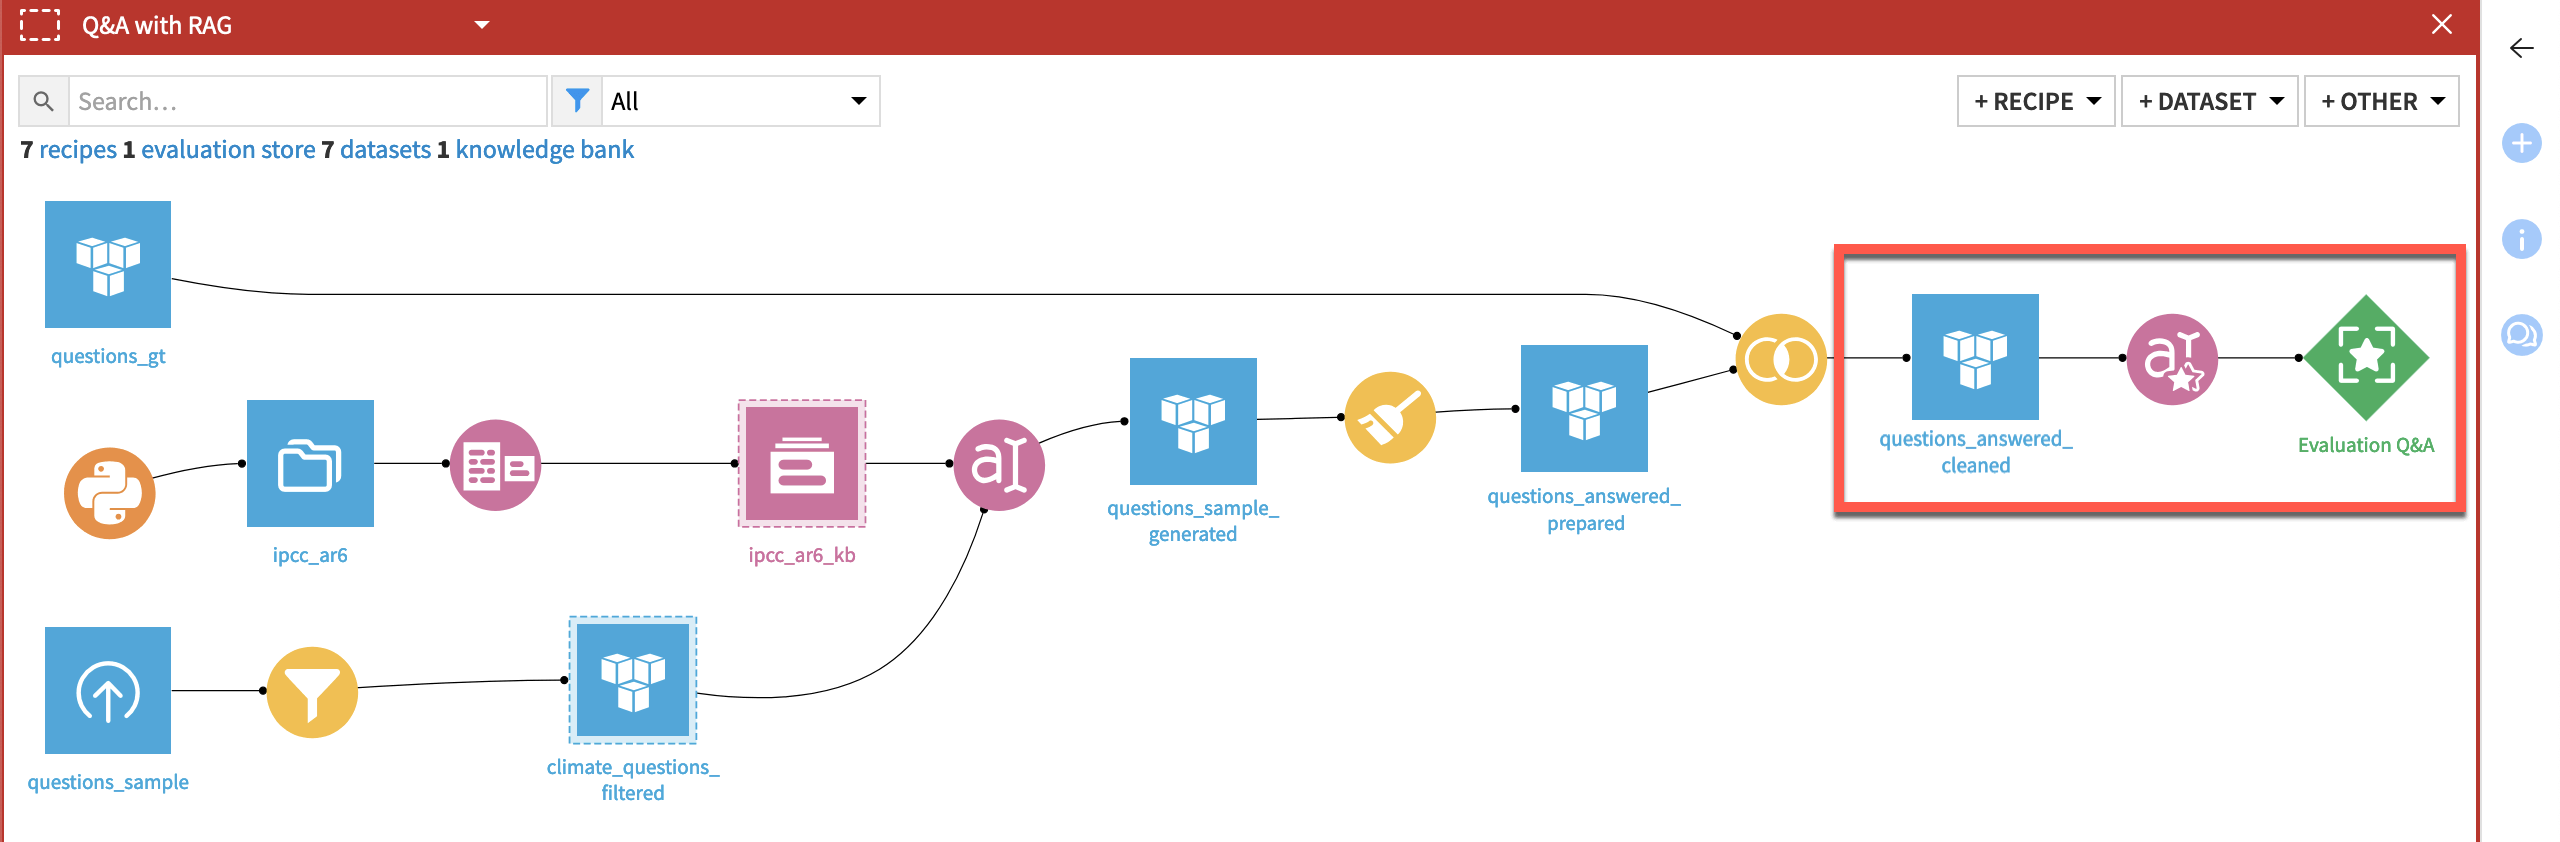
Accordingly, the Evaluate LLM recipe takes only a dataset as input. Therefore, the starter project includes only one dataset: questions_answers_cleaned. You can imagine this dataset as the output of a typical GenAI Flow, such as the one shown below.
Tip
See the Use Generative AI and Agents section of the Knowledge Base, and in particular Tutorial | Retrieval Augmented Generation (RAG) with the Embed dataset recipe, for opportunities to build a GenAI pipeline like the one shown above.
The exact requirements for the input dataset depend on the type of LLM evaluation task at hand. In some cases, you may only have an input column, whereas in other cases you may also have columns containing the ground truth or context if using a RAG approach.
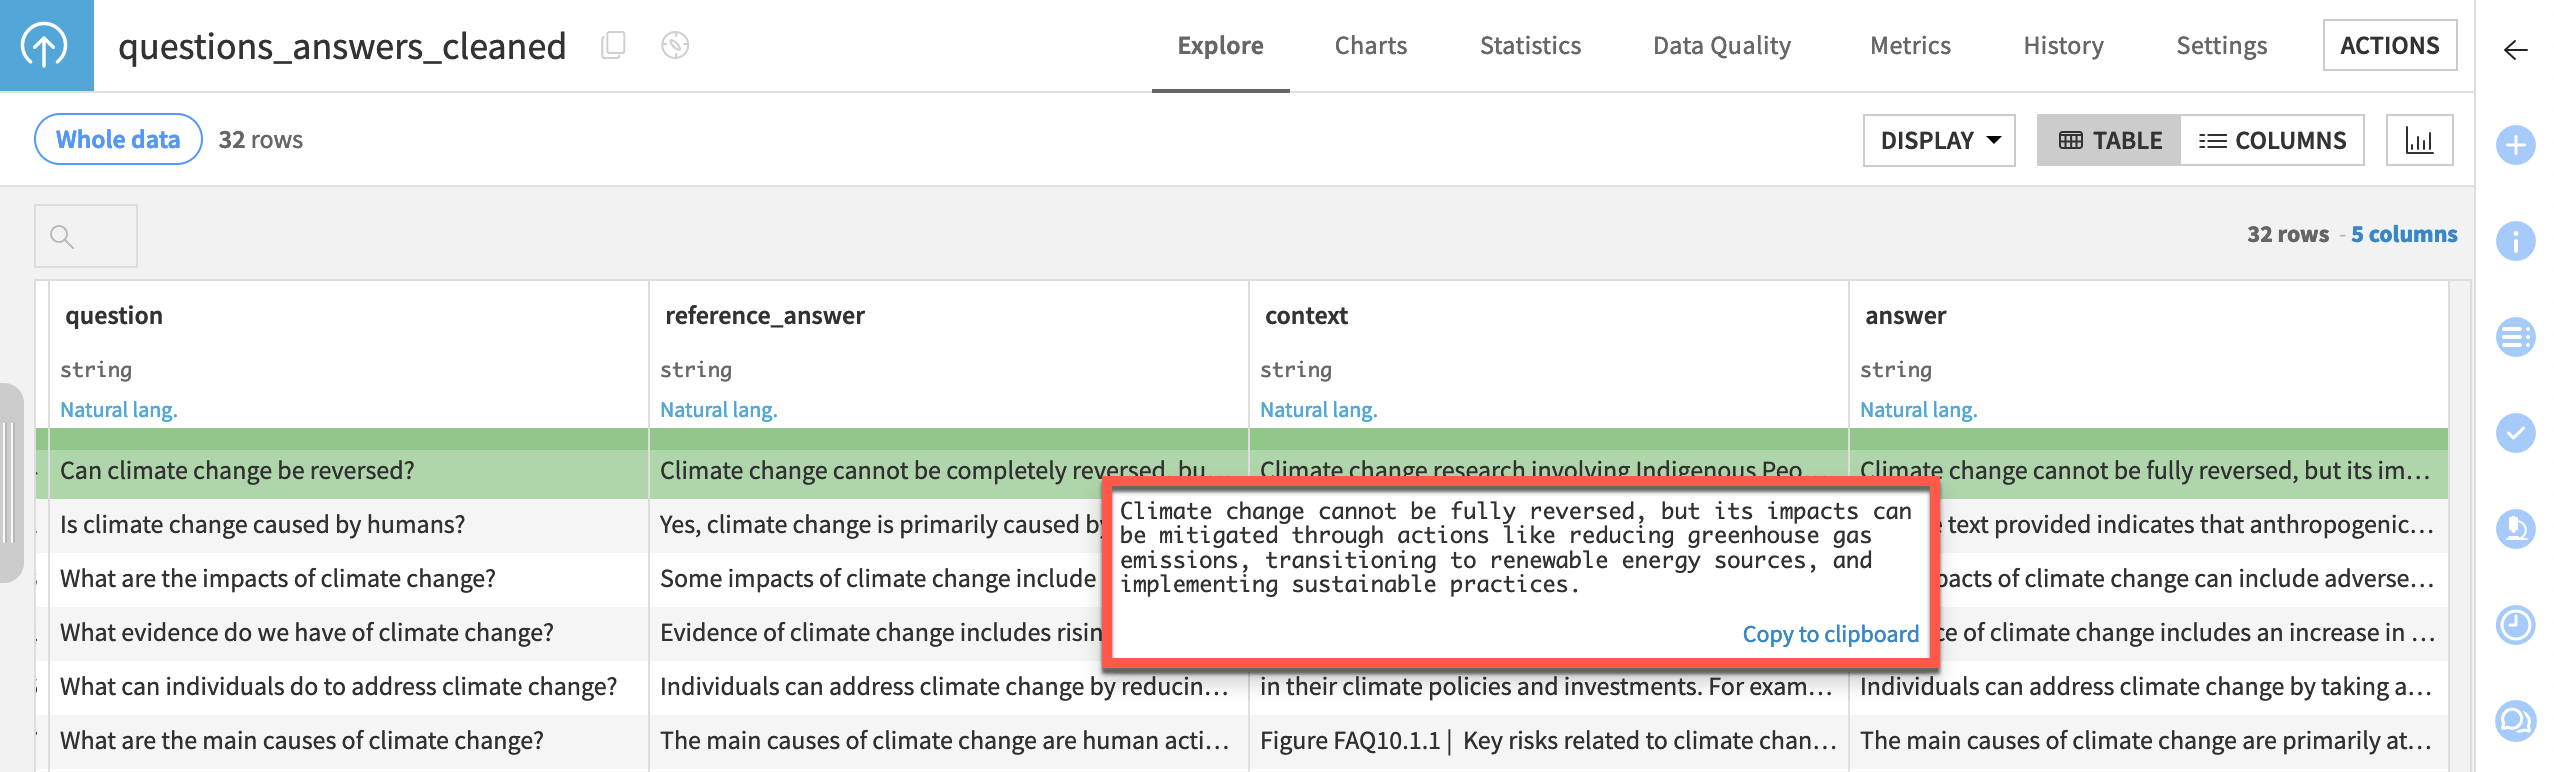
Take a closer look at the questions_answers_cleaned dataset:
Column |
Contents |
|---|---|
question |
An actual question that could have been asked through a Chat UI. |
reference_answer |
A response to the question written by a human or expert. In other words, the ground truth. |
context |
The content of the Knowledge Bank added by a RAG model — for example, through a Prompt recipe. |
answer |
The actual response to a question from an LLM. |
From the Flow, open the questions_answered_cleaned dataset.
Take a moment to explore these four columns.
See also
Examining real-world use cases may help draw inspiration for the two general types of datasets that can be used as input to the Evaluate LLM recipe. The blog article Unlocking the Future: Generative AI in Manufacturing Use Cases is one place to start.
Create an Evaluate LLM recipe#
Although the Evaluate LLM recipe only takes one dataset as input, its three outputs are the same as the Evaluate recipe.
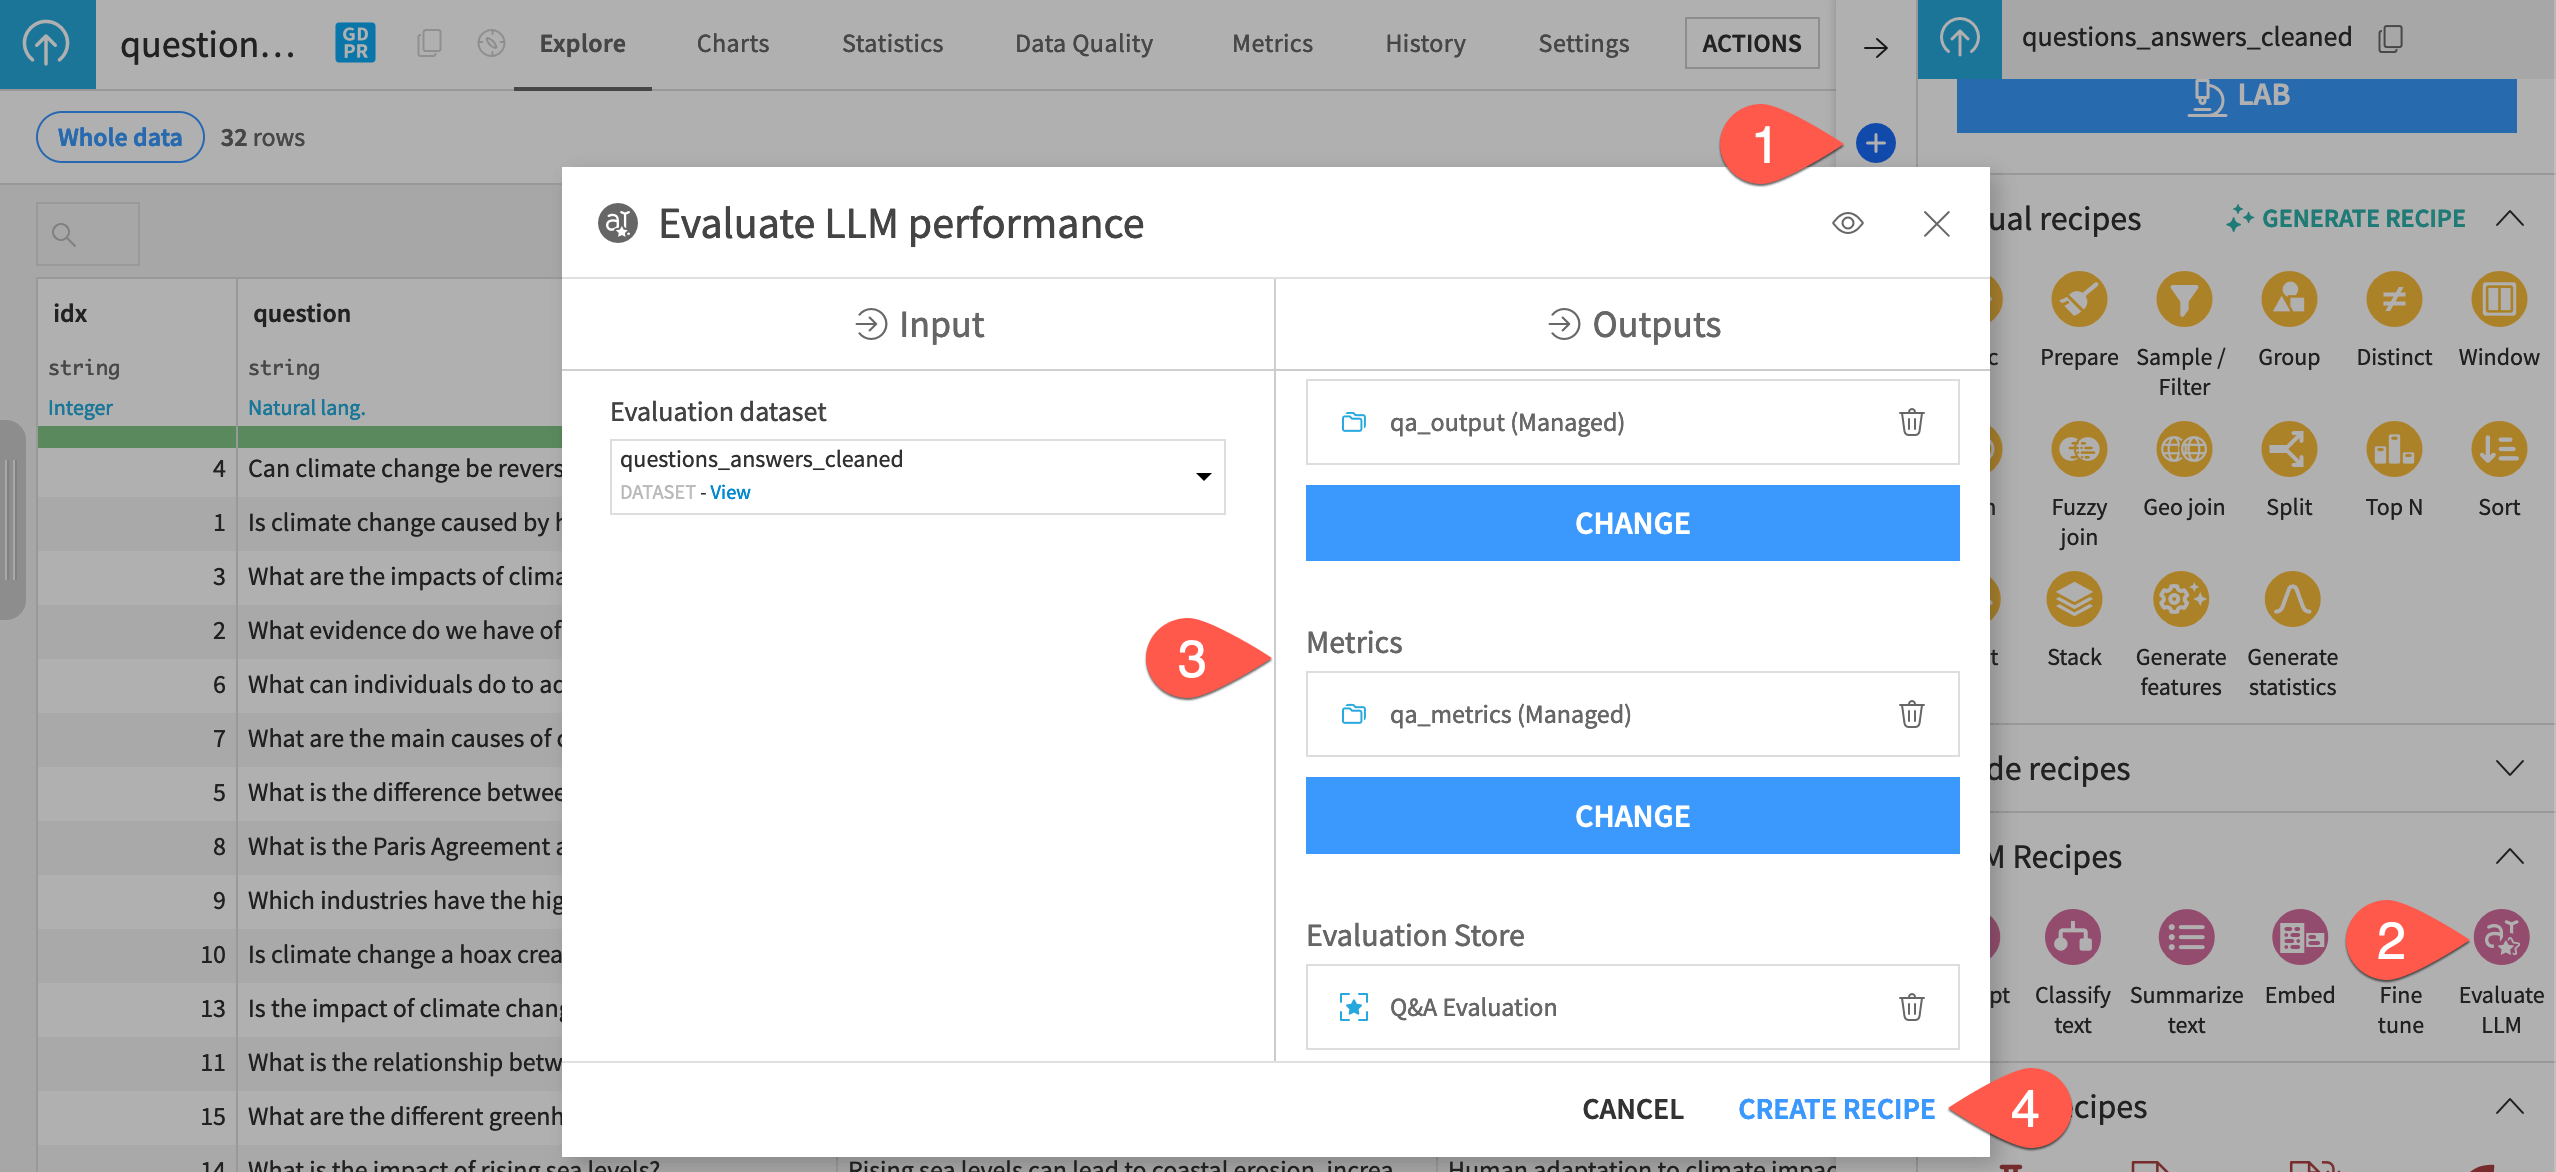
Open the Actions panel of the questions_answered_cleaned dataset.
From the menu of GenAI recipes, select the Evaluate LLM recipe.
Set the following three outputs:
qa_outputas the output datasetqa_metricsas the metrics datasetQ&A Evaluationas the evaluation store
Click Create Recipe.
Configure the Evaluate LLM recipe#
Configuring the recipe has two key requirements: defining the evaluation task and the metrics to compute.
Define the evaluation task#
The recipe first asks the user to choose an input dataset format. If your project is evaluating the output from a Prompt recipe or a Dataiku Answers chatbot, selecting those options will help configure many of the recipe’s fields. To keep the project setup as simple as possible, this tutorial doesn’t have either of those formats. Instead, you’ll choose Custom.
The next step is to define the type of evaluation task. This tutorial walks through a question answering task. Additional options include summarization, translation, or a non-prescriptive “other.”
Together, the choice of input dataset format and evaluation task guides the recipe’s configuration in terms of required input columns and recommended metrics. For example, computing faithfulness requires columns for the answer and the context. Compute answer correctness requires columns for the answer and the ground truth. Moreover, a summarization task suggests ROUGE; a translation task suggests BLEU.
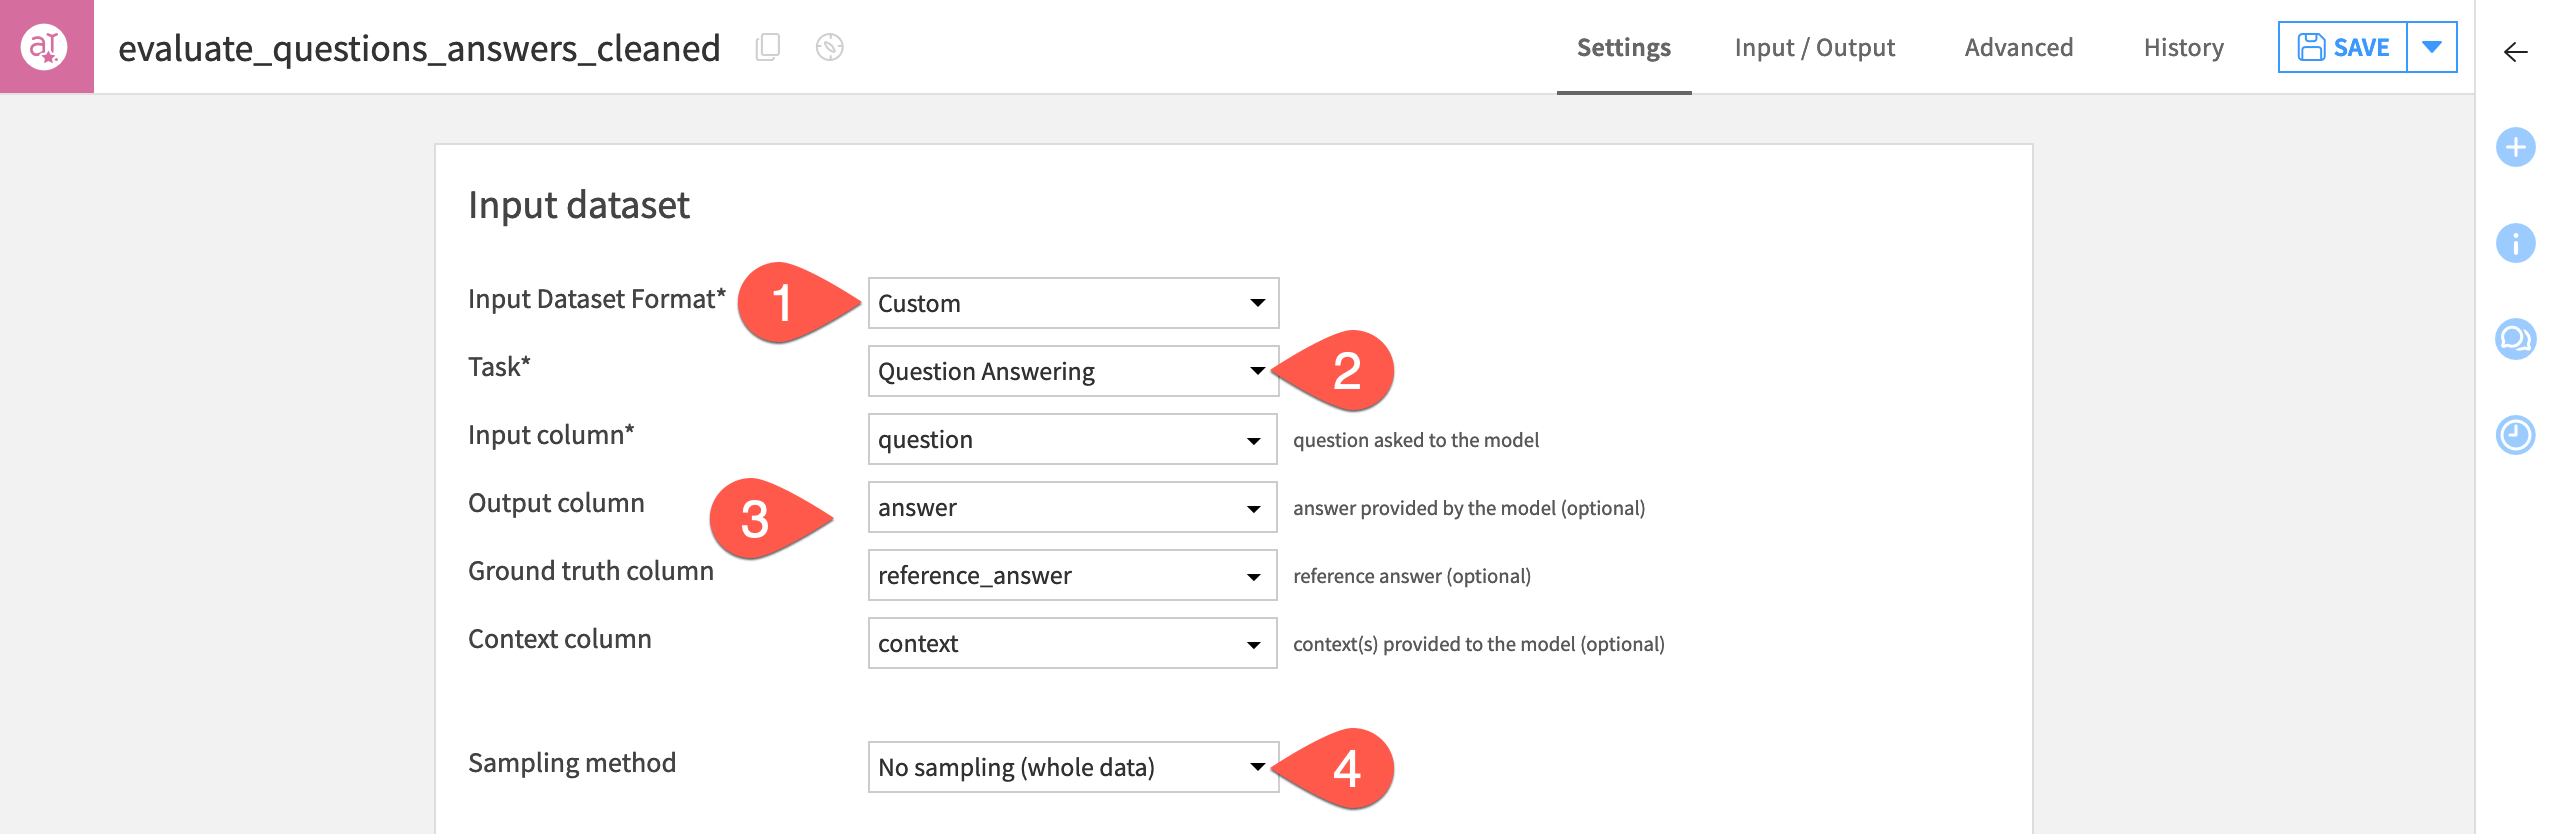
In the Input dataset tile, select Custom as the Input Dataset Format.
For the Task, select Question Answering.
Select the columns for the fields indicated in the table below:
Field
Column
Input column
question
Output column
answer
Ground truth column
reference_answer
Context column
context
As the dataset is small, sampling can remain turned off.
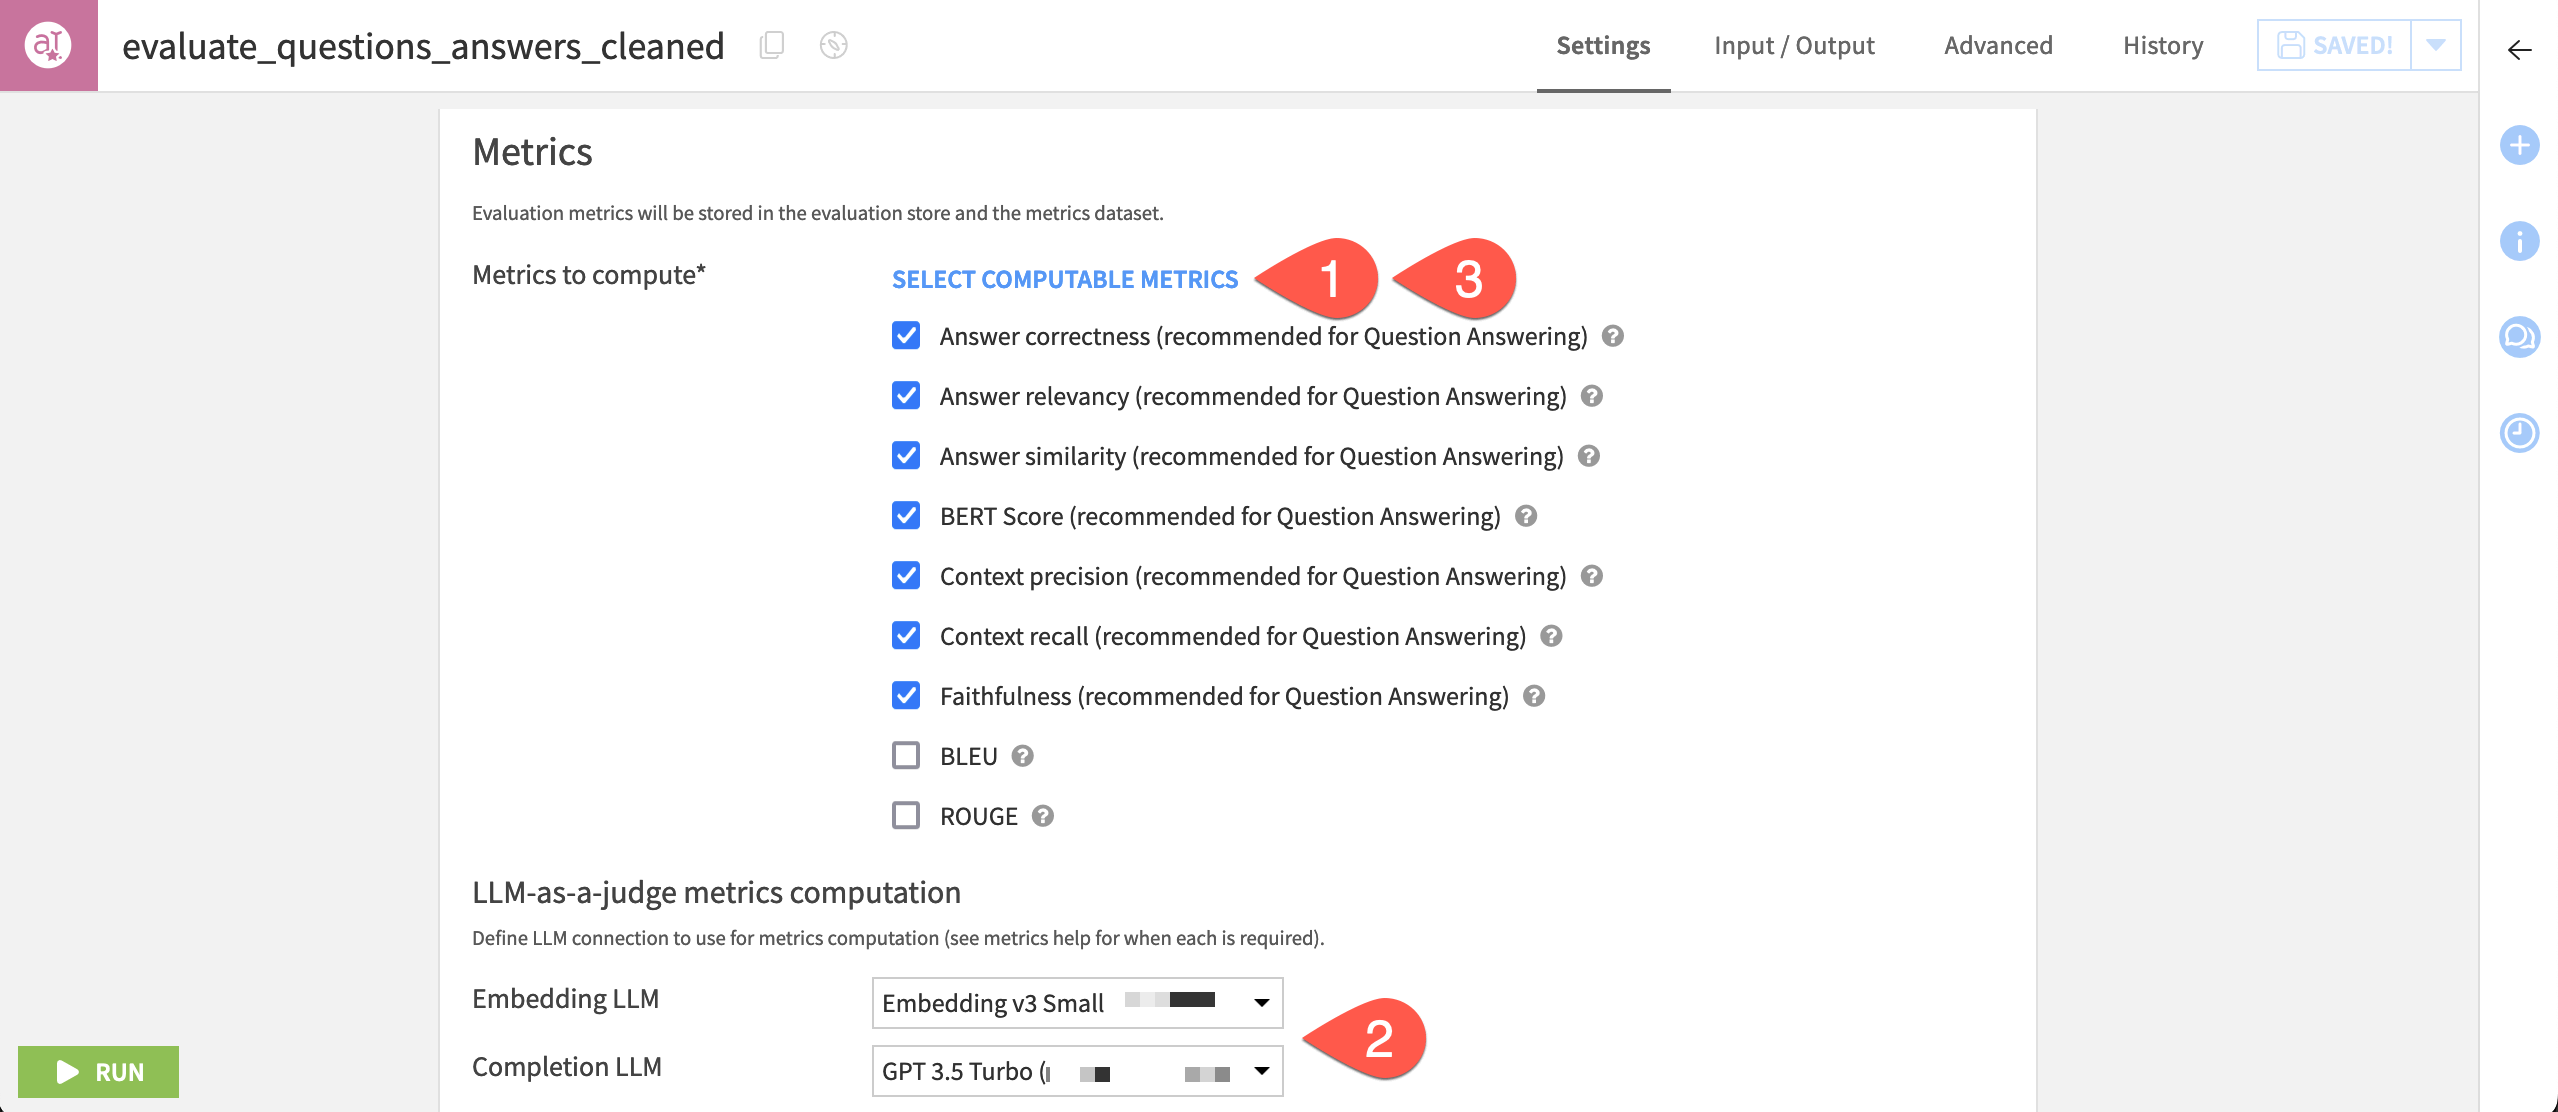
Select out-of-the-box evaluation metrics#
Like the Evaluate recipe, the Evaluate LLM recipe lets you define alternatives to the default evaluation ID, name, and labels. You’ll return to labels later.
Next, you can select the metrics to compute. Which metrics are suitable depend on the task at hand. Some metrics are more algorithmic (such as ROUGE or BLEU), and others use a technique called LLM-as-a-judge. This second approach is relatively new and relies on asking an LLM a specifically crafted question to have it assess various performance metrics.
See also
More details on these out-of-the-box metrics can be found in the reference documentation on Evaluating LLMs & GenAI use cases.
For LLM-as-a-judge metrics, you’ll also need to choose an LLM connection for an embedding and/or a completion LLM.
All metrics depending on the distance between two strings, such as answer correctness or faithfulness, require an embedding model.
All LLM-as-a-judge metrics require a completion LLM. Accordingly, it’s optional if you don’t compute any of those metrics.
Try this out for yourself.
Click Select Computable Metrics, and observe how most metrics aren’t selected. This is because many of these metrics require an embedding LLM and/or a completion LLM.
If available, select your Embedding LLM and Completion LLM.
Click Select Computable Metrics once again, and observe how metrics like answer correctness are now included.
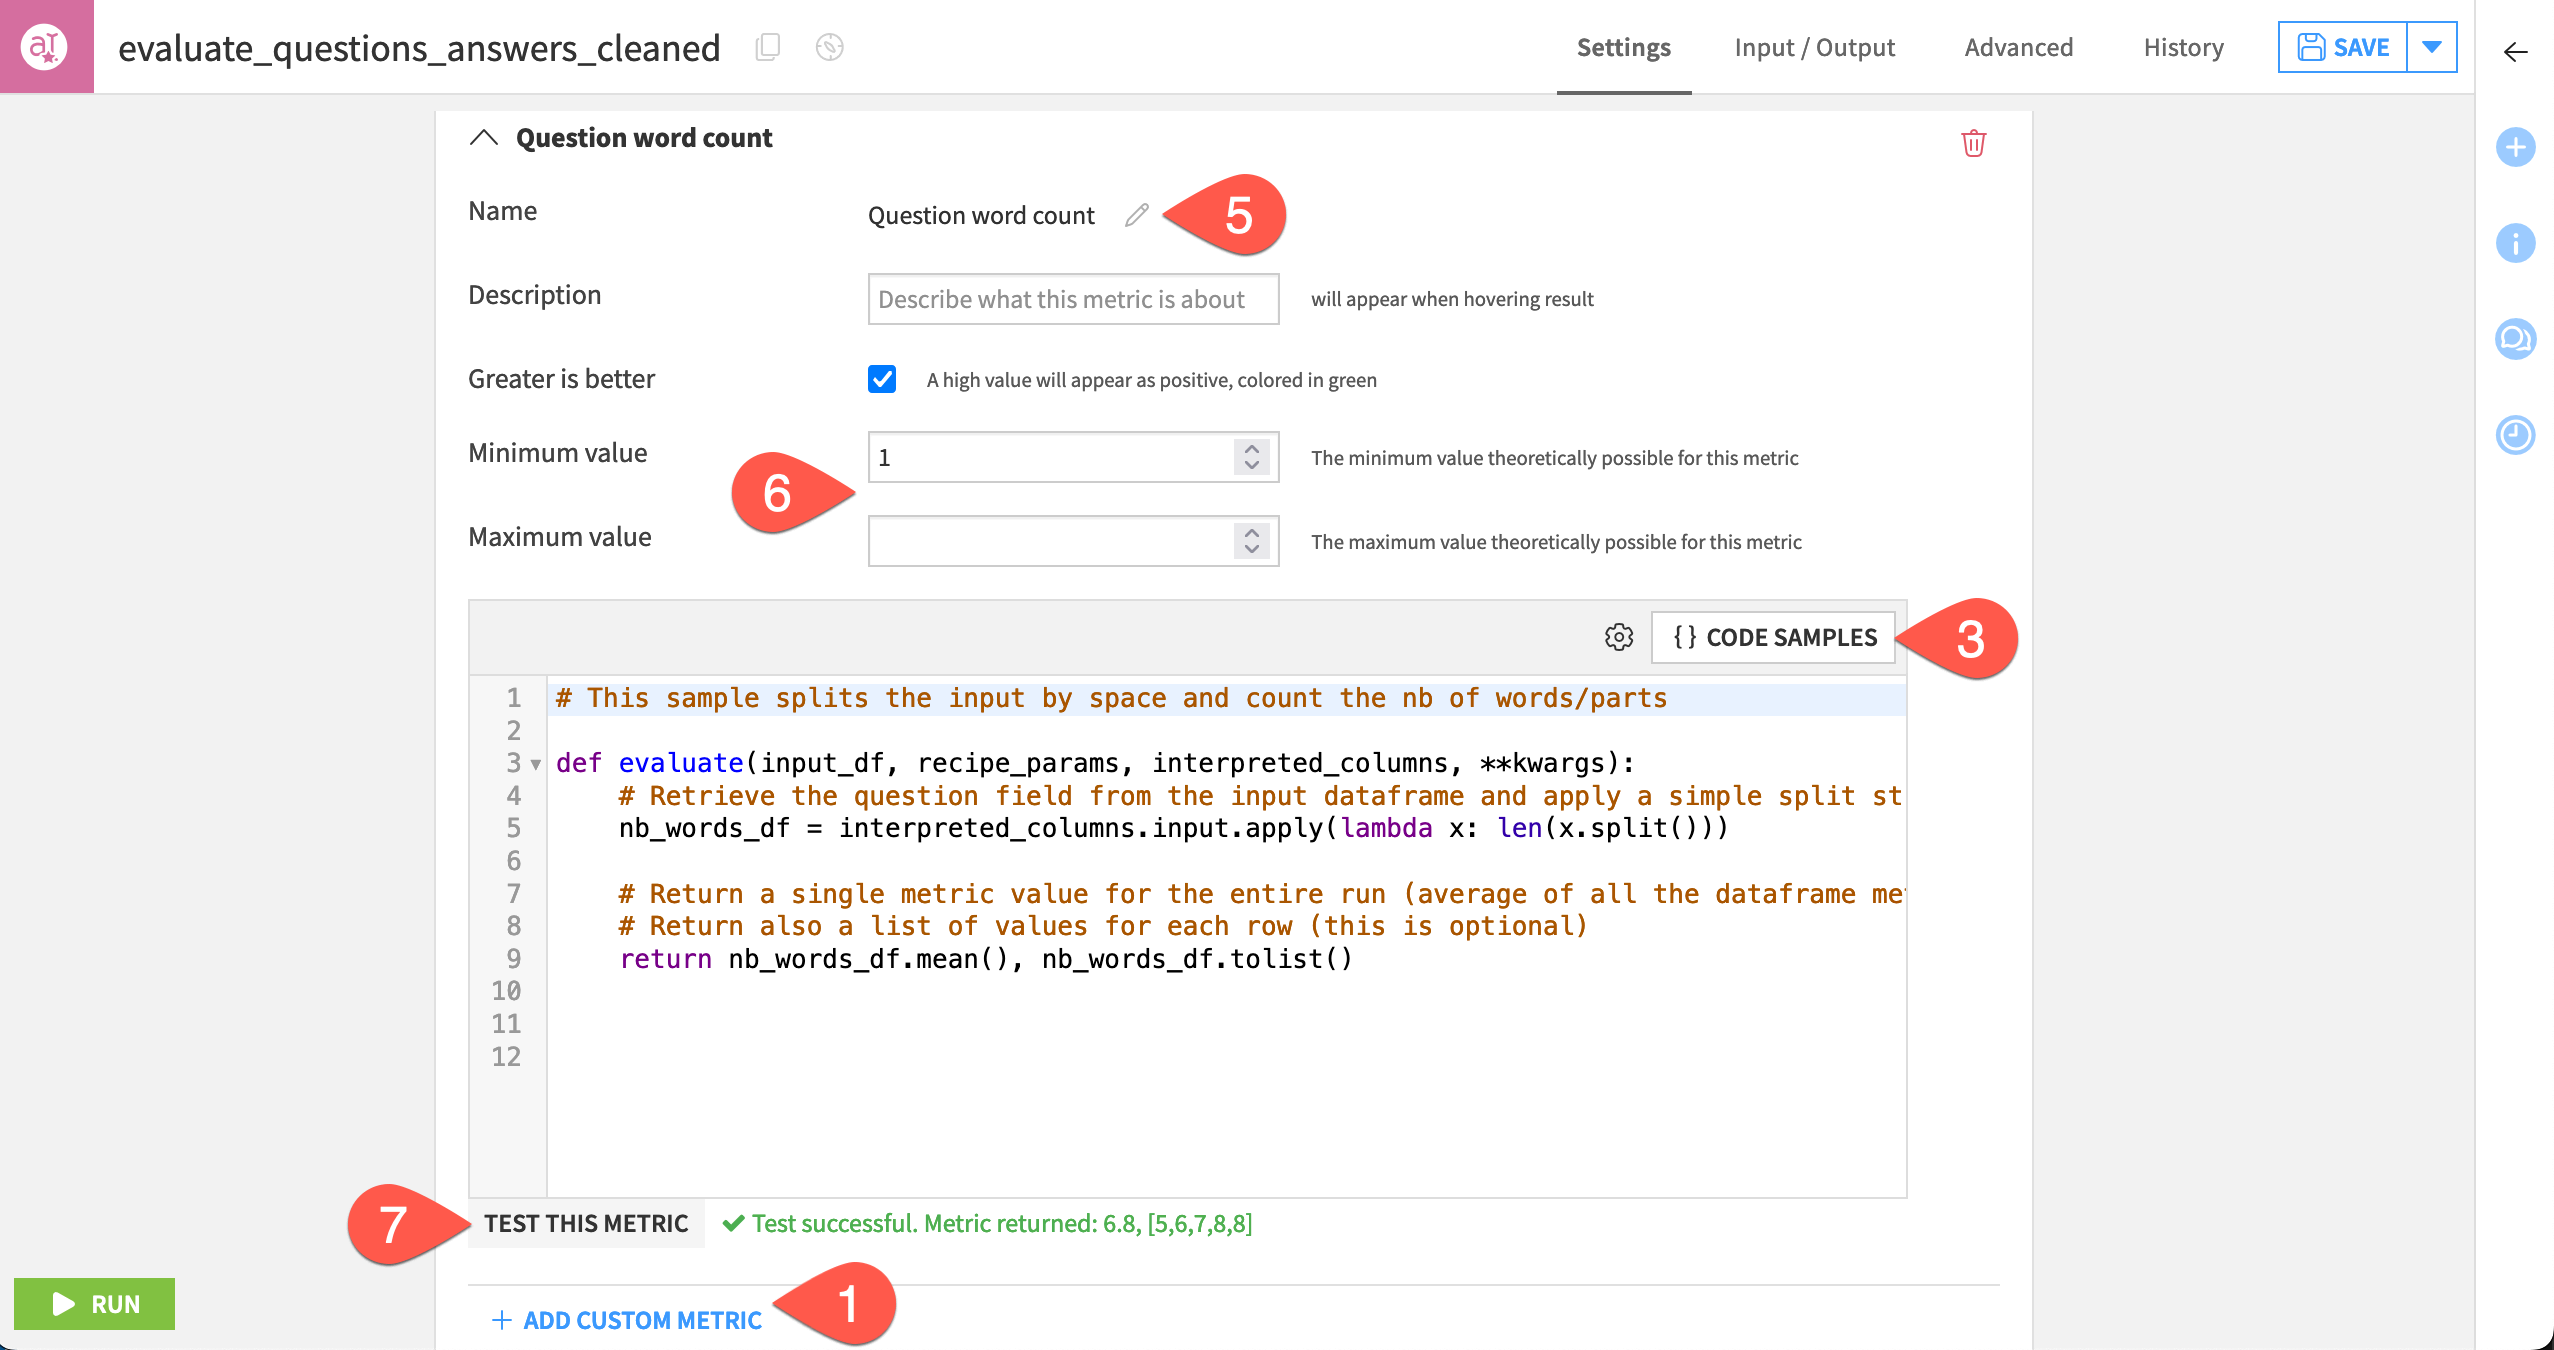
Optional: Define custom evaluation metrics#
In addition to the out-of-the-box metrics, you can also code your own custom metrics using Python. You can return Python metrics in two ways:
As a float, where it’s displayed alongside other metrics in the model evaluation store.
As an array of values, which is helpful in row-by-row analysis.
In the Custom Metrics section, click + Add Custom Metric.
Read the default docstring to understand the function’s input parameters, and then delete the default code.
Click Code Samples.
Select Simple custom LLM metric, and click the pencil icon to edit it.
For the sample title, rename the metric
Question word count.Click Save.
Set the minimum value to
1, and the clear the maximum value to leave it unbounded.Click Test This Metric to confirm an expected value is returned.
Tip
When writing a custom metric, first develop the code in a notebook. You only need the input evaluation dataset and, potentially, the embedding and completion LLMs. When ready, uncheck all other metrics to run the recipe faster and validate the custom metric’s computation. Note that a failure in the custom metric’s computation will only raise a warning and not fail the entire recipe. The other metrics will be computed and added in the evaluation.
Run the evaluation#
When satisfied with the configuration of metrics, you can execute the recipe.
In the Python environment section, confirm that you have selected a compatible code environment as mentioned in the prerequisites.
Click Run.
Analyze the results of an LLM evaluation#
Once the recipe has finished executing, you can explore the outputs.
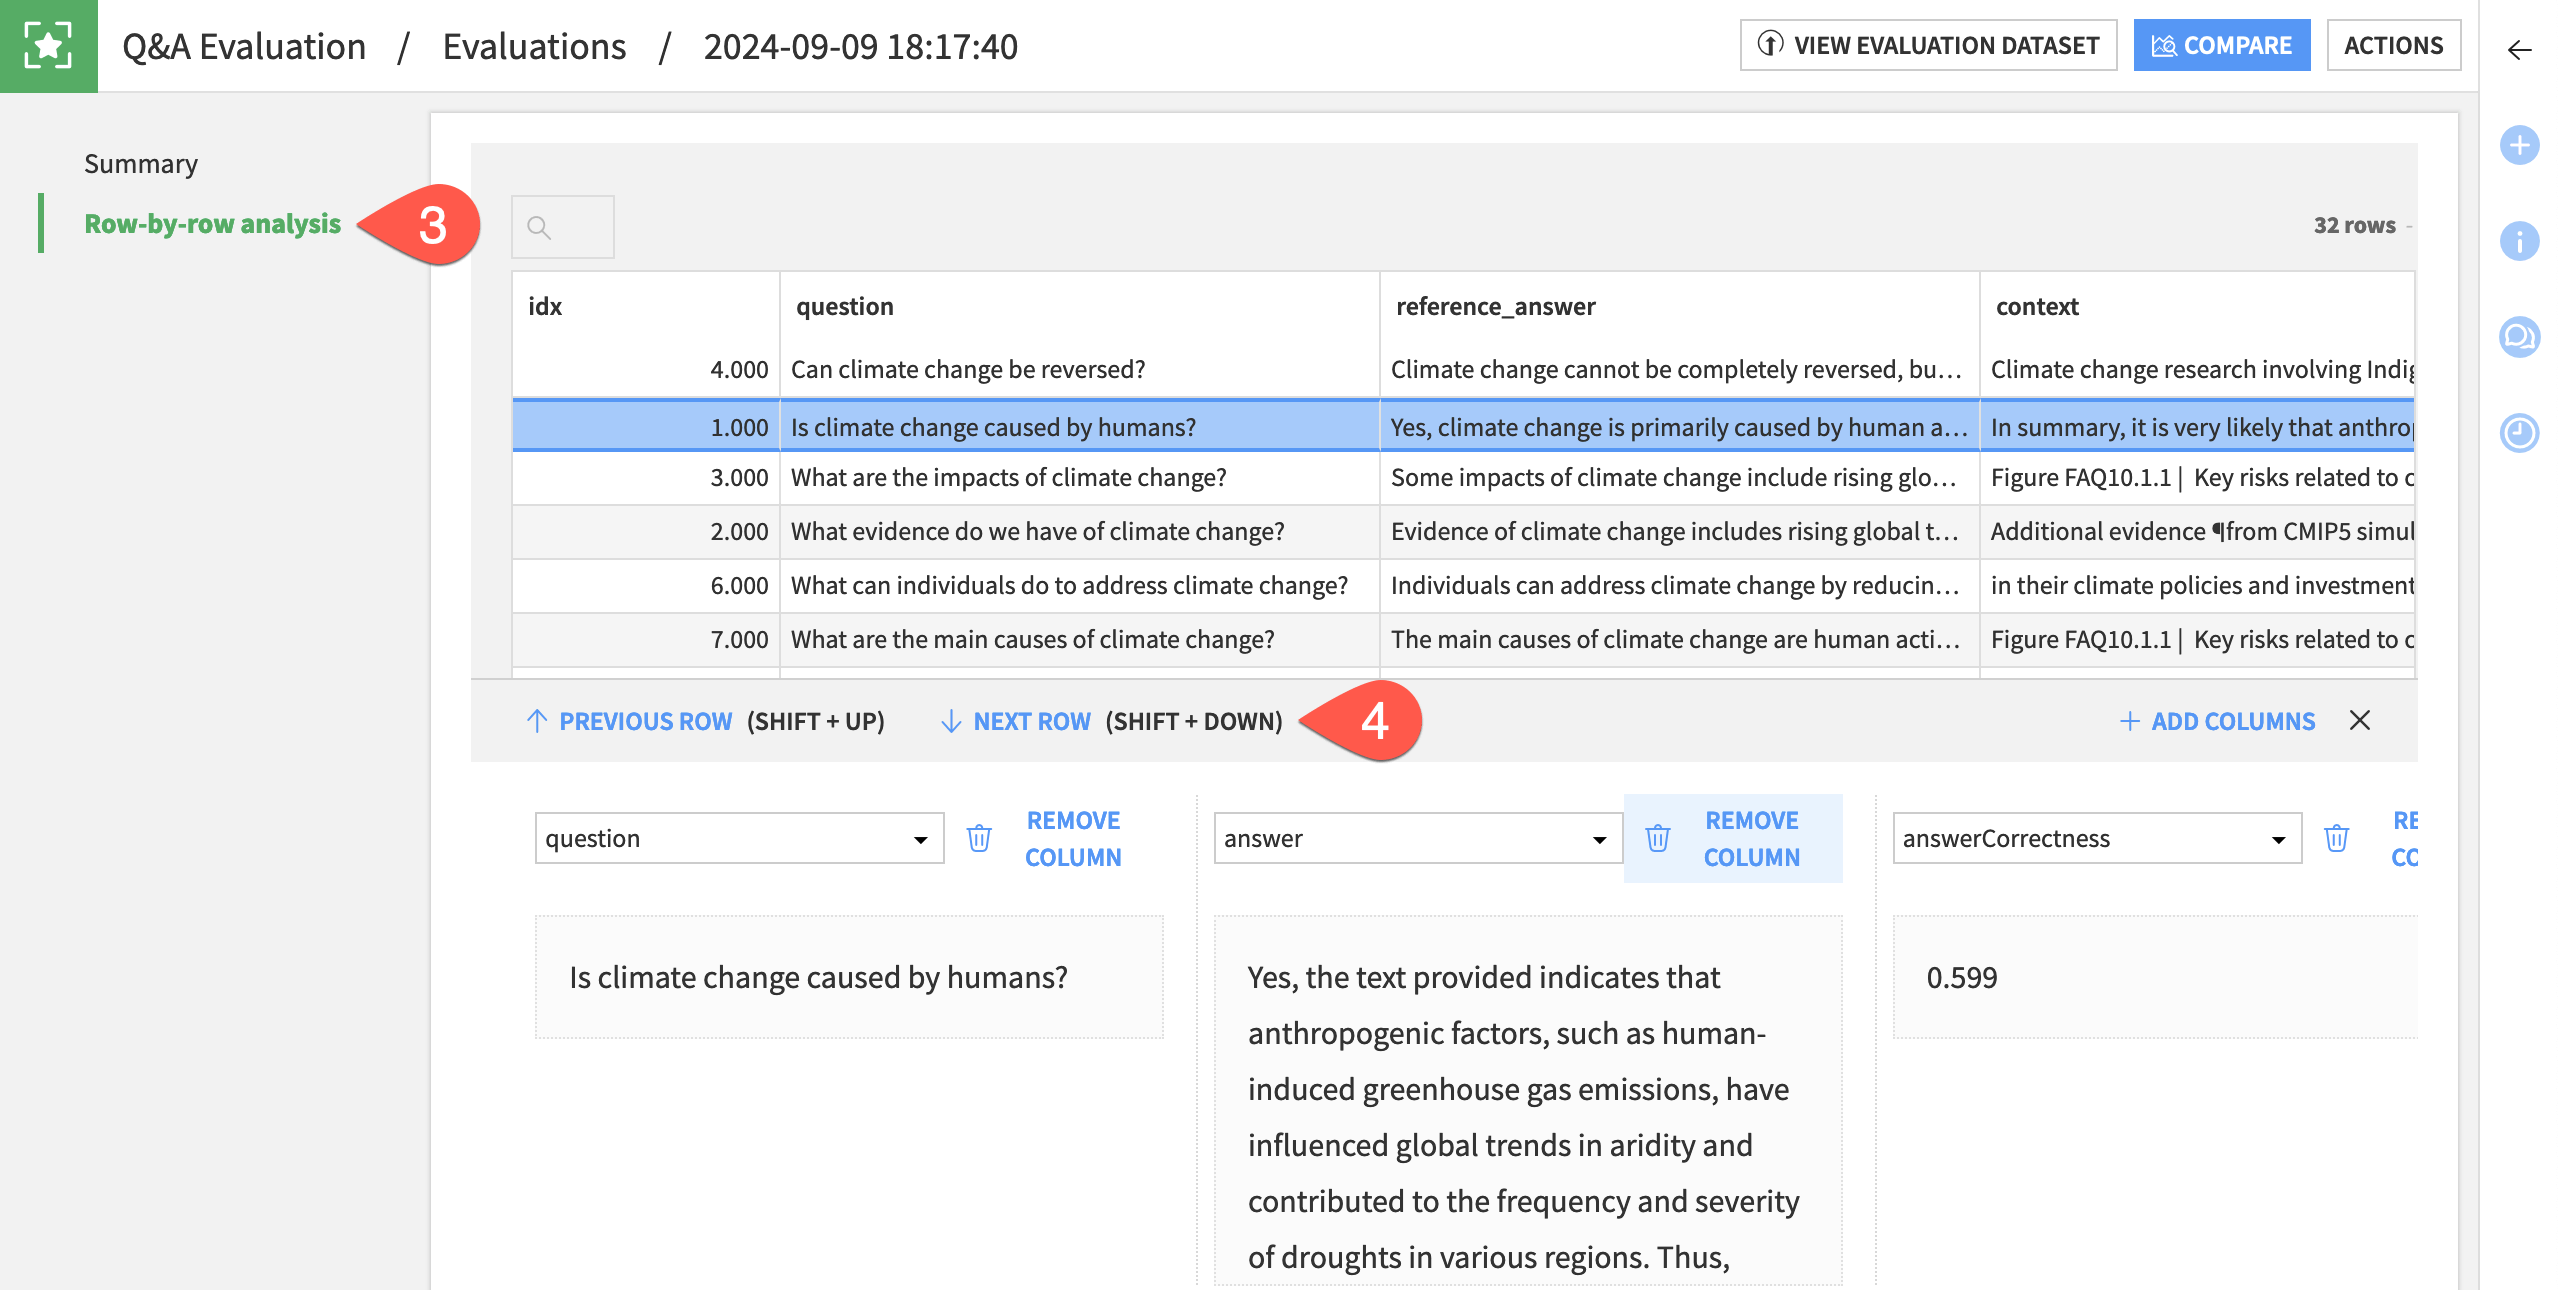
Explore the GenAI evaluation store#
The most important output is the GenAI evaluation store.
Open the Q&A Evaluation store to find the selected evaluation metrics.
For the first evaluation, click Open to view a summary.
Go to the Row-by-row analysis panel.
Explore some individual row output, adding and removing columns as needed.
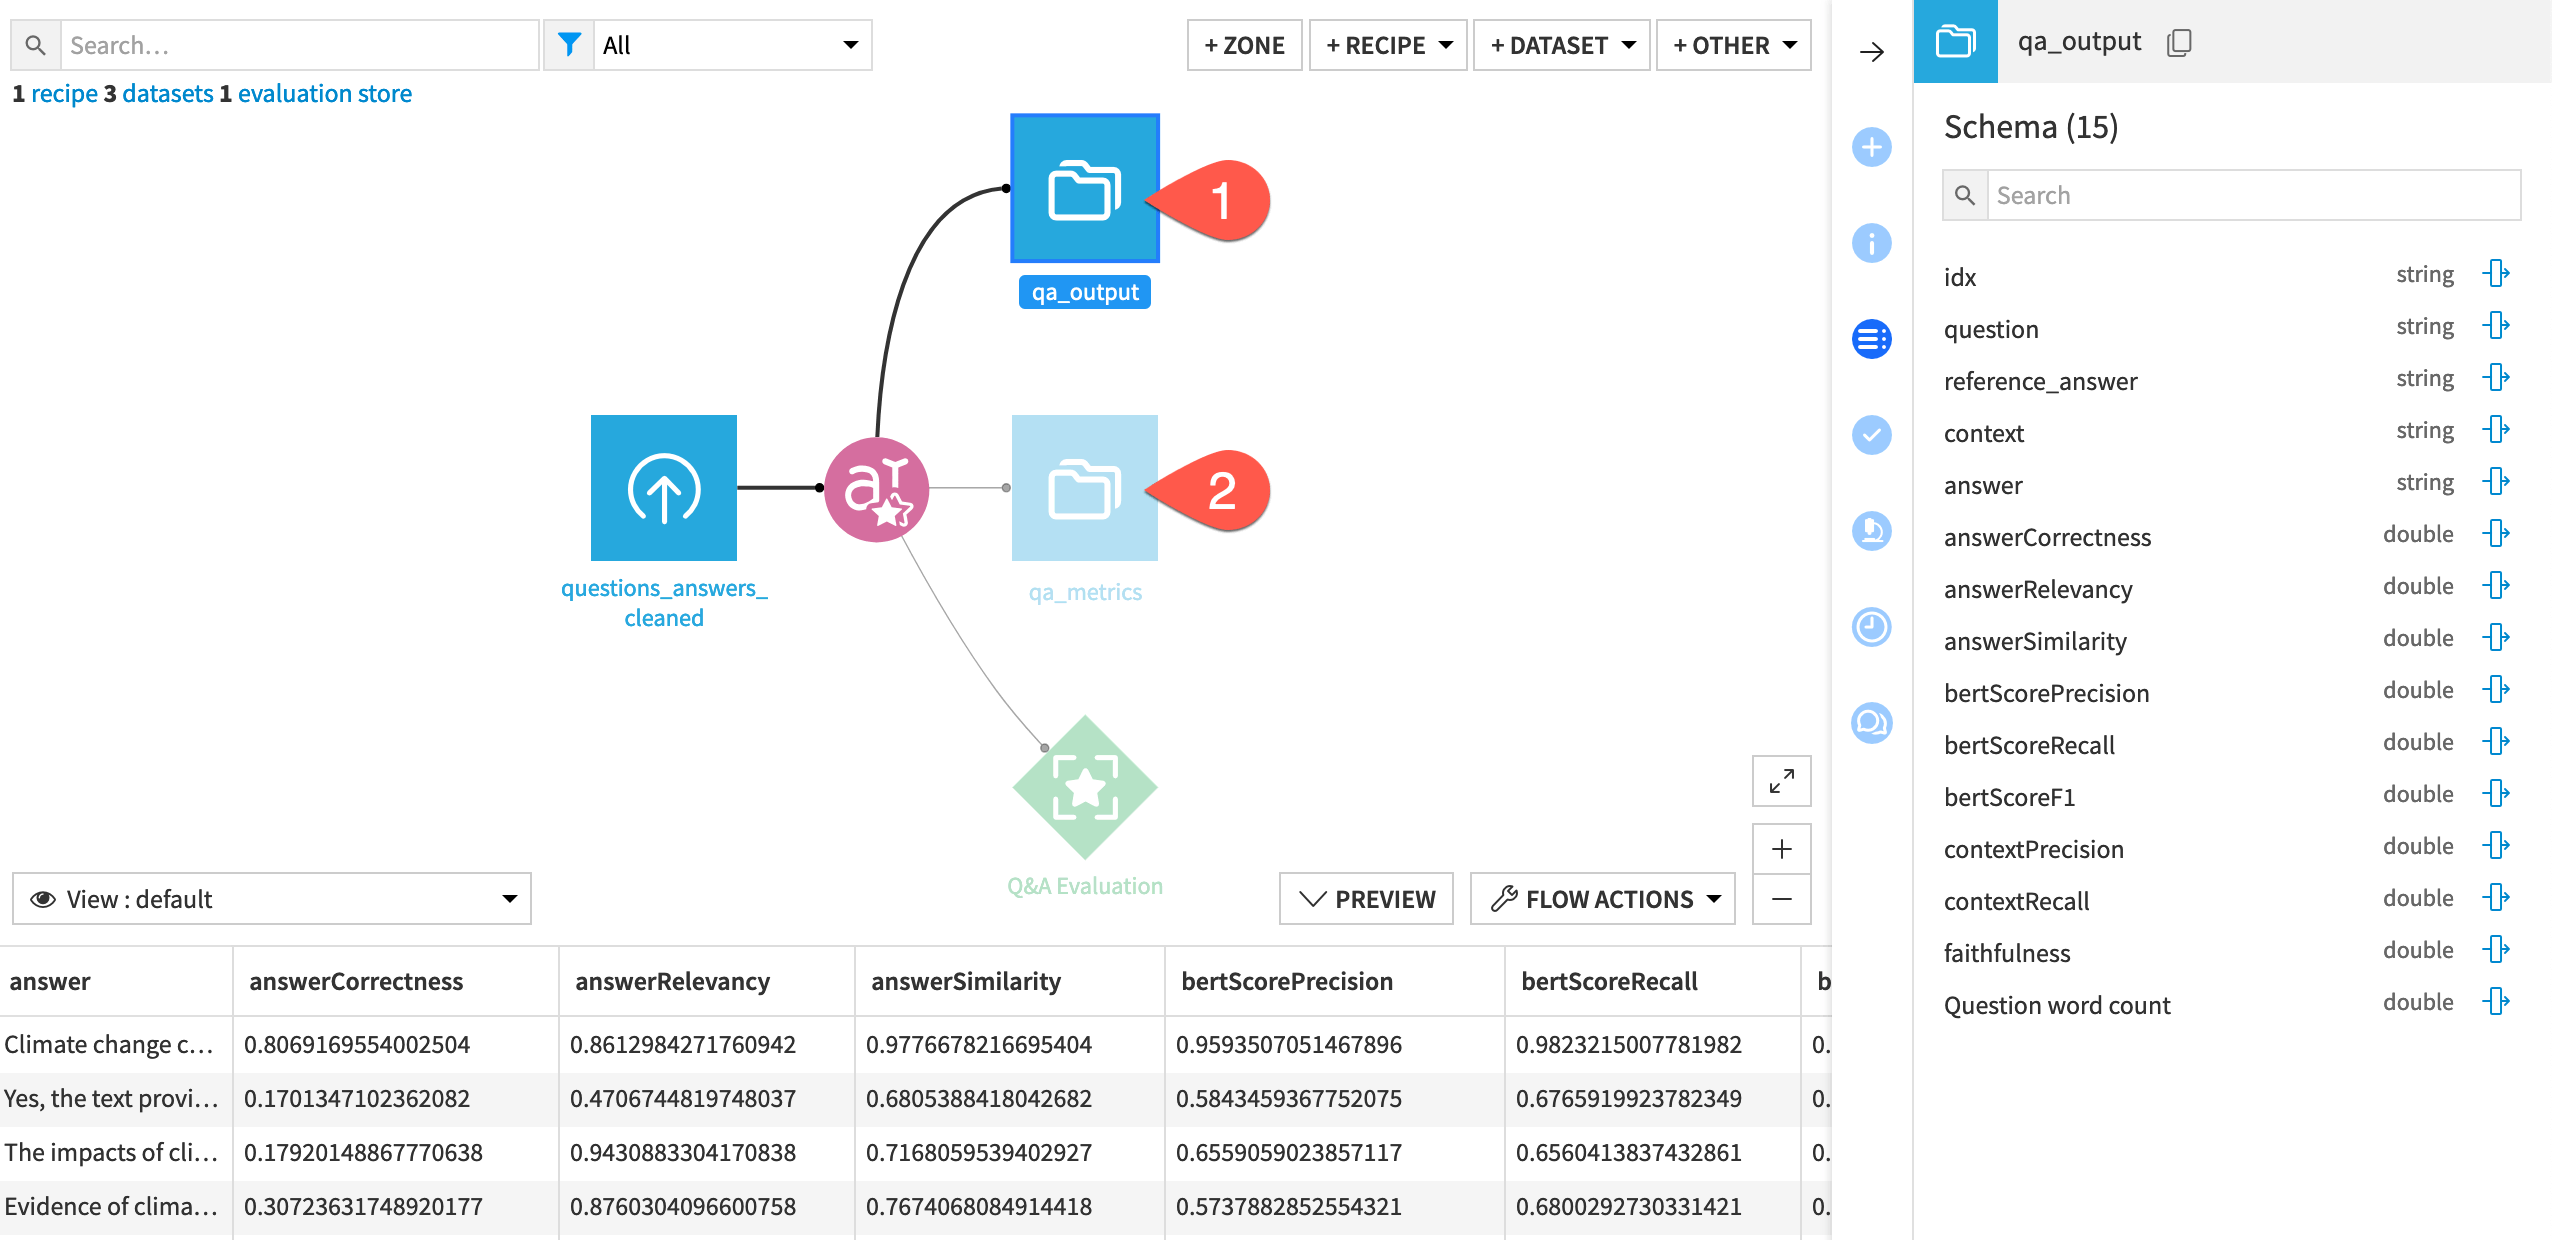
Explore the output and metrics datasets#
Similar to the Evaluate recipe, the Evaluate LLM recipe can also output results in a dataset format:
One dataset containing the input dataset, plus the computed metrics.
One dataset containing just the metrics.
Open the qa_output dataset, and observe the addition of the metrics to the input dataset’s schema.
Open the qa_metrics dataset, and find the same metrics without the input data, identified by the timestamp of the model evaluation.
Tip
These datasets can be particularly useful as inputs to other processes such as webapps and/or dashboards.
Compare LLM evaluations#
Of course, a single LLM evaluation is just the first step. As you ingest new data, or make changes in your upstream GenAI pipeline, you can compare evaluations, much like you do with model comparisons.
Open the Evaluate LLM recipe.
Make an arbitrary change to the recipe, such as a different LLM if available. You can also go to the Advanced tab of the recipe and change a parameter, such as the temperature.
After making a change, click Save, and then Run to execute the recipe a second time.
Open the Q&A Evaluation store to observe the results of the second evaluation in relation to the first.
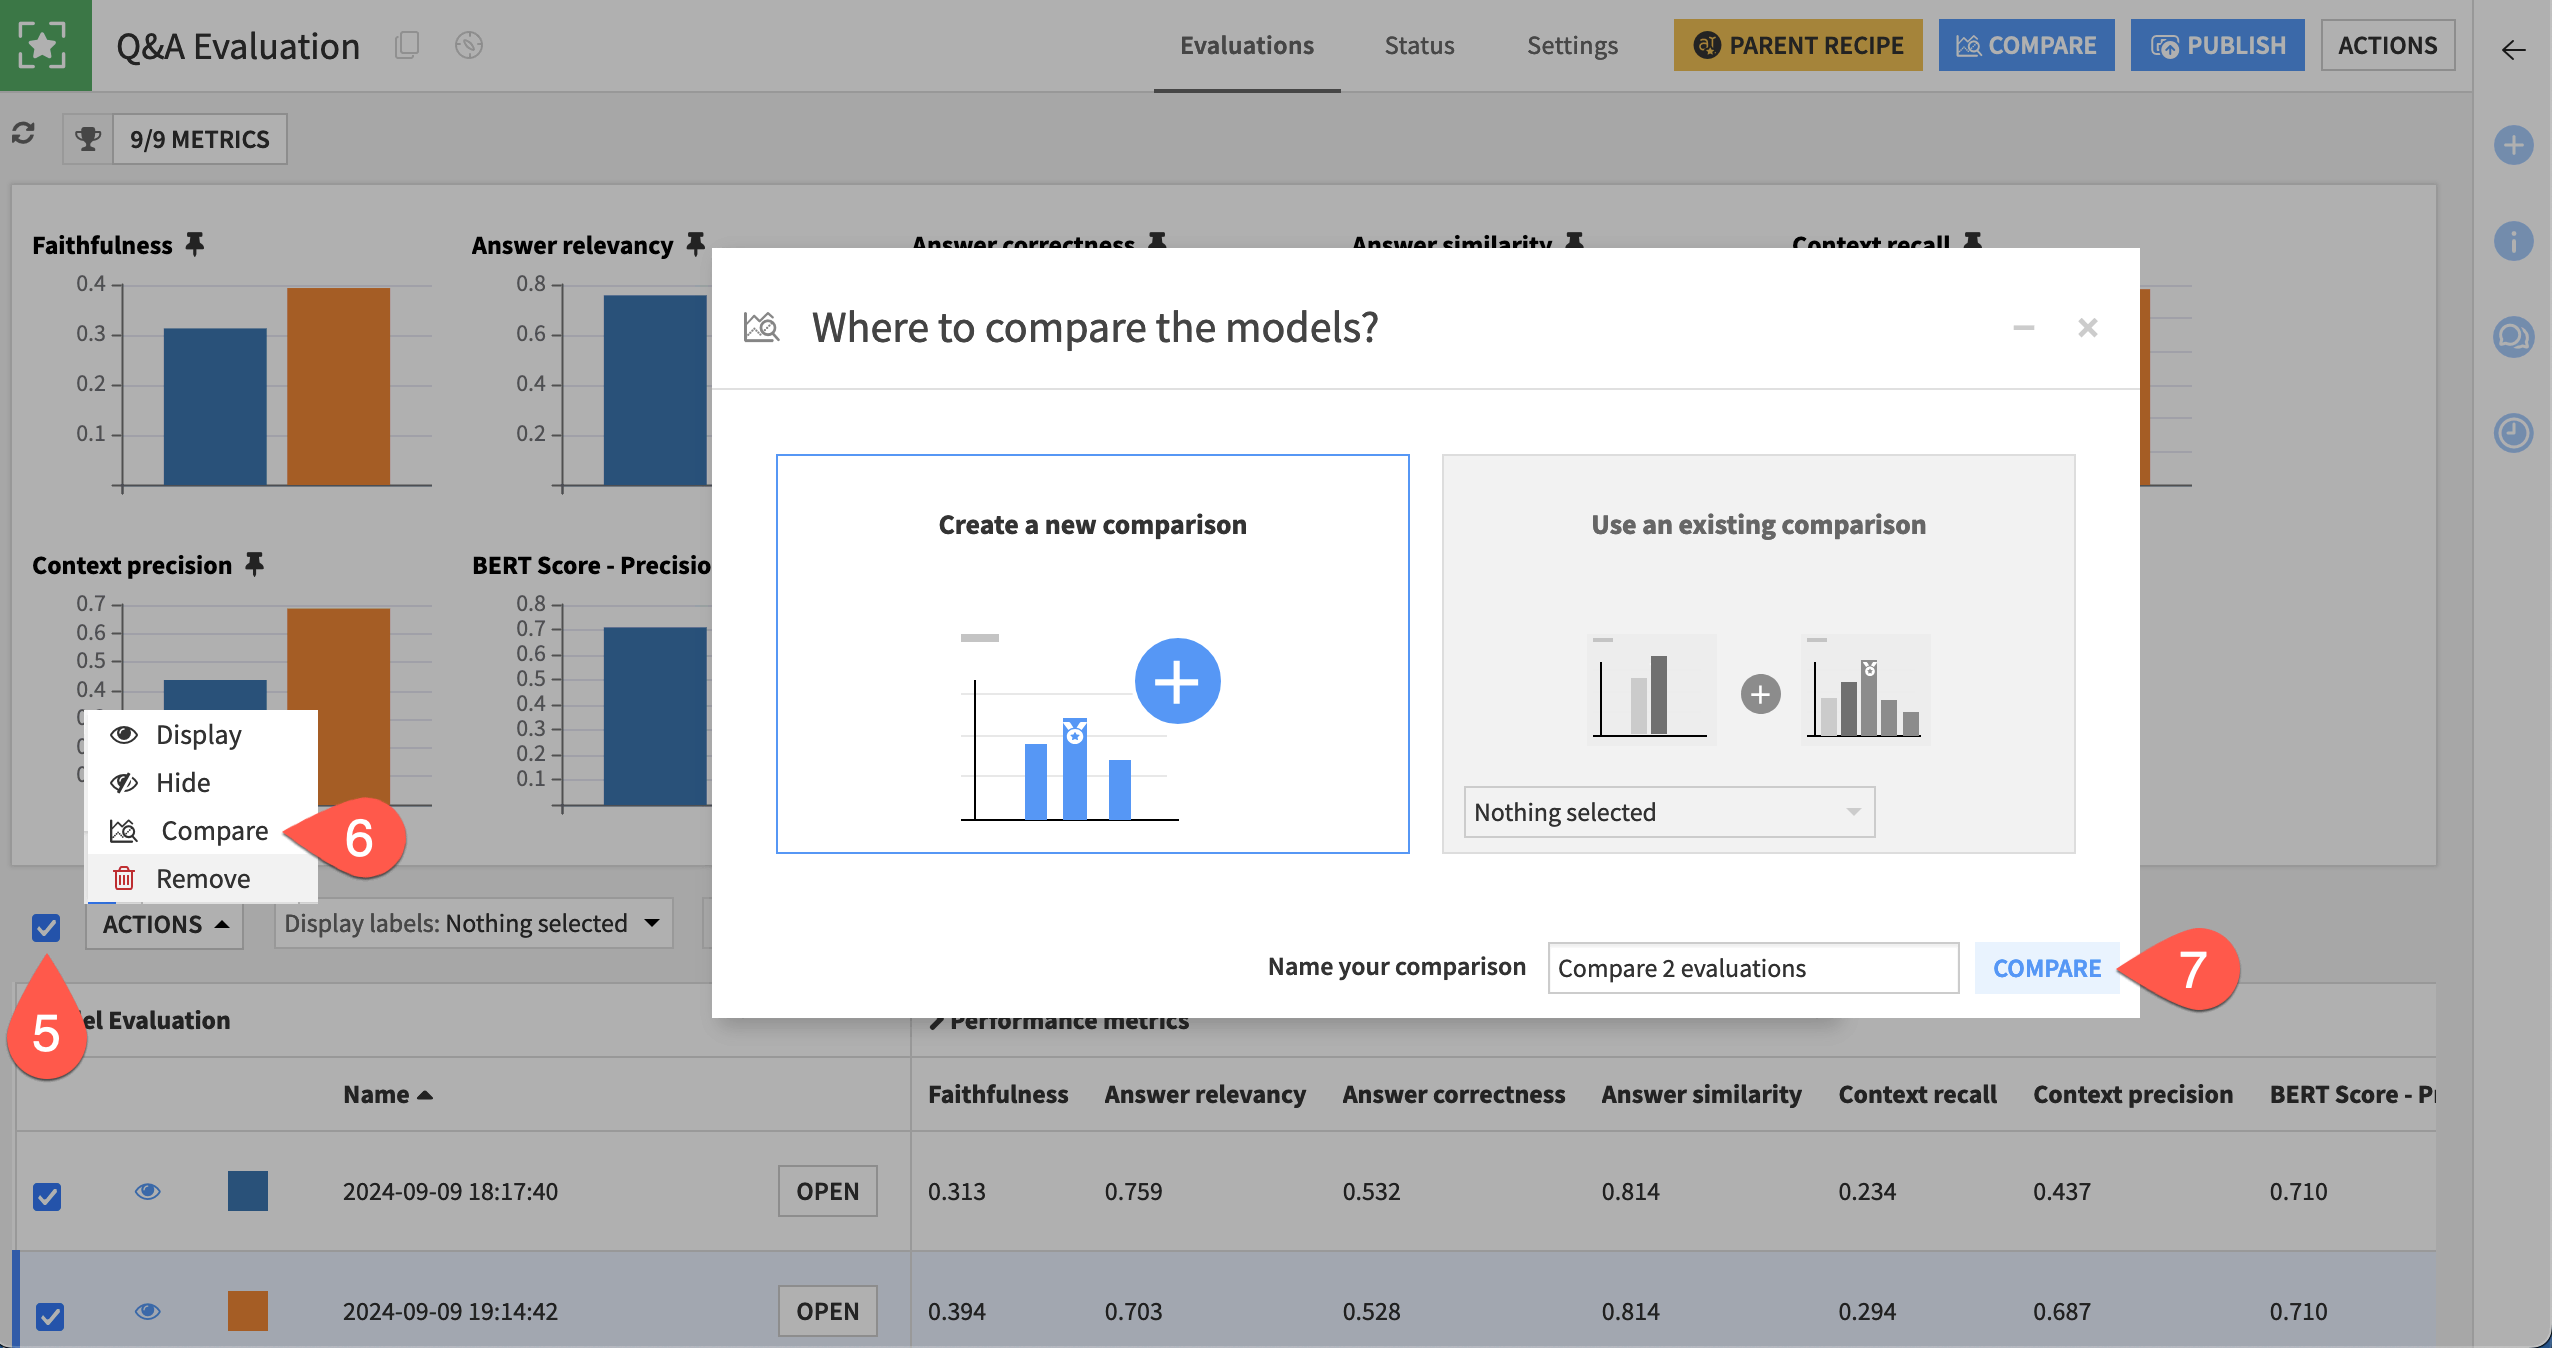
Check the box to the left of the Actions button to select all evaluations.
Click the Actions button, and select Compare.
In the dialog, click Compare to create a new comparison.
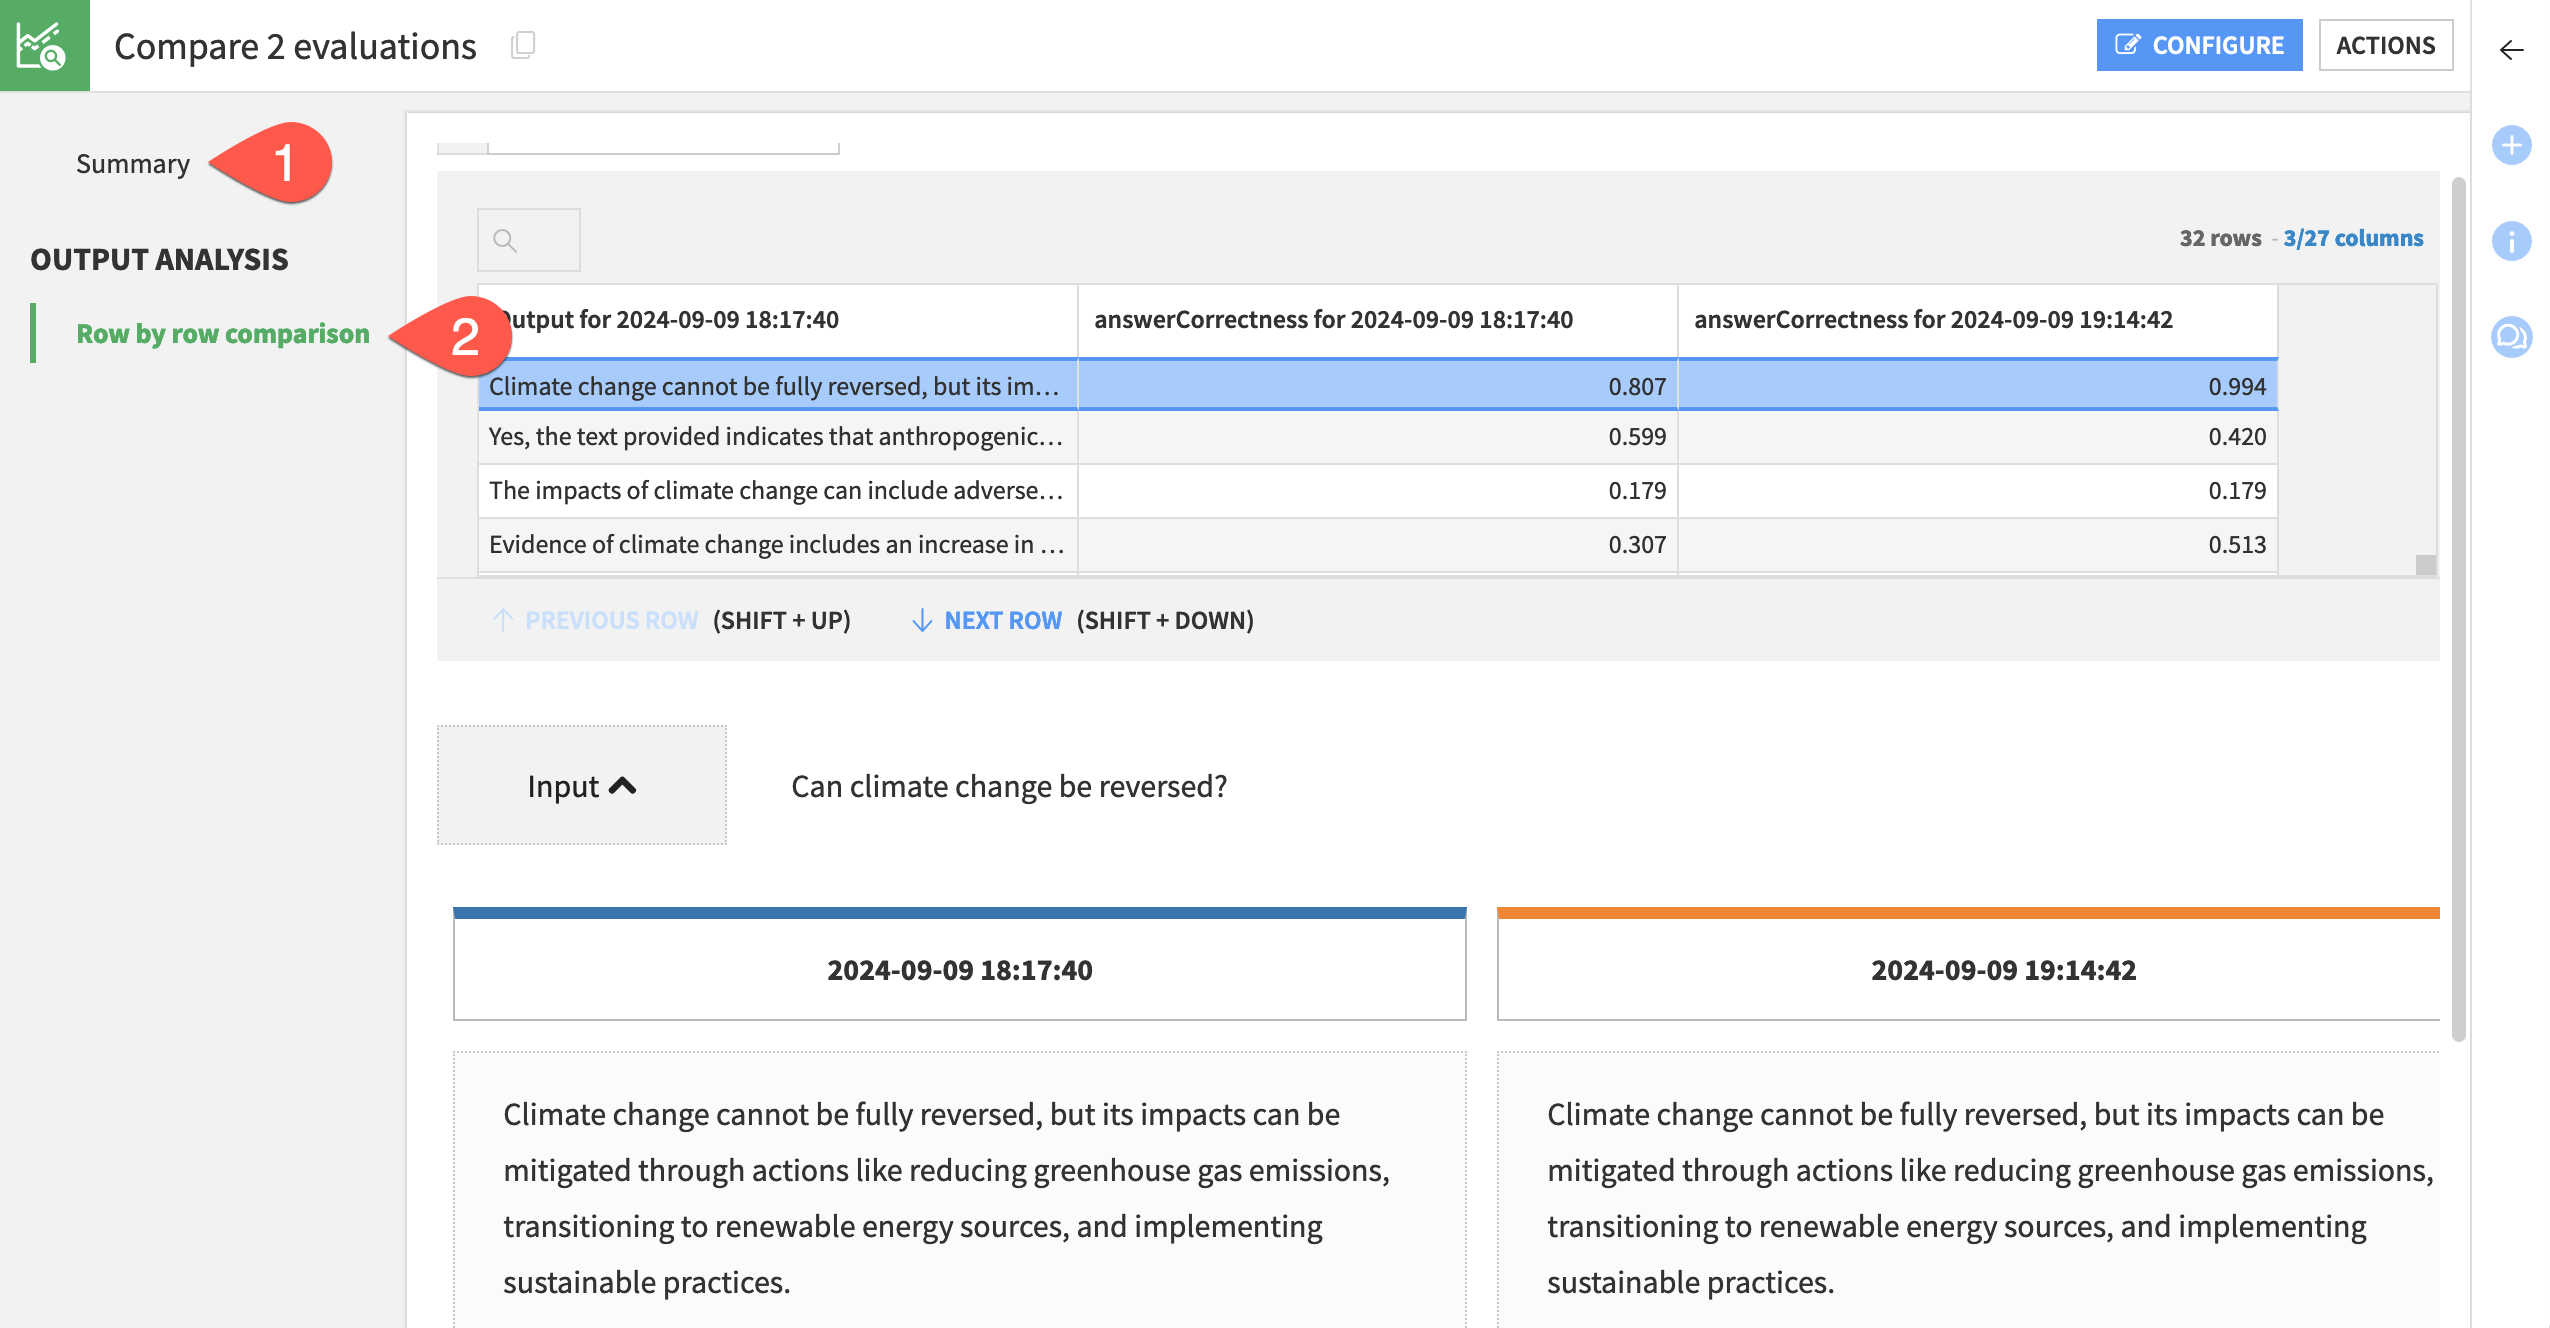
Then you can dive into the results, attempting to understand why some results may have poor metrics.
View the Summary of the comparison.
Navigate to the Row by row comparison to dive deeper into individual results.
Label an LLM evaluation with metadata#
The name of an LLM evaluation (like a model evaluation) defaults to the timestamp at which it was created. Without enough metadata, it can be difficult to keep track of what these evaluations actually refer to.
Labels, in the format of <domain>:<key>, can be added either before the evaluation in the Evaluate LLM recipe or afterward in the model evaluation store. Let’s demonstrate the former.
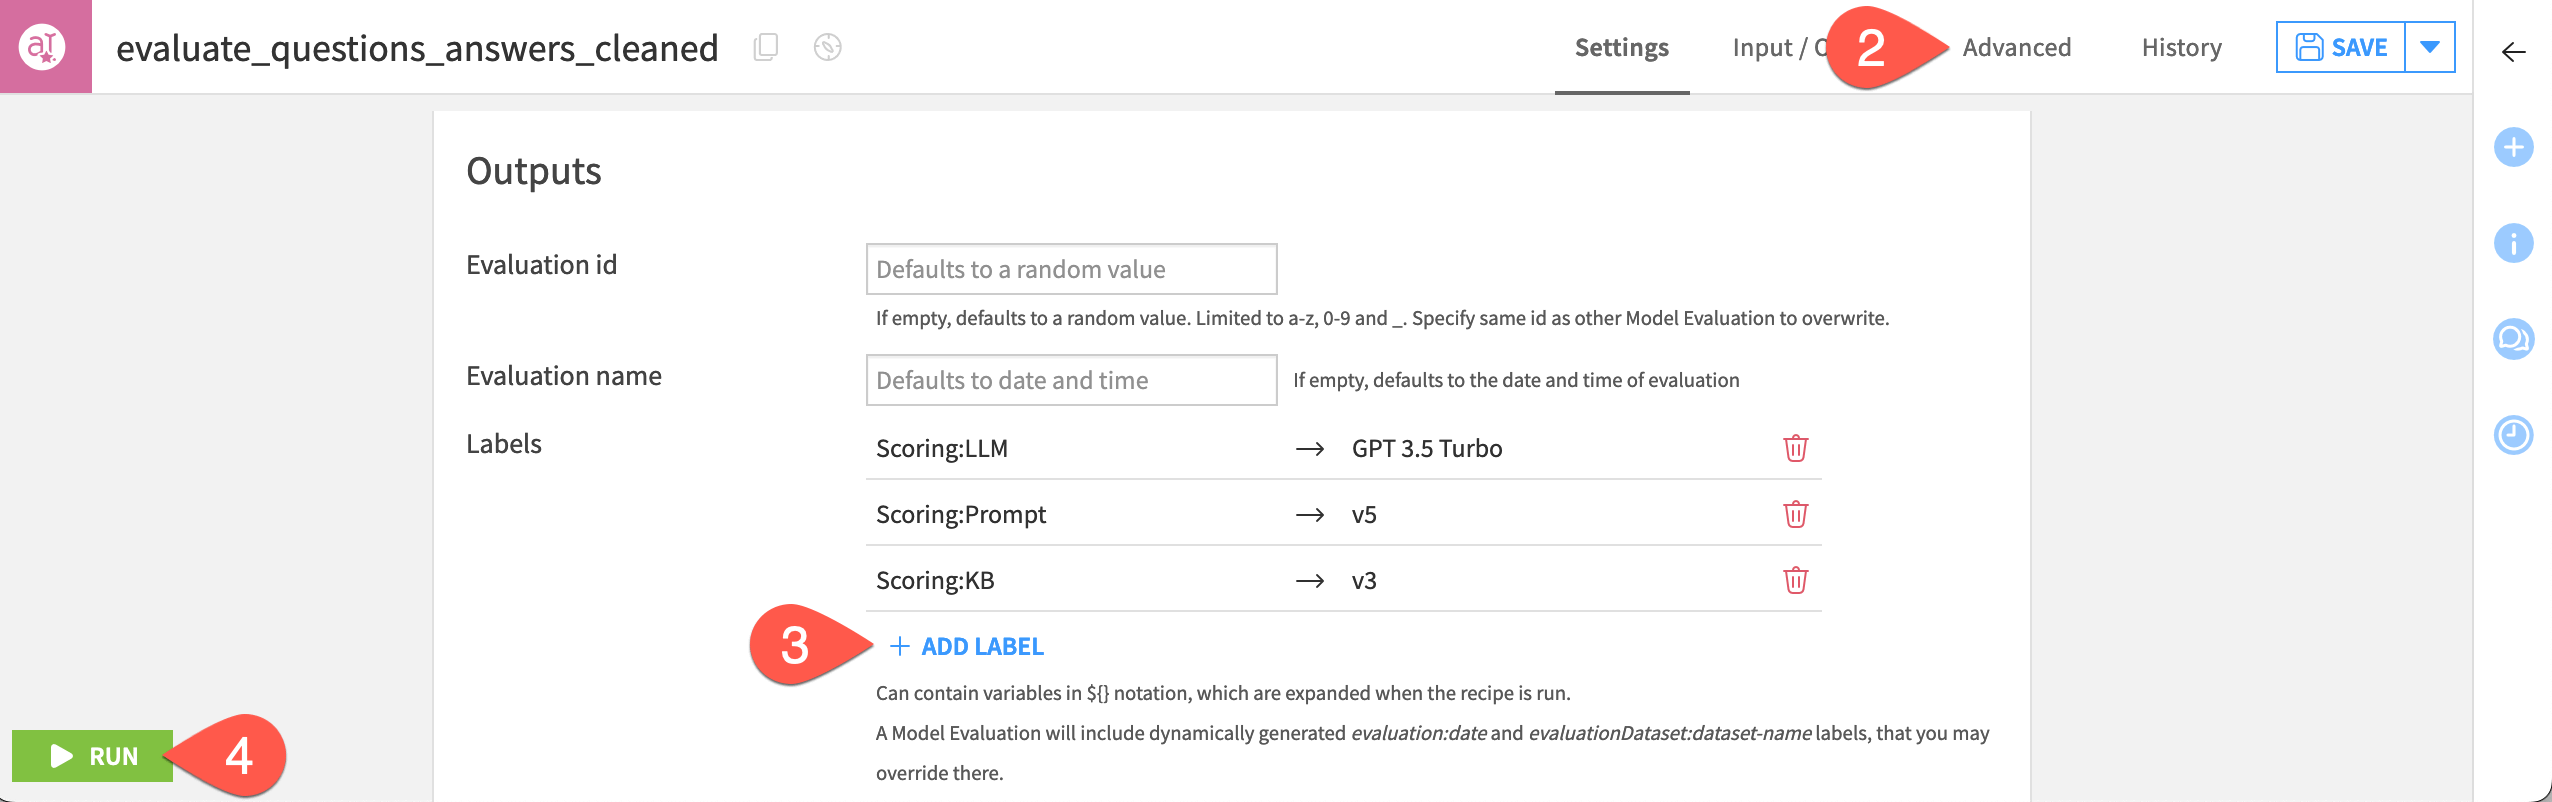
Reopen the Evaluate LLM recipe.
Optionally, make another arbitrary change, such as a temperature change in the recipe’s Advanced tab.
In the Outputs tile of the recipe’s Settings tab, click + Add Label. You’ll find possible examples in the screenshot below.
Click Run to produce another LLM evaluation.
Now you can display these labels in the GenAI evaluation store.
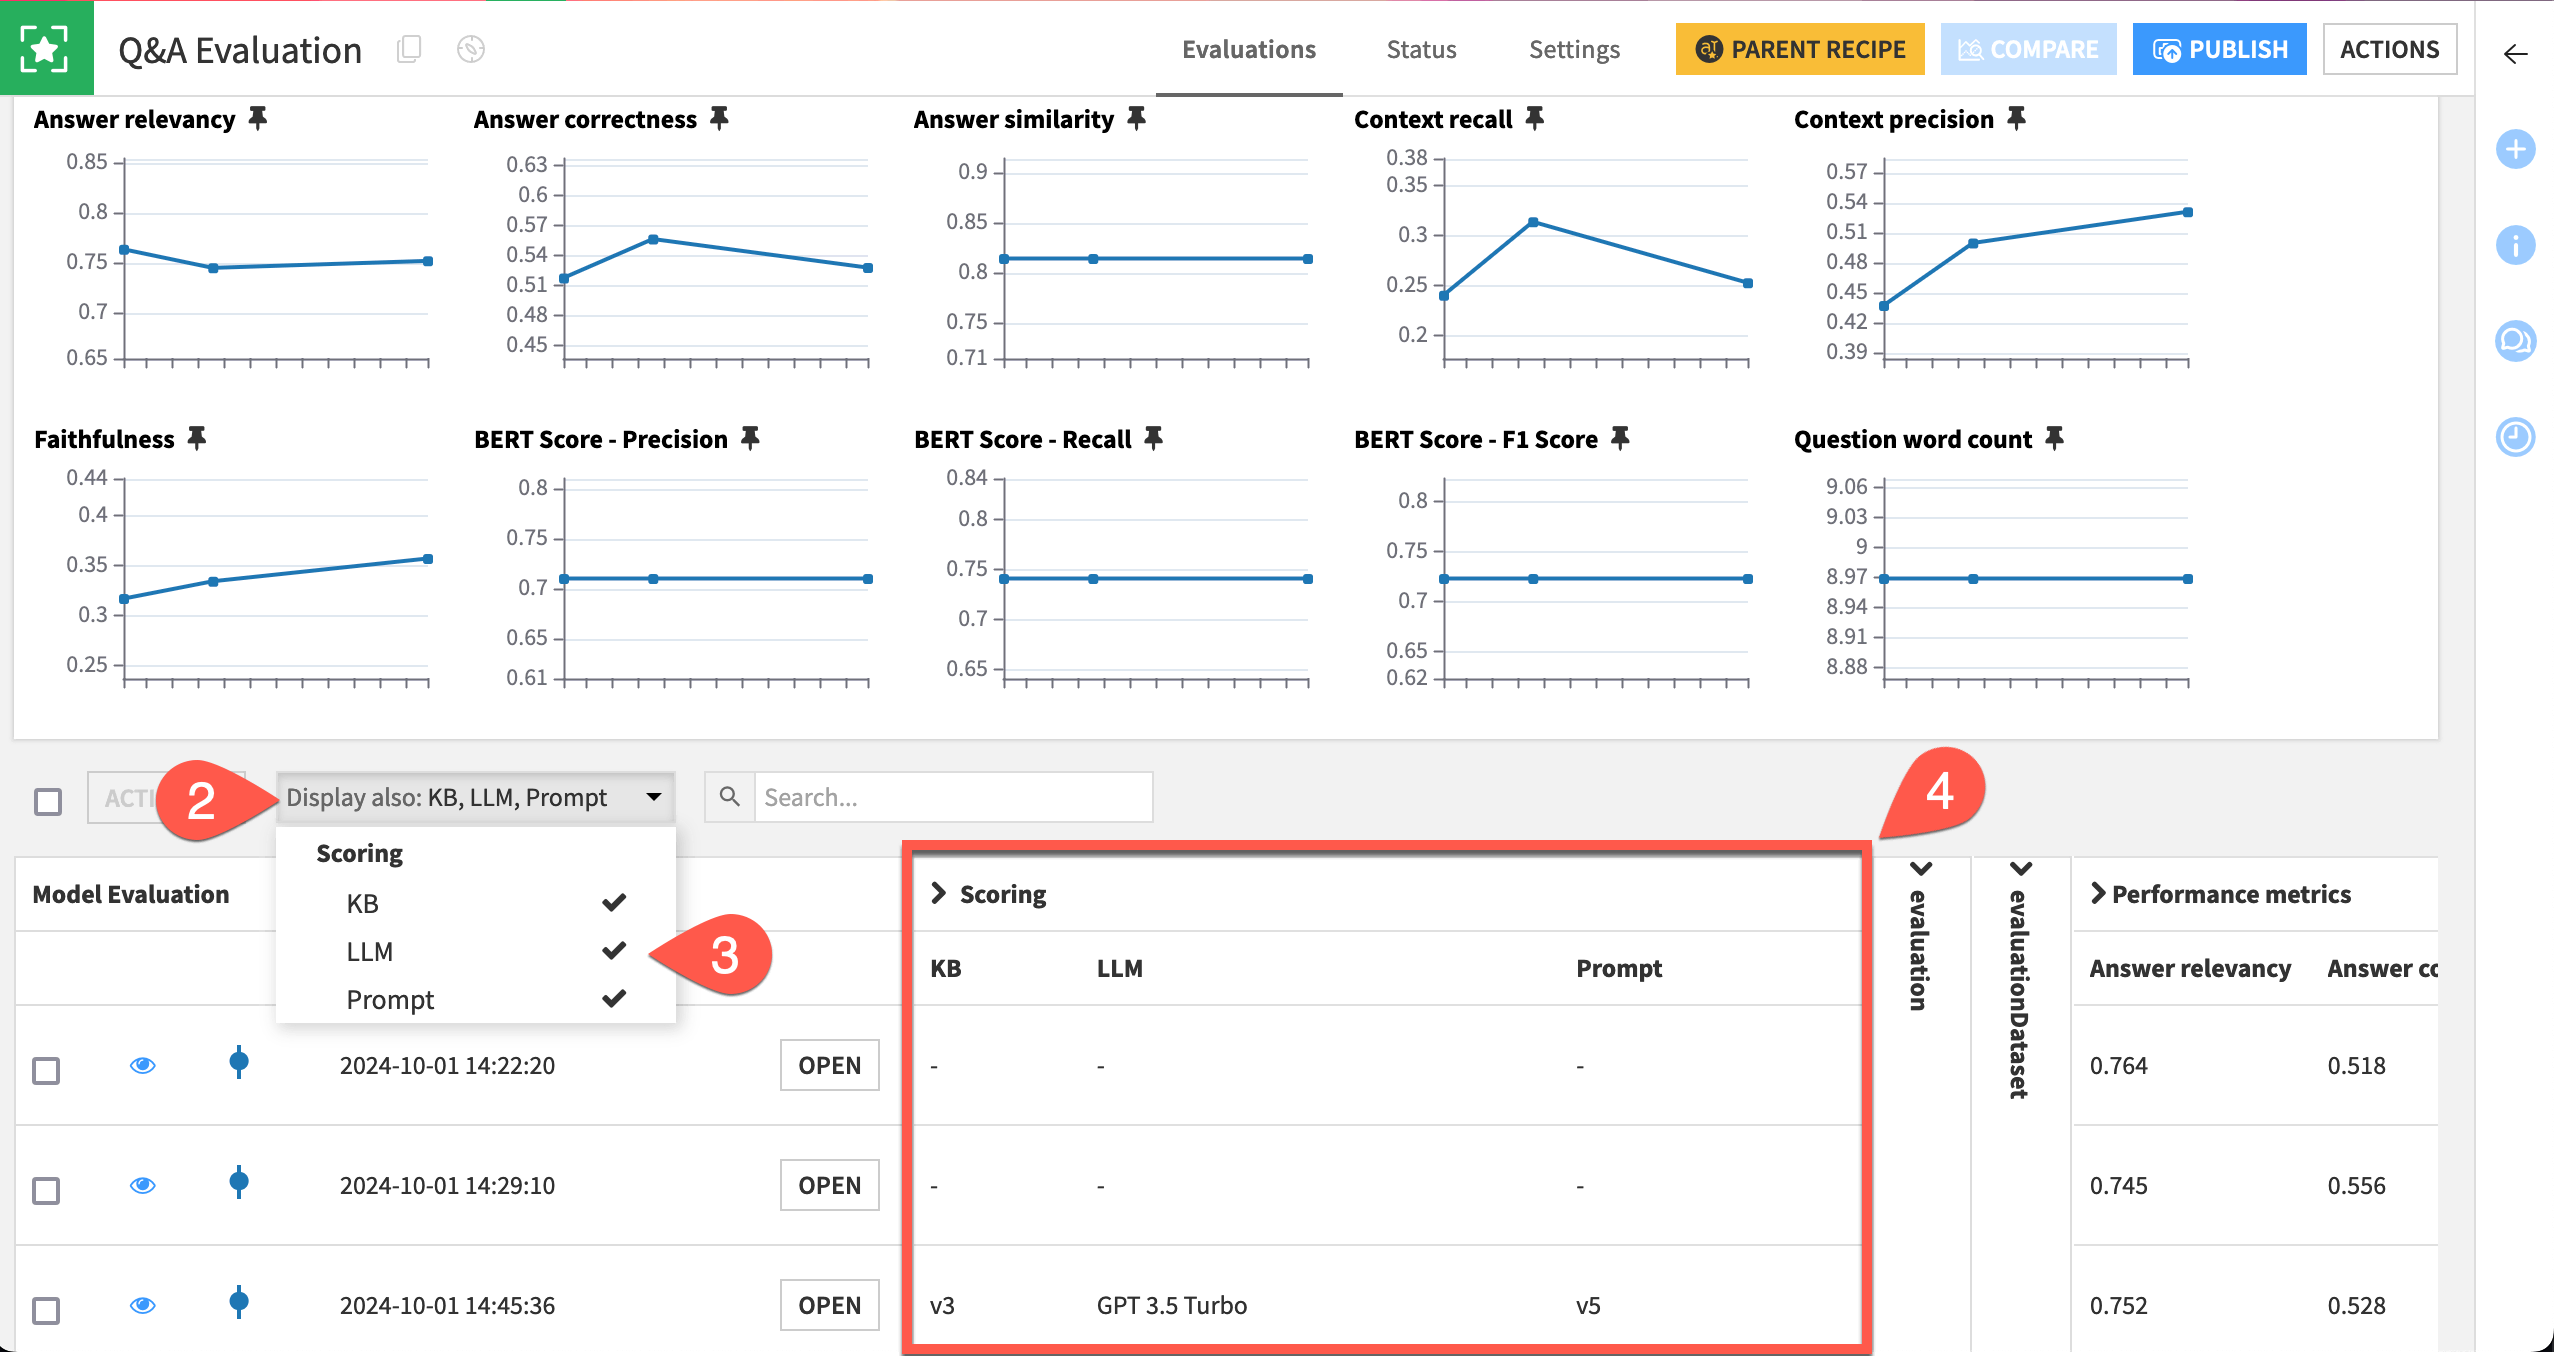
When the recipe finishes running, open the Q&A Evaluation store.
Open the Display also dropdown.
Select the new labels.
Confirm they appear as columns in the evaluation store.
Tip
You can also open previous evaluations, and add labels in the Metadata section of the Summary panel.
Automate the LLM lifecycle#
The Evaluate LLM recipe outputs a GenAI evaluation store. You can incorporate it into Dataiku’s standard automation toolbox of checks and scenarios.
Tip
If you’re unfamiliar with features like checks and scenarios, start with the Academy course on Data Quality & Automation.
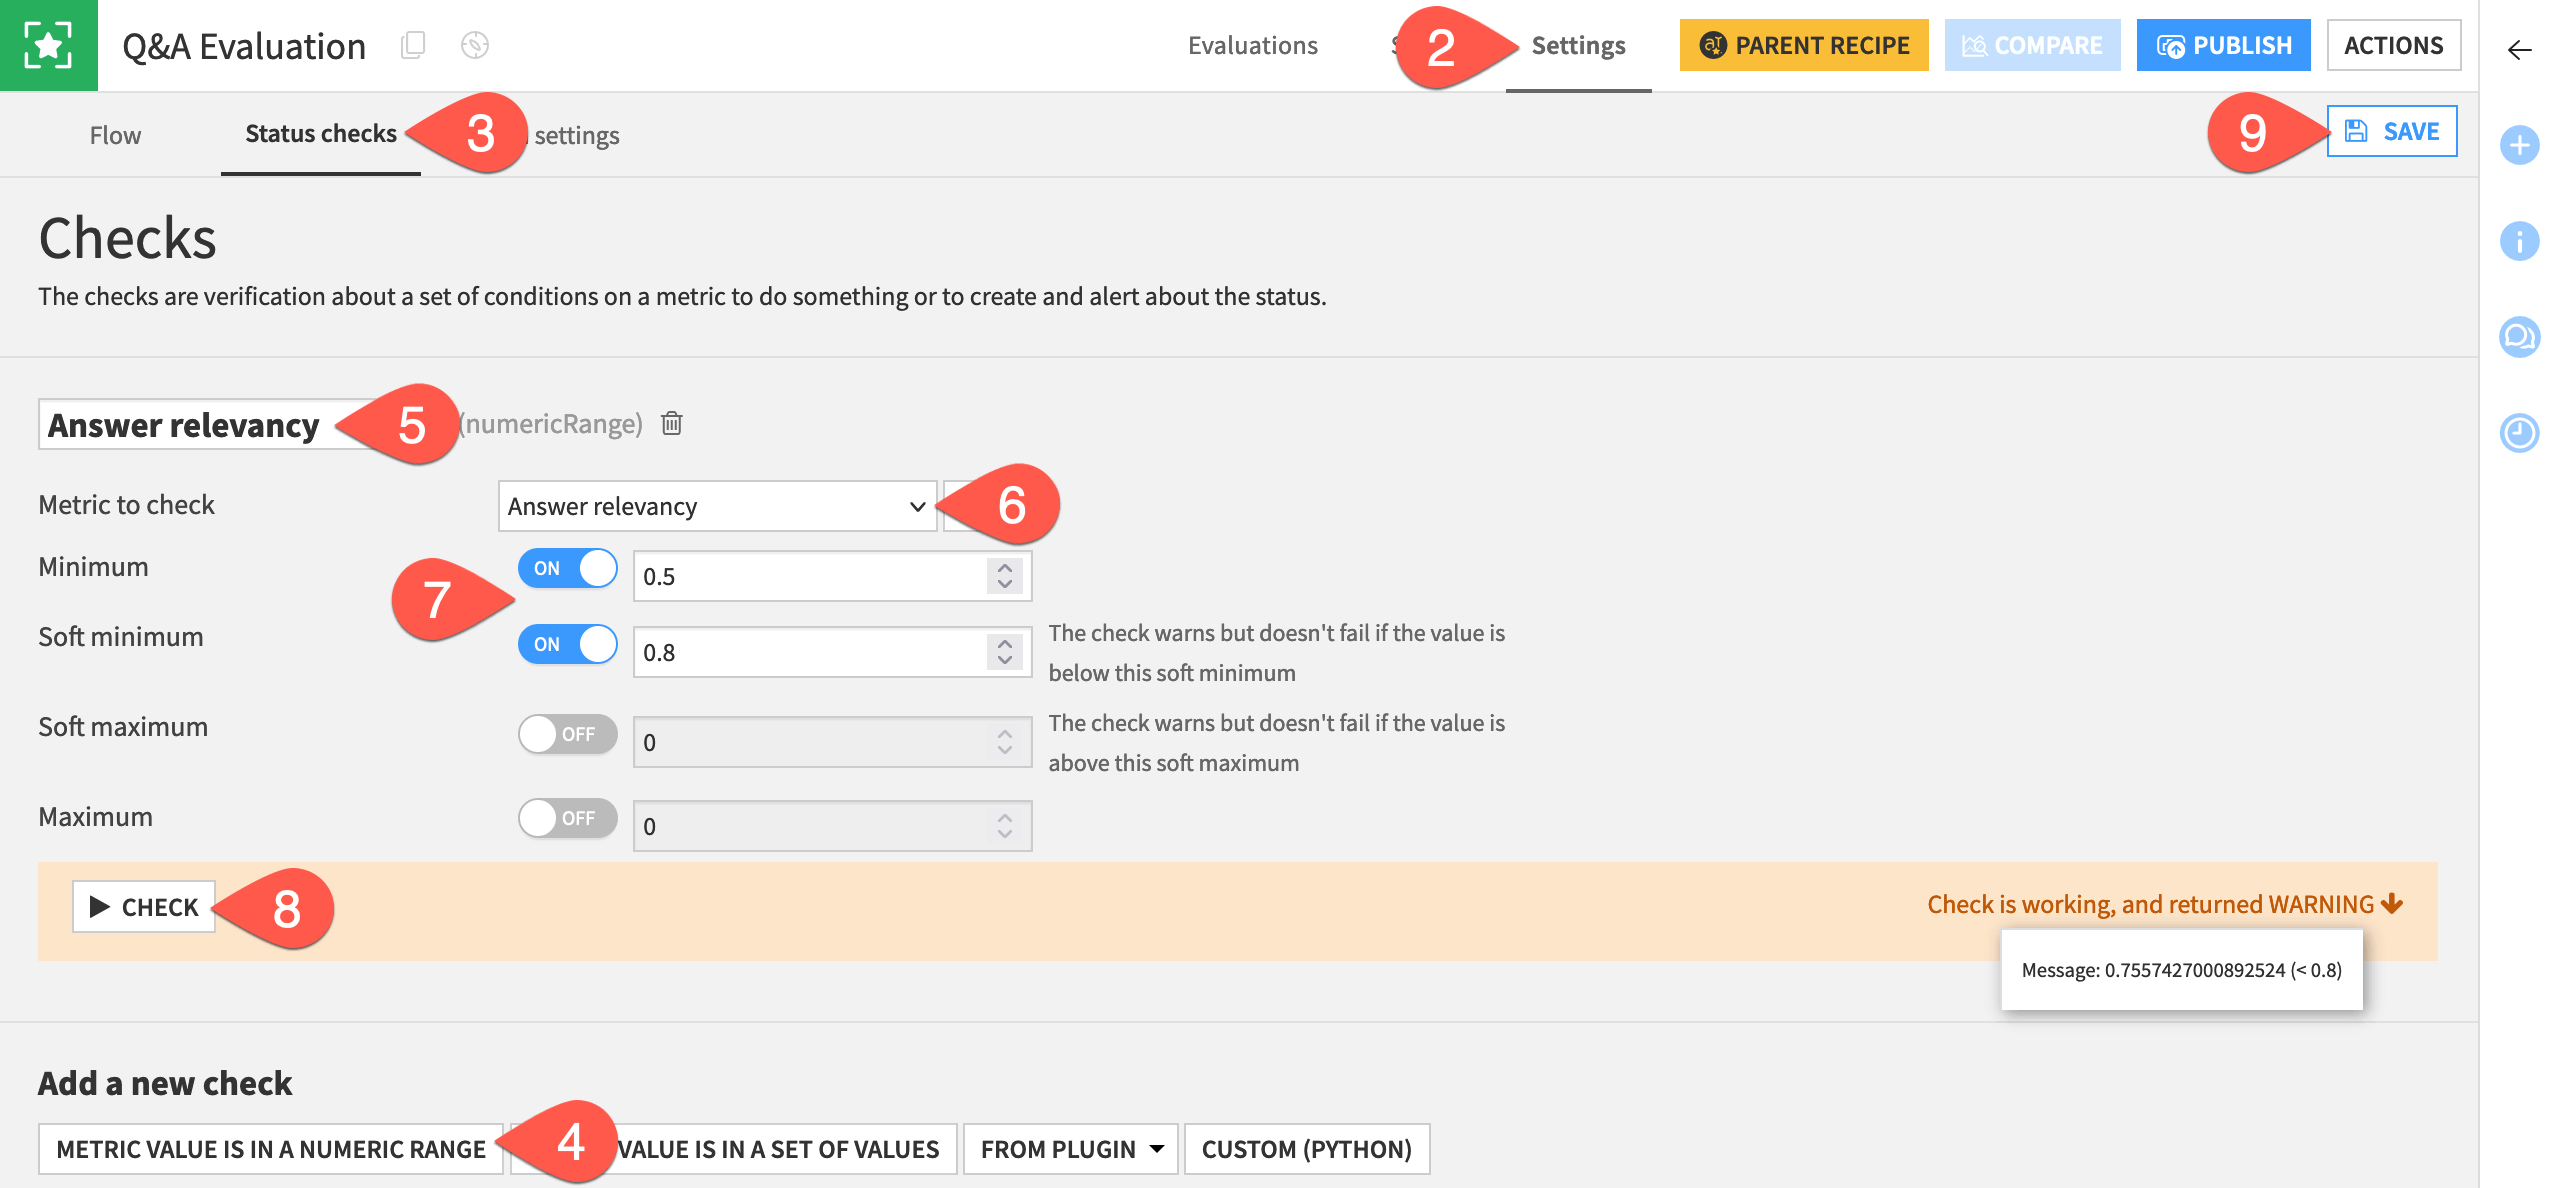
Open the Q&A Evaluation store.
Navigate to the Settings tab.
Go to the Status checks subtab.
Click Metric Value is in a Numeric Range.
Name the check
Answer relevancy.Select Answer relevancy as the metric to check.
For most metrics, you’ll often want to set minimum and soft minimum values (such as 0.5 and 0.8, respectively) to issue warnings or errors according to your use case.
Click Check to test it.
Click Save.
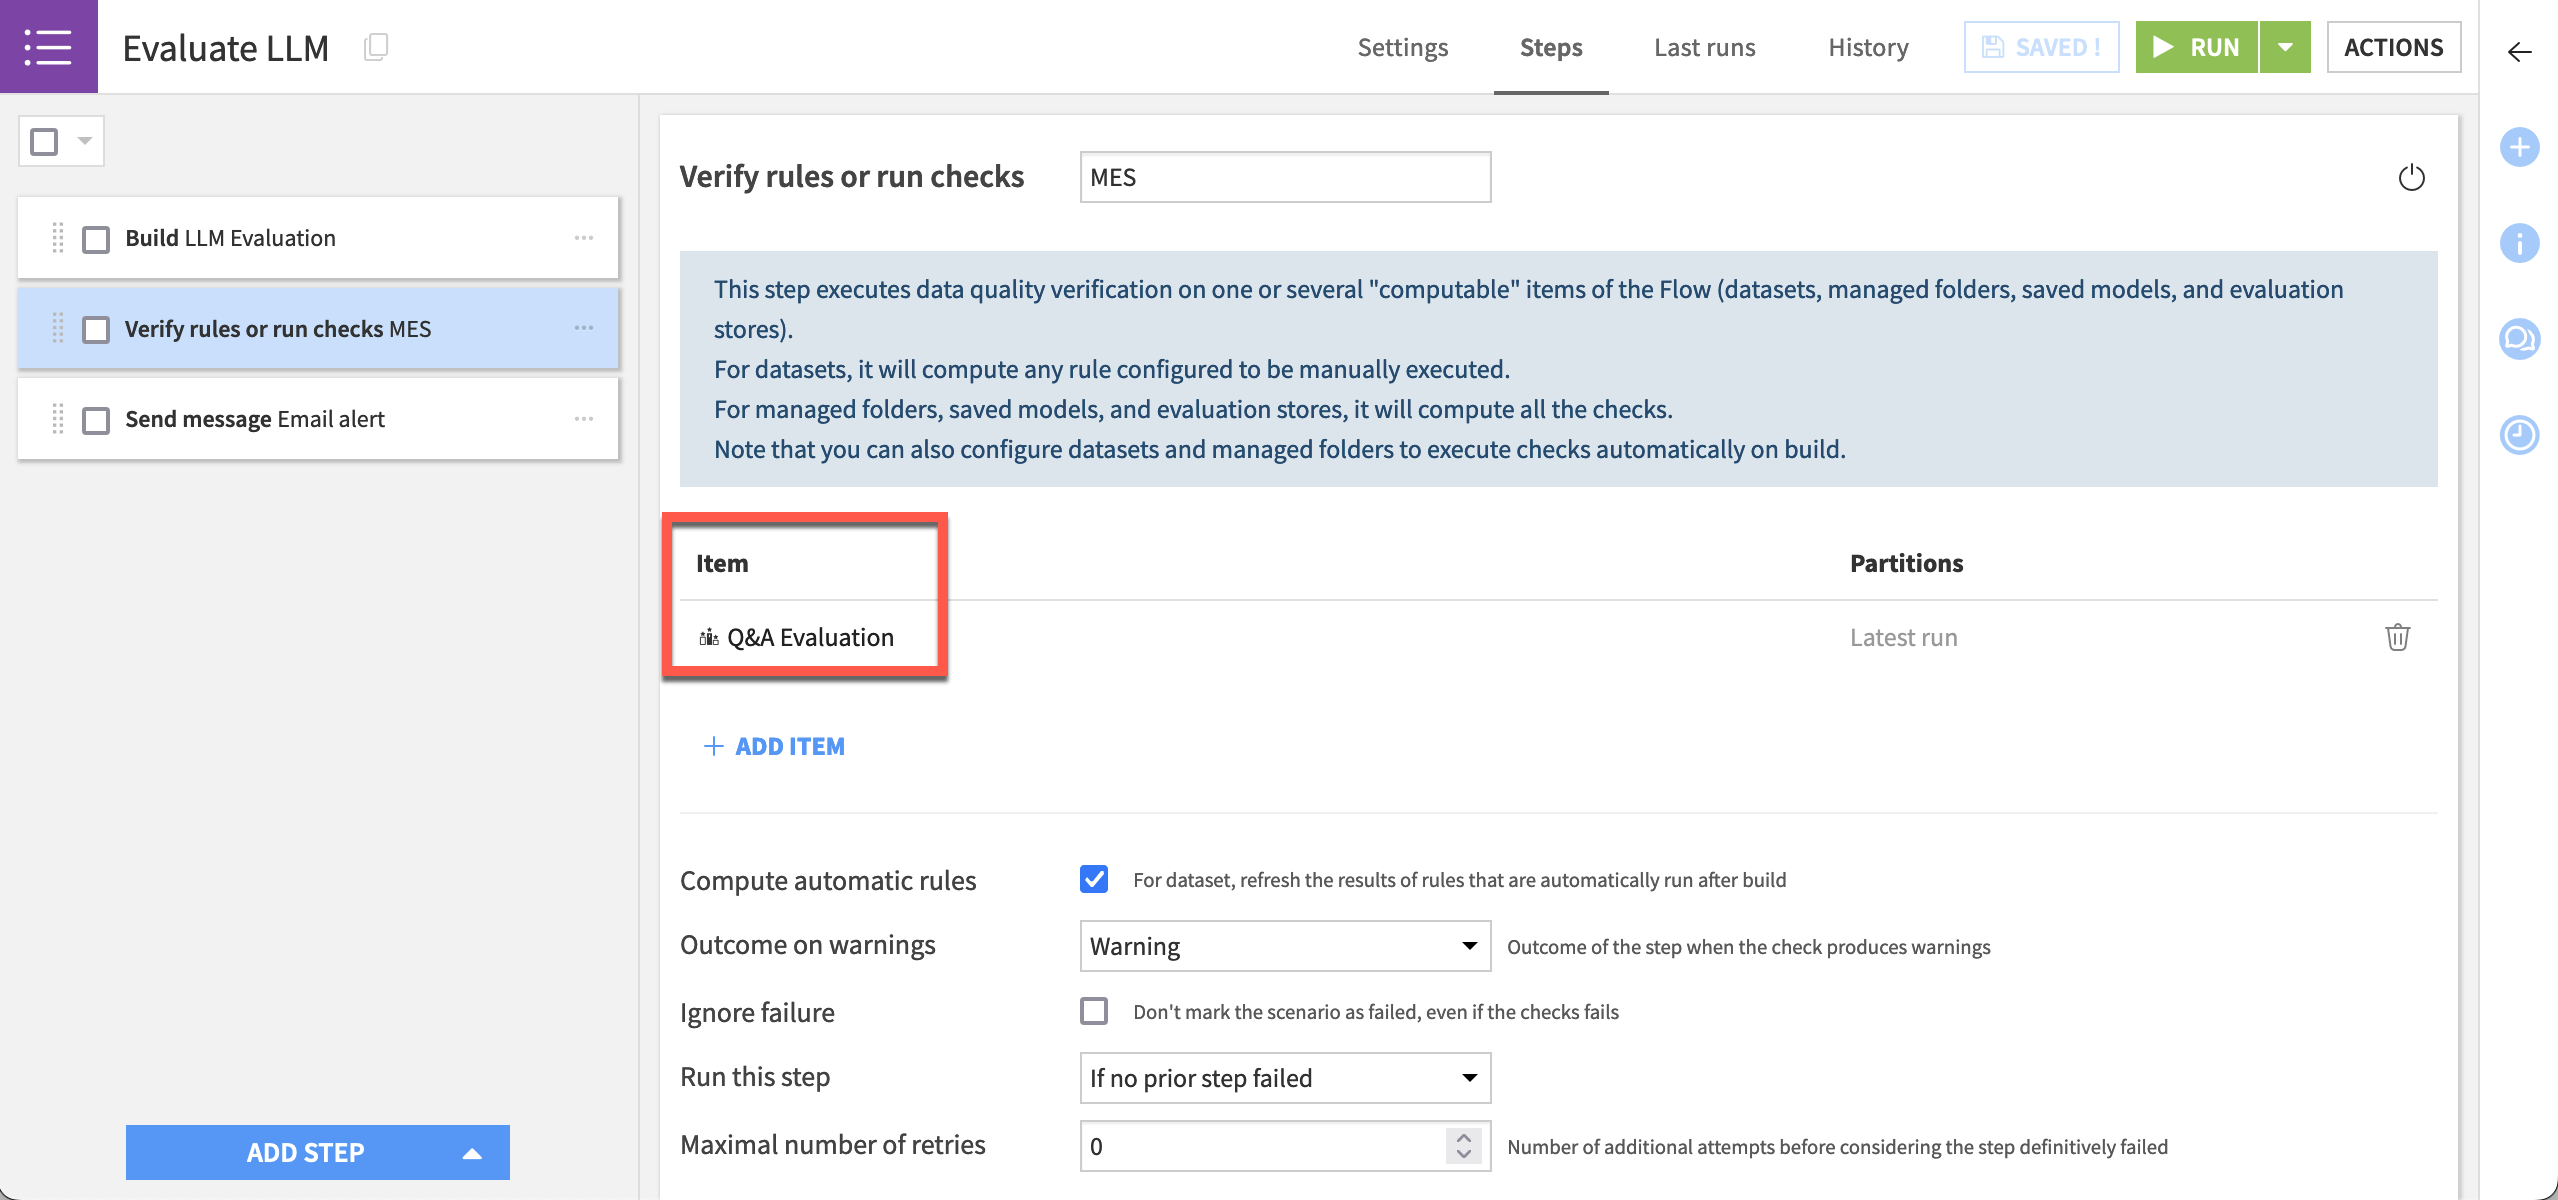
Once you have a check on a valuable metric, you can create a scenario like the one below to send a notification if it deviates from the expected range.
Important
This tutorial has focused on LLM evaluation, but there is another similar aspect: monitoring. You can use the model evaluation store for both evaluation and monitoring.
For the latter, the input dataset (in this case questions_answered_cleaned) would be the logging dataset from your production environment. From this dataset, you can select the metrics relevant to your usage, and receive progress notifications using the same kind of scenario shown here.
To learn more about working with production environments in Dataiku, see the MLOps Practitioner learning path.
Next steps#
Congratulations! You’ve seen how the Evaluate LLM recipe can assess the performance of a GenAI application. You’ve also seen how it fits into Dataiku’s broader ecosystem for GenAIOps.
If your GenAI application uses agents, see Tutorial | Agent evaluation. You’ll find a very similar experience, but with the addition of metrics to investigate the agent’s tool call trajectory.
See also
Consult the reference documentation for more information on Generative AI and LLM Mesh and Evaluating LLMs & GenAI use cases.