
Version a deployed project#
As you monitor the health of deployments, you’ll need to deploy updated versions of projects over time — especially since this one is already failing!
Where to make changes to a project#
When it’s necessary to make a change to a deployed project, it’s critical to make all such changes in the development environment (the Design node). Only then should you push a new bundle to the production environment (the Automation node).
It may be tempting to make a quick change to the project on the Automation node. However, you should avoid this temptation because the project in the production environment would no longer be synced with its counterpart in the development environment.
Consider a situation where you want to revert back to an earlier version of the project. If you’ve made changes in the Automation node, you will lose these changes. Accordingly, actual development should always happen in the Design node. You should publish new versions of bundles from there.
Fix the failing scenario#
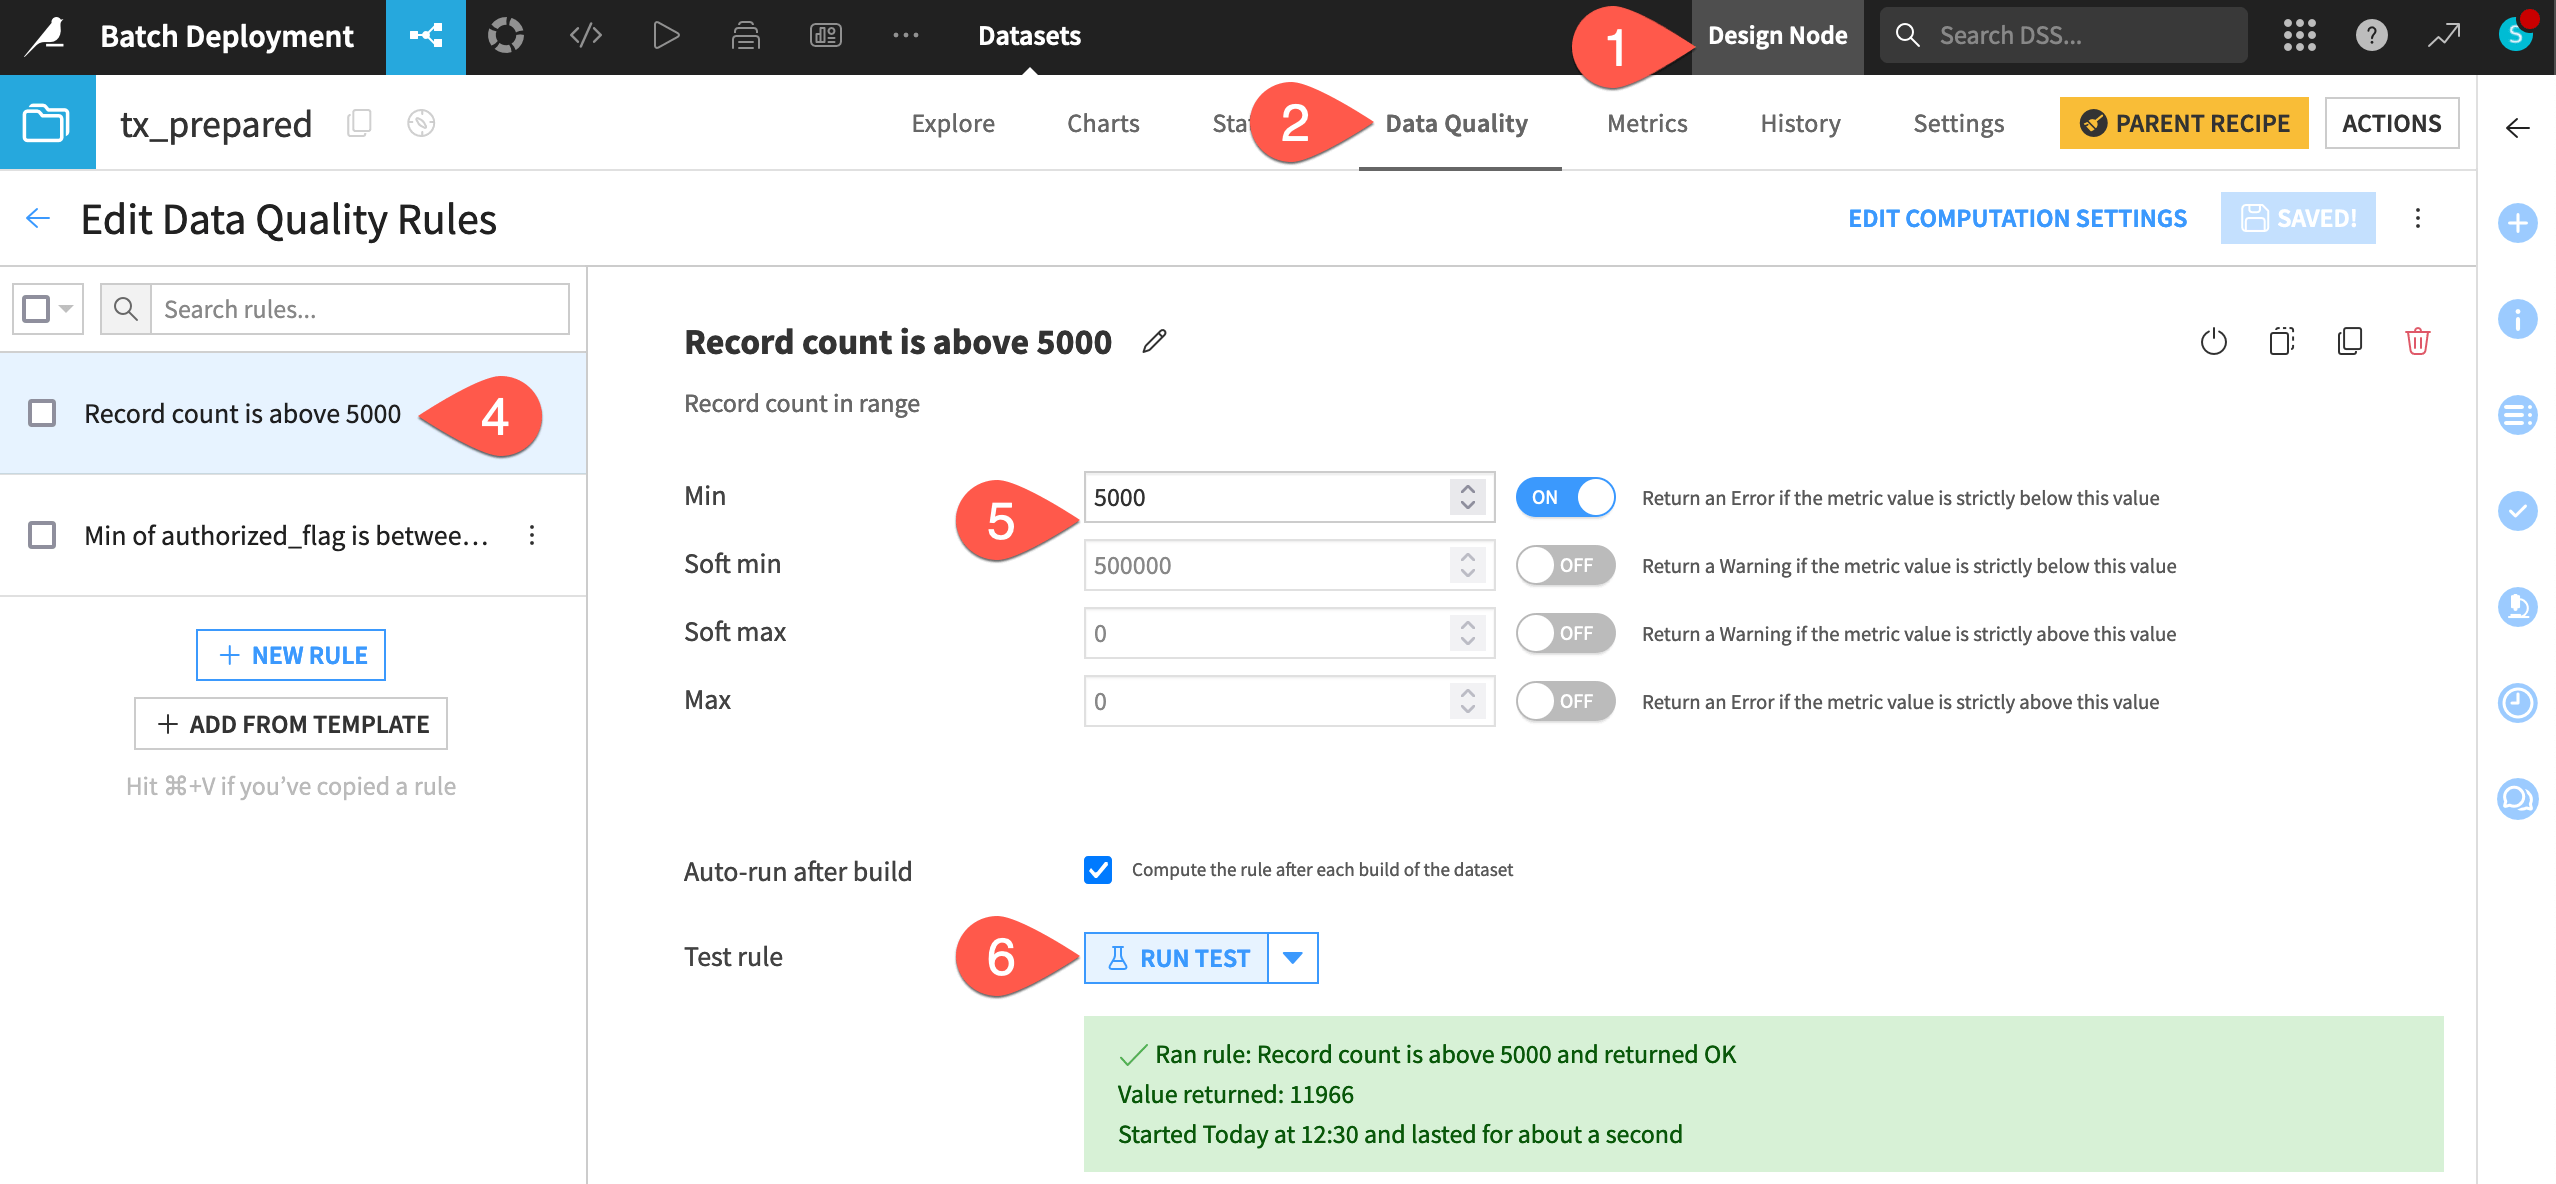
Taking this advice, return to the Design node project. You know the source of the problem is a data quality rule on the tx_prepared dataset. Fix it so the scenario can succeed.
In the Design node project, open the tx_prepared dataset. If it’s empty, build it.
Navigate to the Data Quality tab.
Click Edit Rules.
Select the Record count rule.
Decrease the min to
5000, and turn Off the soft min.Click Run Test to confirm it returns OK.
Create a second bundle#
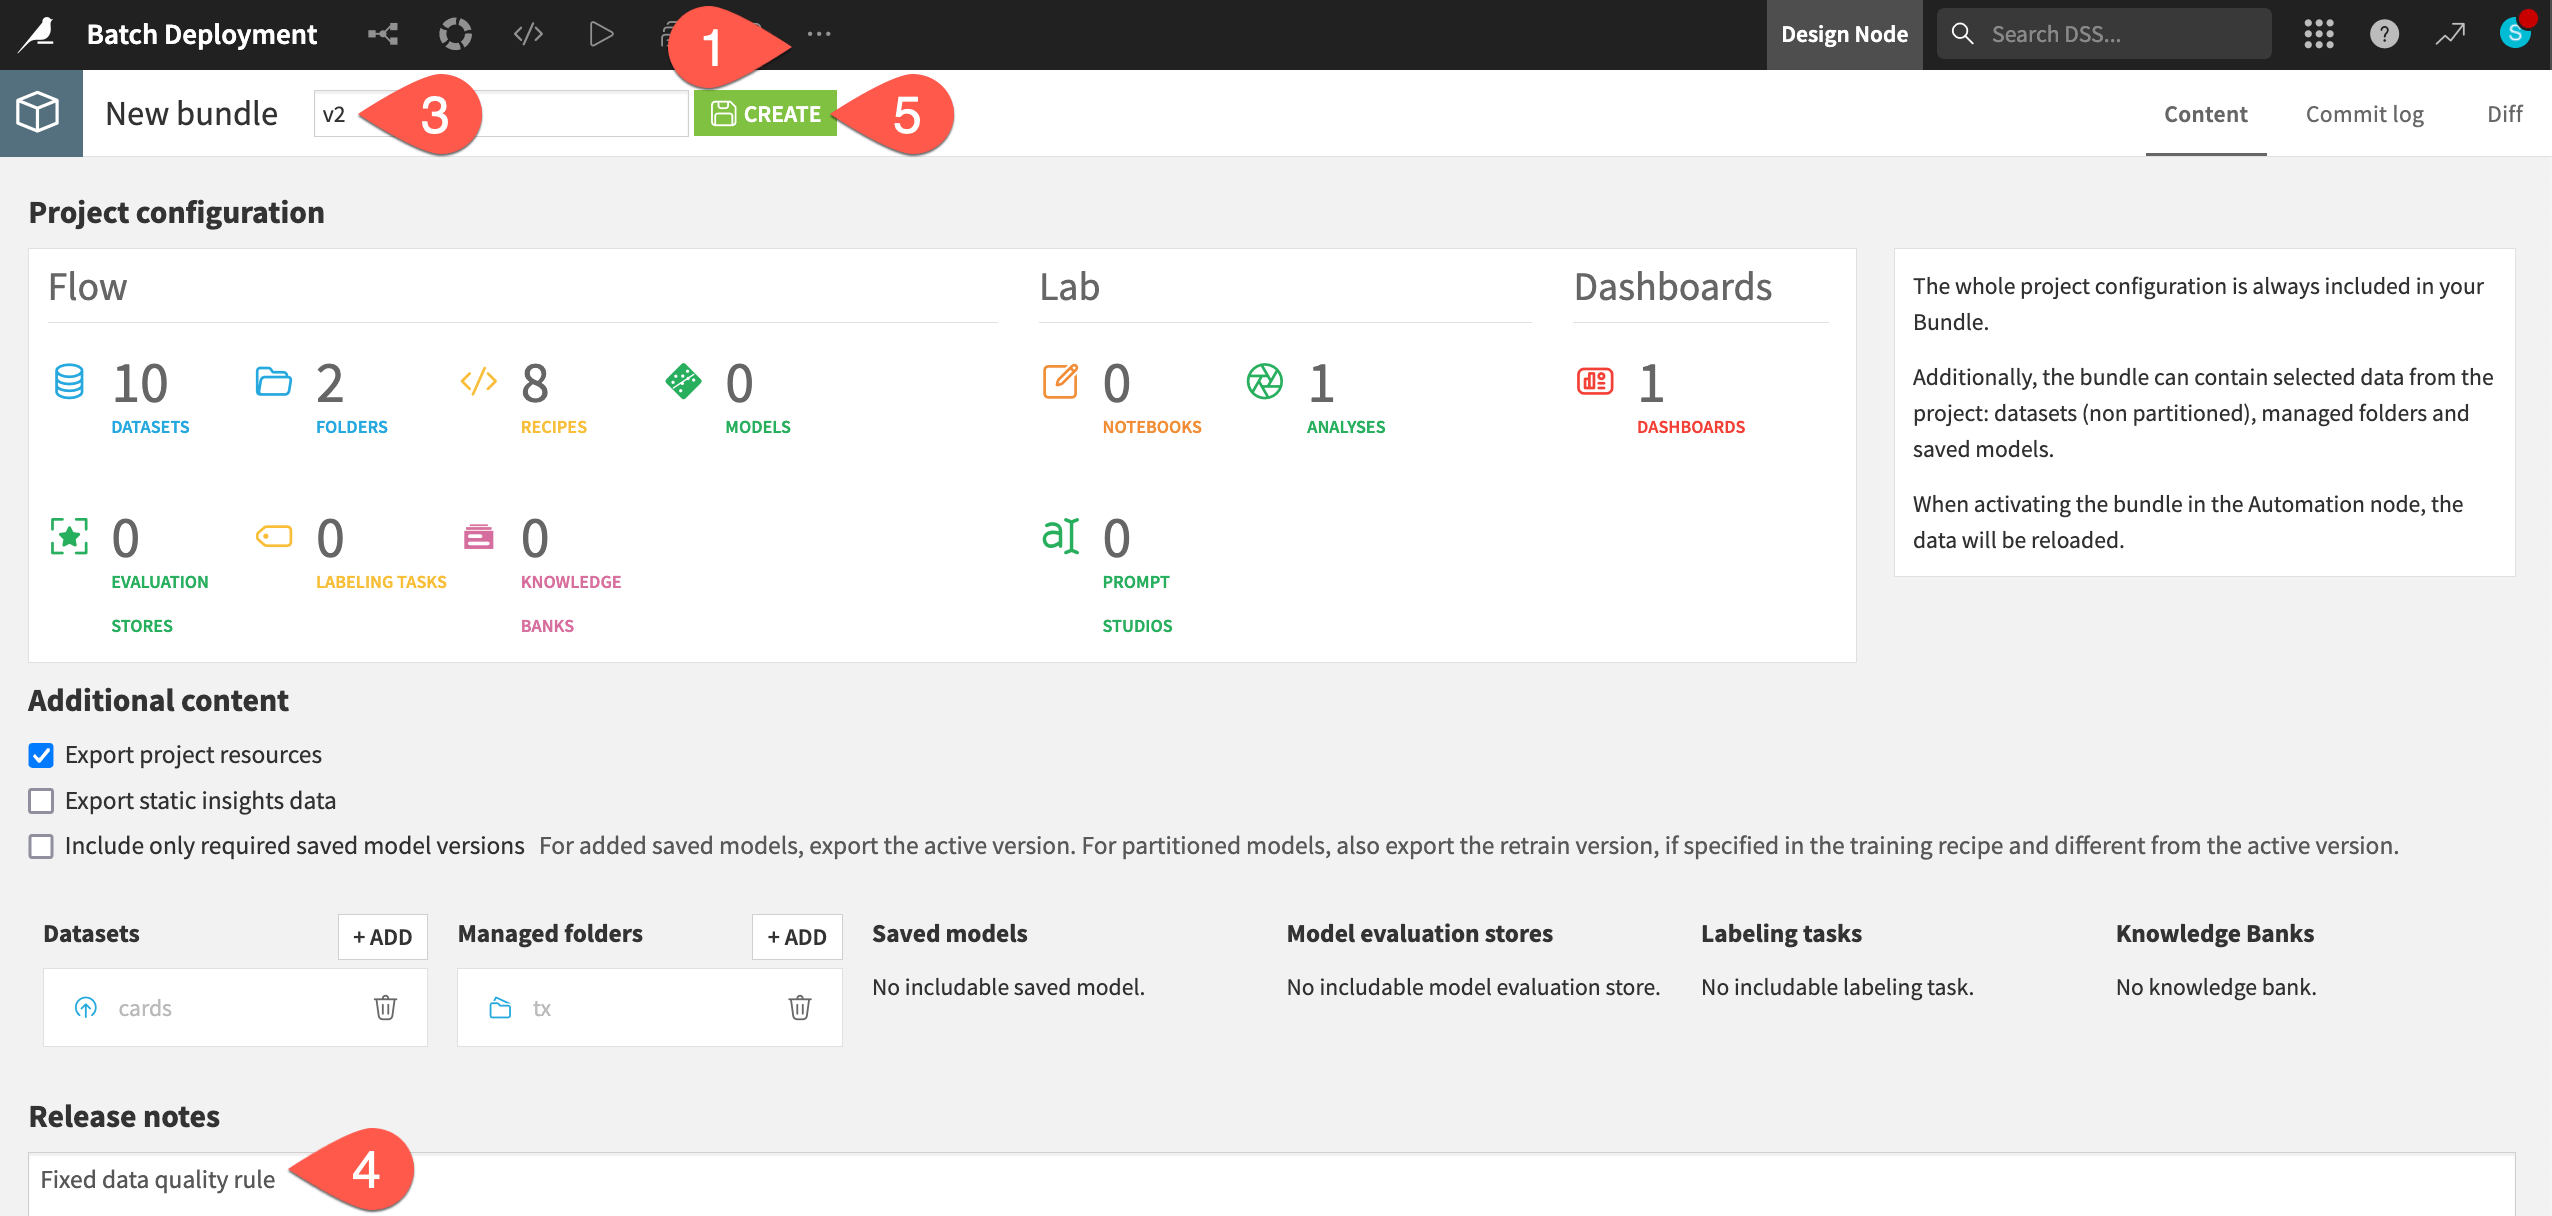
With the scenario’s problem fixed, update the existing deployment with a new bundle.
From the More Options (
 ) menu of the top navigation bar, select Bundles.
Click + New Bundle.
Name it
v2.In the release notes, add
Fixed data quality rule.Click Create.
Tip
Subsequent bundles inherit the configuration of their predecessor. In this case, the second bundle already includes the uploaded dataset and the managed folder.
Deploy the new bundle#
The process for deploying the new bundle is the same as for the first one.
Click on the newly created v2 bundle, and click Publish on Deployer.
Confirm that you indeed want to Publish on Deployer.
Click to Open in Deployer to view the bundle details on the Deployer.
Once on the Deployer, click Deploy on the v2 bundle.
You have the option to create a new deployment or update the existing one.
Since this is a new version of an existing deployment, verify Update is selected, and click OK.
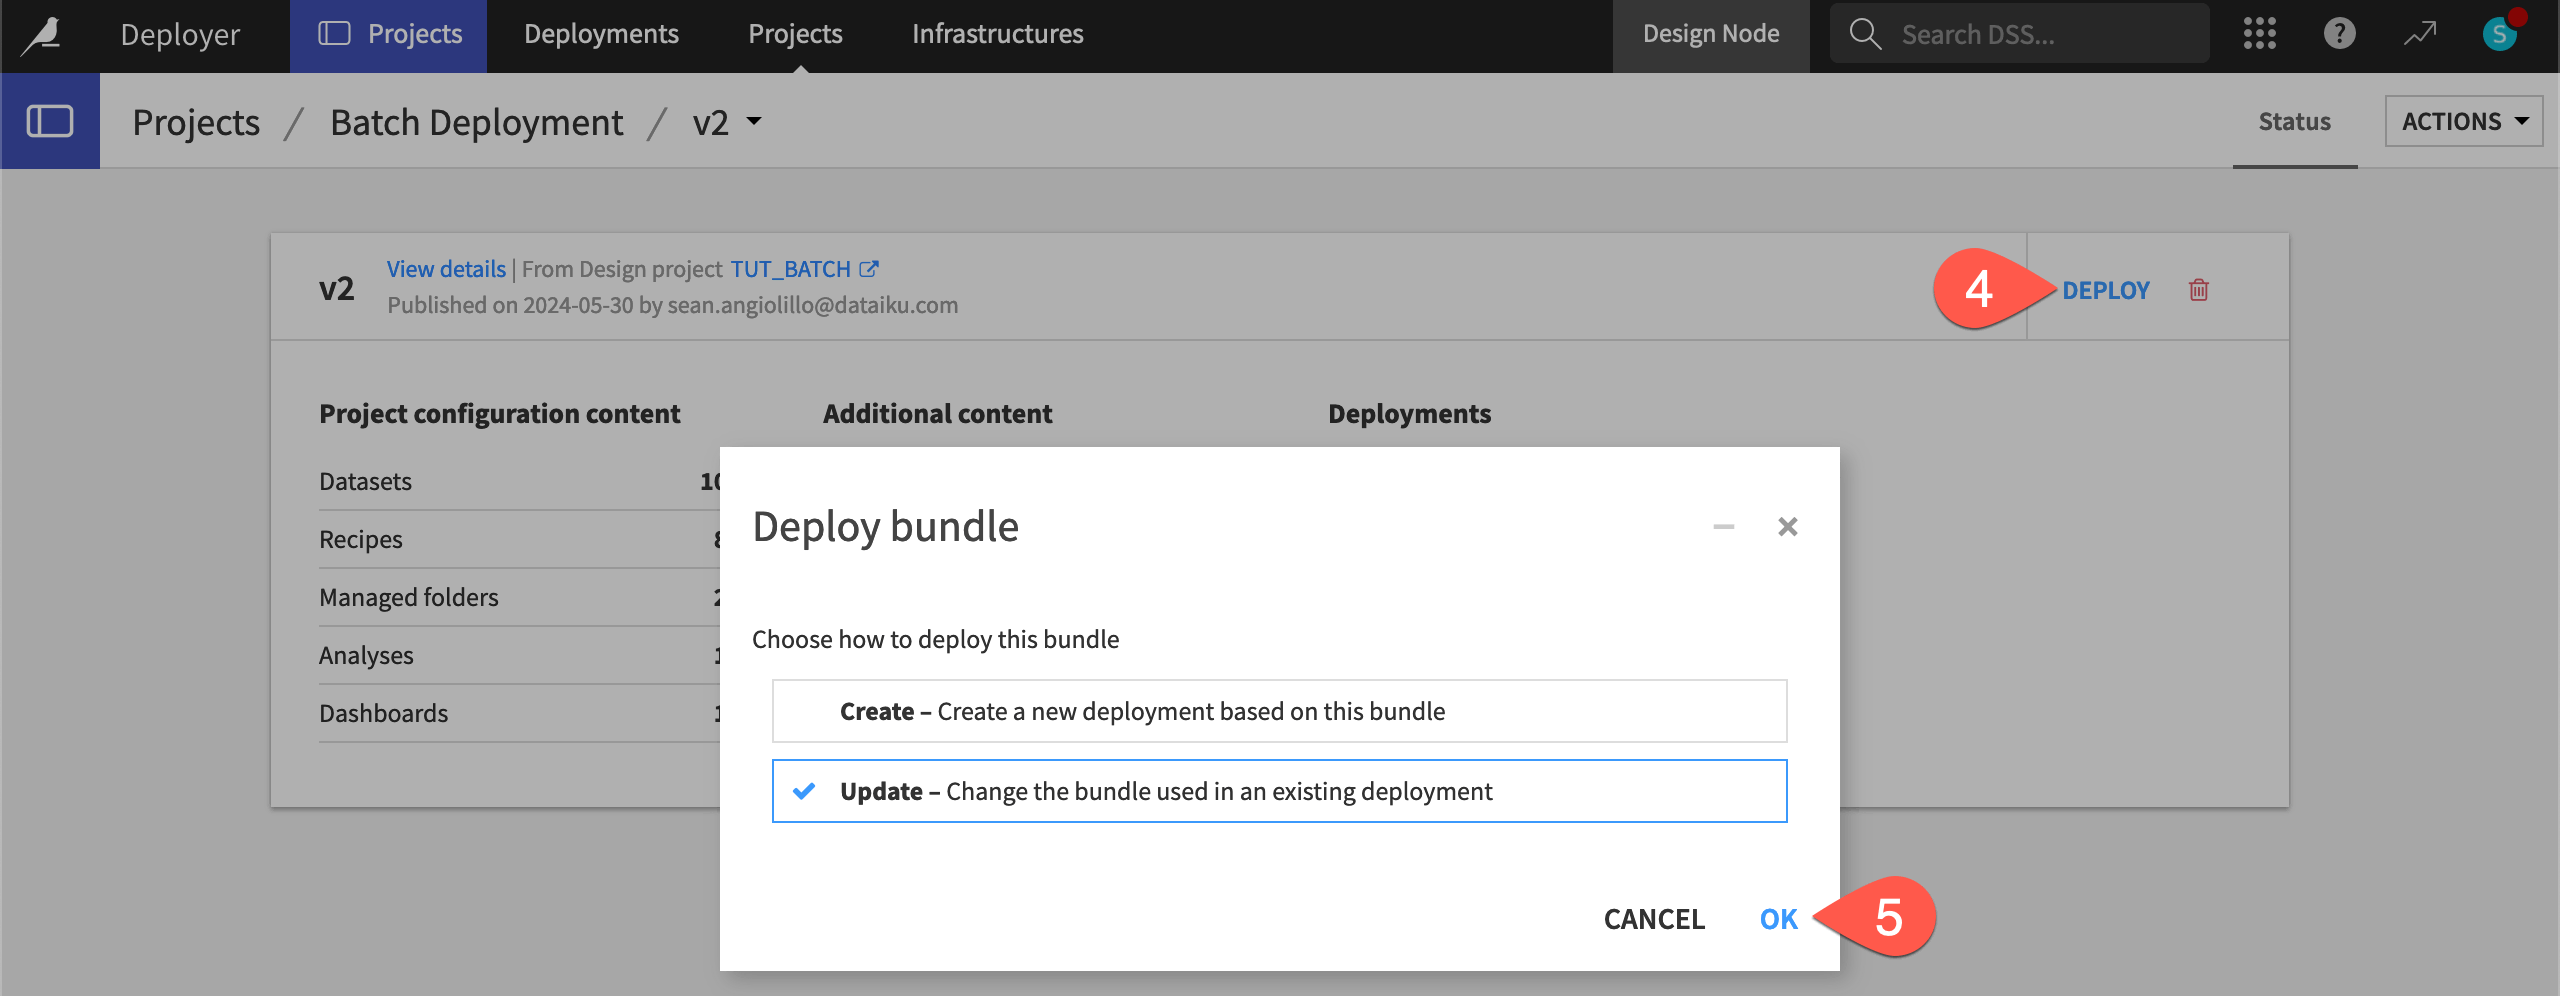
Click OK again to confirm the deployment you want to edit.
You’re not done yet!
Navigate to the Status tab of the deployment, and note how Dataiku warns that the active bundle on the Automation node doesn’t match the configured bundle.
Click the Update button to deploy the new bundle. Then Confirm.
Refresh the page to see v2 as the active bundle in the deployment’s Status tab.
Tip
You can track changes to a deployment in the Last Updates tab. If you’ve followed the tutorial, you’ll see three updates: one for the initial deployment, one for disabling the automatic scenario triggers, and one for deploying the v2 bundle.
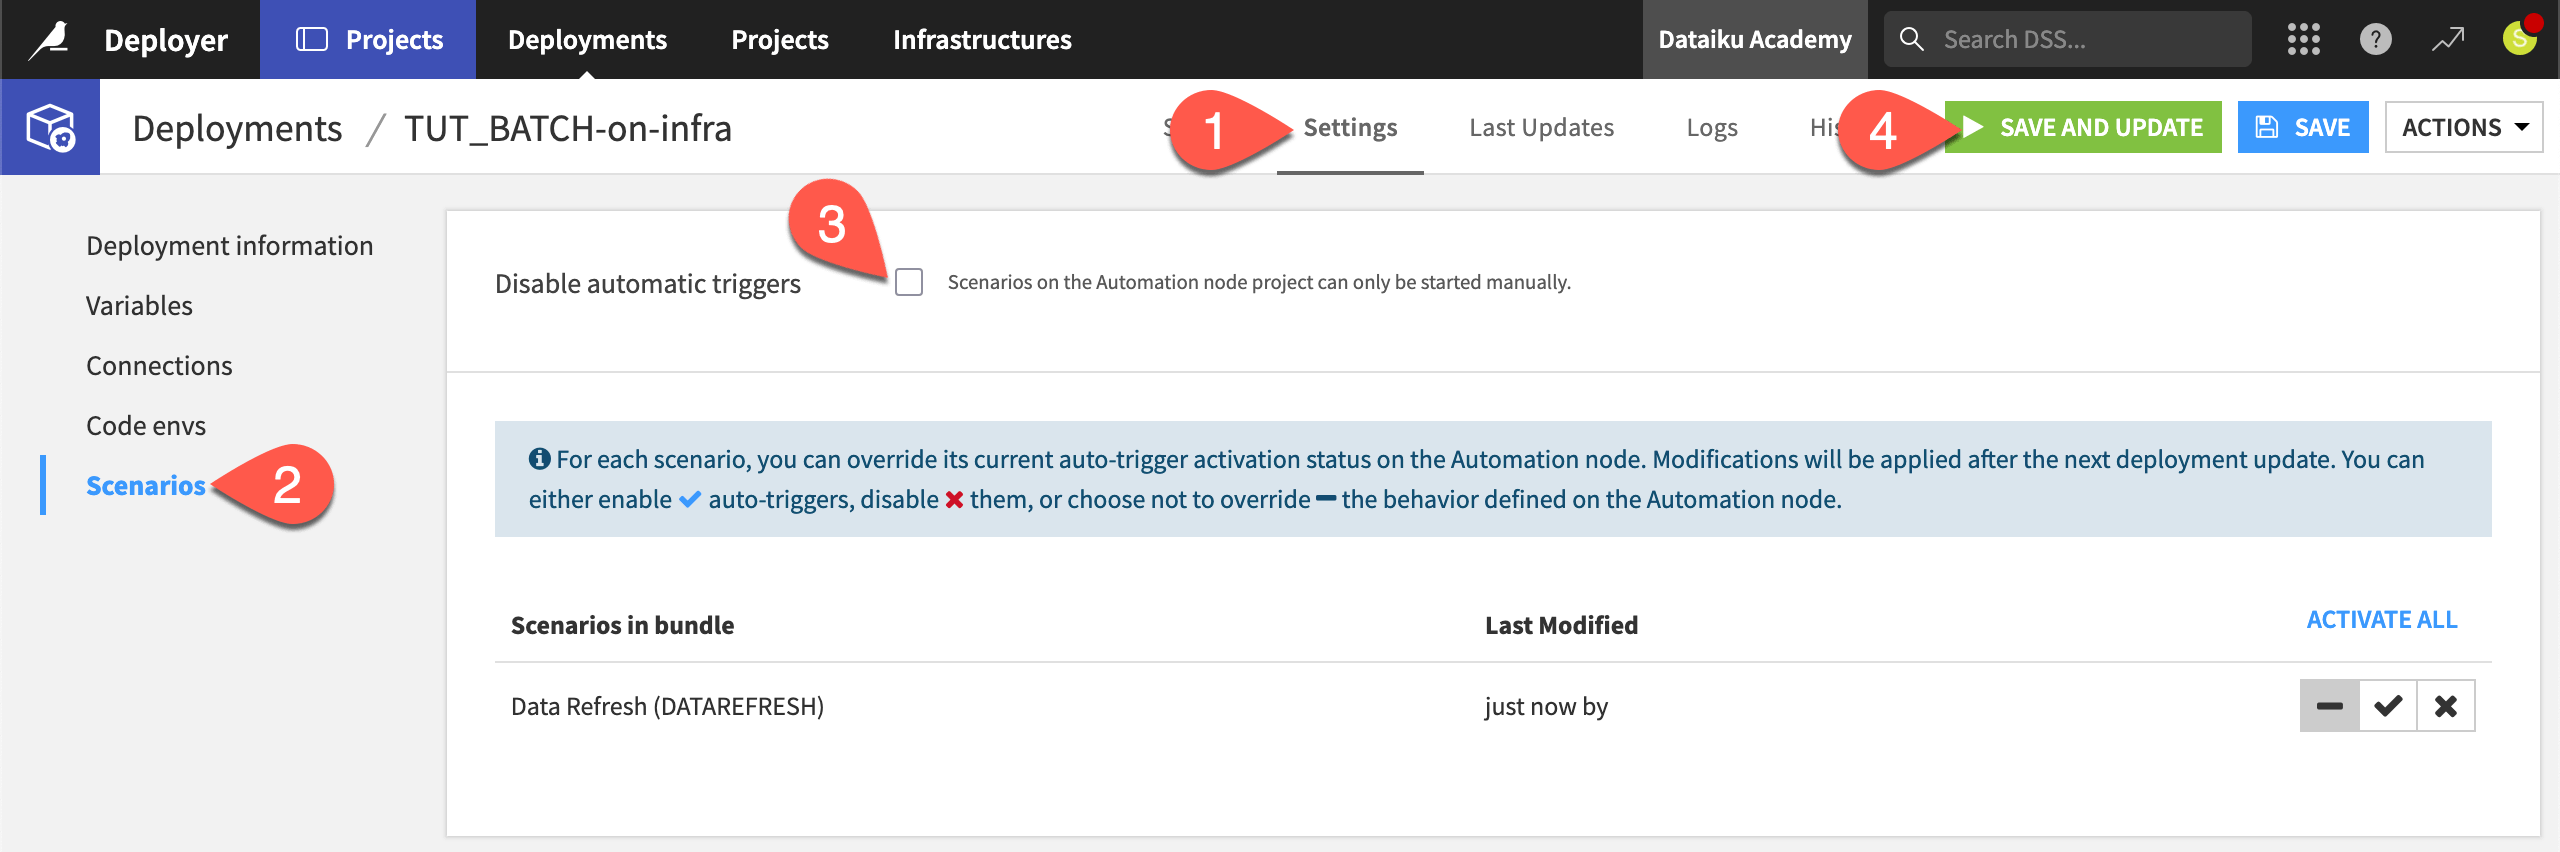
Activate a scenario from the Deployer#
Previously you activated the scenario directly from the Automation node project. Now control it from the Project Deployer.
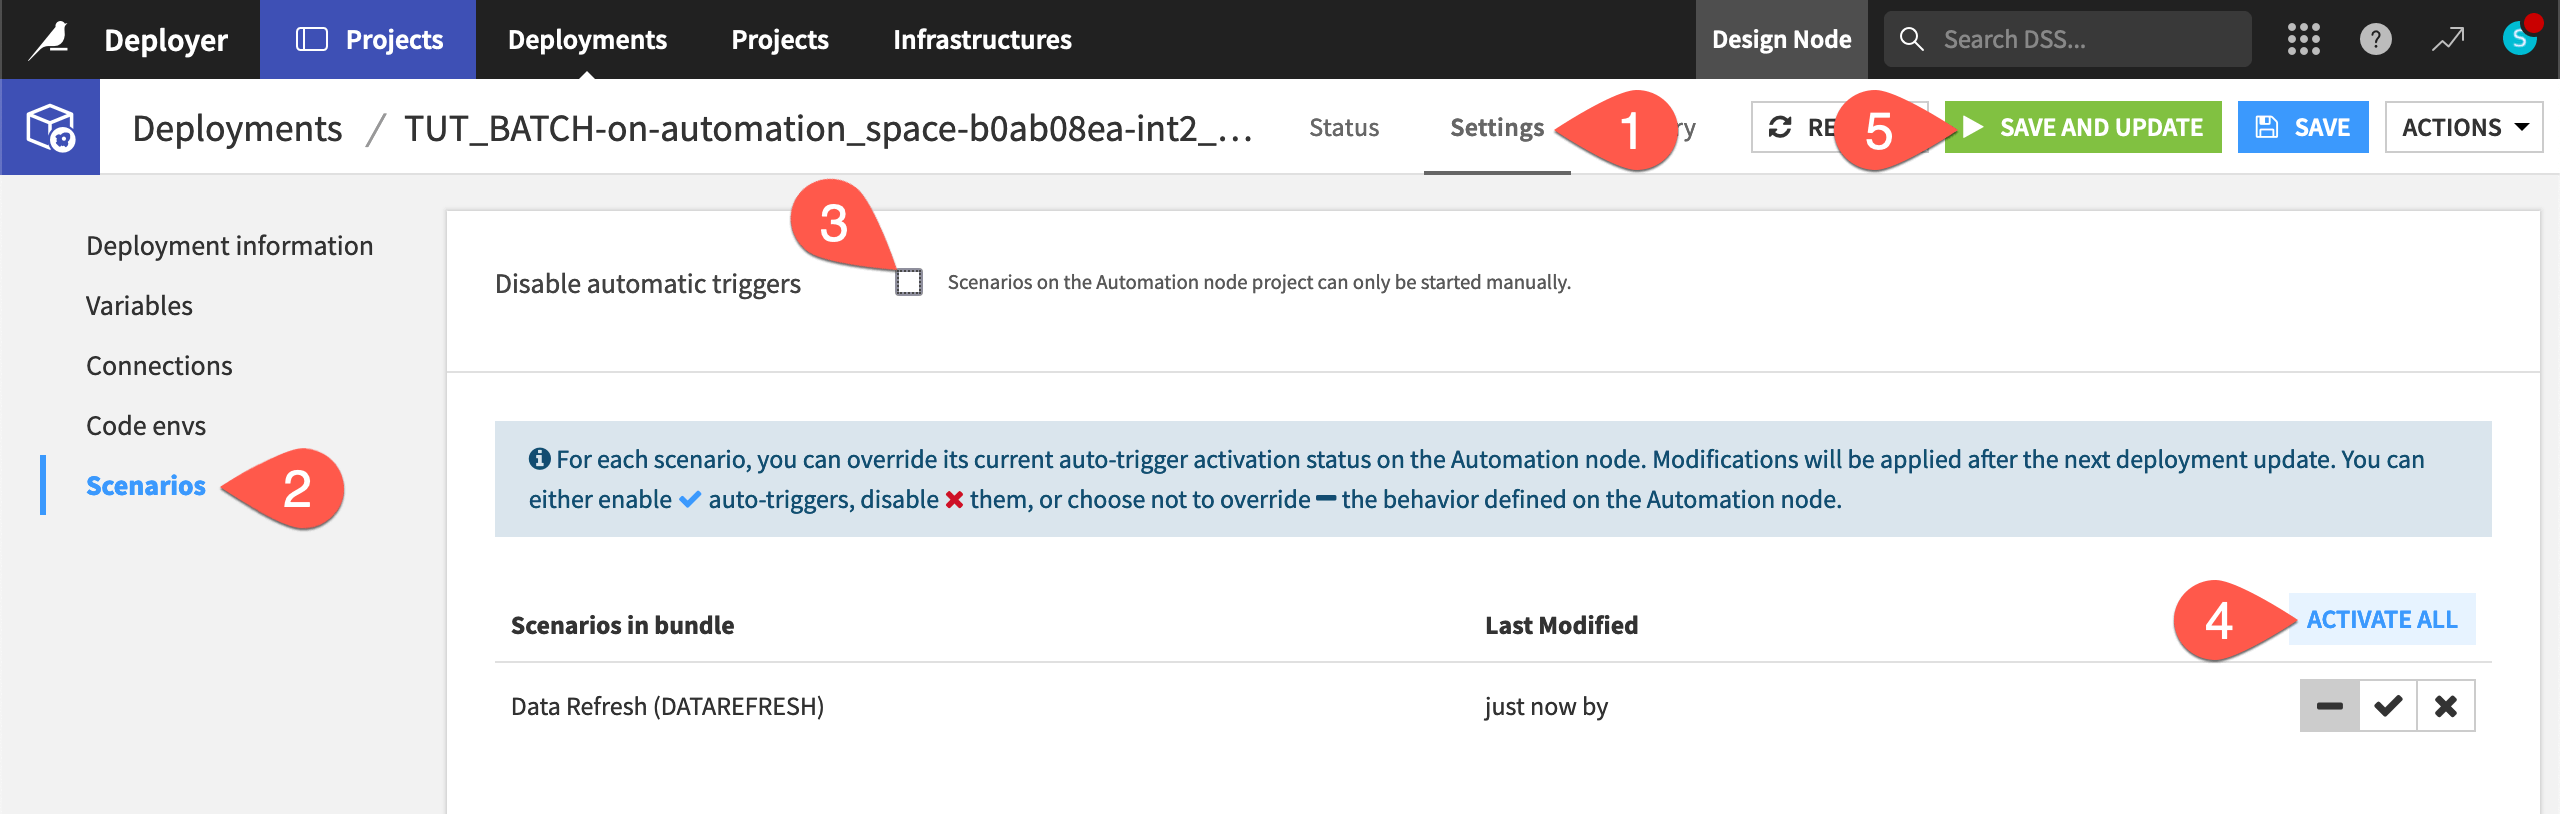
Navigate to the Settings tab of the deployment.
Go to the Scenarios panel.
Uncheck the box for Disable automatic triggers.
Click Activate All to enable the auto-triggers for any scenario.
Click Save and Update and then Confirm.
Tip
Once you’ve done this, verify the scenario in the v2 bundle ran successfully! You can check this on the Automation project or the Project Deployer.
Keeping in mind the synchronization interval, you can also view this on the Unified Monitoring page. Fixing the data quality rule means the data status should be OK. In turn, the successfully running scenario means the execution status should be OK. Therefore, given that the model and governance statuses are empty, the global status should also be OK.
Revert to a previous bundle#
It’s also important to be able to revert to an earlier version, should a new bundle not work as expected.
From the Deployments tab of the Project Deployer, find the project in the left hand panel.
Click Deploy next to the v1 bundle.
With Update selected, click OK, and confirm this is correct.

Now on the Settings tab with v1 as the source bundle, click the Update button, and Confirm the change.
Return to the Status tab of this deployment, or open the project homepage on the Automation node. Confirm that v1 is once again the active bundle running in production.
See also
See the reference documentation to learn more about reverting bundles.
Disable automatic scenario triggers#
Before you finish, don’t forget to turn off any running scenarios!
In the Project Deployer, go to the Settings tab of the active deployment.
Go to the Scenarios panel.
Click Disable automatic triggers.
Click Save and Update, and then Confirm.
Next steps#
Congratulations! To recap, in this tutorial, you:
Created a bundle in a project on the Design node.
Published a bundle to the Automation node via the Deployer.
Activated (and deactivated) a scenario to run on the Automation node.
Saw where to monitor the health of deployments.
Switched bundle versions within a deployment.
Now you have seen the batch processing framework for production. Your next step may be to examine the real-time API scoring method of production presented in the API Deployment course.
See also
For more information on bundle deployment, see the reference documentation on Production deployments and bundles.