

Optional: Update a project deployment automatically#
Congratulations on putting your first project bundles into production! Under this batch scoring framework, our project will be able to run in a dedicated production environment.
As your MLOps setup becomes more sophisticated, you can rely on automation to do more. You can run scenarios that not only monitor model performance or data drift, but also retrain models based on this information.
It’s also possible to go one step further once a deployment is created. You can automatically create new bundles and update project deployments when certain conditions are met. Let’s try that next!
Start with a retrain model scenario#
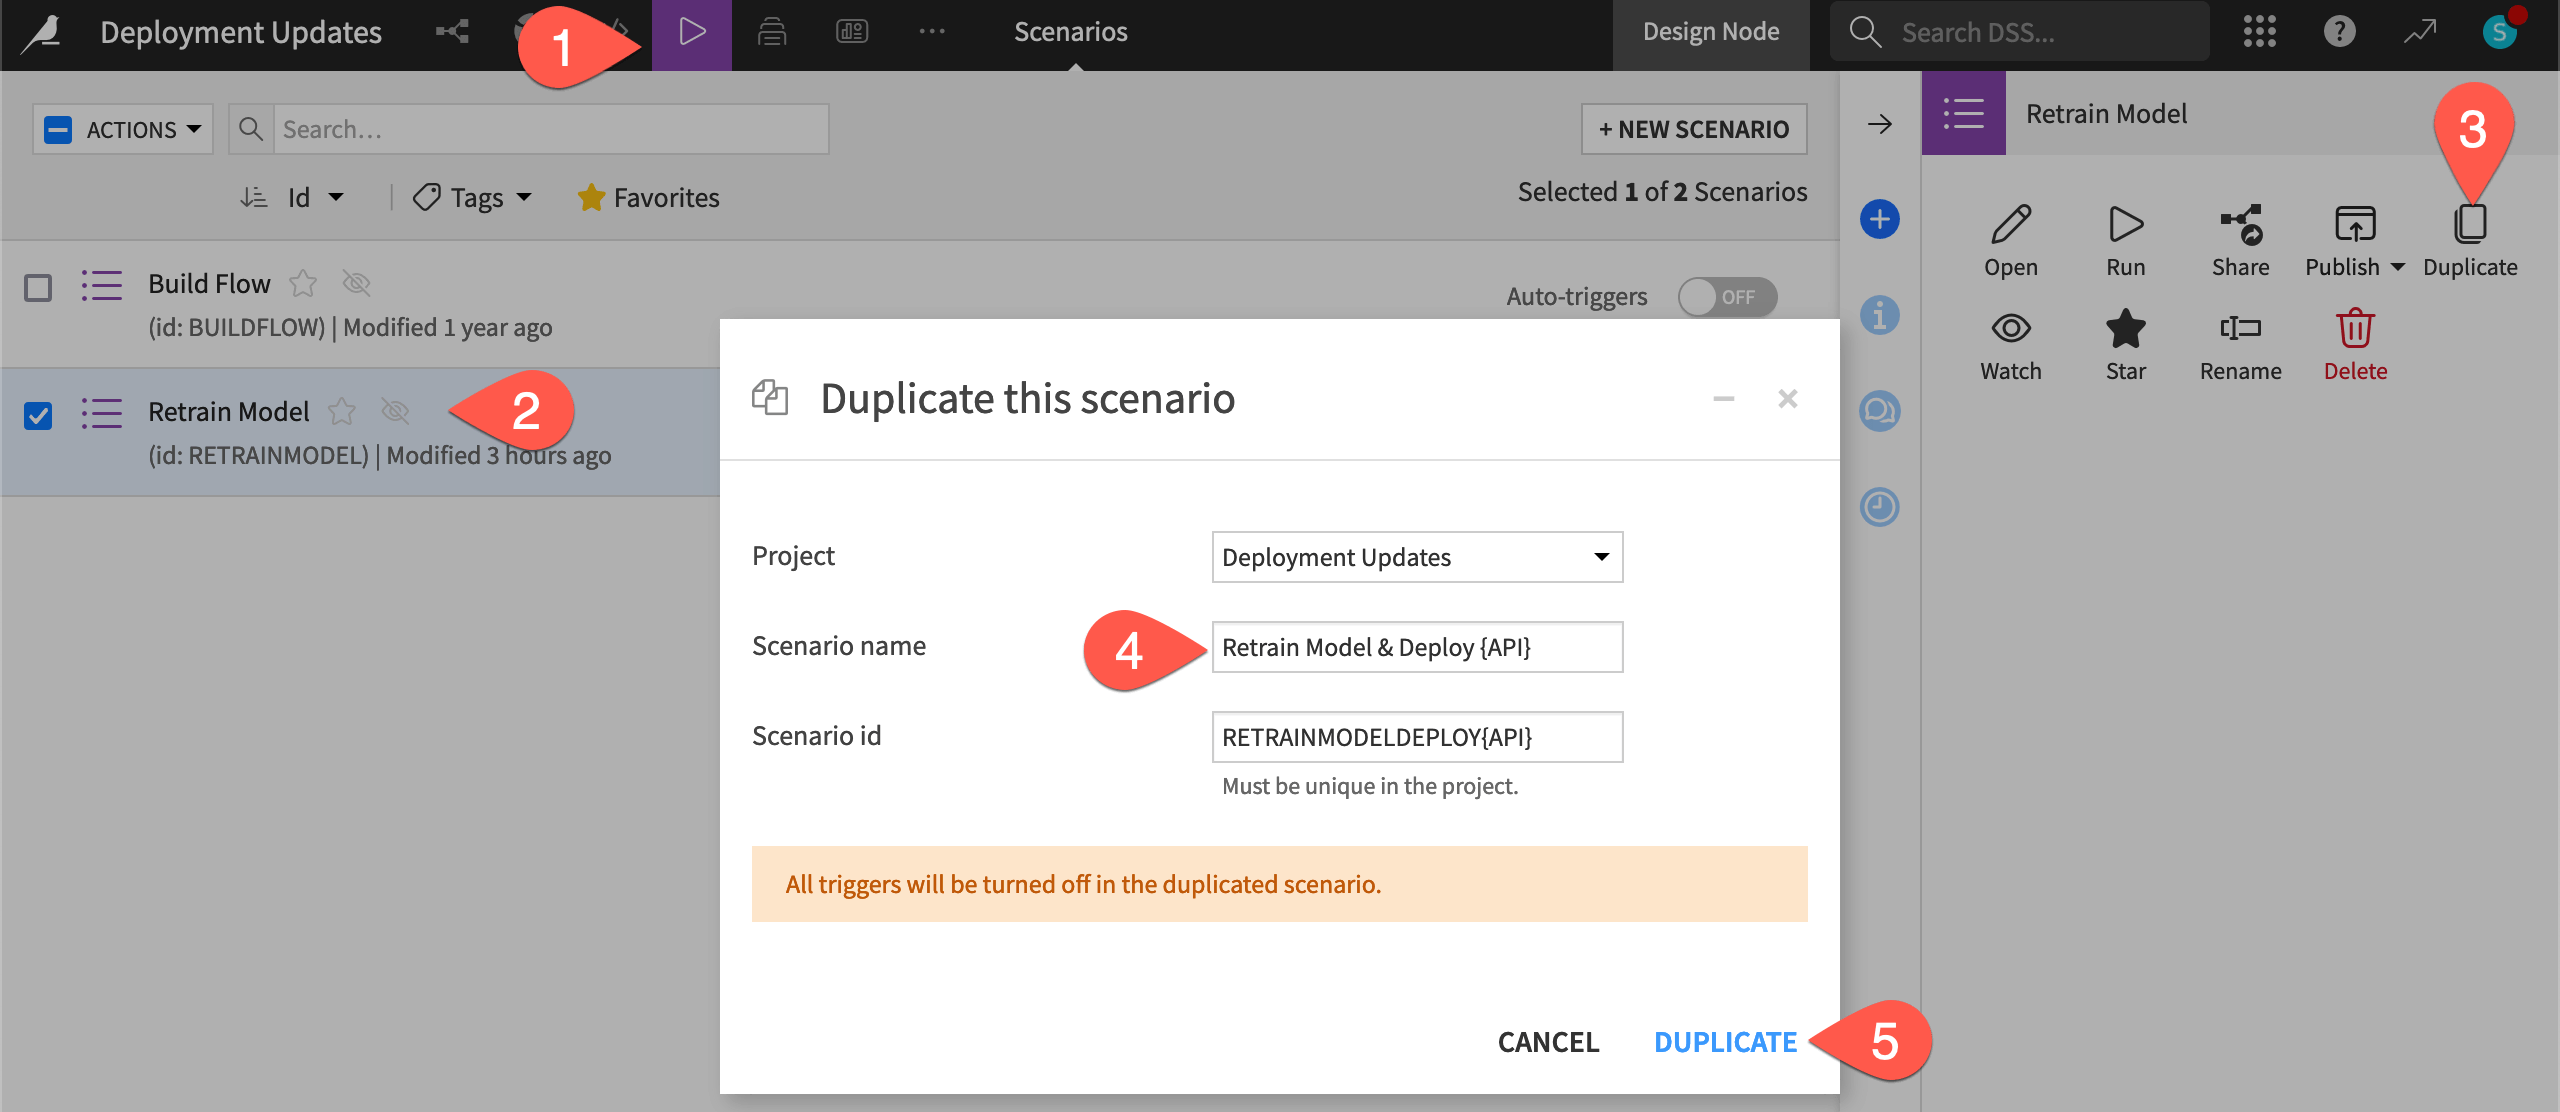
Let’s start by duplicating a scenario that retrains the model if the data drift metric fails. In other words, this scenario retrains the model when our chosen metric in the model evaluation store exceeds the specified threshold.
Navigate to the Scenarios page from the top navigation bar.
Check the box to the left of the Retrain Model scenario to open the Actions tab.
Click Duplicate.
Name it
Retrain Model & Deploy.Click Duplicate.
Note
To learn more about the Retrain Model scenario, see Tutorial | Model monitoring basics.
Add a create bundle step#
In the current scenario, the step that retrains the model runs only if a previous step (in our case the MES check) fails. However, the box is ticked to reset the failure state, and so this scenario can continue with other steps.
Let’s proceed with creating the bundle in cases where a new model is retrained.
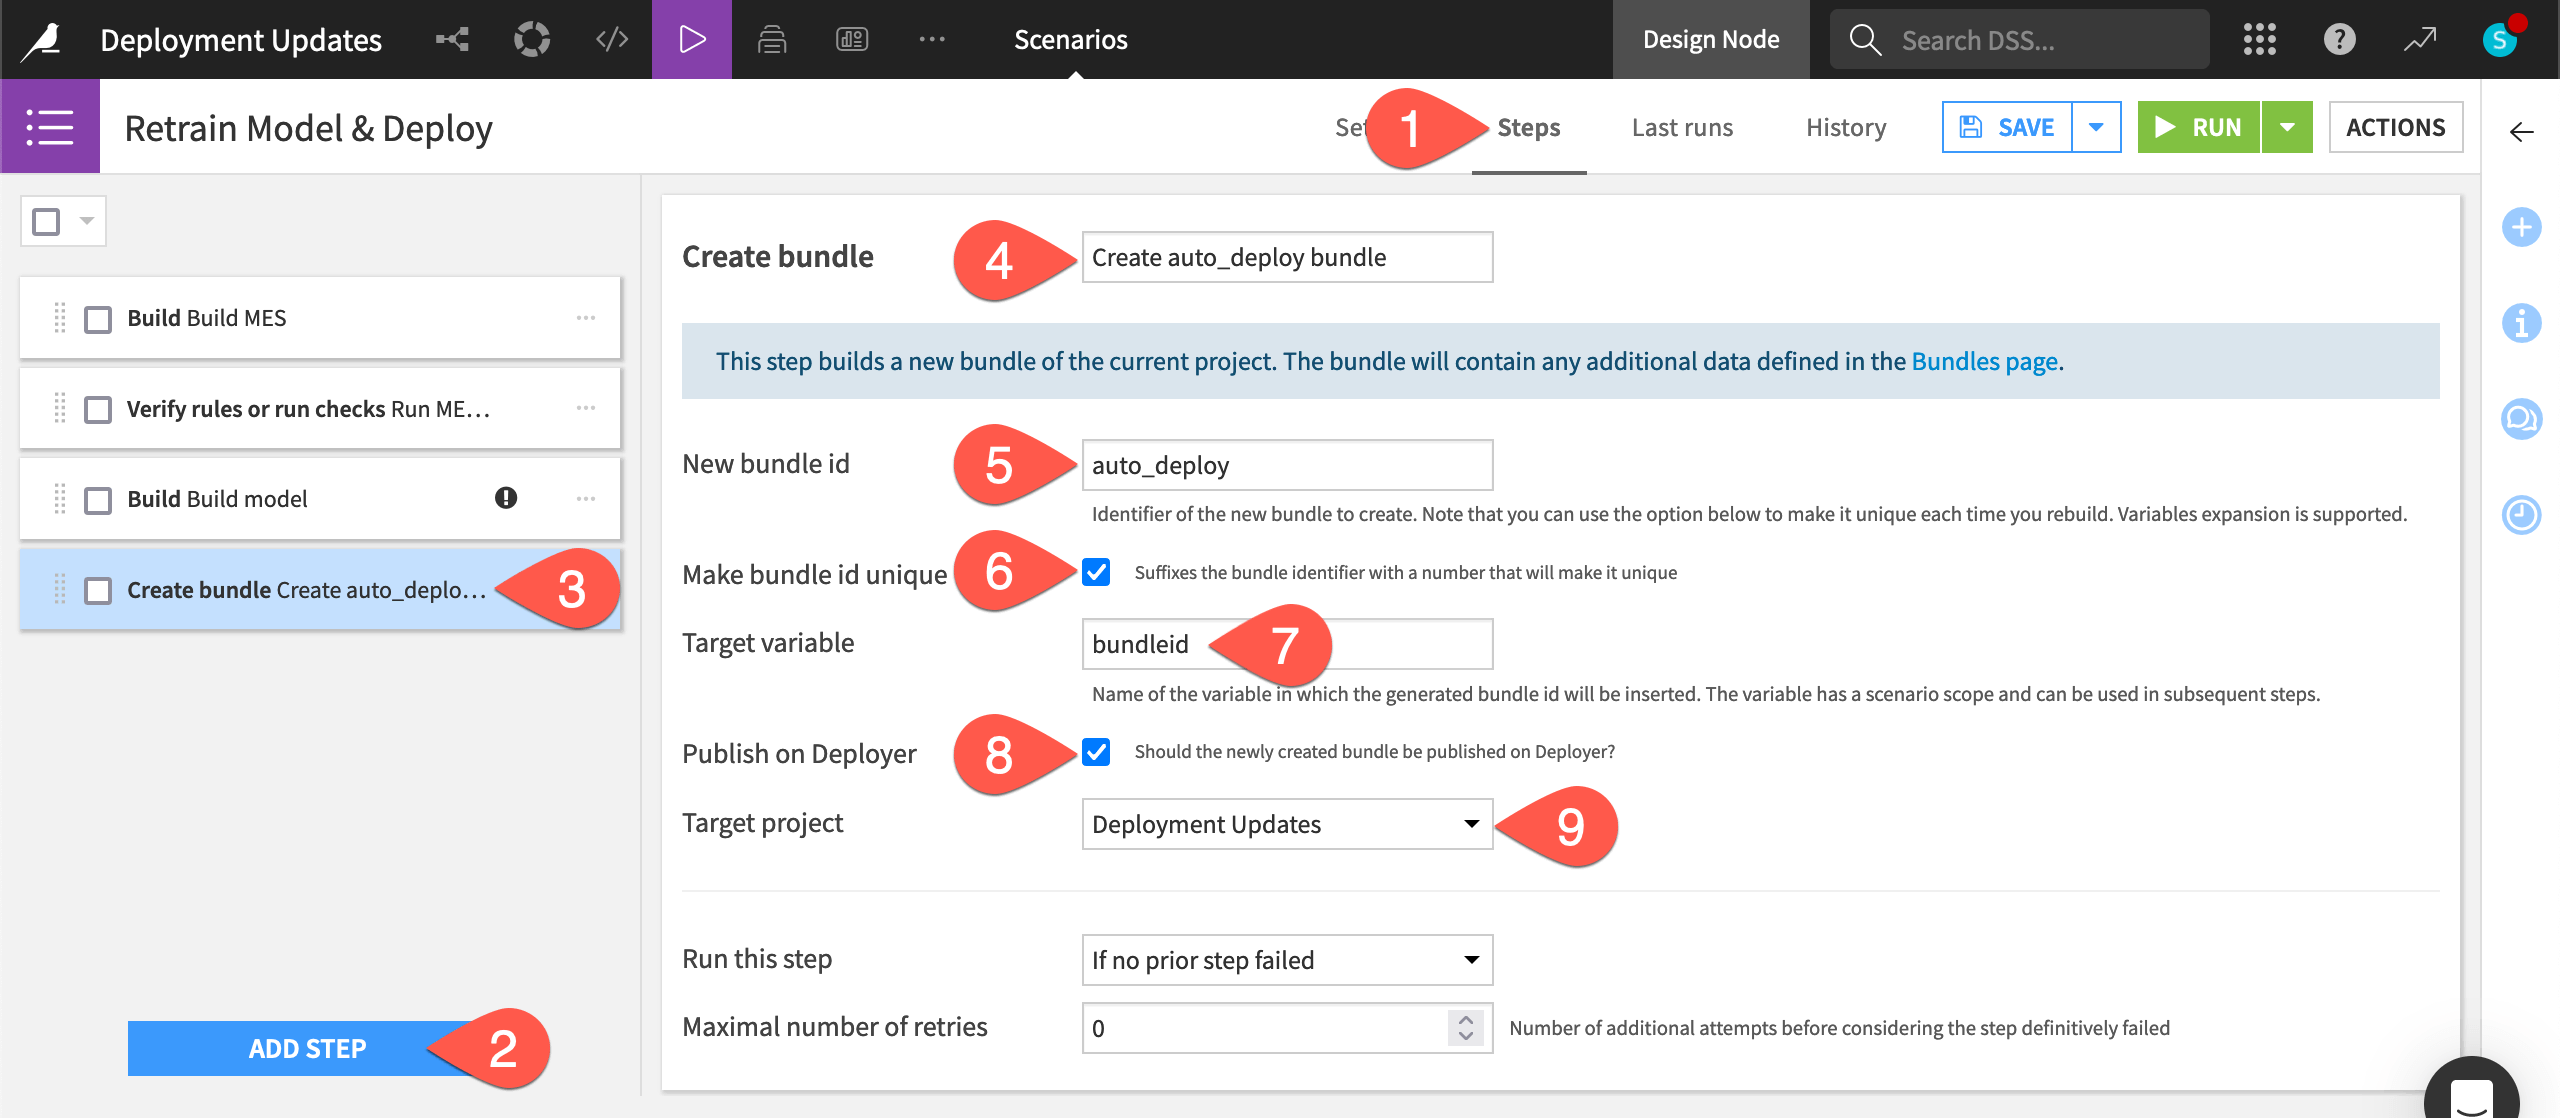
In the Retrain Model & Deploy scenario, navigate to the Steps tab.
Click Add Step.
Select Create bundle from the Deployer section.
Name the step
Create auto_deploy bundle.Provide the bundle id
auto_deploy.Check the box to Make bundle id unique. Instead of v1, v2, etc, as we previously chose manually, our bundle ids will be “auto_deploy”, “auto_deploy1”, etc.
Provide the target variable
bundleid.Check the box to Publish on Deployer.
Choose the present project from the existing deployments as the Target project (selected by default).
Note
The help note at the top of this step indicates that the new bundle will include any additional data defined in the Bundles page. If you navigate to the Bundles page, click Configure Content to see what data will be included in the automatically-created bundles.
Add an update project deployment step#
As we have seen in the process for batch deployment, once we have a bundle, we need to deploy it. There’s a scenario step for this too!
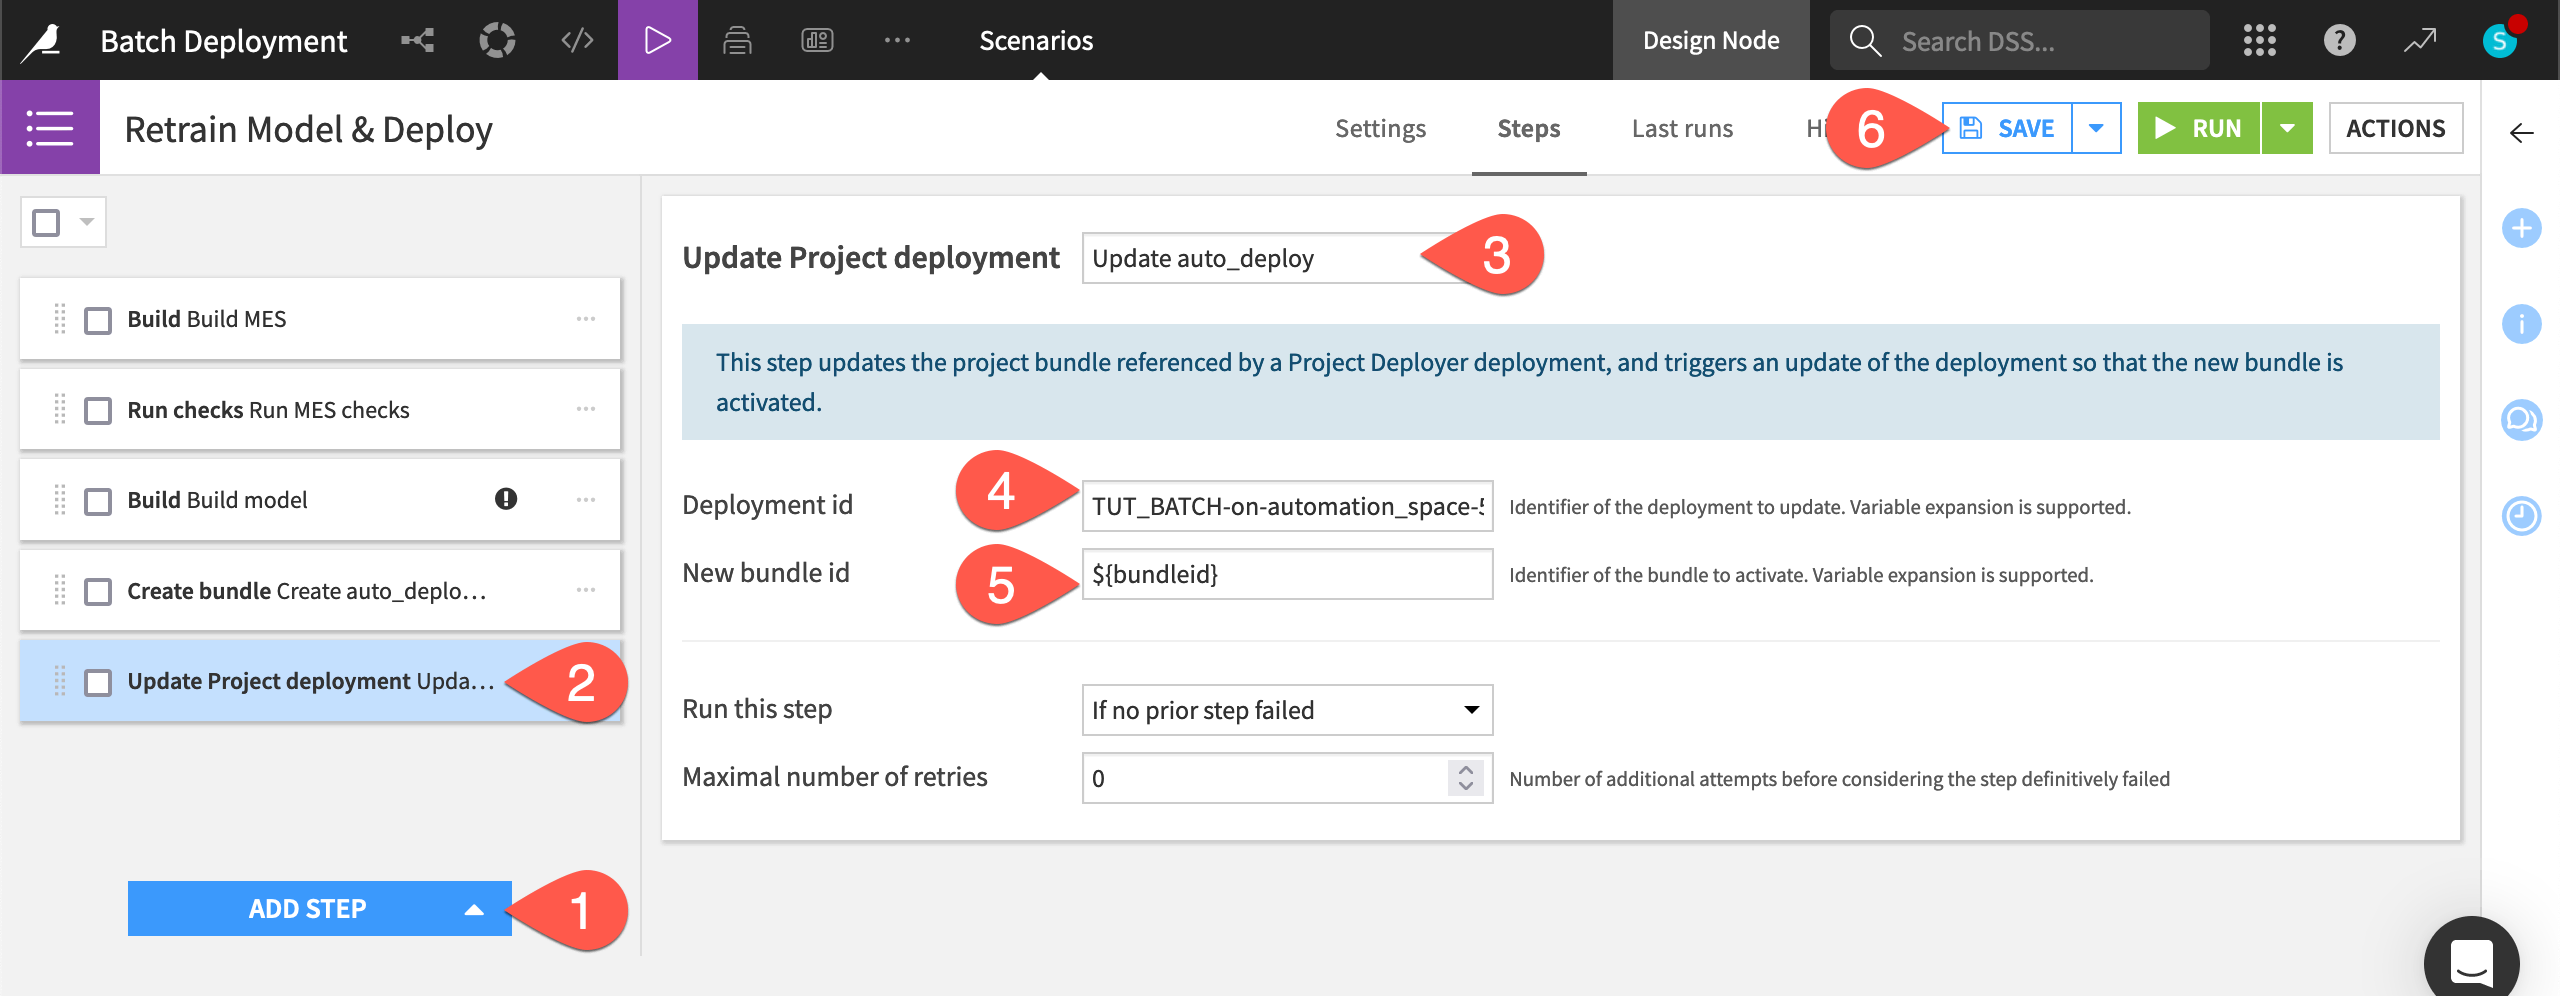
In the Retrain Model & Deploy scenario, click Add Step.
Select Update project deployment from the Deployer section.
Name the step
Update auto_deploy.Provide the Deployment id, which takes the form of
<PROJECTKEY>-on-<infrastructure>. Click on the field or start typing to see available options.Provide the new bundle id as
${bundleid}. Be sure to use the variable syntax here since this references the target variable in the previous step.Click Save.
Run the scenario & observe the outcome#
Let’s imagine that some specified unit of time has passed, triggering the scenario to run.
Click Run to manually trigger the Retrain Model & Deploy scenario on the Design node project.
Switch to the Last Runs tab to observe its progress, including the two new steps.
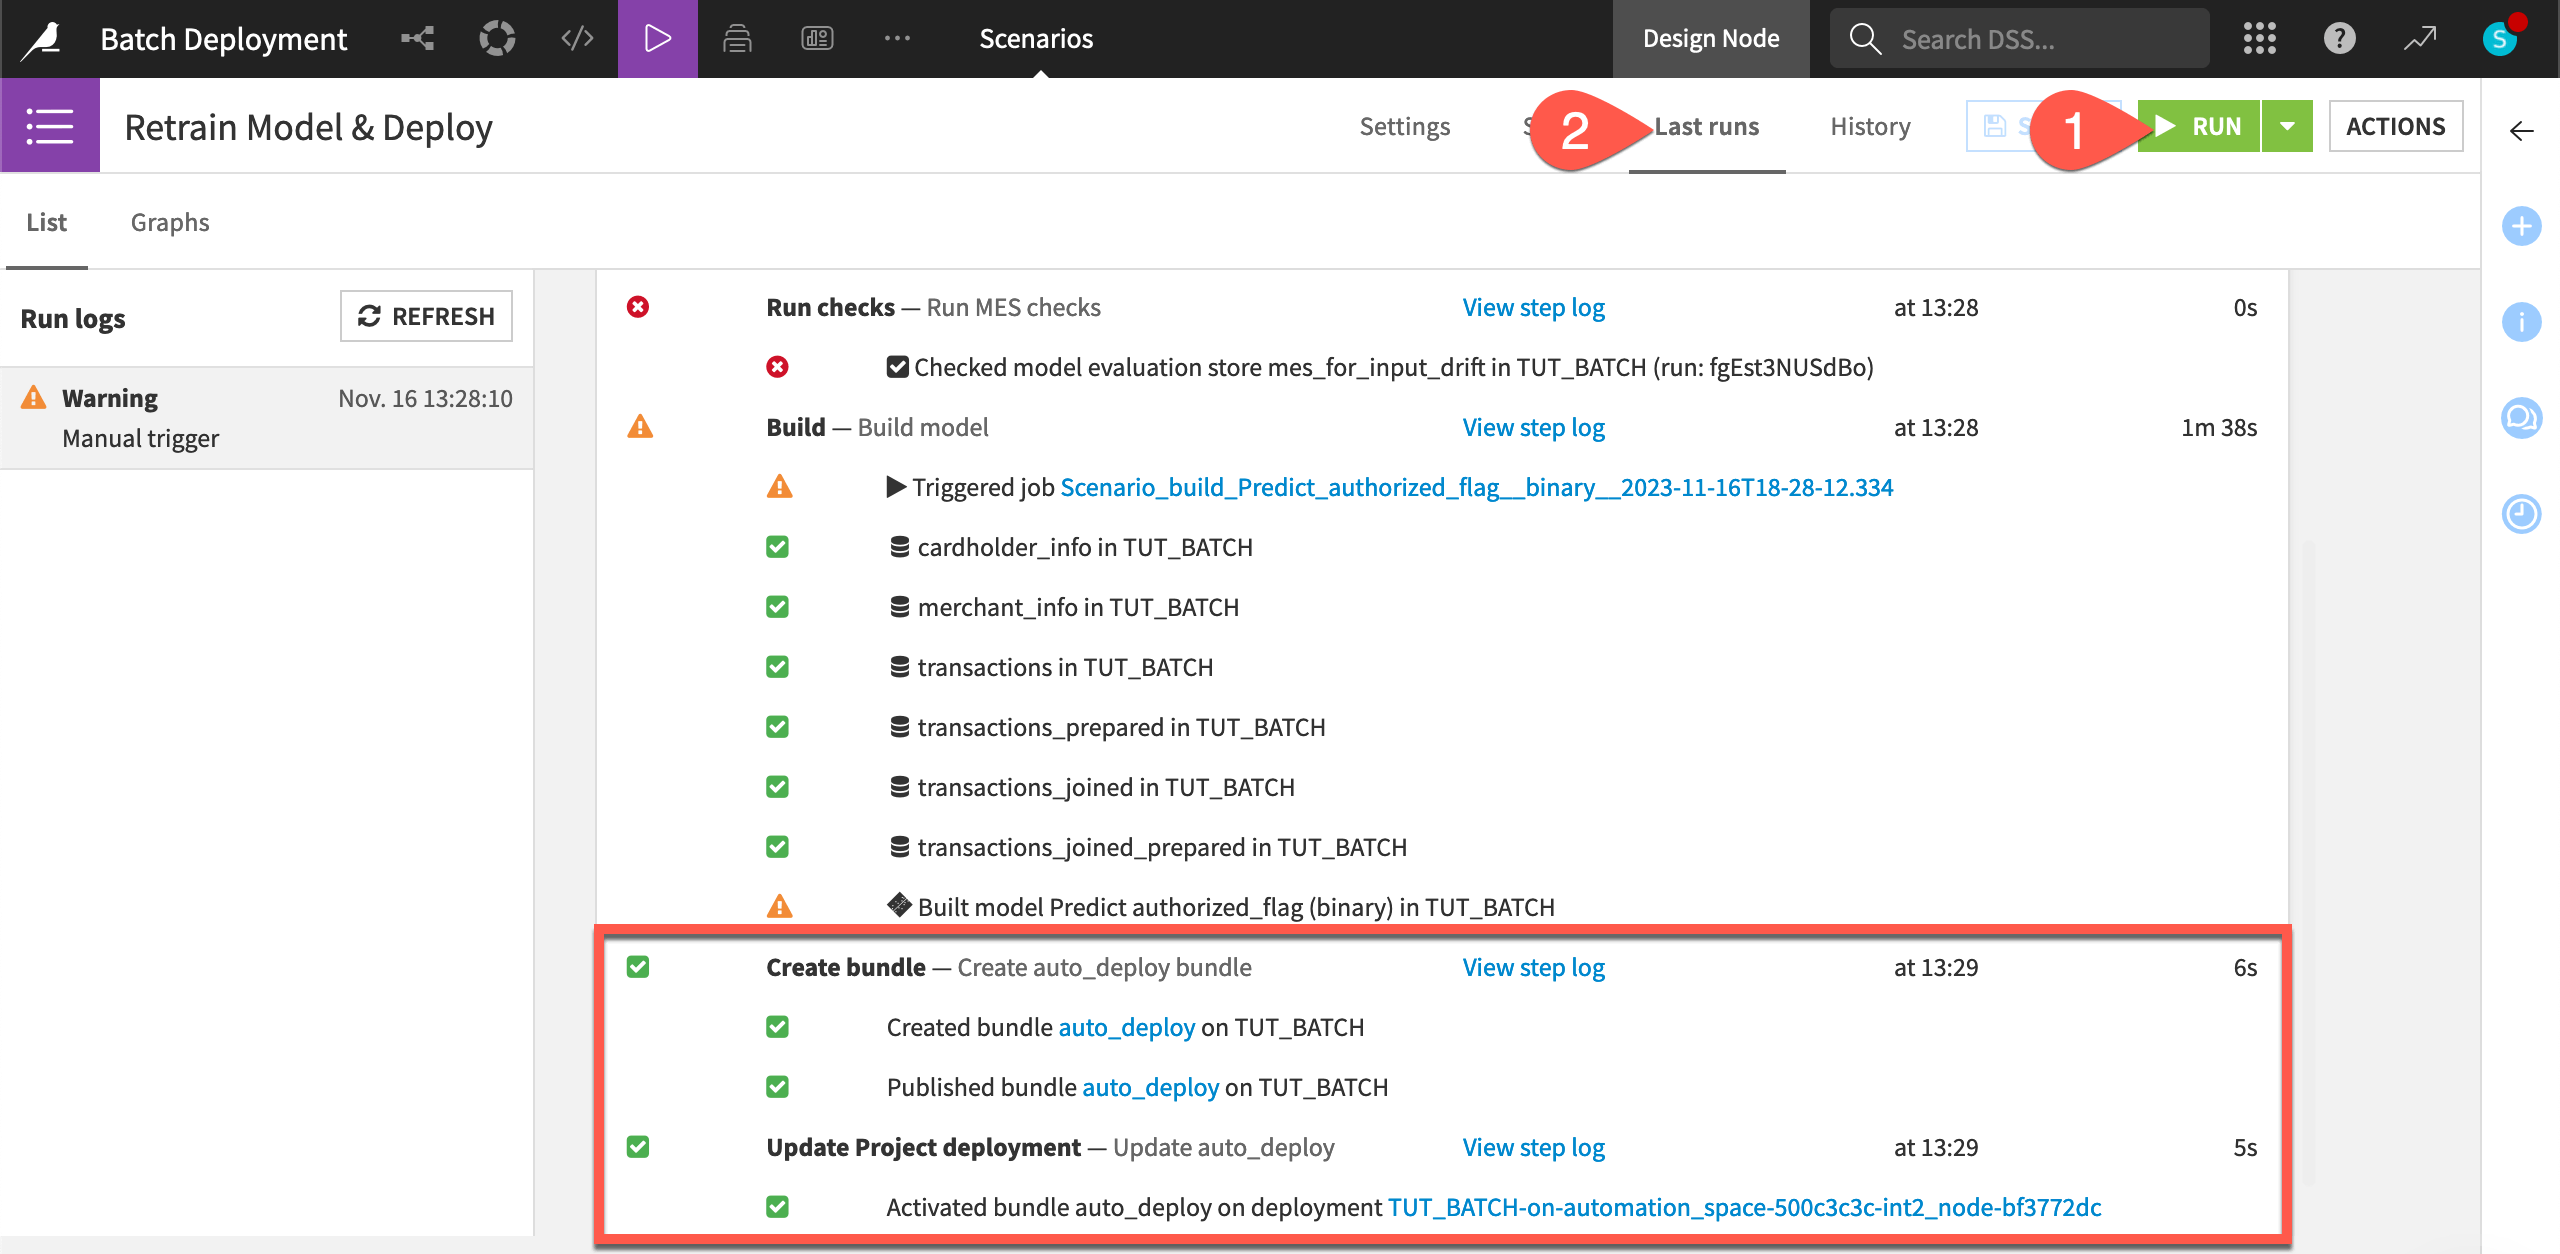
With no new data in this situation, we already know the check on data drift in the model evaluation store will fail, and so we can anticipate the outcome.
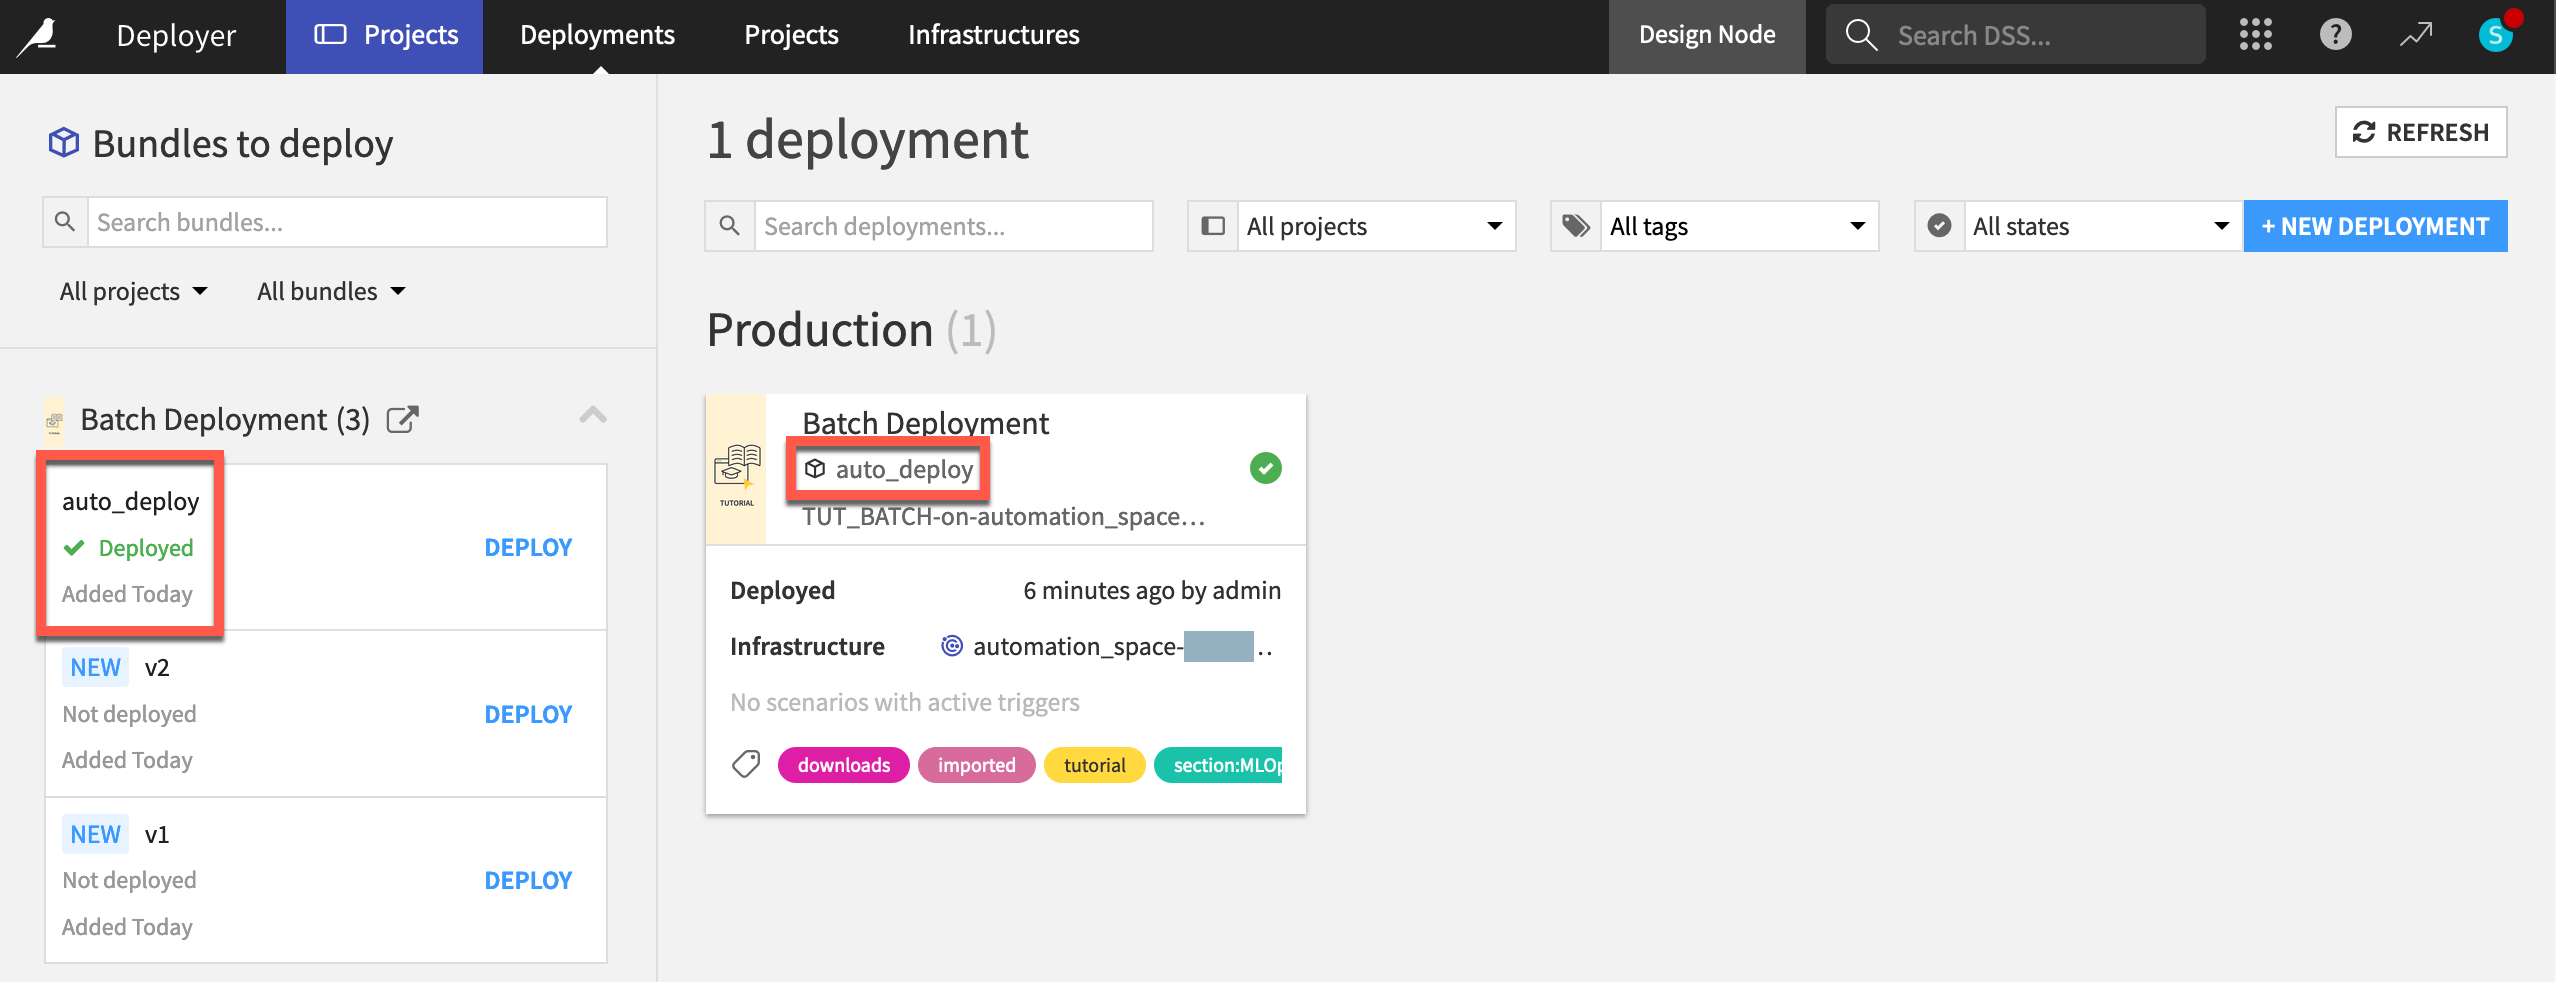
Return to the Deployments page of the Project Deployer to confirm that auto_deploy is the new active bundle.
You can also confirm that the project on both the Design and Automation nodes has a new active version of the saved model found in the Flow.
Tip
Run the scenario again to see how the bundle ID increments to auto_deploy1, and so on.
Plan for a more robust setup#
To be sure, this scenario is not ready for a live MLOps setup. It’s intended only to demonstrate how you can use Dataiku to achieve your MLOps goals.
In fact, this level of automation may only become necessary when deploying very large numbers of models in many projects. To do this successfully though, you need to have mastered the fundamentals — i.e. robust metrics and checks to know with certainty that the model you are redeploying is truly better than the existing one.
That being said, let’s discuss a few ways you could make this setup more robust to handle the challenges of live production.
Add more metrics & checks#
This scenario triggered the model rebuild based on the failure of one check based on a model evaluation store metric.
Depending on our Flow, it’s likely that we also want to create metrics and checks on other on upstream objects, such as datasets or managed folders. If upstream checks fail, we can circumvent the model retraining cycle.
We might also want to implement metrics and checks on the saved model itself to determine whether it is better than a previous version.
Keep a human in the loop#
Even after adding a sufficient level of metrics and checks, we might never want to automatically deploy a bundle. Our scenario might stop at creating the new bundle, alerting a team member with a reporter, but leaving the job of updating the deployment to a human.
Add more stages of deployment infrastructure#
In this example, we had only one lifecycle stage of deployment infrastructure. However, in a real setup, it would be common to have multiple stages, such as the default “Dev”, “Test”, and “Prod”.
Our scenario might automatically update a deployment in the “Dev” stage, but require a human to push the deployment to the “Test” or “Prod” stages.
What’s next?#
Congratulations! In this tutorial, you:
Created a project bundle.
Deployed it to an Automation node via the Deployer.
Published and redeployed new bundle versions.
Created a scenario that can automatically update a batch deployment.
While this level of automation may not always be desirable (or advisable), it hints at what’s possible using only very simple building blocks.
Now that you have seen the batch deployment framework, move on to the methods for real-time API scoring.
See also
For more information, please refer to the reference documentation on MLOps or production deployments.