Tutorial | Use the Retrieval Augmented Generation (RAG) approach for question-answering#
The Embed recipe in Dataiku allows you to augment Large Language Models (LLMs) with some specialized internal knowledge from your organization to increase the relevance and accuracy of the models’ responses.
In this tutorial, we’ll use the Retrieval Augmented Generation (RAG) approach to augment the GPT 4 model from OpenAI with the content from the Dataiku Knowledge Base to help Dataiku users find relevant answers to their questions.
Get Started#
Objectives#
In this tutorial, you will:
Use the Text extraction and OCR plugin to extract text content from our source HTML files.
Warning
You must be an administrator to install the plugin. If you cannot use the plugin to extract the text, go straight to the Create the Embed recipe section of this tutorial.
Use the Embed recipe to vectorize the textual data from the Dataiku Knowledge Base.
Create a prompt in the Prompt Studio to check the response from the augmented LLM.
Prerequisites#
To use the Embed text recipe, you’ll need:
Dataiku 12.3 or later.
An Advanced Analytics Designer or Full Designer user profile.
A compatible code environment for retrieval augmented models.
A connection to a supported embedding model for text embedding in the Embed recipe.
A connection to a supported Generative AI model, which is the model that will be augmented. See LLM connections for details.
Tip
You do not need previous experience with Large Language Models (LLMs), though it would be useful to read the article Concept | Embed recipe and Retrieval Augmented Generation (RAG) before completing this tutorial.
Create the project#
From the Dataiku Design homepage, click + New Project.
Select Learning projects.
Search for and select Question Answering with RAG Approach.
Click Install.
From the project homepage, click Go to Flow (or
g
+f
).
From the Dataiku Design homepage, click + New Project.
Select DSS tutorials.
Filter by Gen AI Practitioner.
Select Question Answering with RAG Approach.
From the project homepage, click Go to Flow (or
g
+f
).
Note
You can also download the starter project from this website and import it as a zip file.
Get the data for retrieval#
This section will help you prepare a dataset that stores the corpus from which the RAG system’s retrieval mechanism will pull relevant passages to answer user questions.
Extract the raw text#
As you can see in the project Flow, the source HTML files are stored in the dataiku_kb_sample folder. To process the data, we need to extract the raw text into a dataset.
The Text extraction and OCR plugin is meant for that. We’ll use it to:
Extract the raw text.
Perform a “smart” split of the raw text into meaningful semantic chunks. A chunk is a small piece of text, typically the size of one or several paragraphs. This method ensures that the text is divided at natural breakpoints (to avoid breaking sections awkwardly), rather than being split based on a fixed number of characters. The splitting step is crucial as chunks are more efficiently processed and retrieved than large documents, and it helps ensure that chunks stay within the prompt size limit.
Note
If the plugin is not installed yet on your Dataiku Design node, install it or ask an admin user to install it for you. If you cannot, skip this section and go straight to Create the Embed recipe section of this tutorial.
From the Flow, select the dataiku_kb_sample folder.
In the Actions tab, under the Plugin recipes section, click Text extraction and OCR.
In the dialog box that pops up, click on Text extraction.
In the Plugin recipe “Text extraction” window:
Keep the selected input folder.
In the output dataset, click on Set.
Name the output dataset
dataiku_knowledge_base_sample
.Select a storage location of your choice.
Click Create Dataset.
Click Create. This opens the Text extraction settings page.
Enable the Extract text chunks option so that the plugin divides the content of each file into different pieces of text. It displays two additional options, which you can keep as is.
In the Advanced tab, set the Selection behavior option to None - use backend to execute.
Go back to the Settings tab and click Run. The execution should last 3-4 minutes as we are just running it on a short sample of the Dataiku Knowledge Base.
Note
At any time, you can check the progression by clicking the Jobs menu of the top navigation bar (or pressing
g
+f
).Click Explore dataset dataiku_knowledge_base_sample to open the output dataset.
As you can see, the plugin has split each file into multiple chunks stored in the text column. If you look at each chunk of the concept-rag file and compare it with the online article, you’ll notice that the text has been divided according to the document’s sections. If you had not enabled the Extract text chunks option, the dataset would include only one row per file, as the text would remain unsplit.
Prepare the dataset#
Note
If you could not use the plugin to extract the text, skip this section and go straight to Create the Embed recipe section of this tutorial.
Refine the chunks#
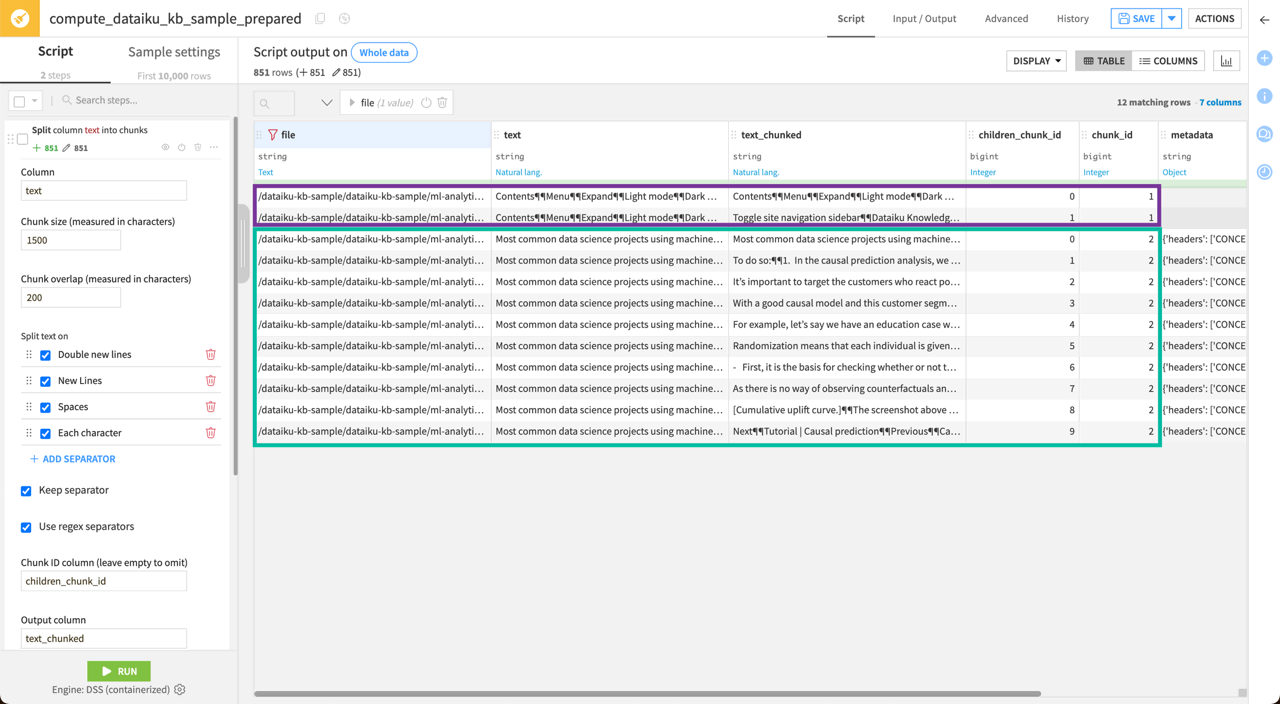
Although the text extraction plugin has already split the text, you can further split each chunk using the Split column into chunks processor in a Prepare recipe. This allows you to have more control over the splitting method or to reduce the chunk size. This can be particularly useful when dealing with documents that have minimal structure.
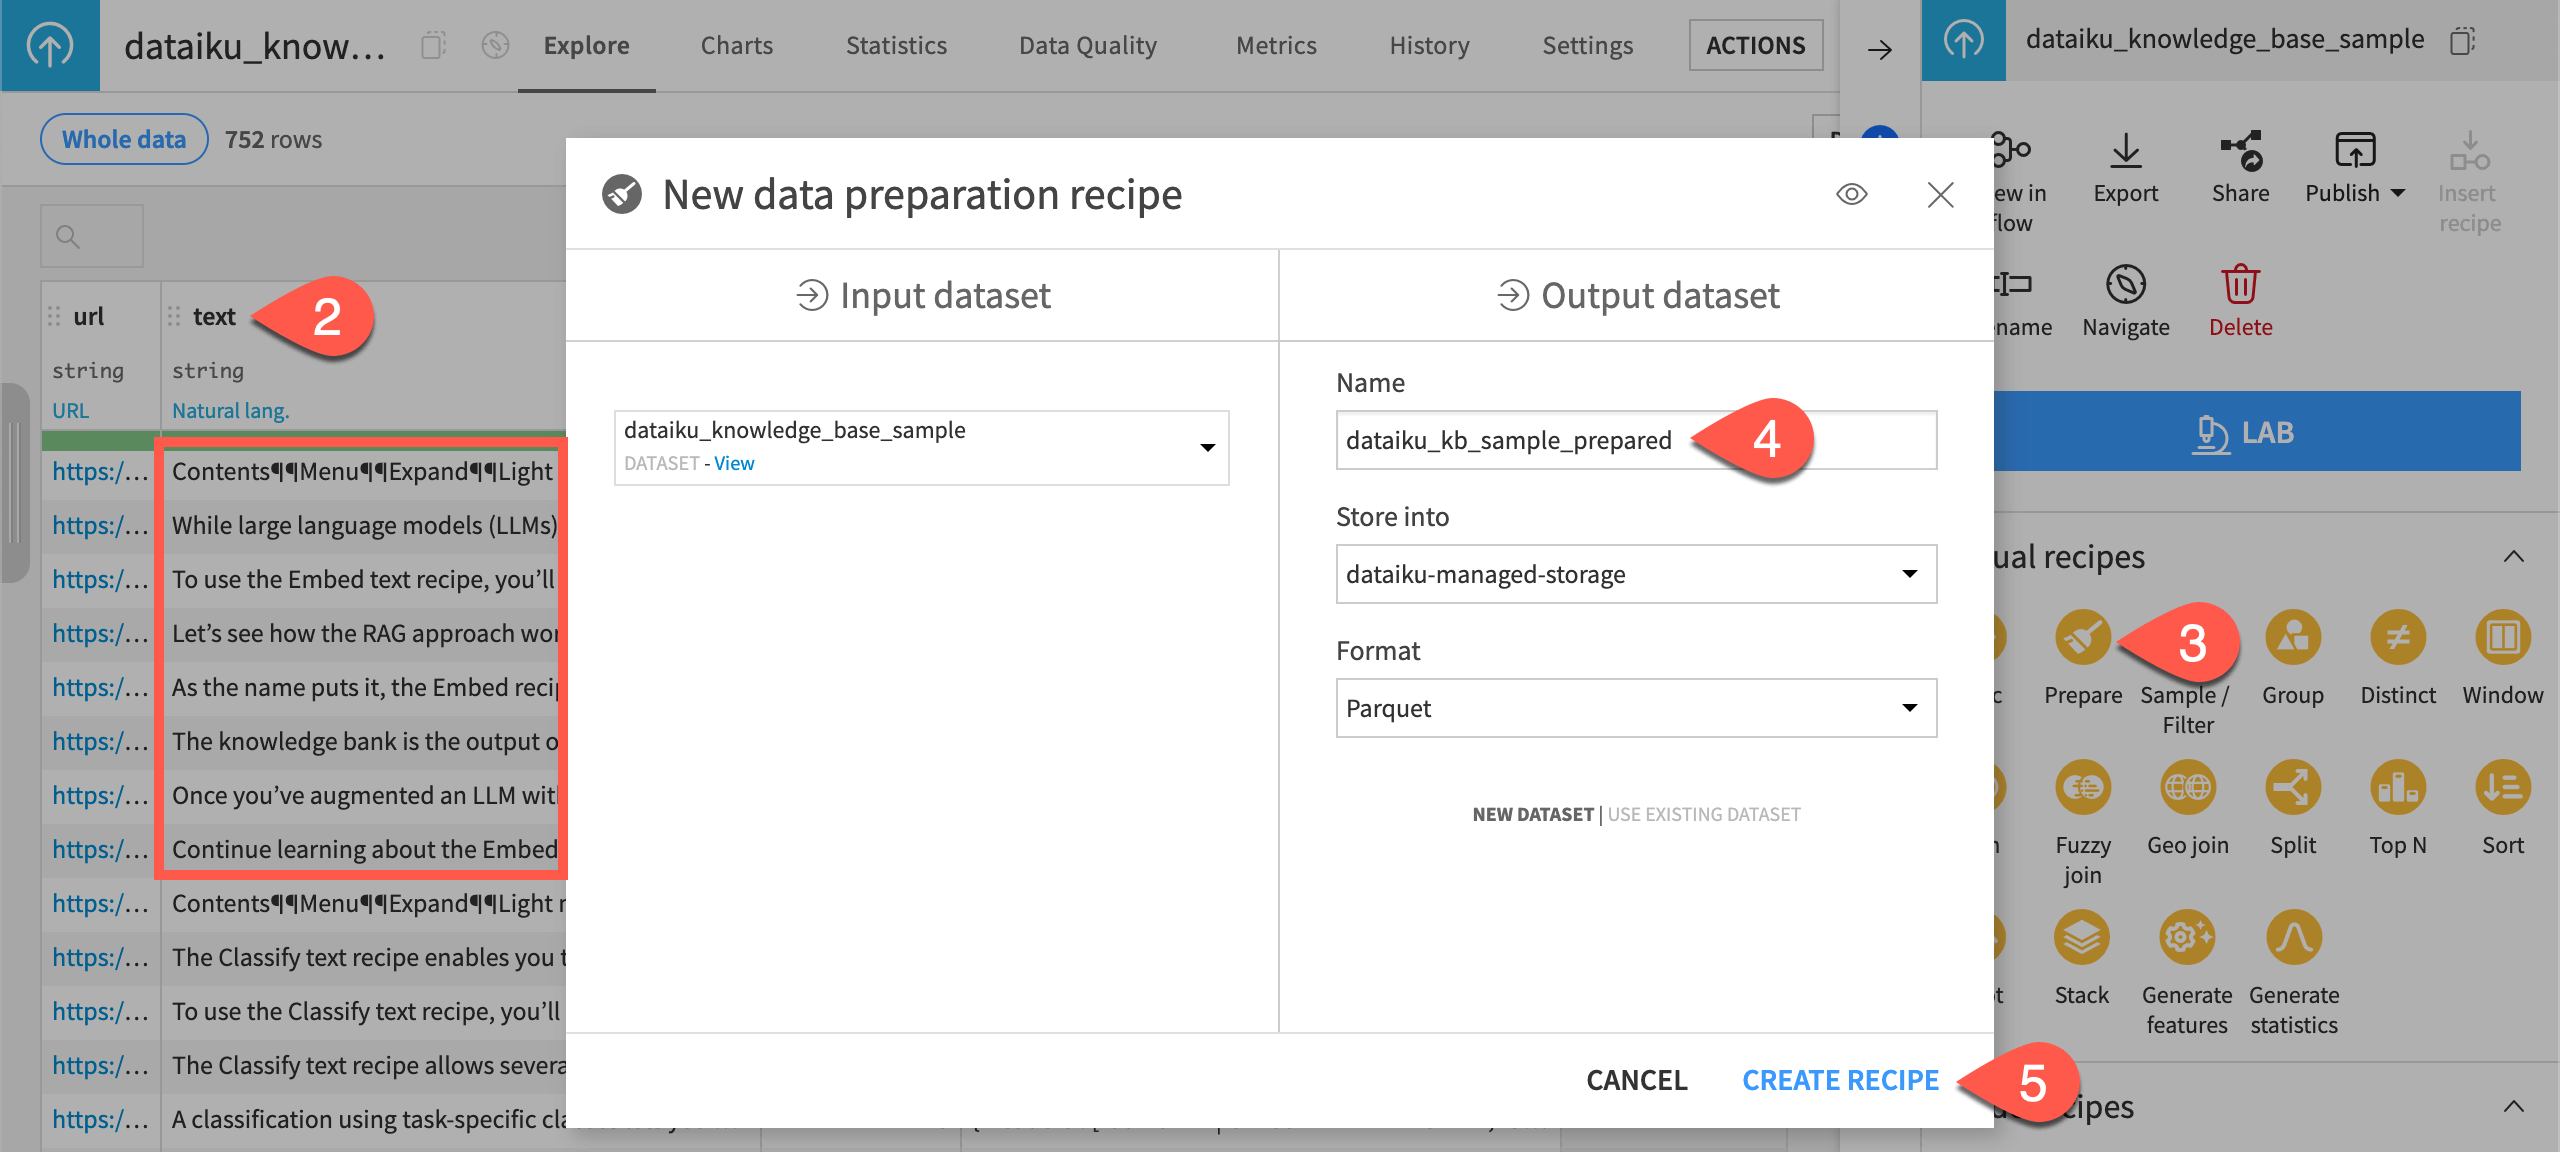
Still from the dataiku_knowledge_base_sample dataset, in the Actions tab, under Visual recipes, click Prepare.
In the New data preparation recipe window:
Keep the input dataset as is.
Name the output dataset
dataiku_kb_sample_prepared
.Click Create Recipe.
In the recipe page, click the + Add a New Step button in the left panel.
In the processors library, search for
Split column into chunks
and select it.Set the processor as follows:
In the Column option, enter
text
, the name of the column that stores the text to chunk.In the Chunk size option, enter
1500
, which means each chunk should include 1500 characters.In the Chunk ID column option, enter
children_chunk_id
.
This step creates a text_chunked column with the new splits. For instance, if you filter the file column on concept-causal-prediction
to focus on this file, you will see that:
The first “parent” chunk is now divided into 2 “child” chunks (in purple below).
The second “parent” chunk is divided into 10 “child” chunks (in green below).
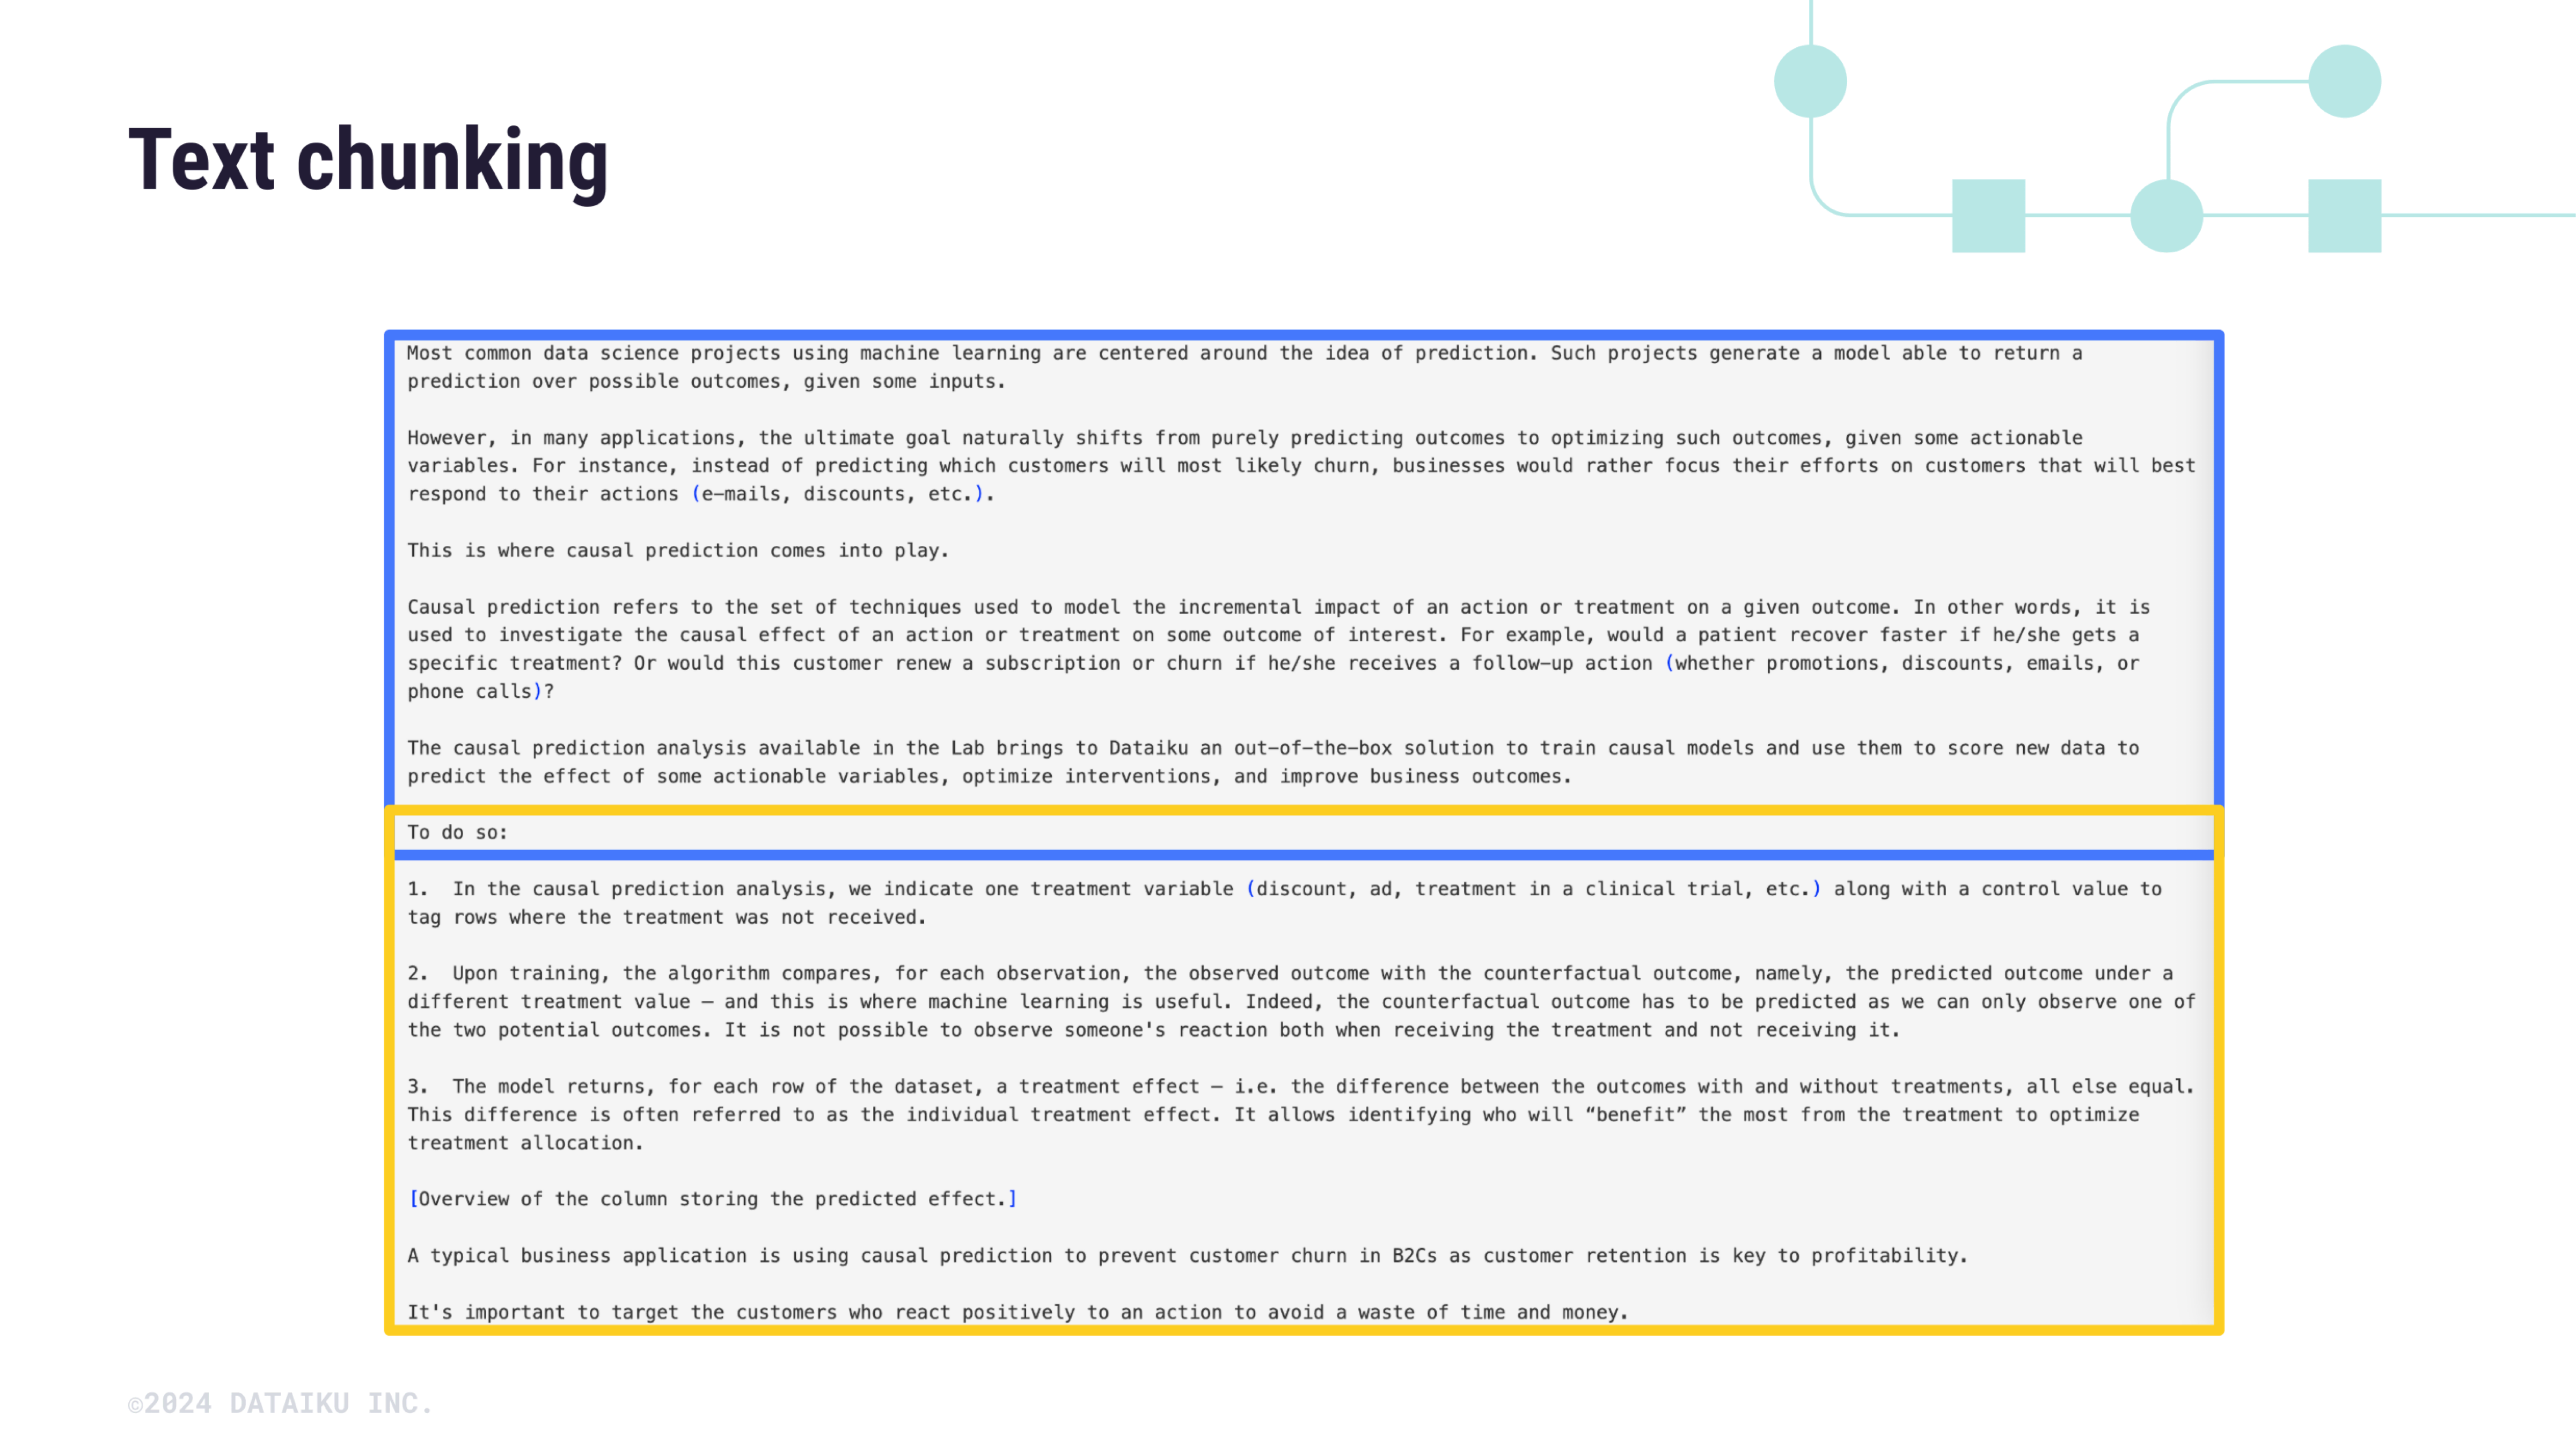
Let’s look closer at the second parent chunk. The illustration below shows a sample of this chunk where:
The blue block corresponds to the first child chunk.
The yellow block corresponds to the second child chunk.
Get the source URL for each file#
In the dataset, the file column stores the file path for each document. Let’s use the Prepare recipe to extract the URL from the file path. This way, the LLM can provide users with the URLs of the sources it used to generate answers to their prompts.
Still from the recipe settings, click the AI Prepare button in the left panel.
In the text box, enter the following text:
Rename the file column url and replace /dataiku-kb-sample/dataiku-kb-sample/ with https://knowledge.dataiku.com/latest/ everywhere in this column.
Click Generate. This should add two steps (Rename and Replace) to the preparation script.
Click Run and open the output dataset.
Now, the dataset includes the URL and text of several Dataiku Knowledge Base articles.
Create the Embed recipe#
Note
If you could not use the Text extraction and OCR plugin:
Download the dataiku_kb_sample_prepared dataset.
Upload it to the project (from the Flow, click + Dataset > Upload your files).
Now that we have an input dataset that contains the URL and text of each article from the Dataiku Knowledge Base sample, let’s attach an Embed recipe to it.
To do so:
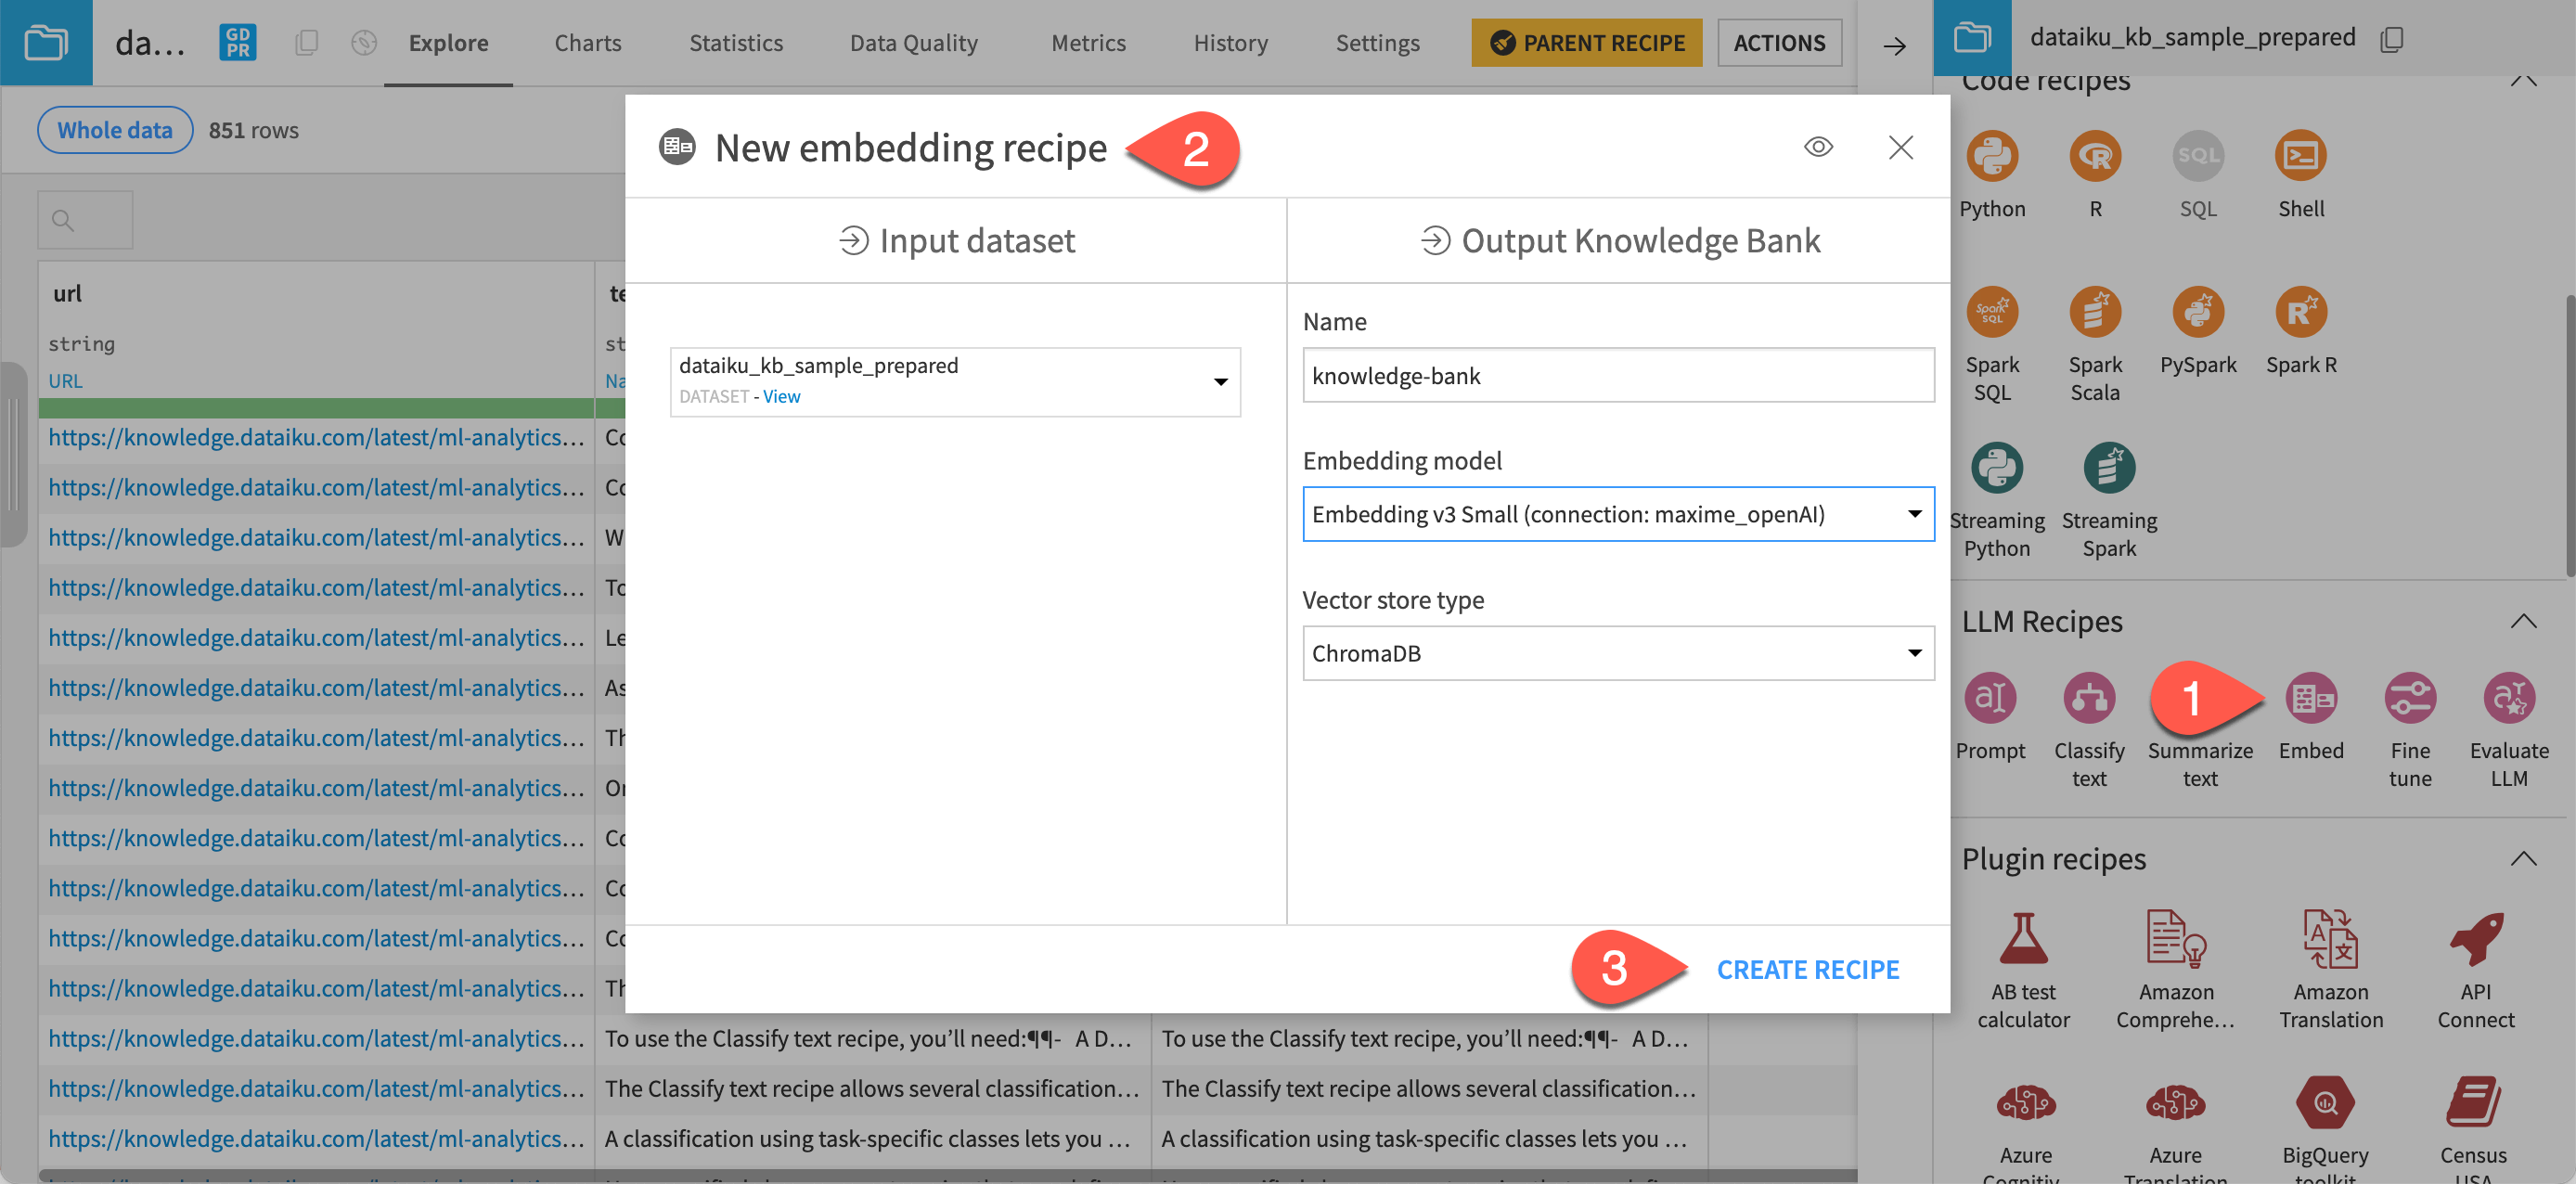
From the dataiku_kb_sample_prepared dataset, go to the Actions tab and click Embed under the LLM Recipes section.
In the New embedding recipe window:
Keep the selected input dataset.
Name the output knowledge bank
knowledge_bank
.In the Embedding model field, select a model you can use for text embedding (i.e. text vectorization, which means encoding the semantic information into a numerical representation).
Keep the default ChromaDB vector store type.
Click Create Recipe. This opens the recipe settings page.
Configure the Embed recipe#
Now, let’s see how to configure the recipe to vectorize the content of the text_chunked column.
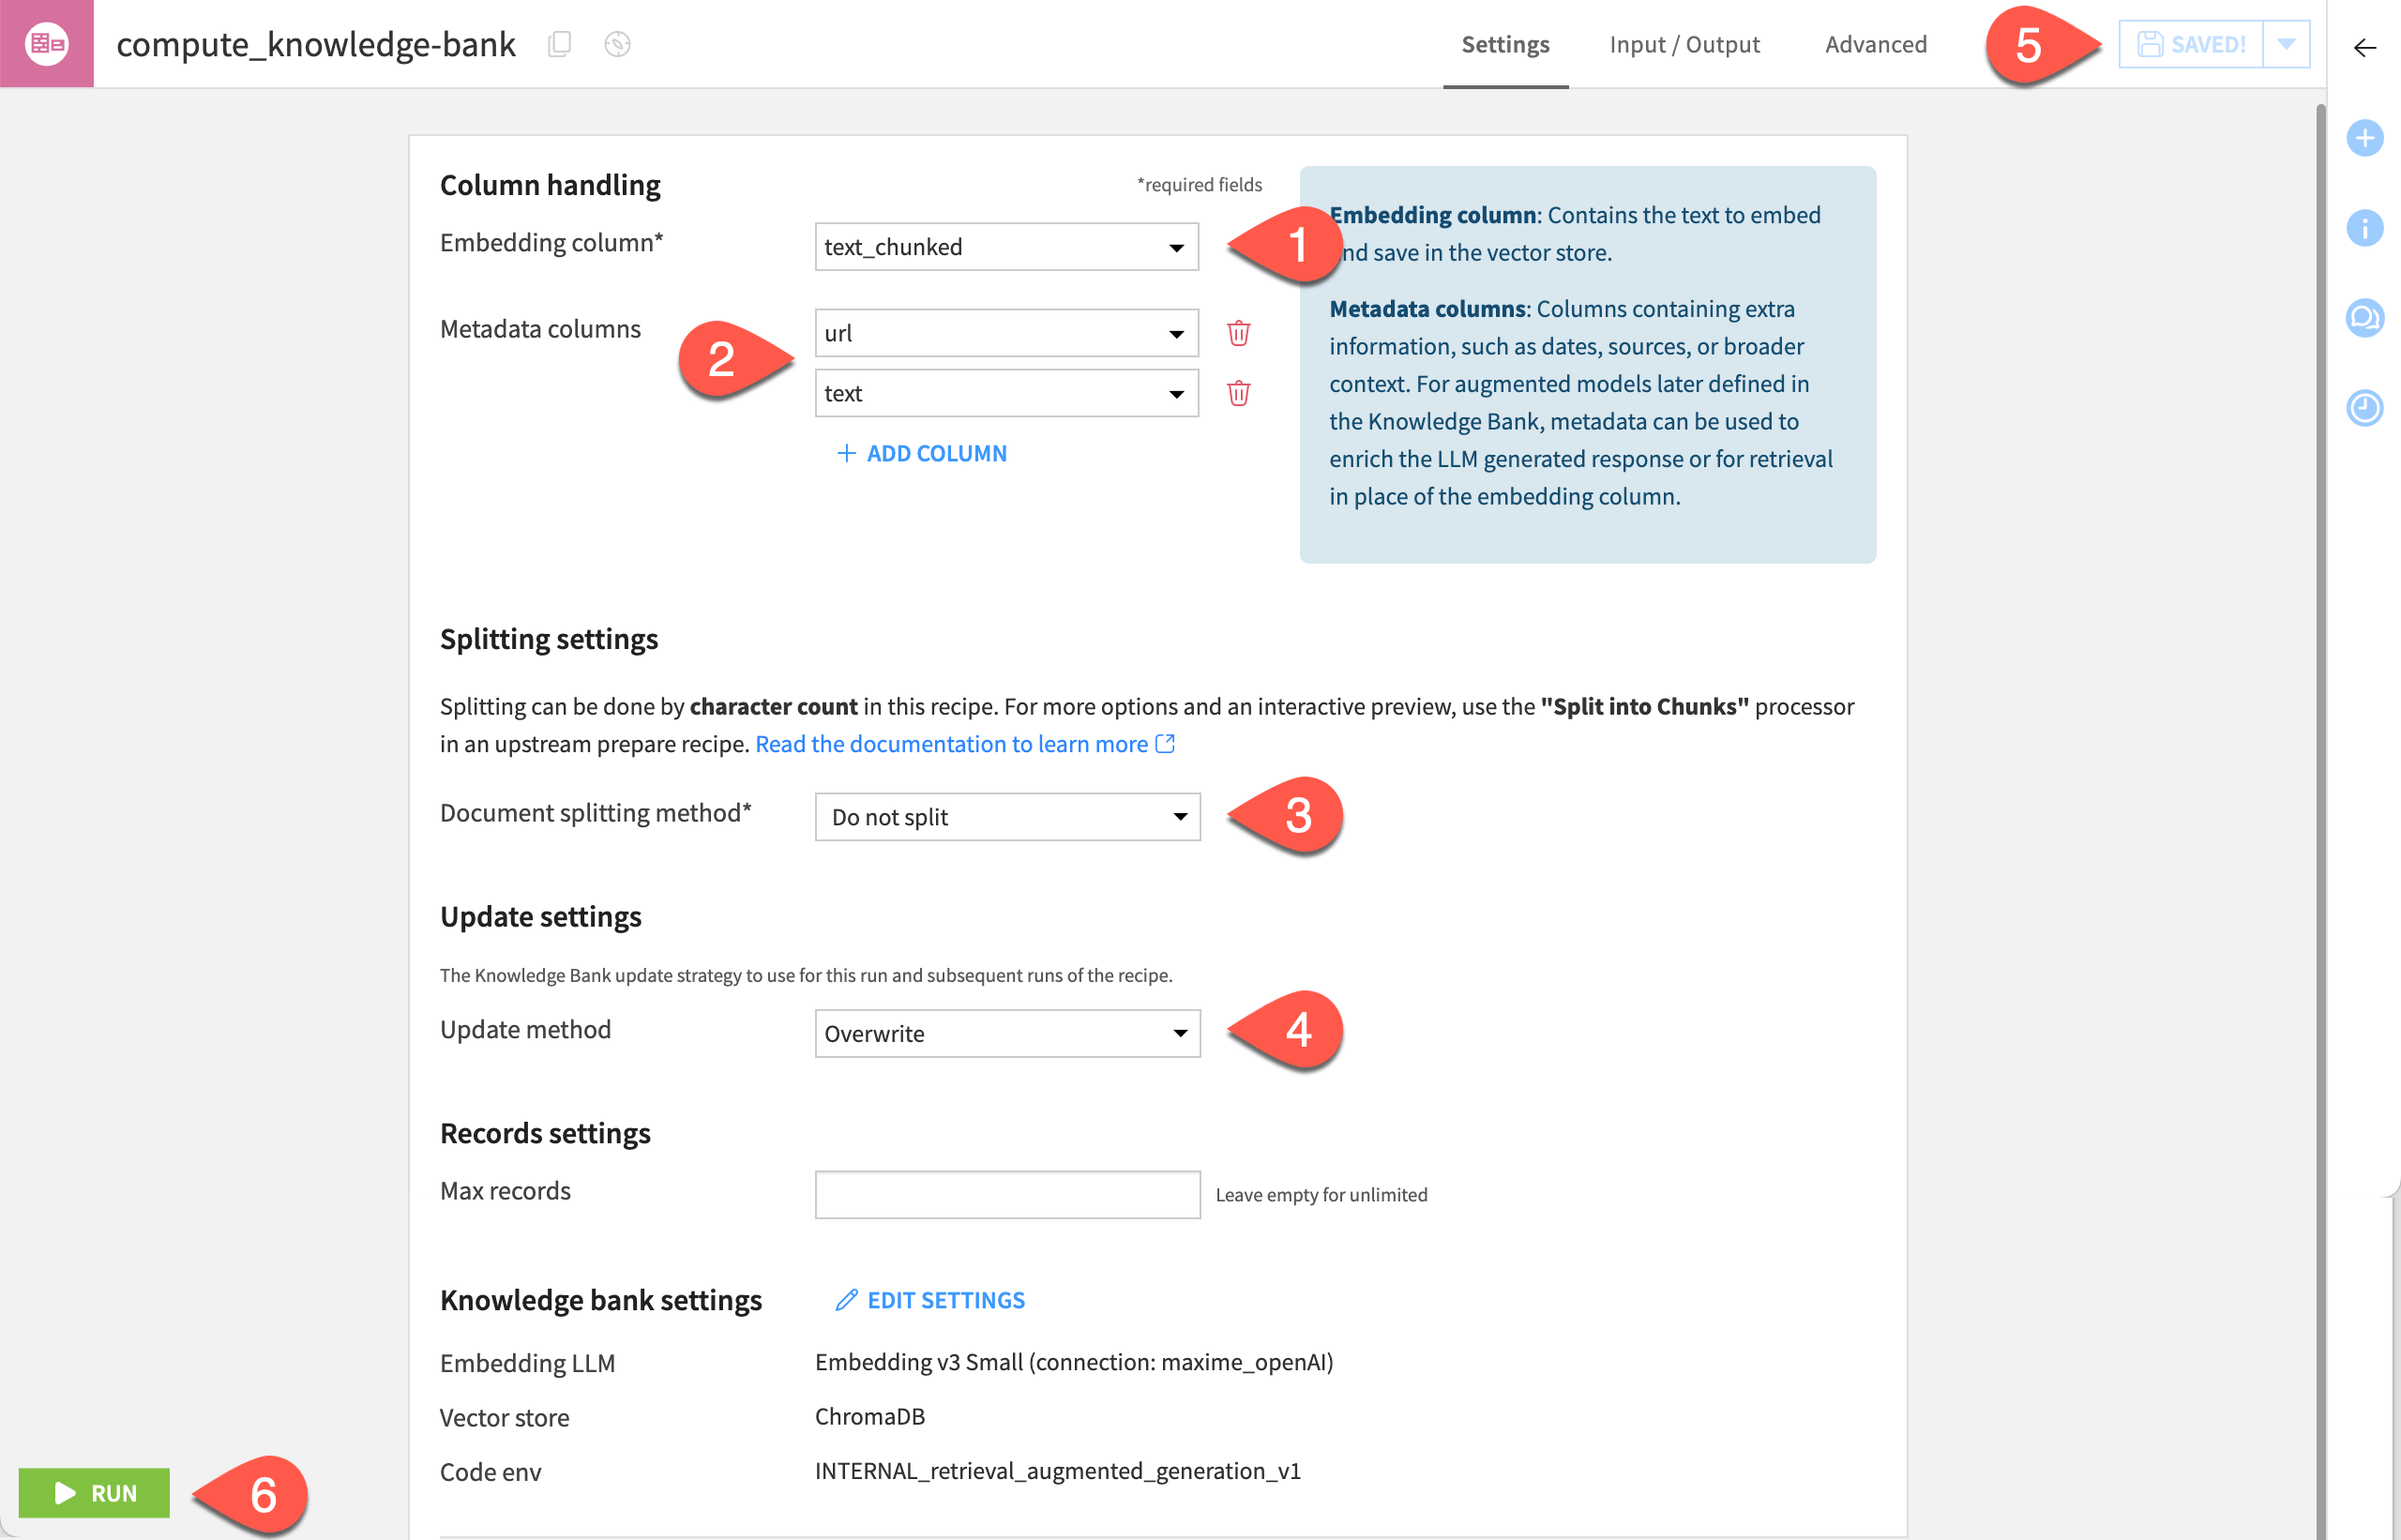
In the Embedding column option, select the text_chunked column, which is the column that includes the textual data to vectorize.
Under Metadata columns, click + Add Column twice and select:
The url column, i.e the column that stores the metadata Dataiku will use to enrich the LLM-generated response by identifying the source used in the responses.
The text column, which we’ll use to configure the augmented model defined in the knowledge bank for retrieval in place of the embedded column.
In the Document splitting method option, select Do not split as we split the data in earlier stages of the Flow.
Keep the default Overwrite method to update the vector store.
See also
For more information on the different update methods, see the Retrieval-Augmented Generation documentation.
Click Save.
Click Run to create the knowledge bank, which is the object that stores the output of the text embedding. This step is required before configuring the knowledge bank. If you skip it, you won’t be able to select the metadata columns when configuring the retrieval augmented LLM.
Configure the knowledge bank#
Once the previous job is over, you can configure the knowledge bank.
Still from the Embed recipe settings page, in the Knowledge bank settings section, click Edit Settings. This opens the knowledge bank settings page.
In the Core settings subtab of the Settings tab:
Keep the embedding model and vector store type. These are the ones you selected upon creating the Embed recipe.
Use the url column as the Document unique ID.
By default, the Code env option should be set to Select an environment and the Environment option to the relevant code environment.
Unless you have a specific installation, set the Container option to None - use backend to execute.
Do not change the Embedding settings and Flow settings subtabs.
In the Usage tab, to configure the LLM that we’ll augment with the content of the knowledge bank, click the + Add Augmented LLM button and fill in the fields as defined below:
Leave the generated Augmented LLM ID field as is or enter any other ID you wish using the pen icon.
In the LLM field, select the LLM that you want to augment (here, GPT 4).
In the Retrieval column option, select Other column then the text column which includes more context than the text_chunked column used for embedding. You could use the same column as the one used for the embedding. Yet, in RAG, it is often useful to use smaller pieces of text for the embedding stage (when we fill in the vector store) and use larger pieces of text for the retrieving stage used to augment the LLM.
Caution
You must first declare the column as metadata in the Embed recipe settings page. Otherwise, the dropdown menu will not display it.
Set the Documents to retrieve option to
5
.Enable the Improve diversity of documents option and keep the default values for the diversity options.
Keep the Print document sources option set to Metadata & retrieval content to ensure that Dataiku adds to LLM responses details on the sources used to generate each response.
Keep the other options as is.
Click Save, and then click Parent Recipe to go back to the Embed recipe settings page.
Click Run to start executing the Embed recipe.
Note
In this tutorial, we need to re-run the recipe because we changed the settings in the Core settings tab. If you just change the settings of the Usage tab, there’s no need to run the recipe again. Changes are automatically taken into account.
With this configuration, we augment the GPT 4 LLM with content from the text_chunked column of the Dataiku knowledge base dataset and ask that the LLM uses the five top documents among the 20 documents closest to the query to build an answer in plain text.
As we enabled the Print document sources option, when testing the augmented LLM in the Prompt Studio (see section below), Dataiku will display the five sources that the model used to generate the answer. Additionally, with the Include text option enabled by default, the model will also include the retrieved text from the retrieval column of each source used.
Test the augmented LLM in a Prompt Studio#
Now, let’s see how the augmented LLM responds to a prompt.
Create the Prompt Studio#
The first thing to do is create a Prompt Studio.
After the run, click the View knowledge bank knowledge-bank link to open the knowledge bank.
In the Usage tab, click Test in Prompt Studio next to the augmented LLM.
Tip
You can also access the Prompt Studios by selecting Visual ML () > Prompt Studios in the top navigation bar.
Give the new studio the name
dataiku_knowledge_base
, then click Create. It opens the Prompt design page.
Design a prompt#
On the Prompt design page, we’ll add our prompt text and run a test using the augmented LLM.
In the left panel of the studio, click + Add Prompt.
Select Managed mode > Blank template then click Create.
In the LLM option, ensure that the augmented LLM in the Retrieval augmented section is selected.
Note
The name for the augmented LLMs is
Retrieval of <knowledge_bank_id>, using <augmented_model_name>
.If you augment the same model more than once using the same knowledge bank, the LLM ID you set is added:
Retrieval of <knowledge_bank_id> (id: <llm_id>) using <augmented_model_name>
.In the Prompt field, copy and paste the following prompt. Use the Copy button at the right of the block for easier copying.
You're an expert in Dataiku and rely on the knowledge from the Dataiku knowledge base. When answering questions, be sure to provide answers that reflect the content of the knowledge base, but avoid saying things like 'according to the knowledge base'. Instead, subtly mention that the information is based on the Dataiku knowledge base.
On the right, in the Inputs from dropdown menu, select Written test cases.
Create one input by typing
Question
in the Description box.The Question input now appears as a column header under Test cases. We’ll add one test case to gauge how our model runs the prompt as it is.
Click + Add Test Case and copy and paste the following text into the Question box:
What's the difference between the Group and Window recipes?
Click Run Prompt to pass the prompt and test case to your selected model.
Depending on the model you selected, you might get different results.
Concretely, here’s what happened upon running the test:
Based on the initial prompt you enter, the knowledge bank identifies five chunks of text that are similar to the prompt. You see them in the Sources section at the bottom of the response.
Note
Why five? This is because we asked to retrieve only five documents in the Documents to retrieve option of the Usage tab of the knowledge bank.
These five text chunks are fetched from the knowledge bank and the text from their retrieval column is added to the prompt.
The LLM generates a response based on this augmented prompt.
Dataiku adds the metadata (here, the original article URLs and raw content) in the Sources section at the bottom of the response.
What’s next?#
Now that you know how to augment an LLM with your specific knowledge, you could:
Create a dataset with some questions to use it for test cases in a Prompt Studio, then create a Prompt recipe from it.
Create a chatbot using Dataiku Answers.
See also
For more information:
On the Embed recipe and the RAG approach, see the Concept | Embed recipe and Retrieval Augmented Generation (RAG) article.
On LLM evaluation, see the Tutorial | LLM evaluation article.
On guardrails, see the content moderation and sensitive data management.