
Tutorial | Scenario reporters#
Get started#
Once you have scenarios automating actions in Dataiku, you may want to attach reporters to those scenarios to send alerts through various messaging channels.
Objectives#
In this tutorial, you will:
Log scenario results in a Dataiku dataset.
Distribute scenario results via a messaging channel, such as email.
Include an attachment in a reporter.
Prerequisites#
To reproduce the steps in this tutorial, you’ll need:
Dataiku 13.4 or later.
Basic knowledge of Dataiku (Core Designer level or equivalent).
For the tutorial’s second example, you’ll also need an administrator to grant access to an active messaging channel. This tutorial uses a mail reporter, but other kinds of channels work similarly.
Create the project#
From the Dataiku Design homepage, click + New Project.
Select Learning projects.
Search for and select Scenario Reporters.
If needed, change the folder into which the project will be installed, and click Create.
From the project homepage, click Go to Flow (or type
g+f).
Note
You can also download the starter project from this website and import it as a ZIP file.
Use case summary#
The project has three data sources:
Dataset |
Description |
|---|---|
tx |
Each row is a unique credit card transaction with information such as the card that was used and the merchant where the transaction was made. It also indicates whether the transaction has either been:
|
merchants |
Each row is a unique merchant with information such as the merchant’s location and category. |
cards |
Each row is a unique credit card ID with information such as the card’s activation month or the cardholder’s FICO score (a common measure of creditworthiness in the US). |
Why reporters?#
Scenarios trigger actions that run in the background. Accordingly, you’ll want to monitor the performance of these actions in some way.
One option is the Automation Monitoring page found in the Jobs (
 ) menu of the top navigation bar.
You may also include a scenario insight on a dashboard showing the latest results.
However, for more direct alerts about scenario activities, you’ll want to become confident customizing reporters according to your organization’s preferred messaging channels, such as mail, Slack, Microsoft Teams, Webhooks, or Twilio.
Send scenario results to a Dataiku dataset#
This project includes a scenario that automates the build of the tx_windows dataset. One upstream dataset in the pipeline includes a data quality rule that happens to be failing.
Before configuring a reporter to send the results of this scenario to a messaging channel, let’s demonstrate sending that kind of information to a Dataiku dataset.
Create a dataset to receive scenario results#
First, you need to create a Dataiku dataset to which you can write scenario results.
Important
This dataset must be on a writable connection. That is, Allow write must be enabled in the Usage params section of the connection settings.
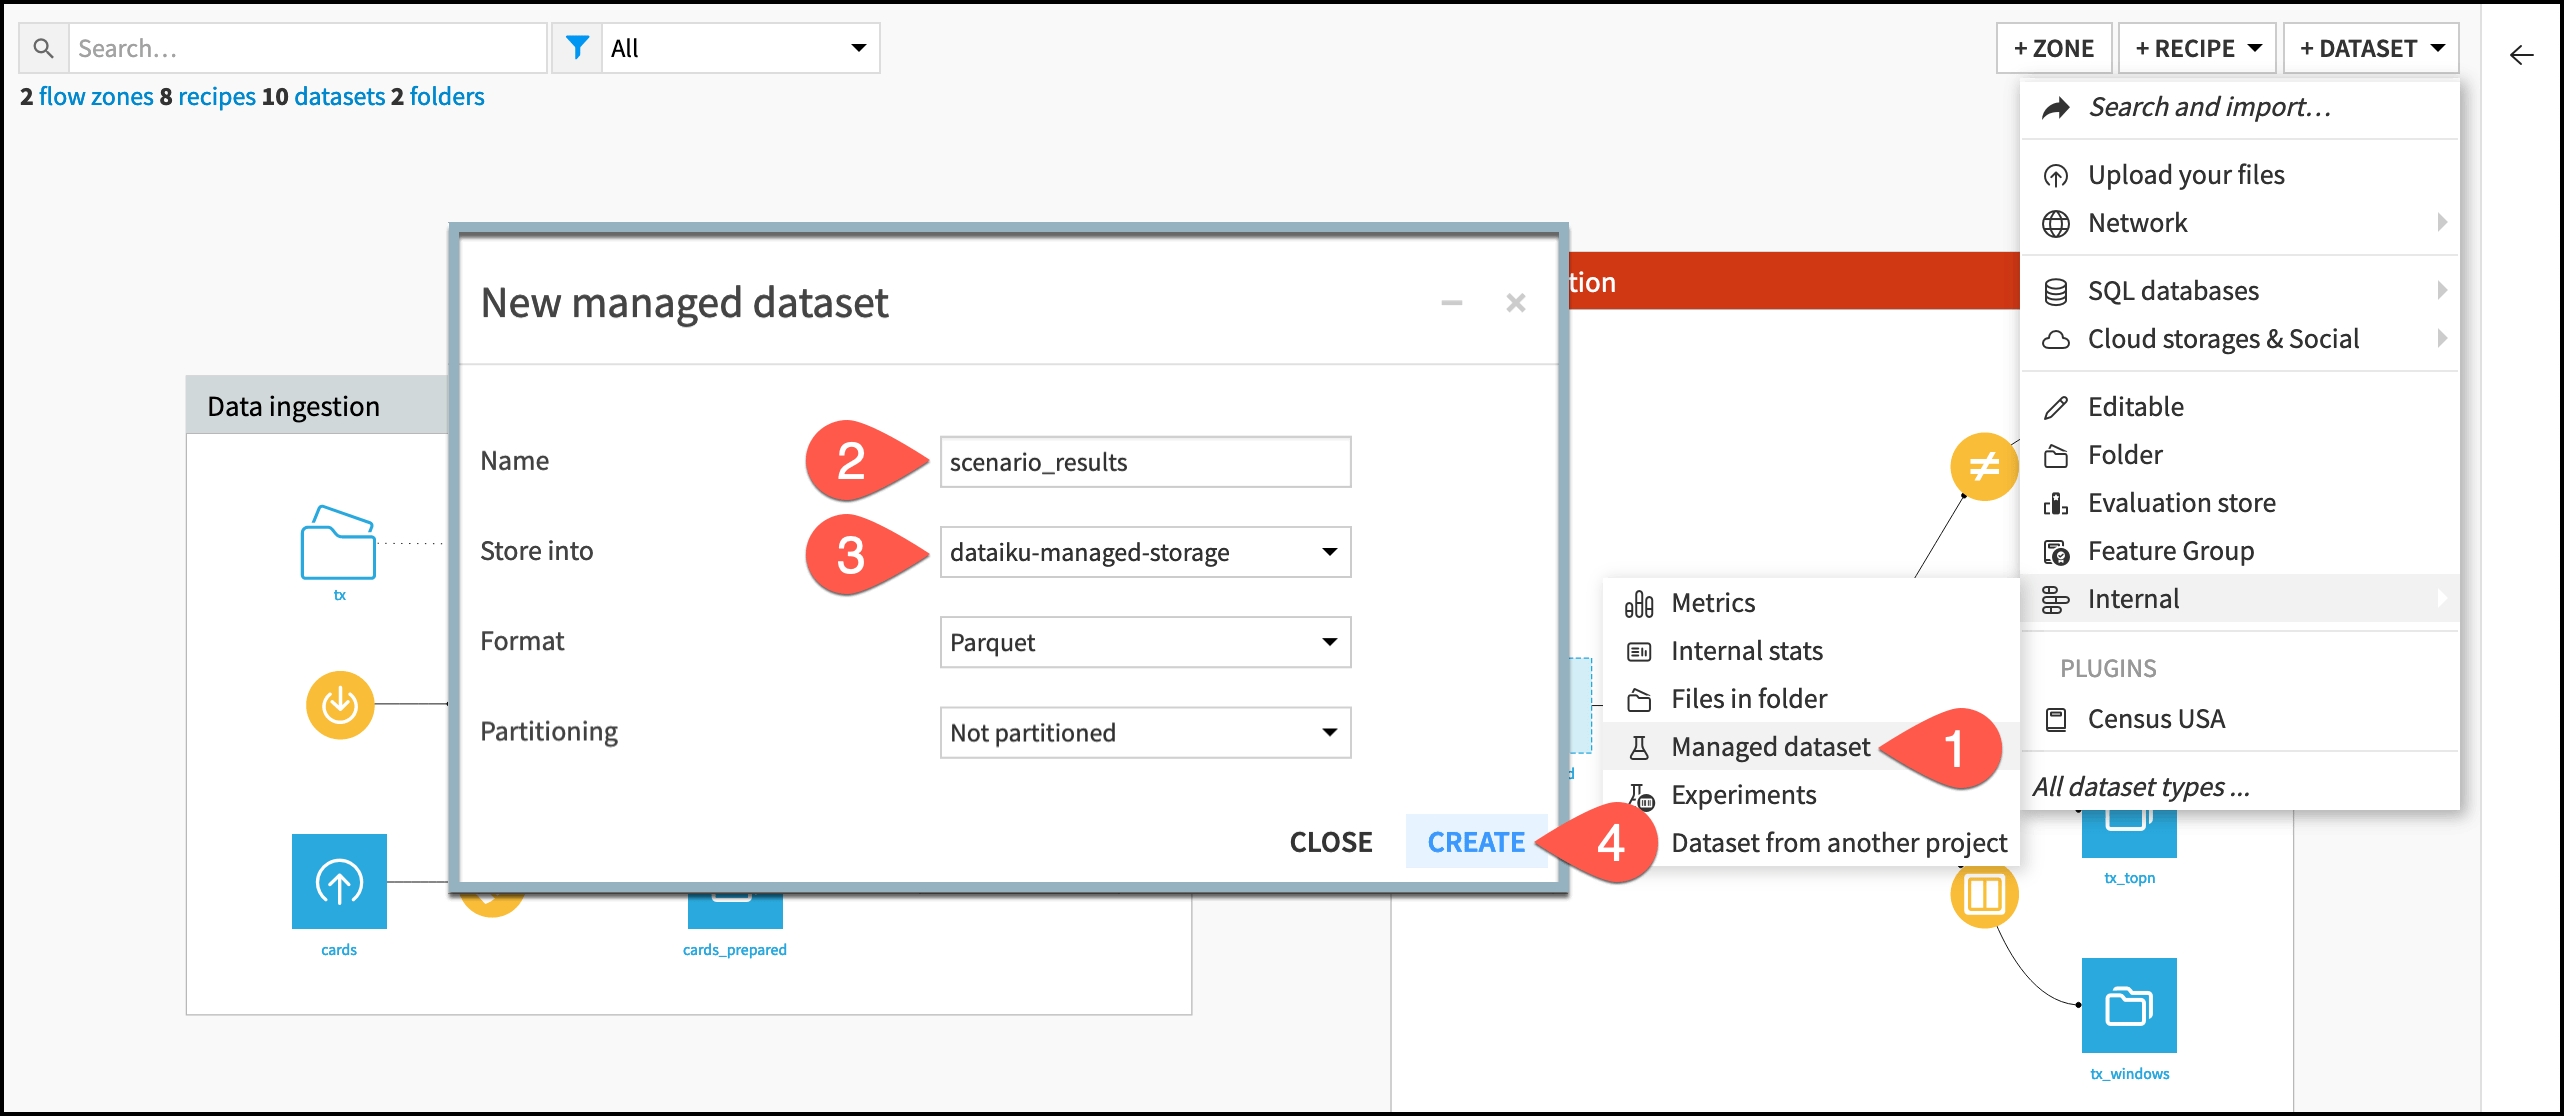
From the Flow, select + Add Item > Connect or create.
Select Managed dataset.
Name it
scenario_results.Store it into a writable connection available on your instance.
Click Create.
Configure the schema of the receiving dataset#
Next, you need to create the schema for the dataset that’s going to record the scenario results. That schema has the following requirements:
It must include one date column to hold the timestamp of the scenario run.
Other columns must match the variables that you want to log.
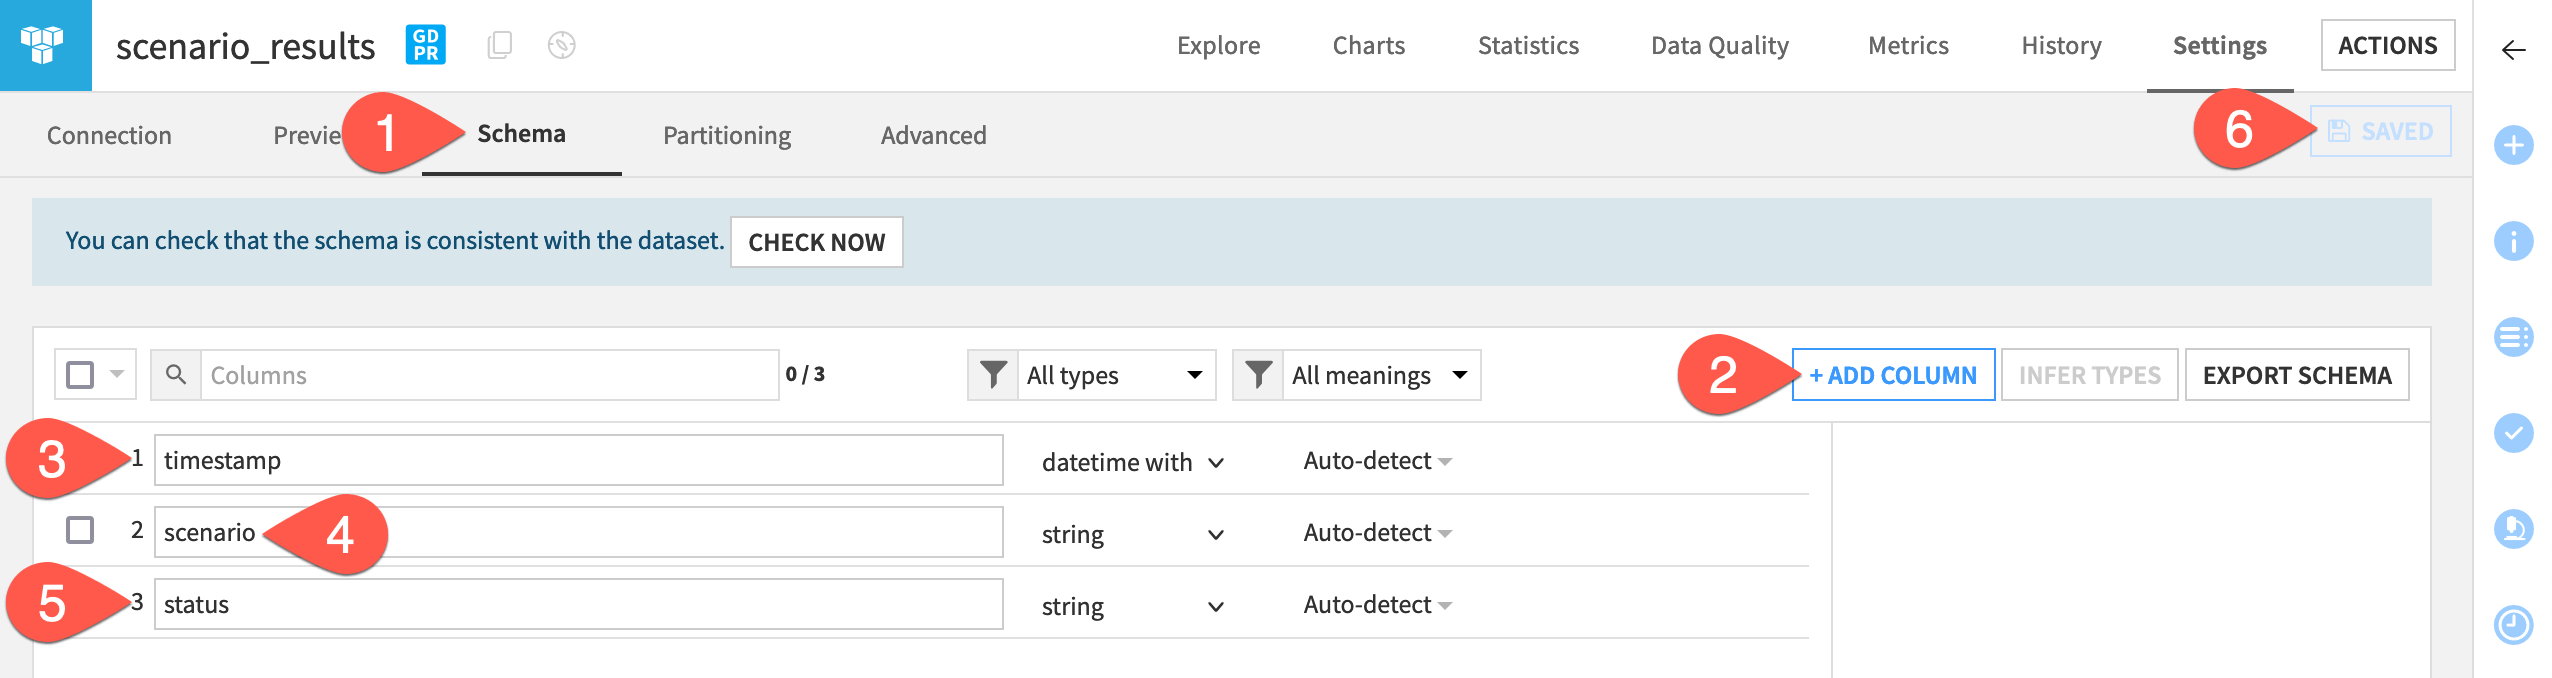
Within the Settings tab of the scenario_results dataset, navigate to the Schema subtab.
Click + Add Column.
Name the first column
timestamp, and set the storage type to a datetime with tz.Click + Add Column again, and name the second column
scenario.Click + Add Column once more, and name the third column
status.Click Save (or
Cmd/Ctrl+S).
See also
Here we chose datetime with tz as the storage type for the timestamp. See Handling and display of dates in the reference documentation to learn more.
Add a “Send to dataset” reporter#
Now that this dataset exists in the project, you can create a reporter to write data to this dataset after each scenario run.
From the Jobs (
) menu of the project, navigate to the Scenarios page.Open the Data Refresh scenario.
Within the Settings tab, click Add Reporter.
Select Send to dataset.
Next, configure the contents of the reporter.
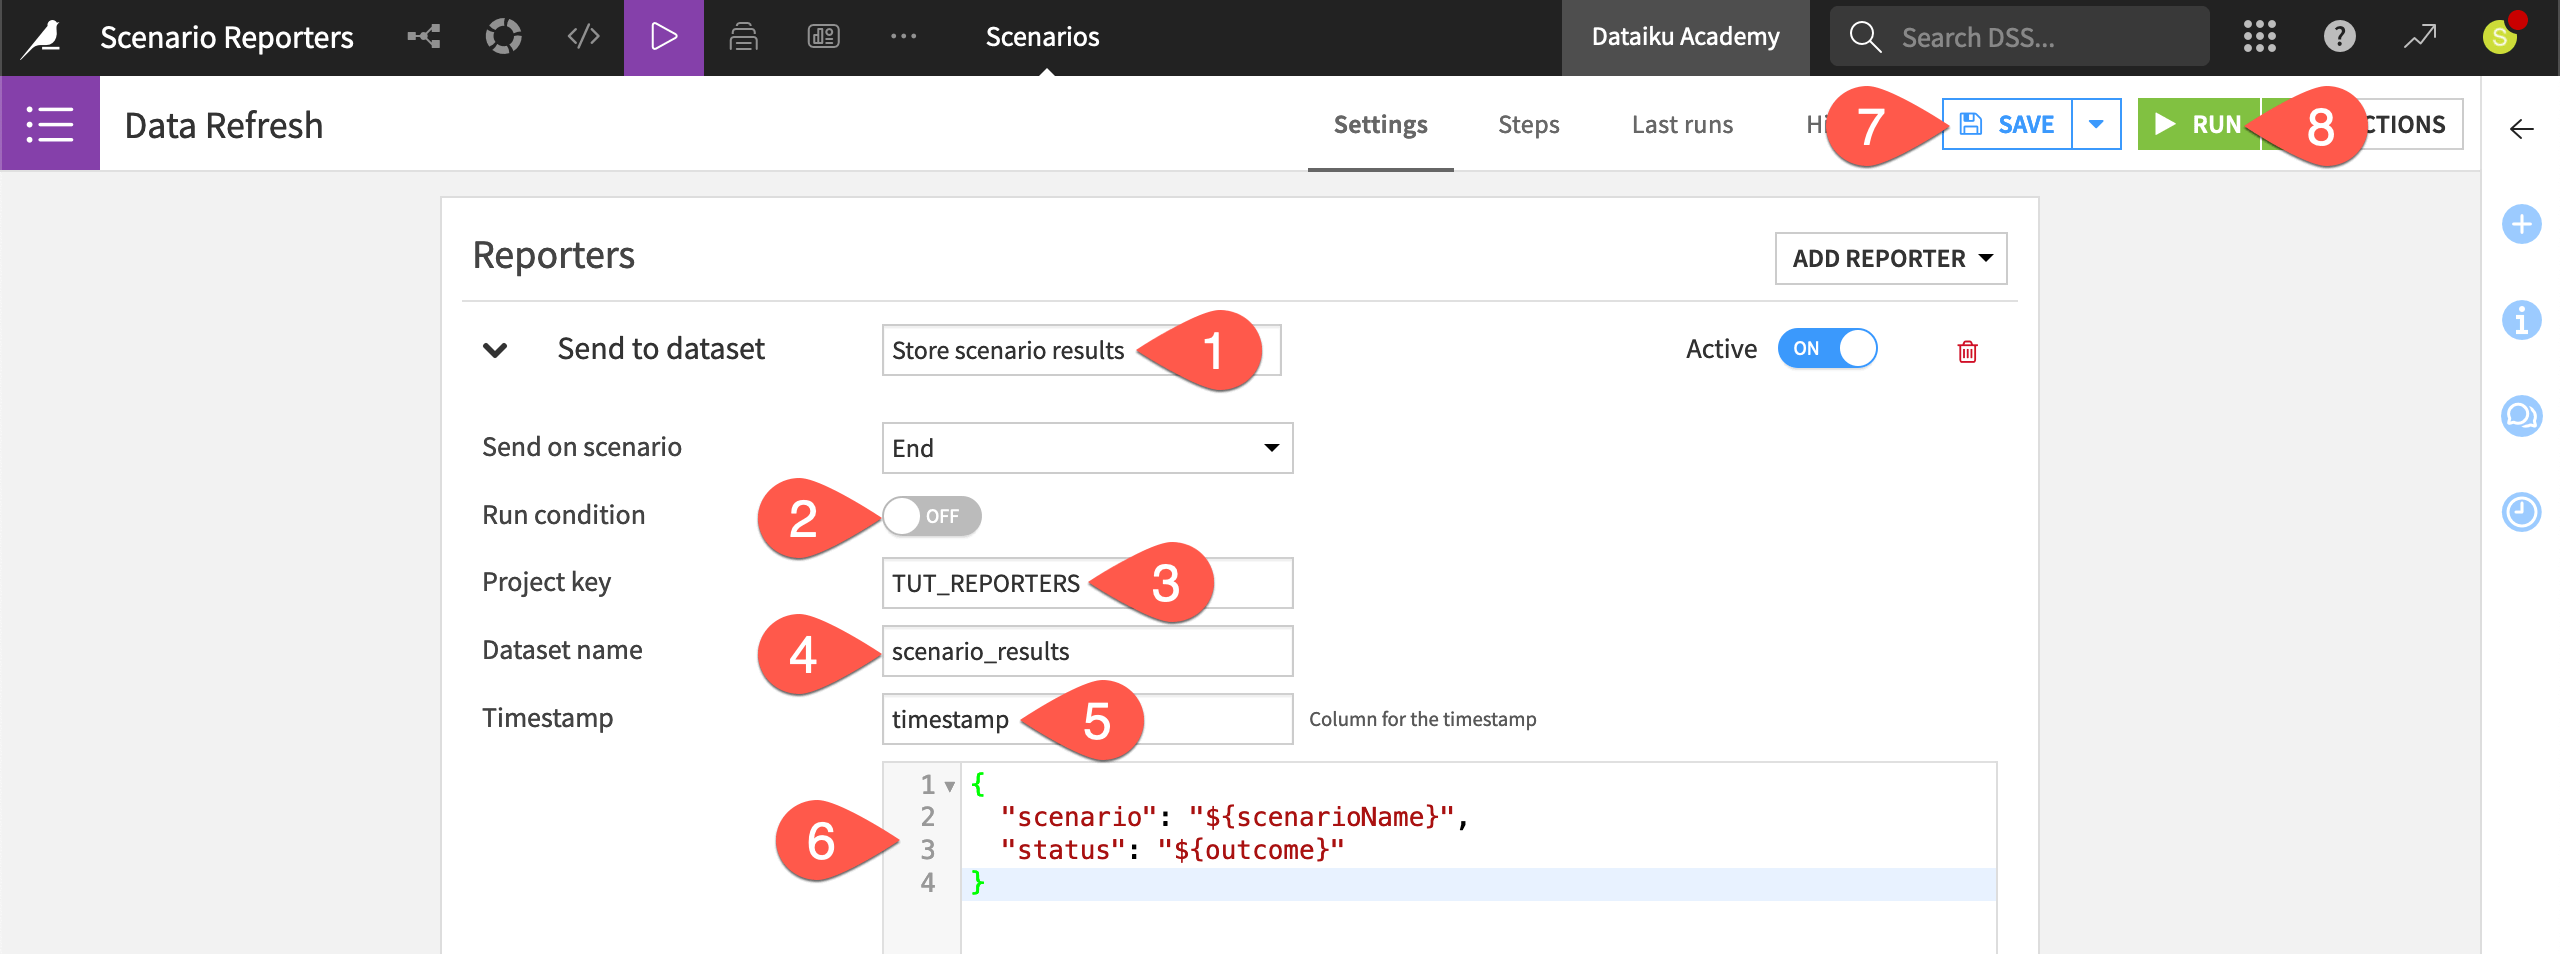
Name the reporter
Store scenario results.Turn Off the run condition to report all results, regardless of the scenario’s success or failure.
Provide the project key found in your URL.
Provide the dataset name
scenario_results(matching the name of the dataset you just created).Provide
timestampas the name of the Timestamp column.Copy-paste the JSON object below for the other two columns found in the schema.
{
  "scenario": "${scenarioName}",
  "status": "${outcome}"
}
Click Save to activate the reporter.
Click Run to launch the scenario manually.
Tip
Browse the Available variables section for a list of other variables that you can include in reporters. To use them, be sure to first update the schema of the receiving dataset.
Check the results#
Make sure the scenario results were written to the dataset you’ve created.
Navigate to the Last runs tab of the scenario to see the reporter activity listed in the most recent run log.
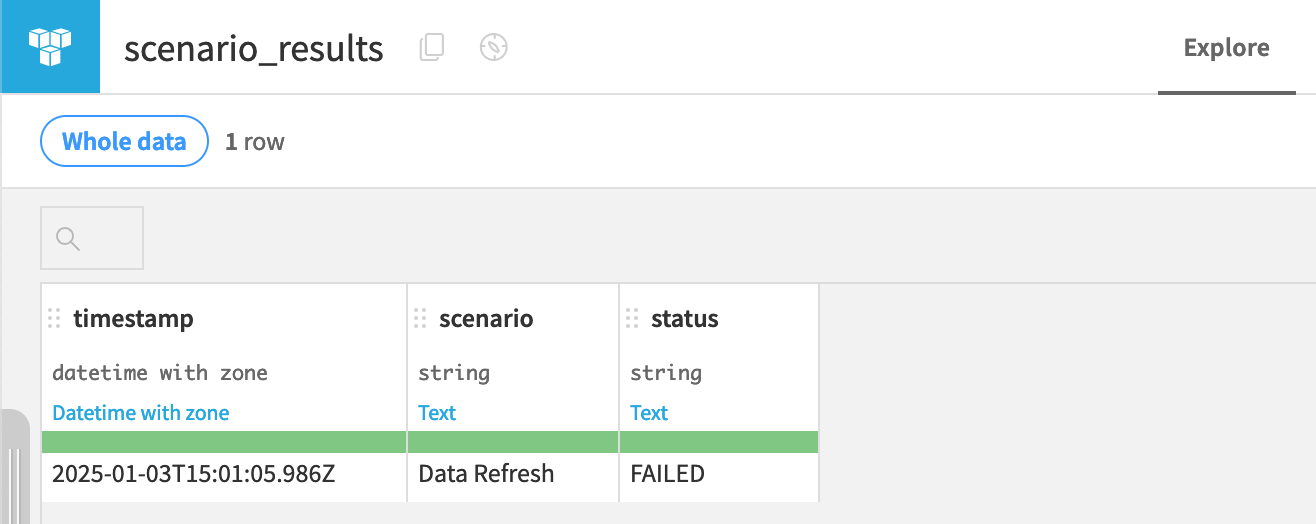
From the Flow, open the scenario_results dataset to see a record of the most recent scenario run.
Note
Depending on your location, you may notice that the timestamp column doesn’t match the local time when you triggered the scenario. Timestamps are recorded in the UTC time standard. To update the timestamp, use the Format date processor in a Prepare recipe. See the reference documentation for more on Managing dates.
Tip
To learn more about why this scenario is failing, see Tutorial | Data quality.
Send scenario results to a messaging channel#
The Send to dataset reporter can be helpful for creating this kind of log in a Dataiku project. Reporters though are most often used for sending alerts outside of Dataiku. For this, you’ll need a messaging channel.
This tutorial demonstrates using a mail reporter, but the process will work similarly if you have other channels configured.
Important
See the reference documentation on Reporting on scenario runs to create a messaging channel. You’ll need admin access to do so.
From the Jobs (
) menu of the project, navigate to the Scenarios page.Open the Data Refresh page.
On the Settings tab, click Add Reporter.
Select your messaging channel. (This tutorial uses Mail).
Configure a reporter with a messaging channel#
First, make sure the messaging channel is working.
Name it
Mail reporter.Once again, turn Off the run condition.
For Channel, select your messaging channel.
Provide your email address in the To field.
Click Run to launch the scenario now including a basic reporter with the default template file.

Check your email for the result.
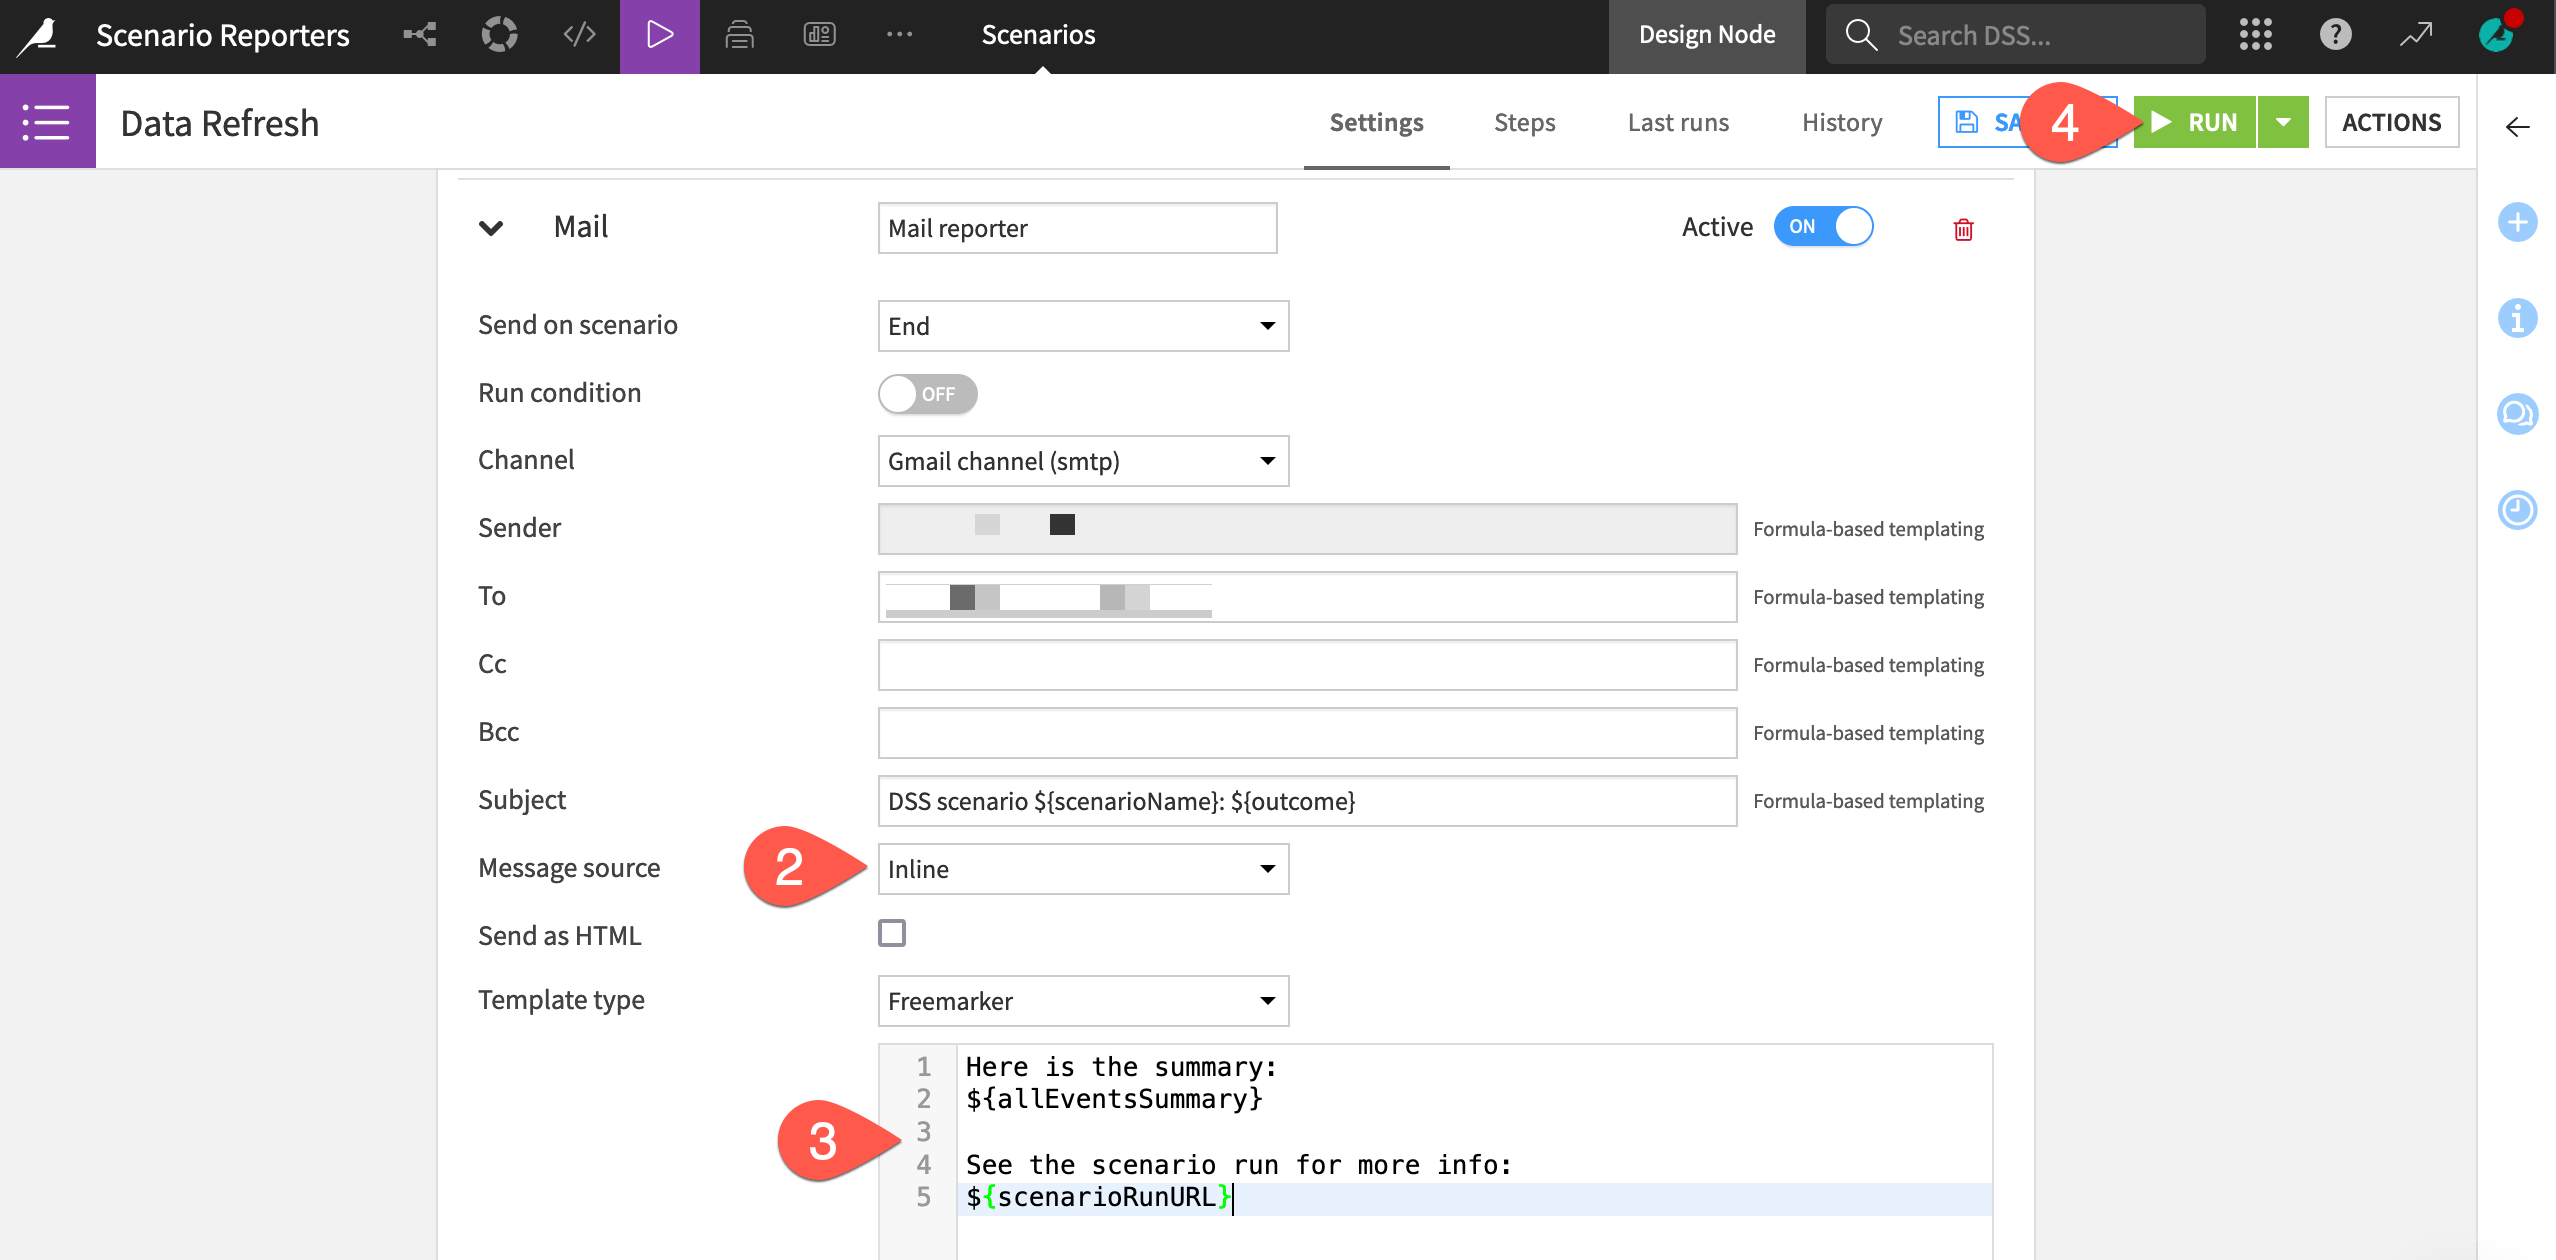
Use an inline message source#
The previous exercise used a default template file to format the message. However, you can also customize the contents of the message.
Return to the Mail reporter of the Data Refresh scenario.
Switch the message source to Inline.
Copy-paste the following text into the message field. You can also customize it with more variables.
Here is the summary:
${allEventsSummary}

See the scenario run for more info:
${scenarioRunURL}
Click Run to launch the scenario again.
Check your email once more for the result.
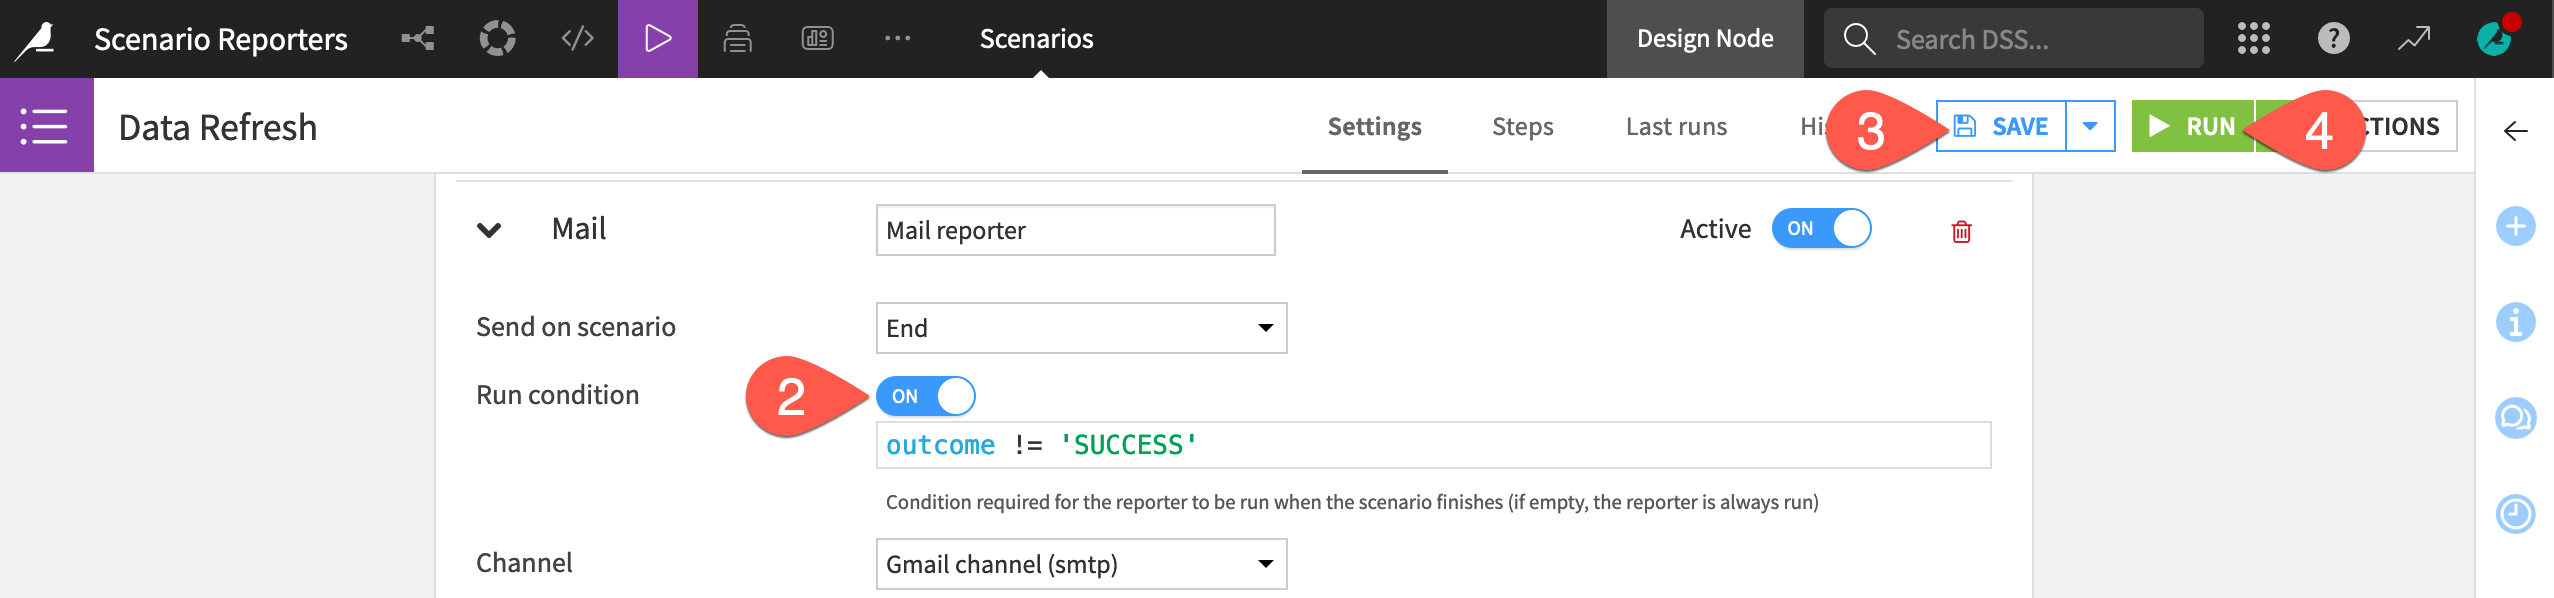
Use a run condition#
Currently, this reporter delivers an email after every scenario run. However, you can also exert more control with run conditions. For example, you may want to send different messages for different scenario outcomes.
Try only sending an email if the scenario run isn’t successful, which in this case is true.
Return to the Mail reporter of the Data Refresh scenario.
Toggle On the run condition. It should say
outcome != 'SUCCESS'.Click Save.
Click Run.
You should receive another email given the scenario’s known failure.
Tip
The run condition uses == for equals and != for not equals. In addition to SUCCESS, other possible states are FAILED and ABORTED.
Add an attachment to a reporter#
Reporters also allow for adding attachments. This can be particularly useful for various kinds of exports.
Return to the Mail reporter of the Data Refresh scenario.
Click Add Attachment > Dataset data.
For the attached dataset, select scenario_results.
Click Save.
Click Run to launch the scenario.
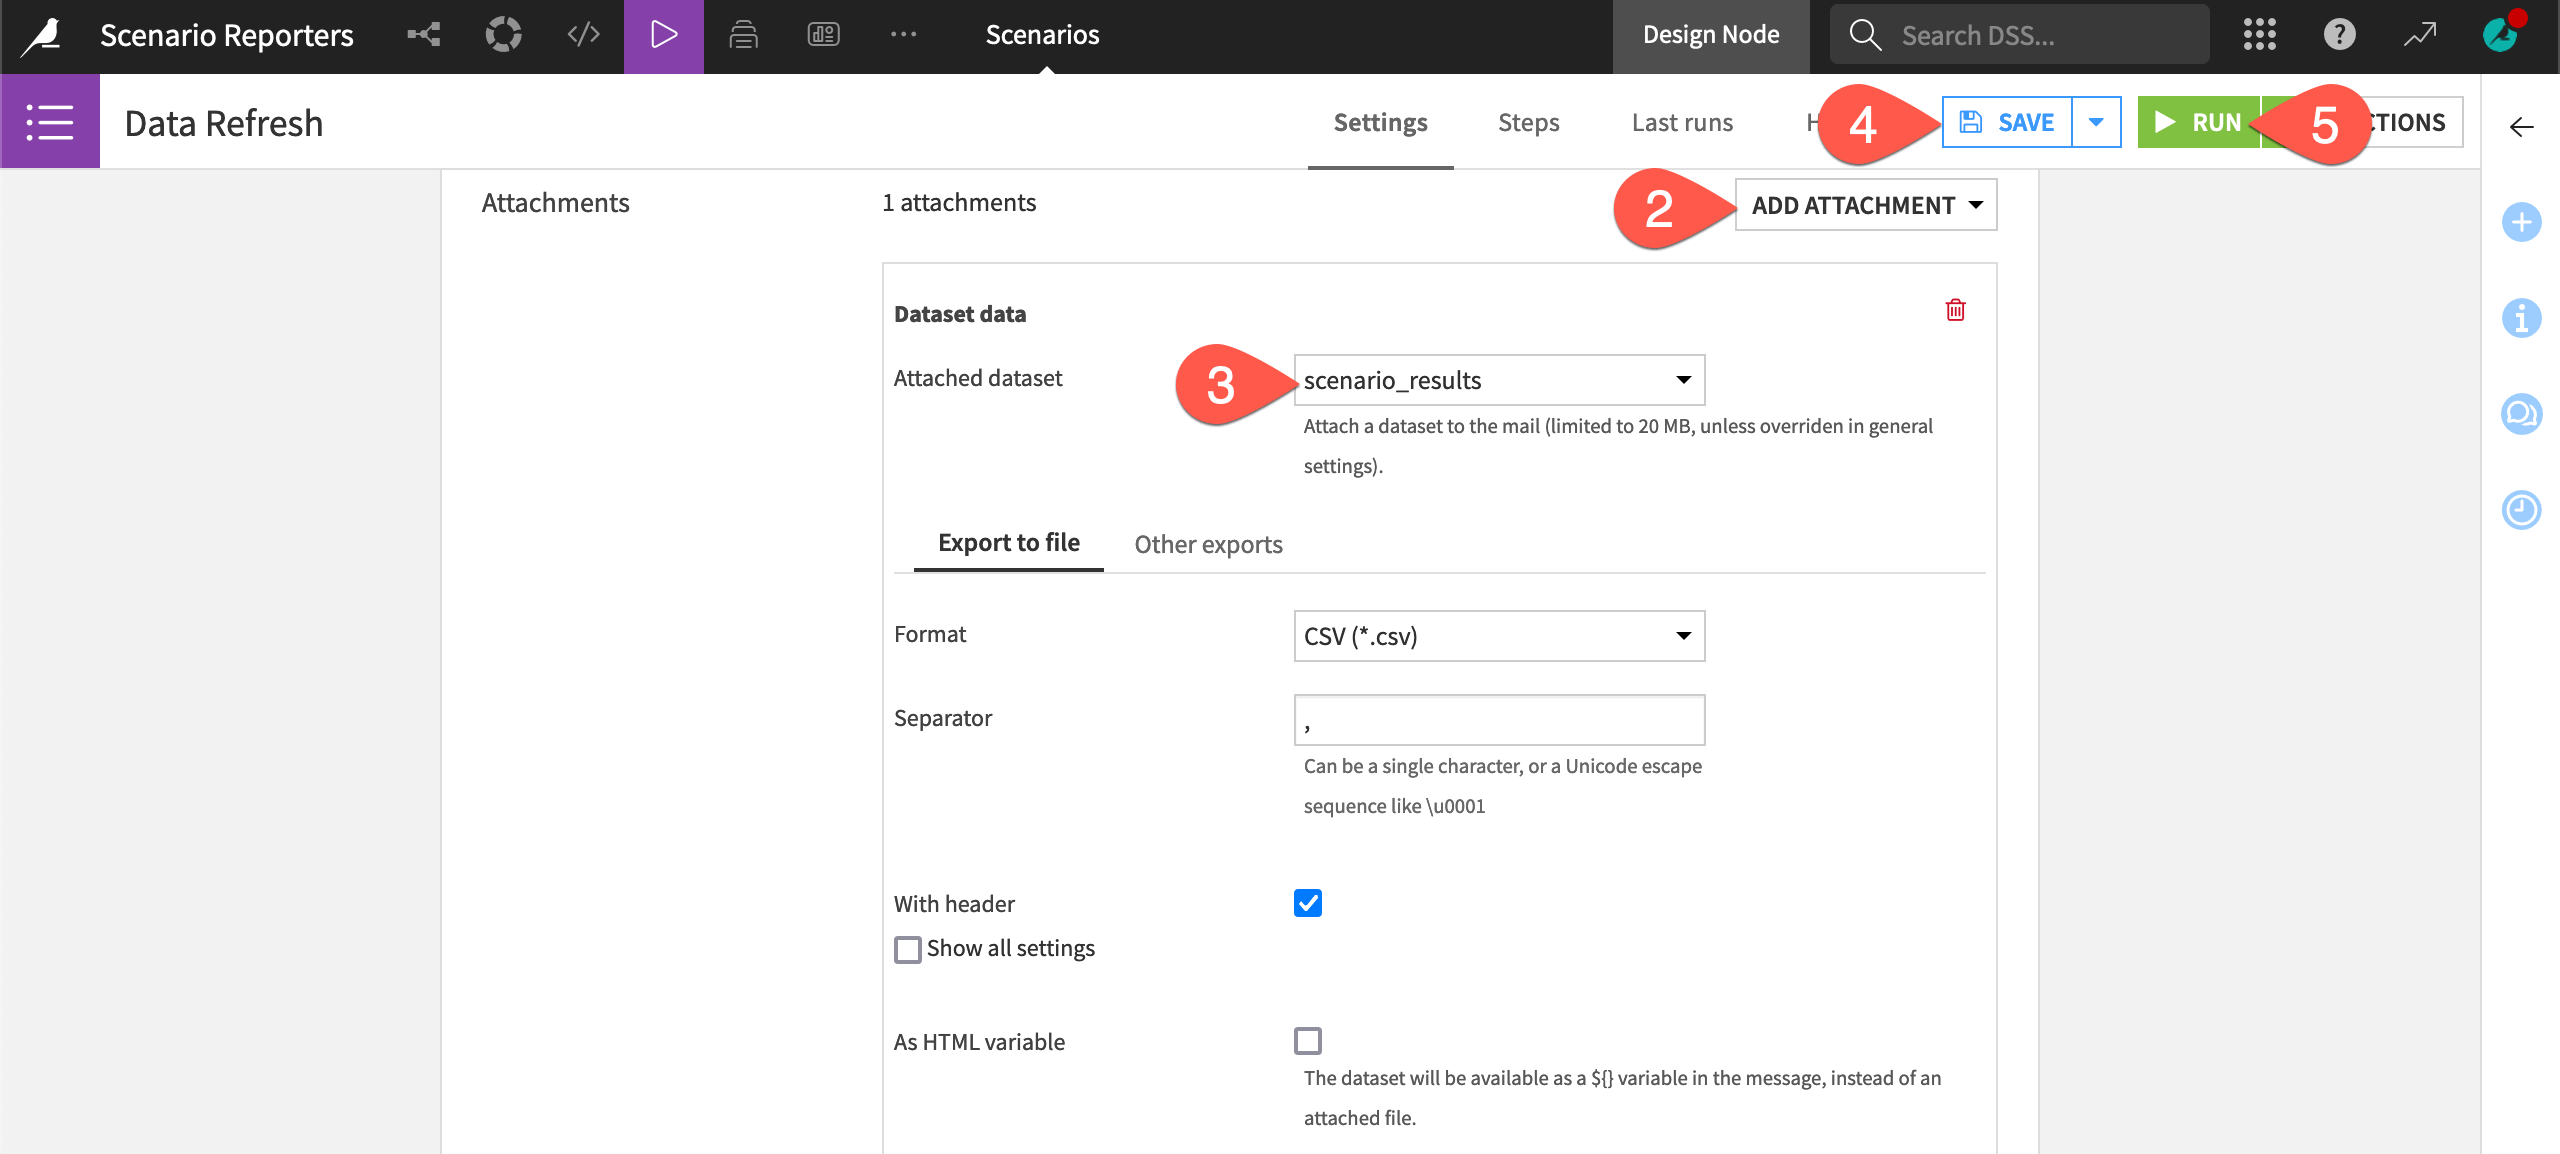
Check your email to find the CSV file included as an attachment in the latest mail.
Tip
If you navigate to the Steps tab of a scenario and browse the available types of steps, you’ll notice many types of export steps. You’ll also find an option for “Send message.” Depending on your specific use case, you have the flexibility to relay scenario information as reporters or as steps in the scenario.
Next steps#
Congratulations on taking your first steps with scenario reporters! Continue experimenting to learn how to send the most relevant alerts to the correct individuals at the best time.
Caution
If you haven’t already done so, be sure to turn off any Auto-triggers in the Data Refresh scenario!
If your organization uses other messaging channels, such as Jira, see Tutorial | Webhook reporters in scenarios to demonstrate how to send scenario messages to any API.
See also
See the reference documentation to learn more about Reporting on scenario runs.