
Quick Start | Dataiku for data preparation#
Get started#
Recent advancements in generative AI have made it easy to apply for jobs. But be careful! Scammers have also been known to create fake job applications in the hopes of stealing personal information. Let’s see if you—with Dataiku’s help—can spot a real job posting from a fake one!
Objectives#
In this quick start, you’ll:
Interactively explore a dataset.
Clean data and create new features.
Import new data into a Dataiku project.
Join two datasets together.
Optional: Write code in a notebook and insert it into a visual Flow.
Tip
To check your work, you can review a completed version of this entire project from data preparation through MLOps on the Dataiku gallery.
Create an account#
To follow along with the steps in this tutorial, you need access to a 12.0+ Dataiku instance. If you don’t already have access, you can get started in one of two ways:
Start a 14 day free trial. See How-to | Begin a free trial from Dataiku for help if needed.
Install the free edition locally for your operating system.
Open Dataiku#
The first step is getting to the homepage of your Dataiku Design node.
Go to the Launchpad.
Click Open Instance in the Design node tile of the Overview panel once your instance has powered up.
Important
If using a self-managed version of Dataiku, including the locally downloaded free edition on Mac or Windows, open the Dataiku Design node directly in your browser.
Once you are on the Design node homepage, you can create the tutorial project.
Create the project#
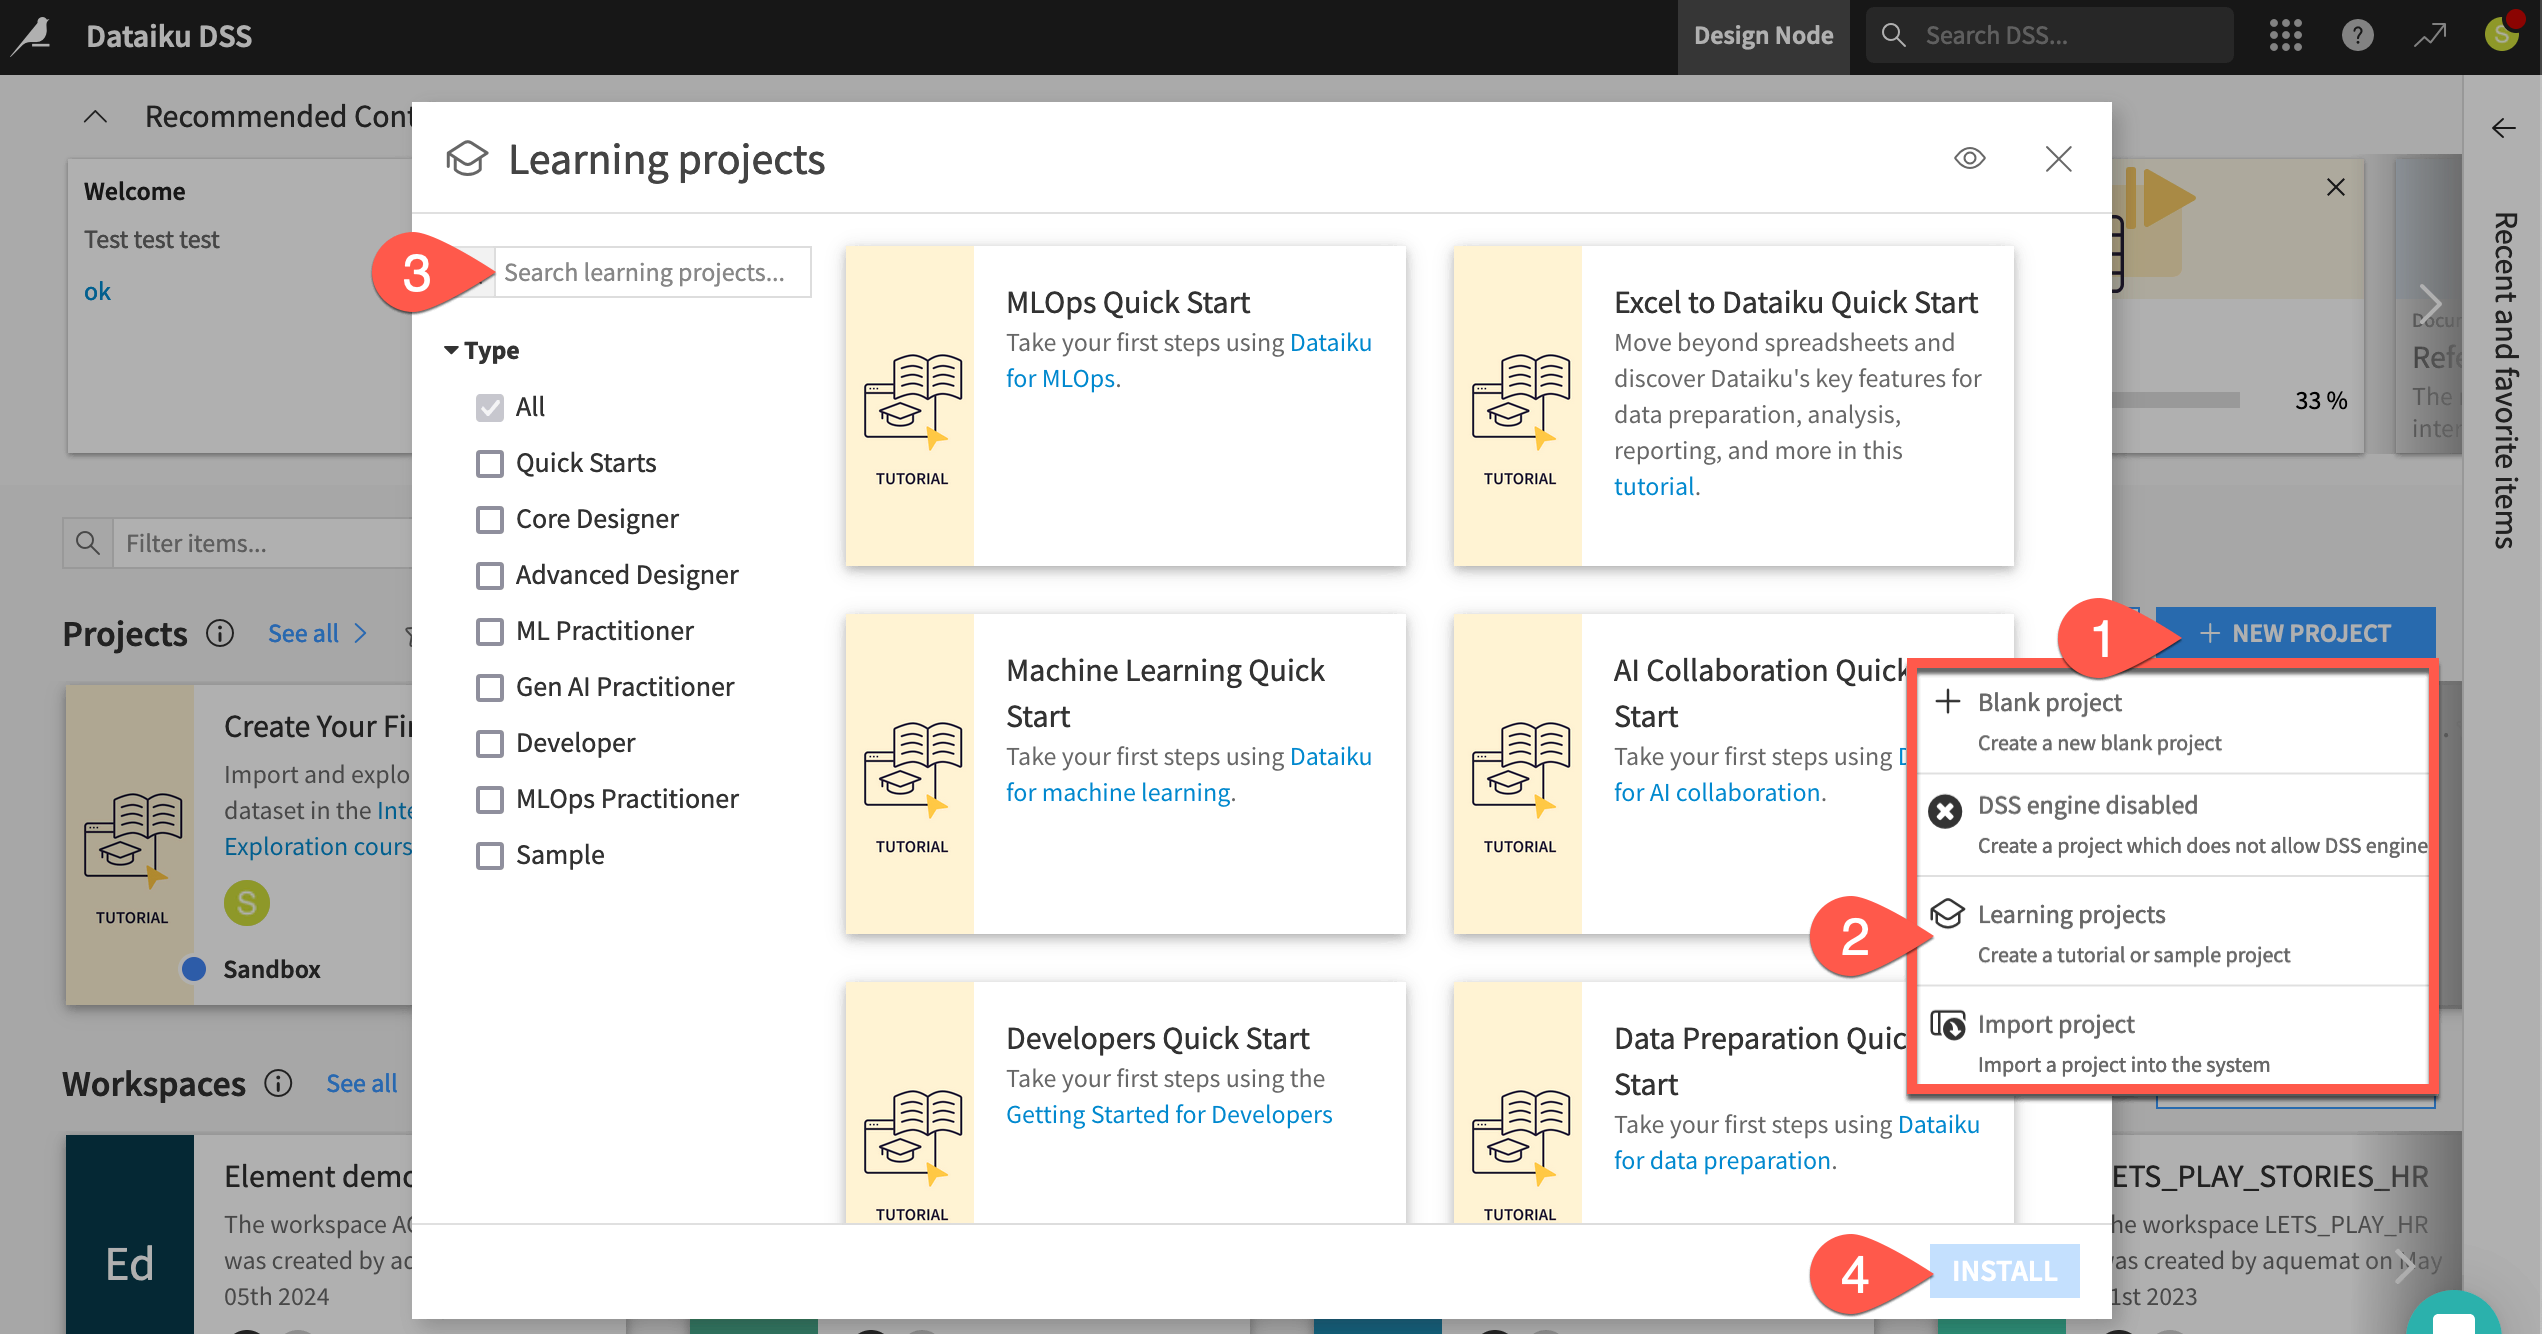
From the Dataiku Design homepage, click + New Project.
Select Learning projects.
Search for and select Data Preparation Quick Start.
If needed, change the folder into which the project will be installed, and click Install.
From the project homepage, click Go to Flow (or type
g+f).
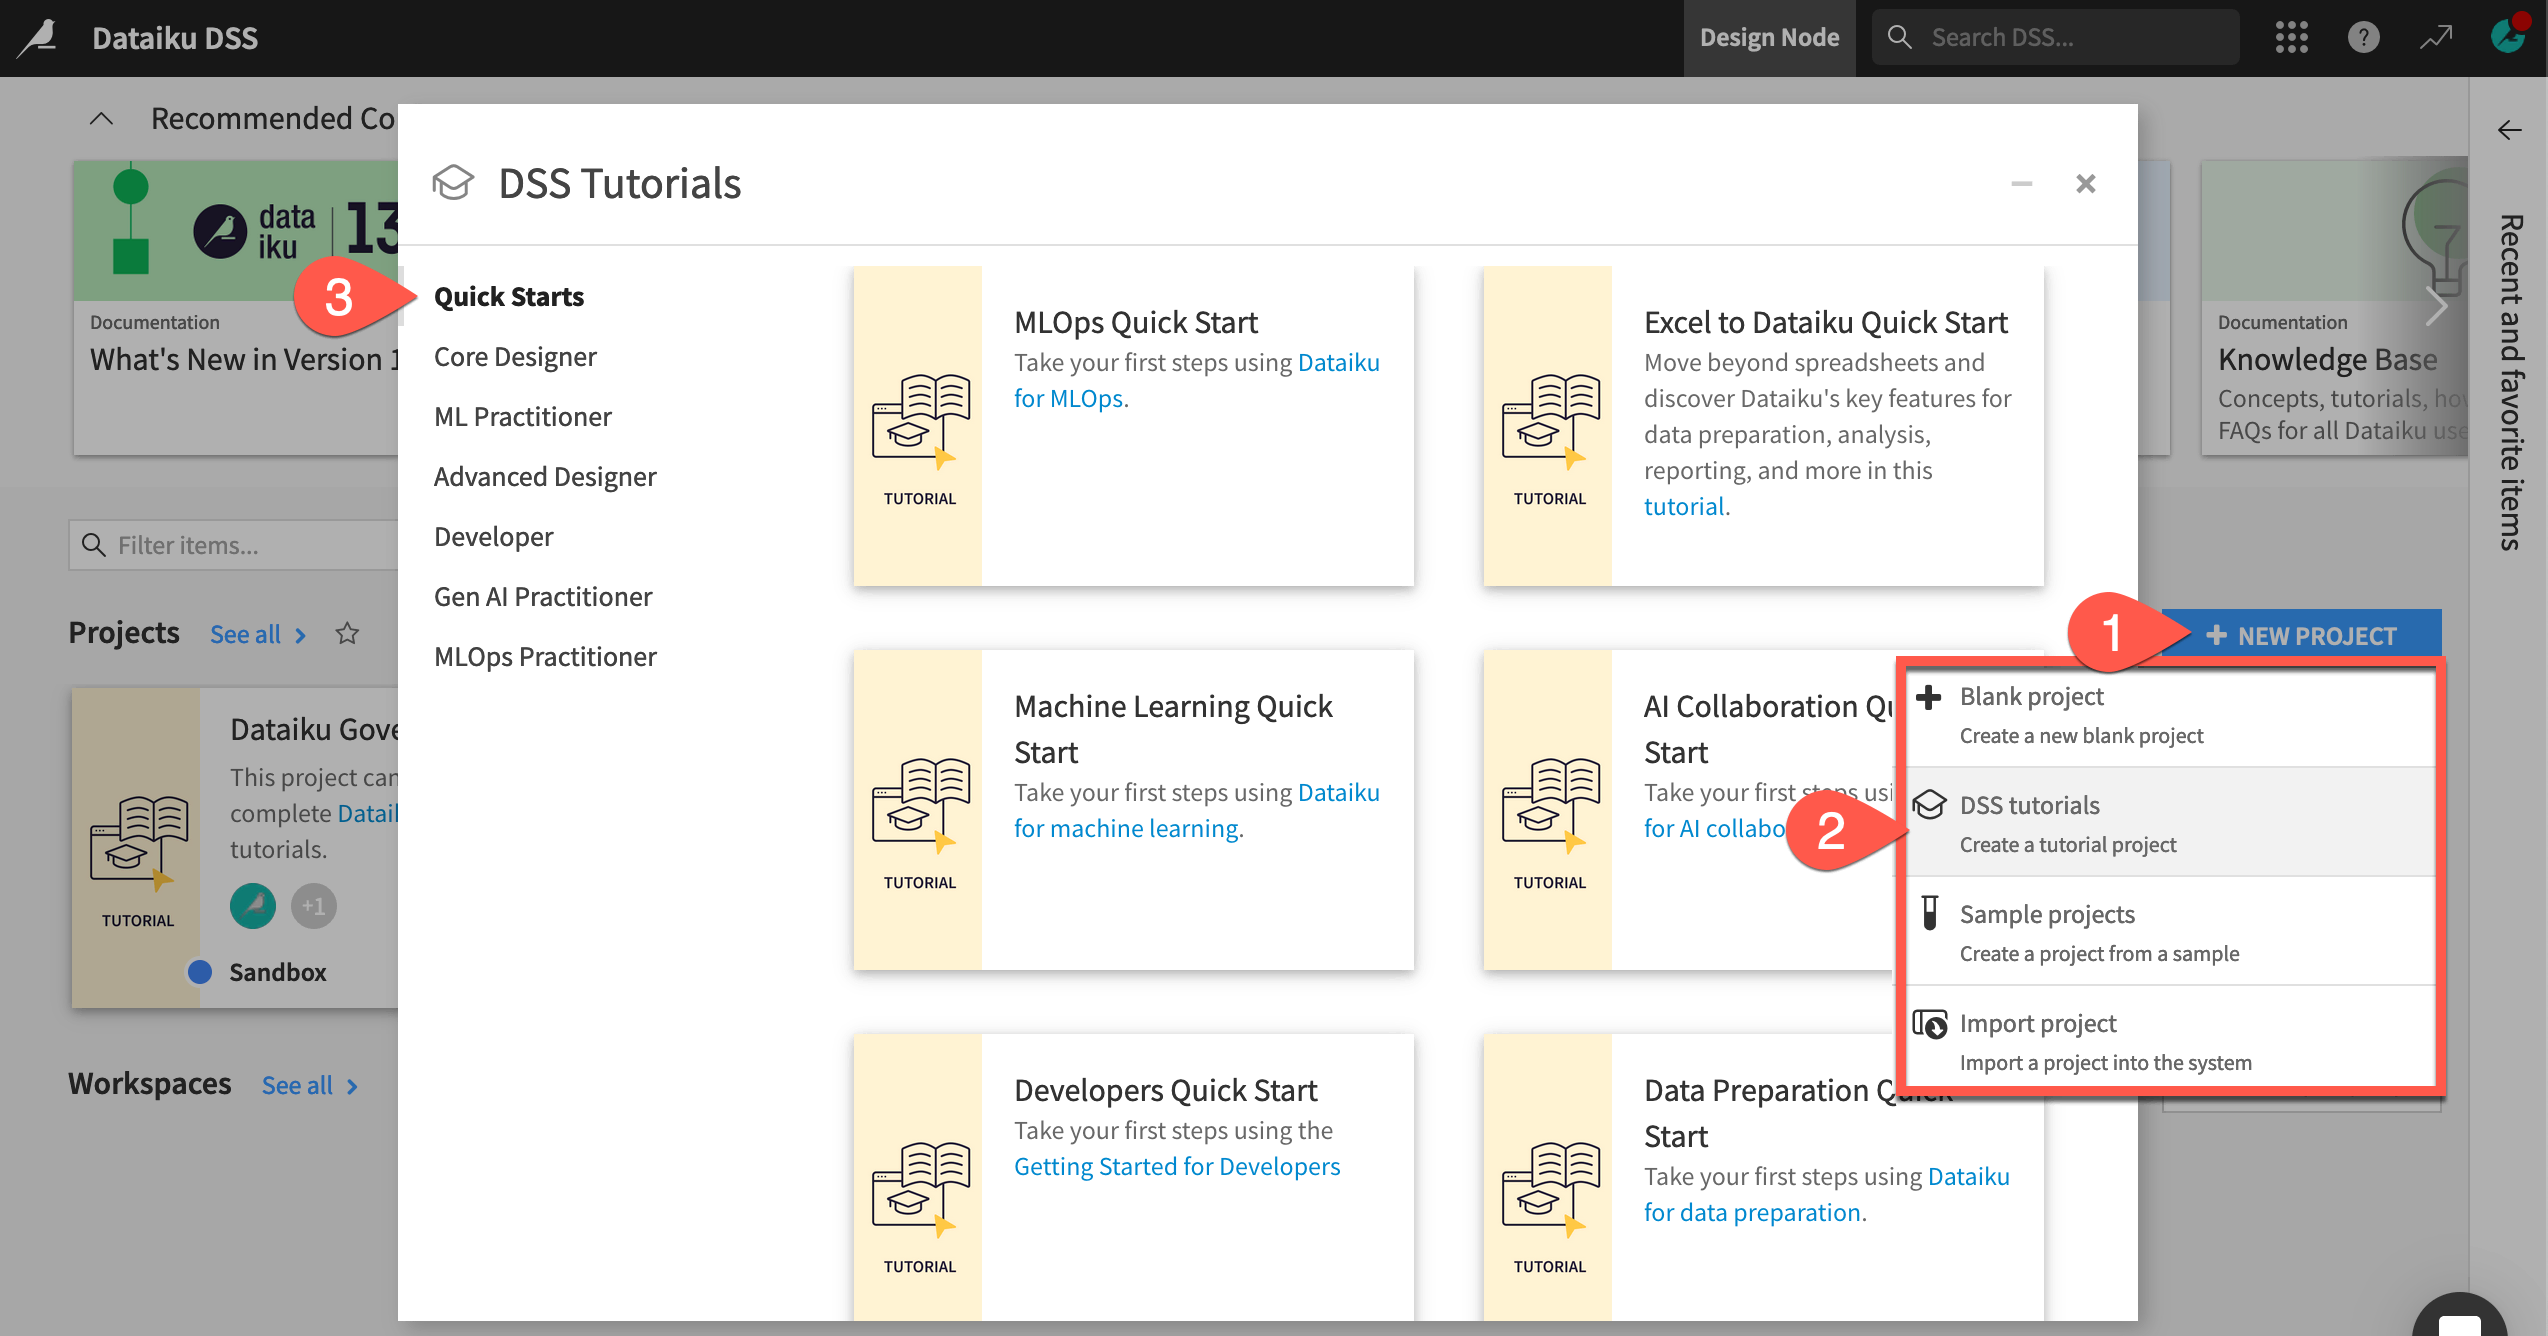
From the Dataiku Design homepage, click + New Project.
Select DSS tutorials.
Filter by Quick Starts.
Select Data Preparation Quick Start.
From the project homepage, click Go to Flow (or type
g+f).
Note
You can also download the starter project from this website and import it as a zip file.
Explore data#
See a screencast covering this section’s steps
The project now at hand includes a labeled dataset of real and fake job postings. Before actually preparing the data, let’s explore it briefly.
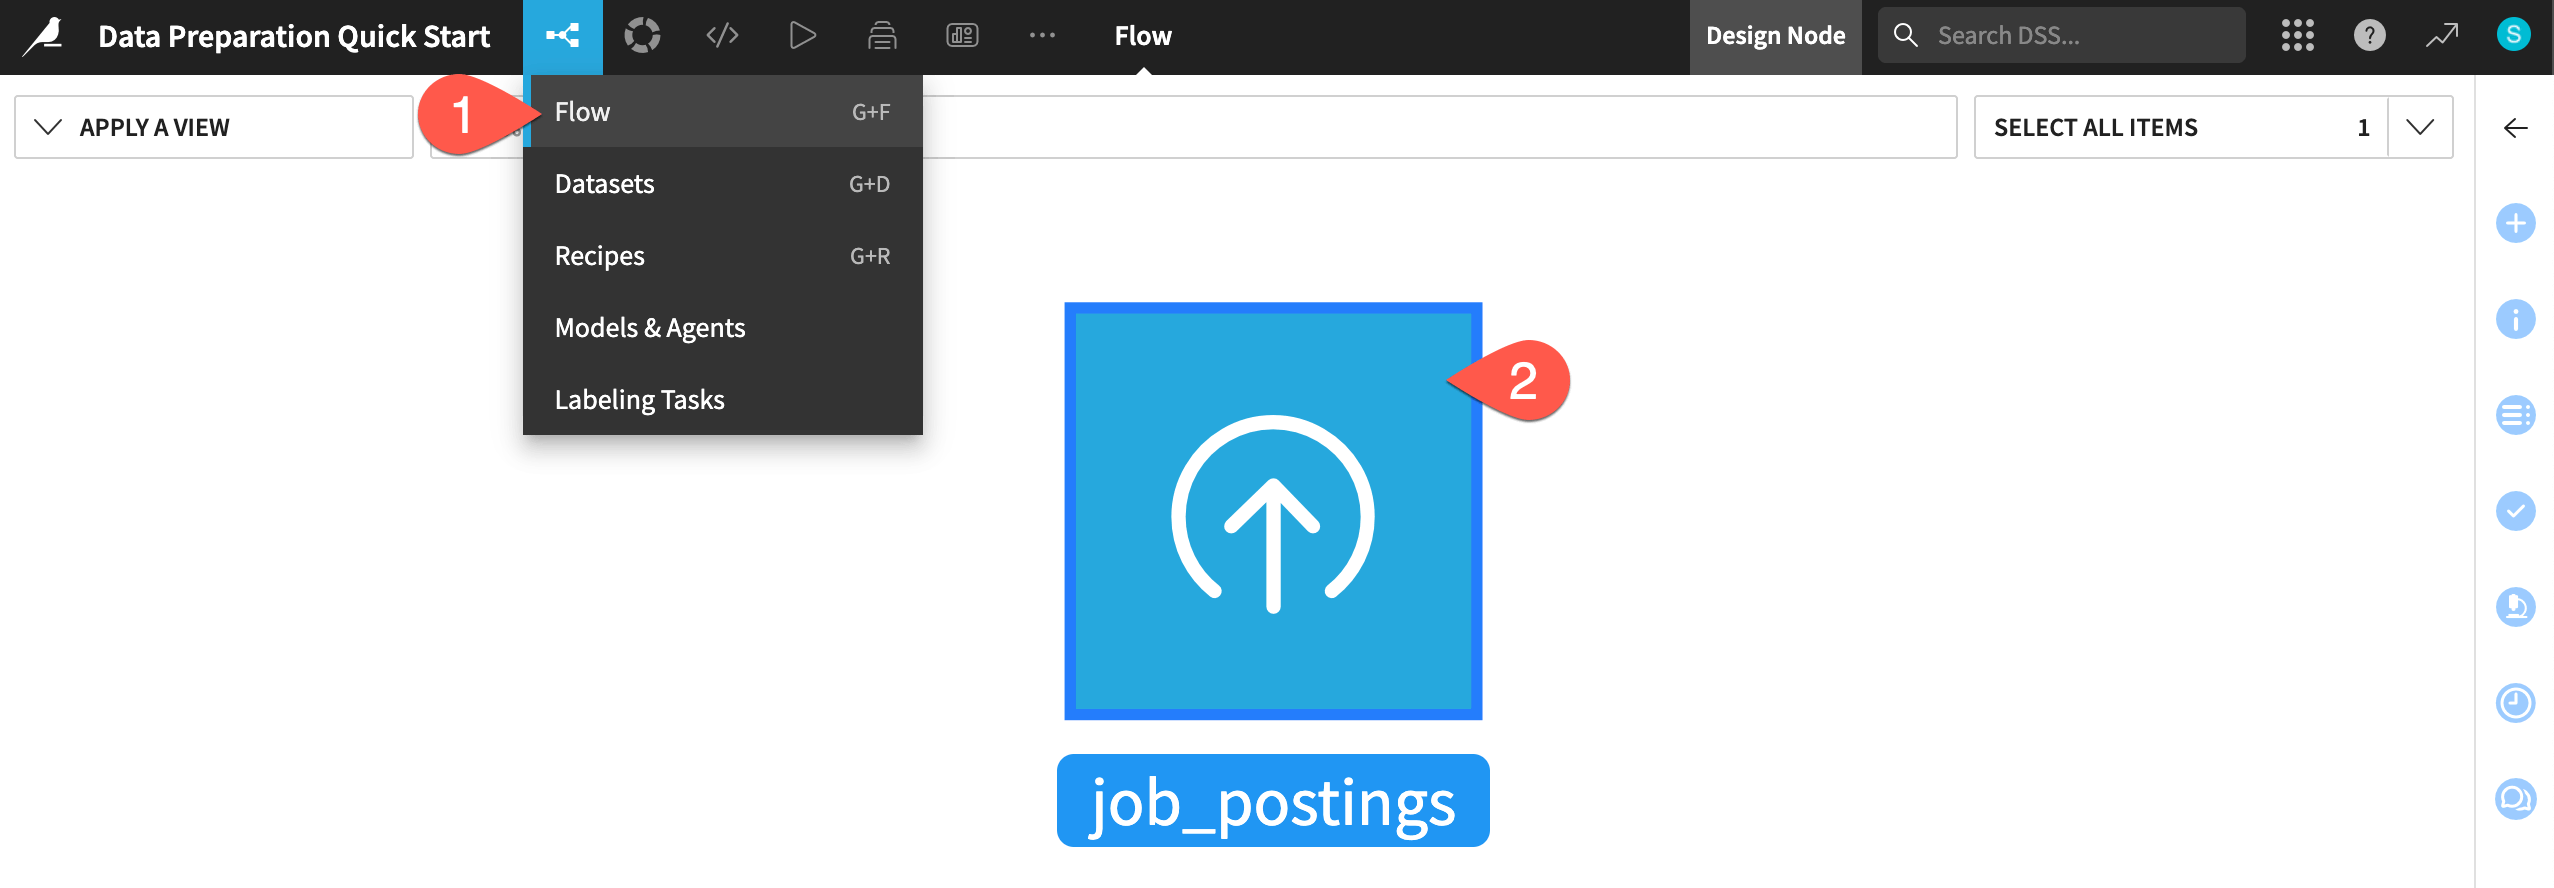
If not already there, from the (
 ) menu in the top navigation bar, select the Flow (or use the keyboard shortcut
 g+f).Double click on the job_postings dataset to open it.
Tip
There are many other keyboard shortcuts beyond g + f. Type ? to pull up a menu or see the Accessibility page in the reference documentation.
Compute the row count#
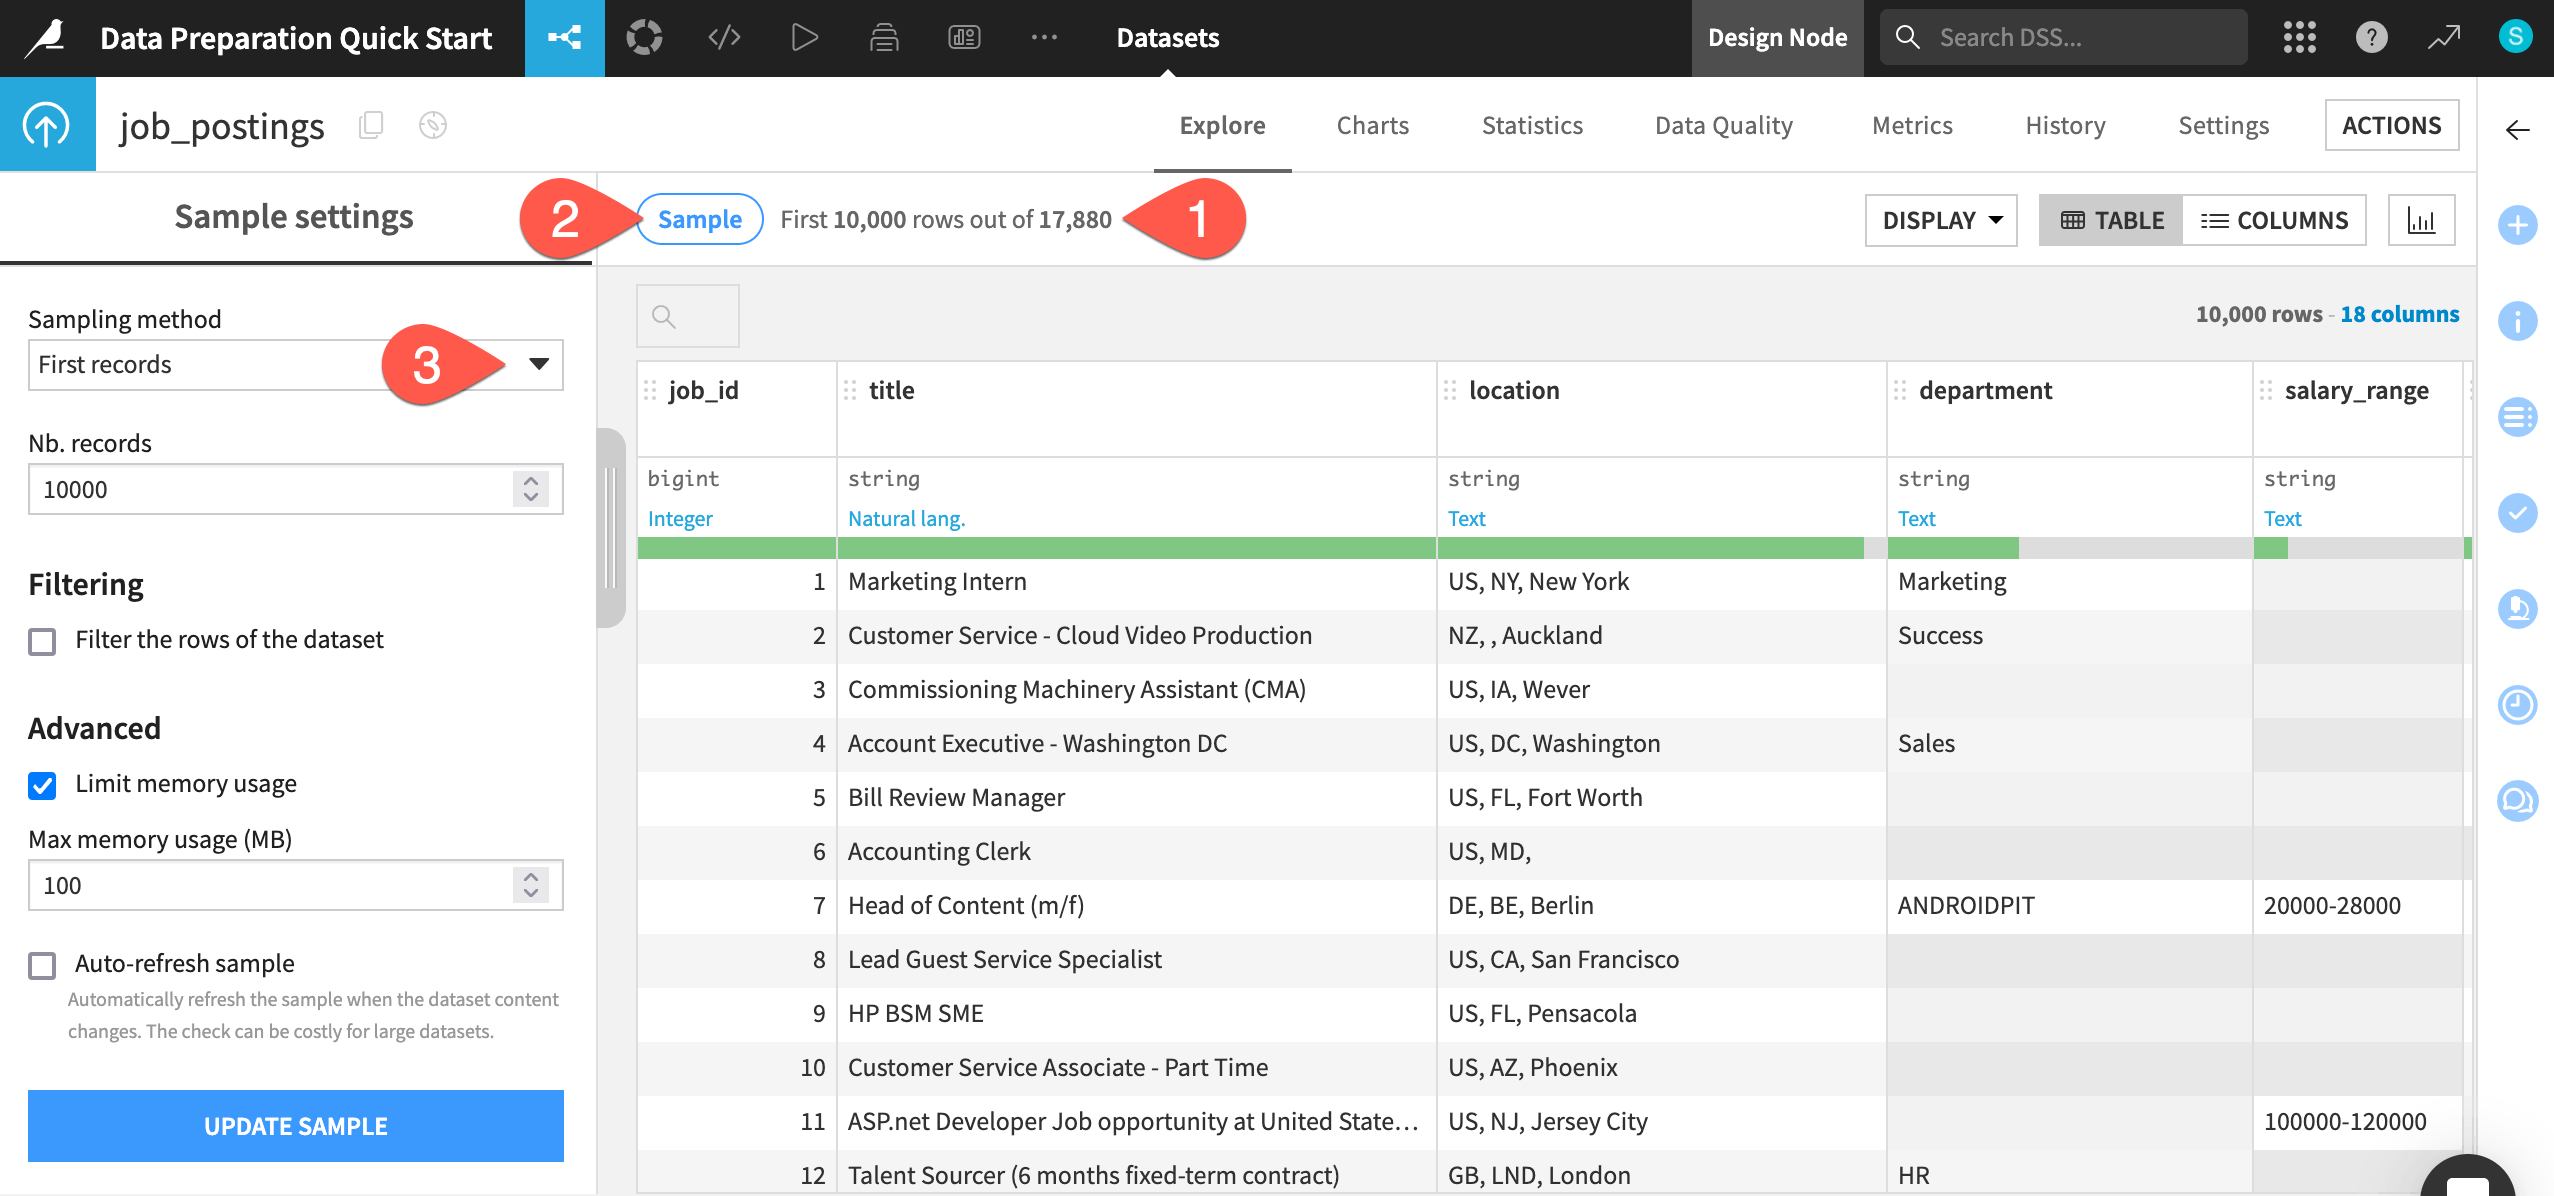
One of the first things to recognize when exploring a dataset in Dataiku is that you are viewing only a sample of the data. This enables you to work interactively even with large datasets.
From within the Explore tab of the job_postings dataset, click the compute row count (
 ) icon to determine the row count of the entire dataset.
Click the Sample button to open the Sample settings panel.
Click the Sampling method dropdown to see options other than the default first records. No changes are required.
When ready, click the Sample button again to collapse the panel.
Analyze column distributions#
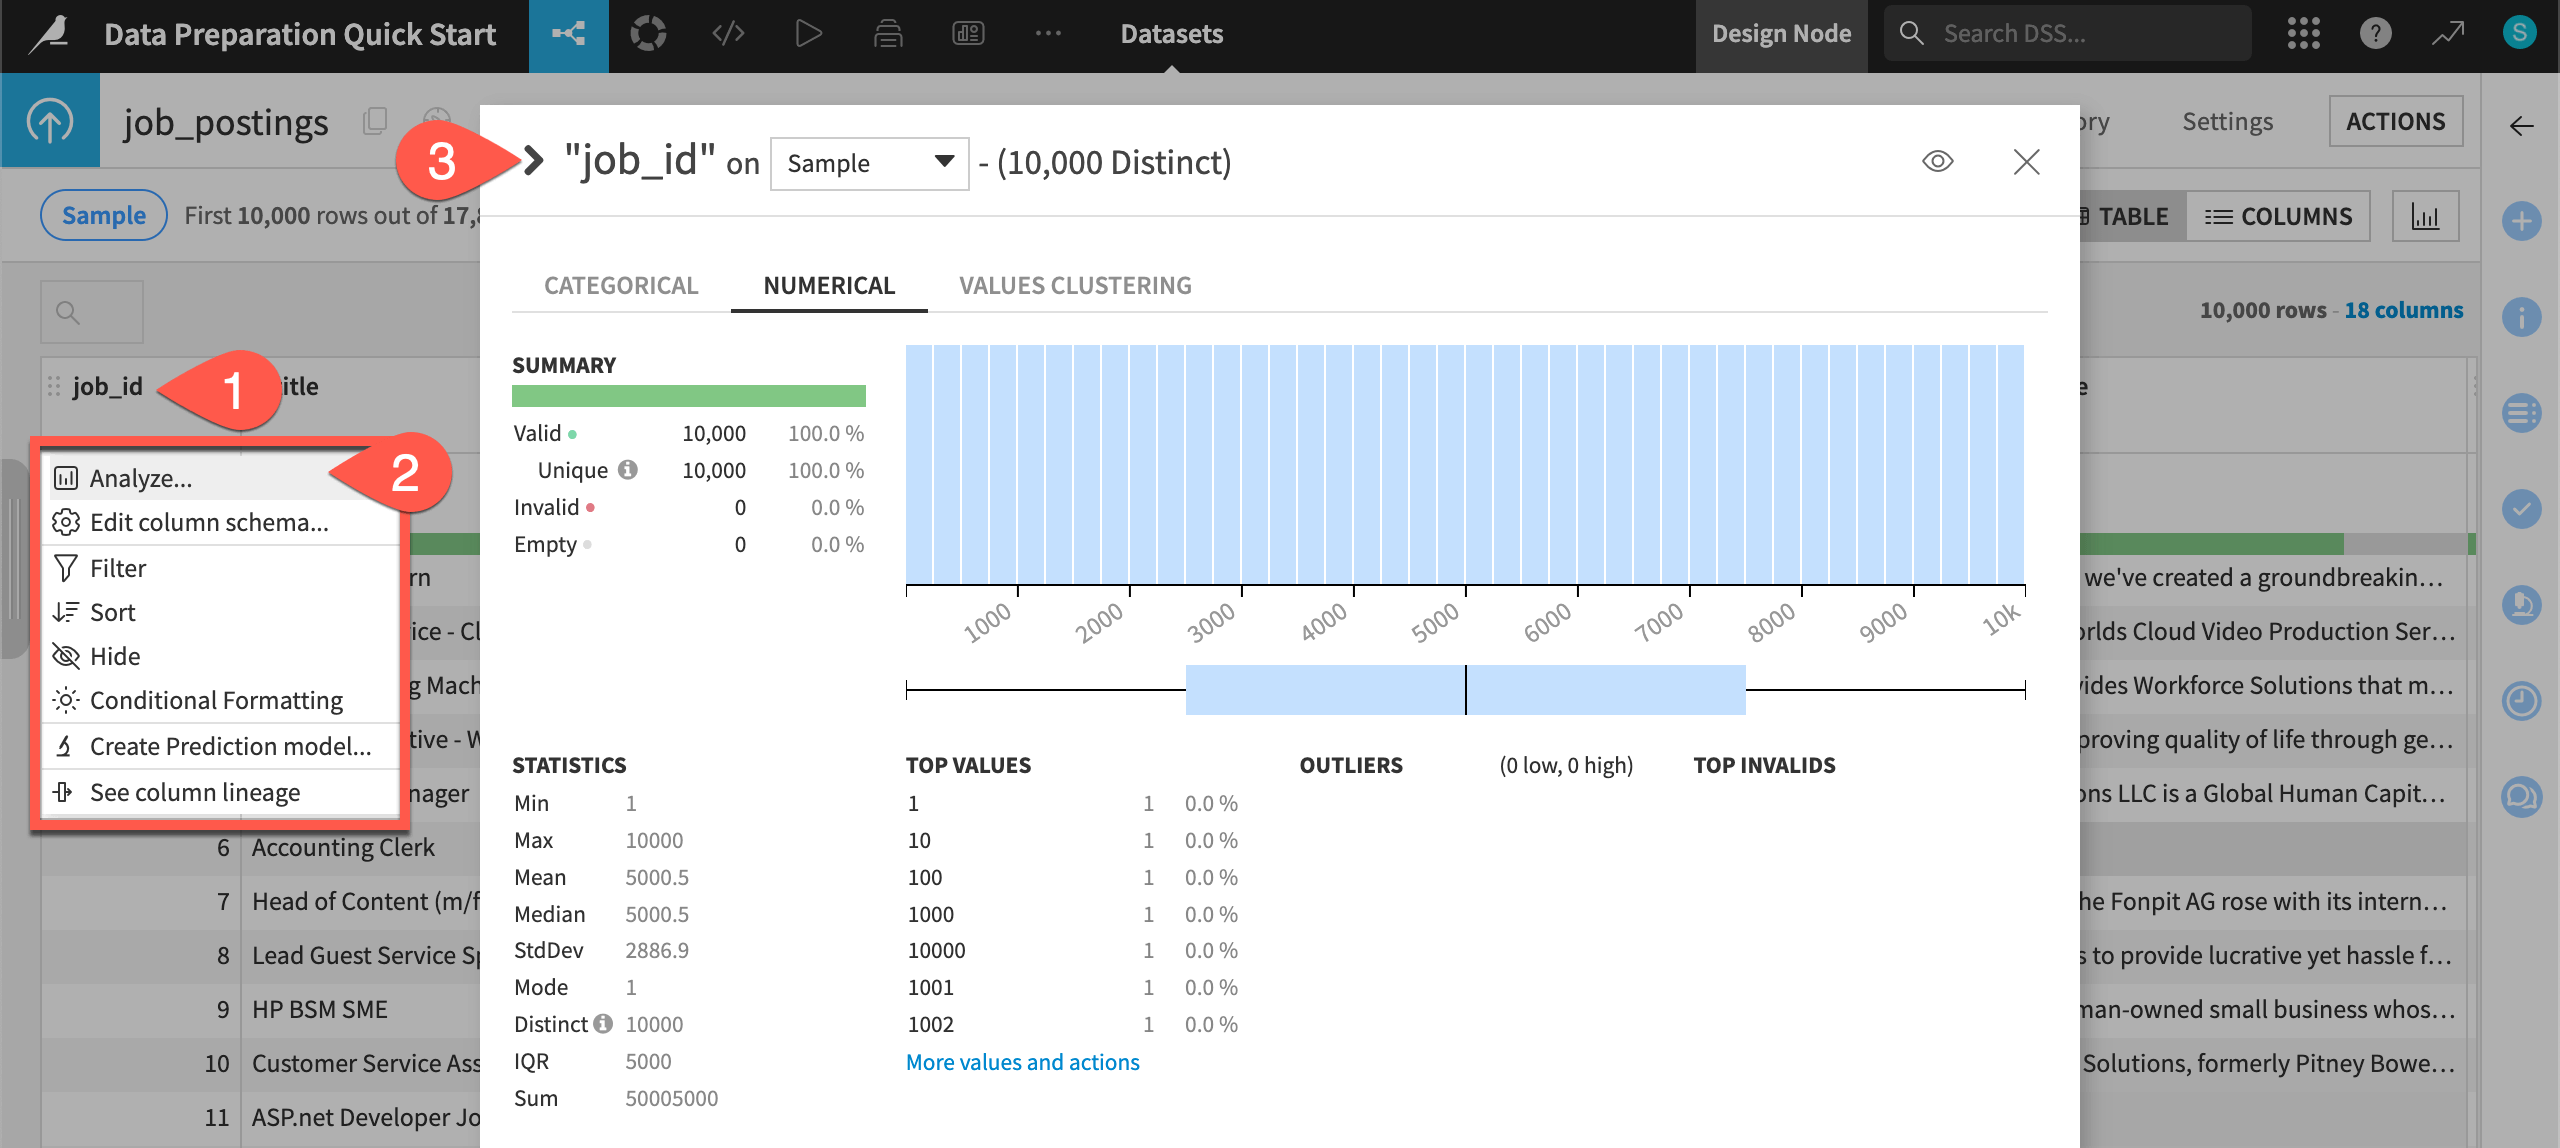
When exploring a dataset, you’ll also want a quick overview of the columns’ distributions and summary statistics.
Click on the header of the first column job_id to open a menu of options.
Select Analyze.
Use the arrows to cycle through presentations of each column distribution, including the target variable fraudulent column.
Tip
Applying the Analyze tool on the fraudulent column shows that about 5% of records in the sample are labeled as fake (a value of 1). The remaining 95% are real job postings (a value of 0).
You can adjust the dropdown from sample to Whole data, and click Save and Compute to see if this statistic differs for the whole dataset.
Prepare data#
See a screencast covering this section’s steps

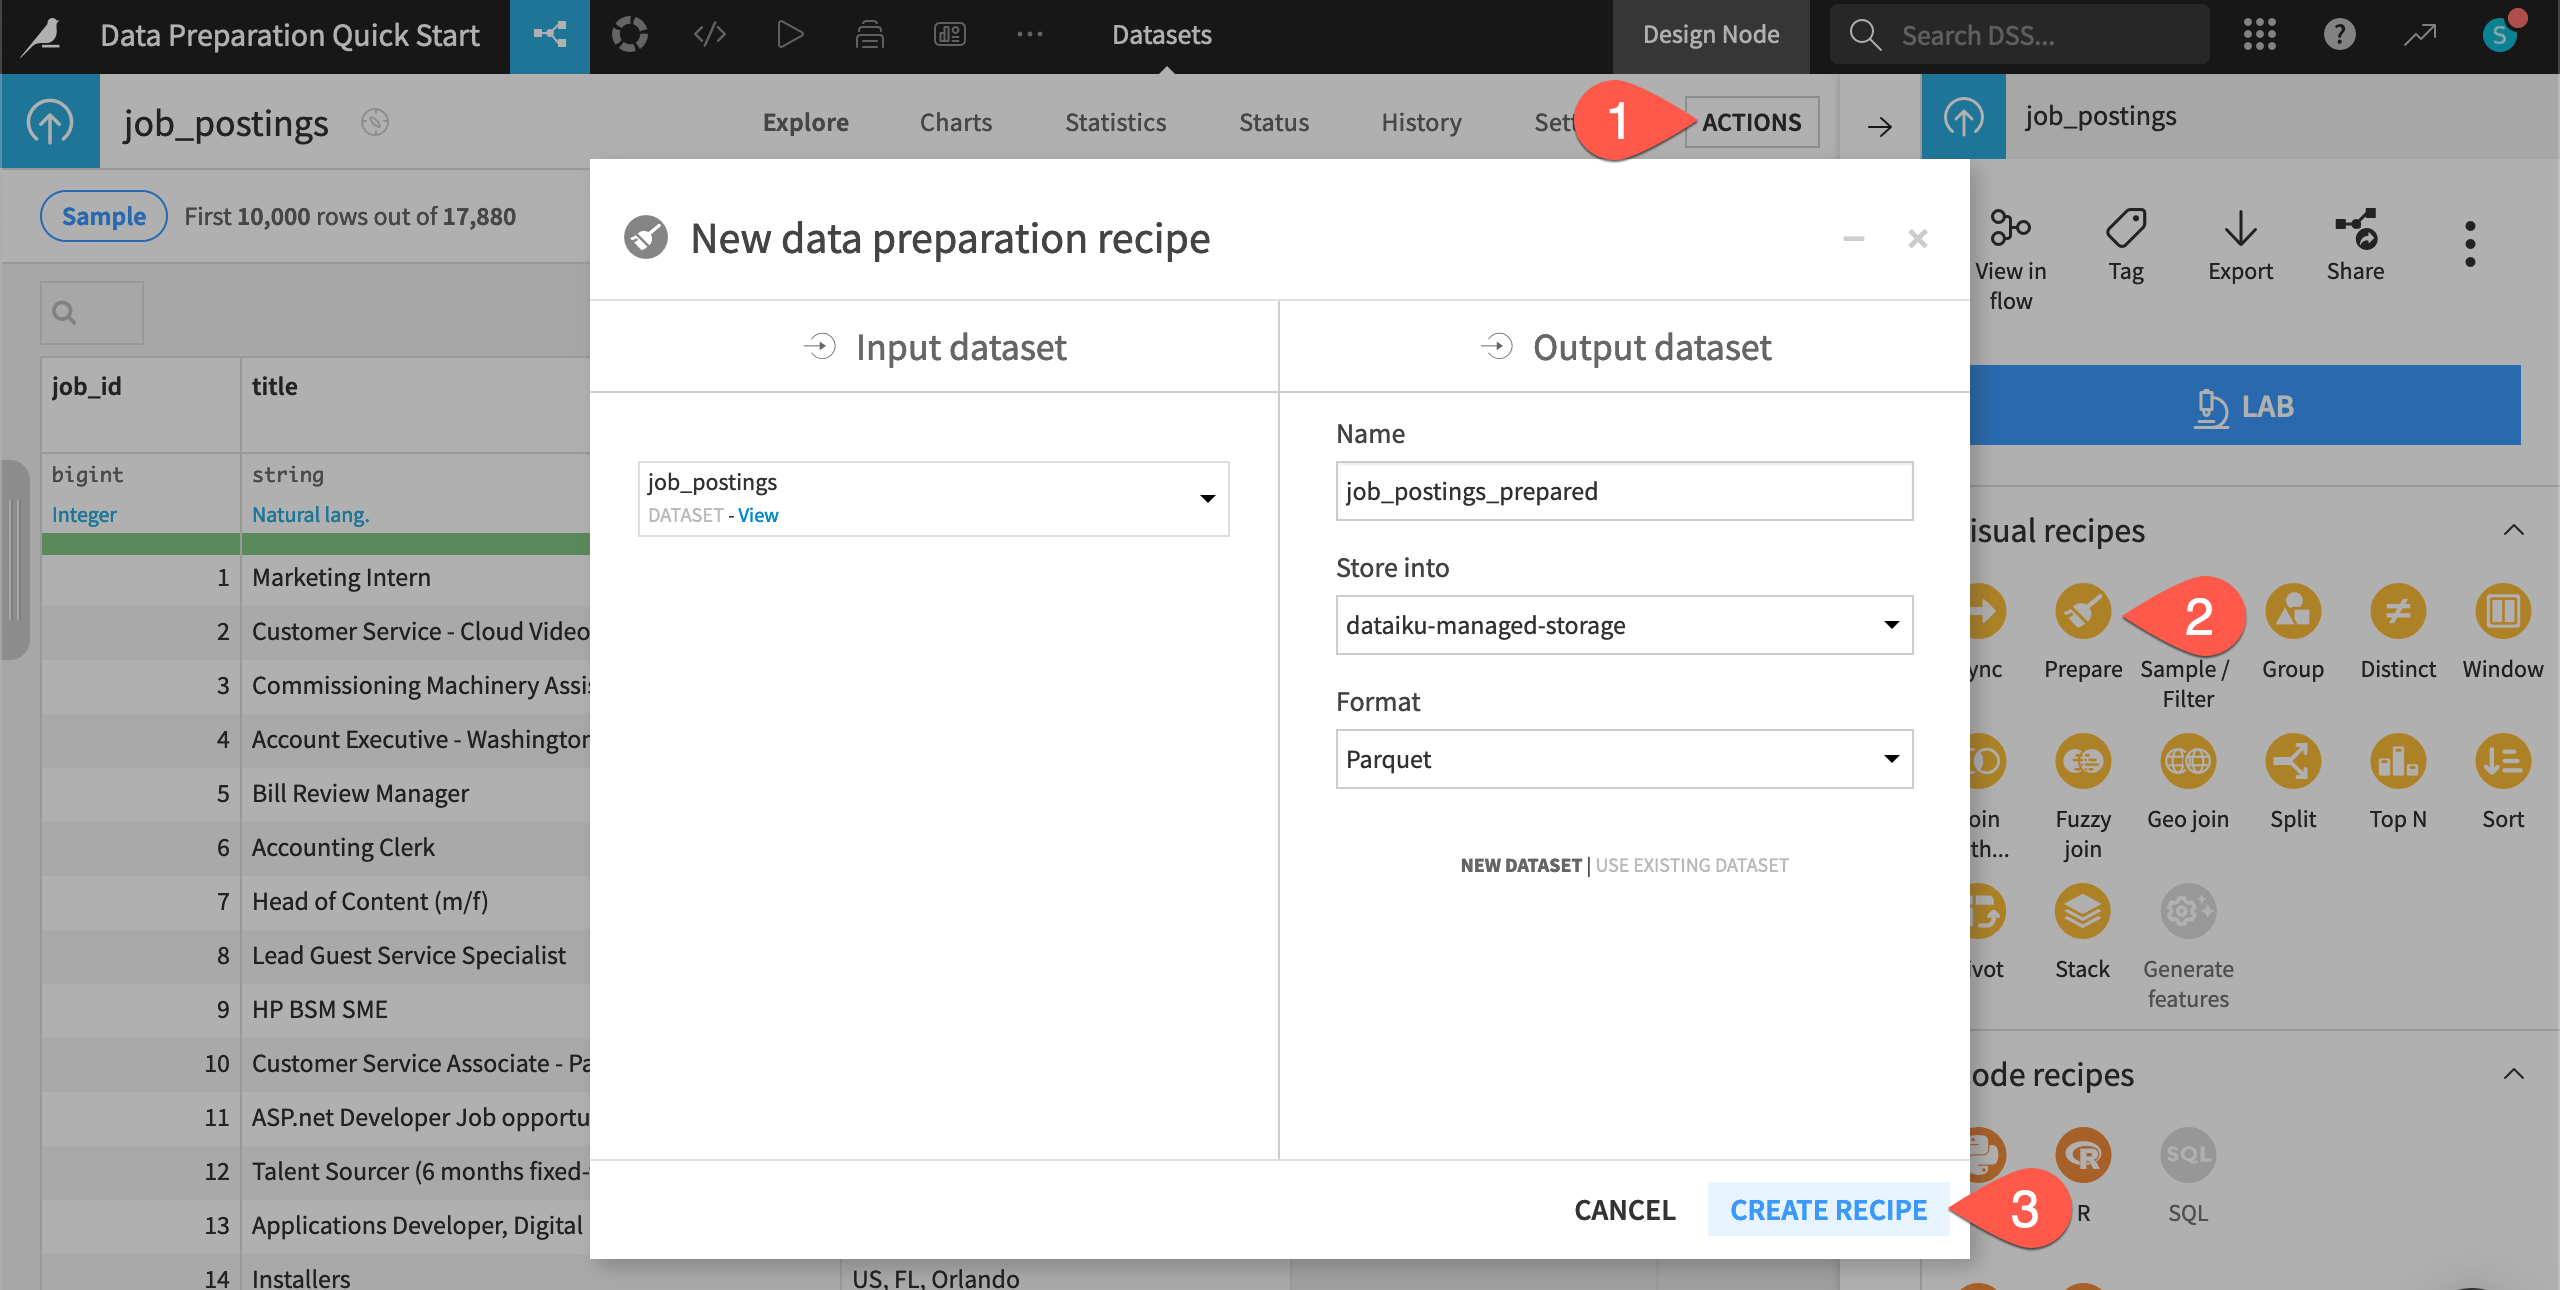
Once you have a sense of the dataset, you’re ready to start cleaning and creating new features using a Prepare recipe.
Important
Recipes in Dataiku contain the transformation steps, or processing logic, that act upon datasets. They can be visual or code (Python, R, SQL, etc).
From the job_postings dataset, click the Actions (
 ) tab in the right panel.
From the menu of visual recipes, select Prepare.
Click Create Recipe, accepting the default output name and storage location for your instance.
Add a step from the processor library#
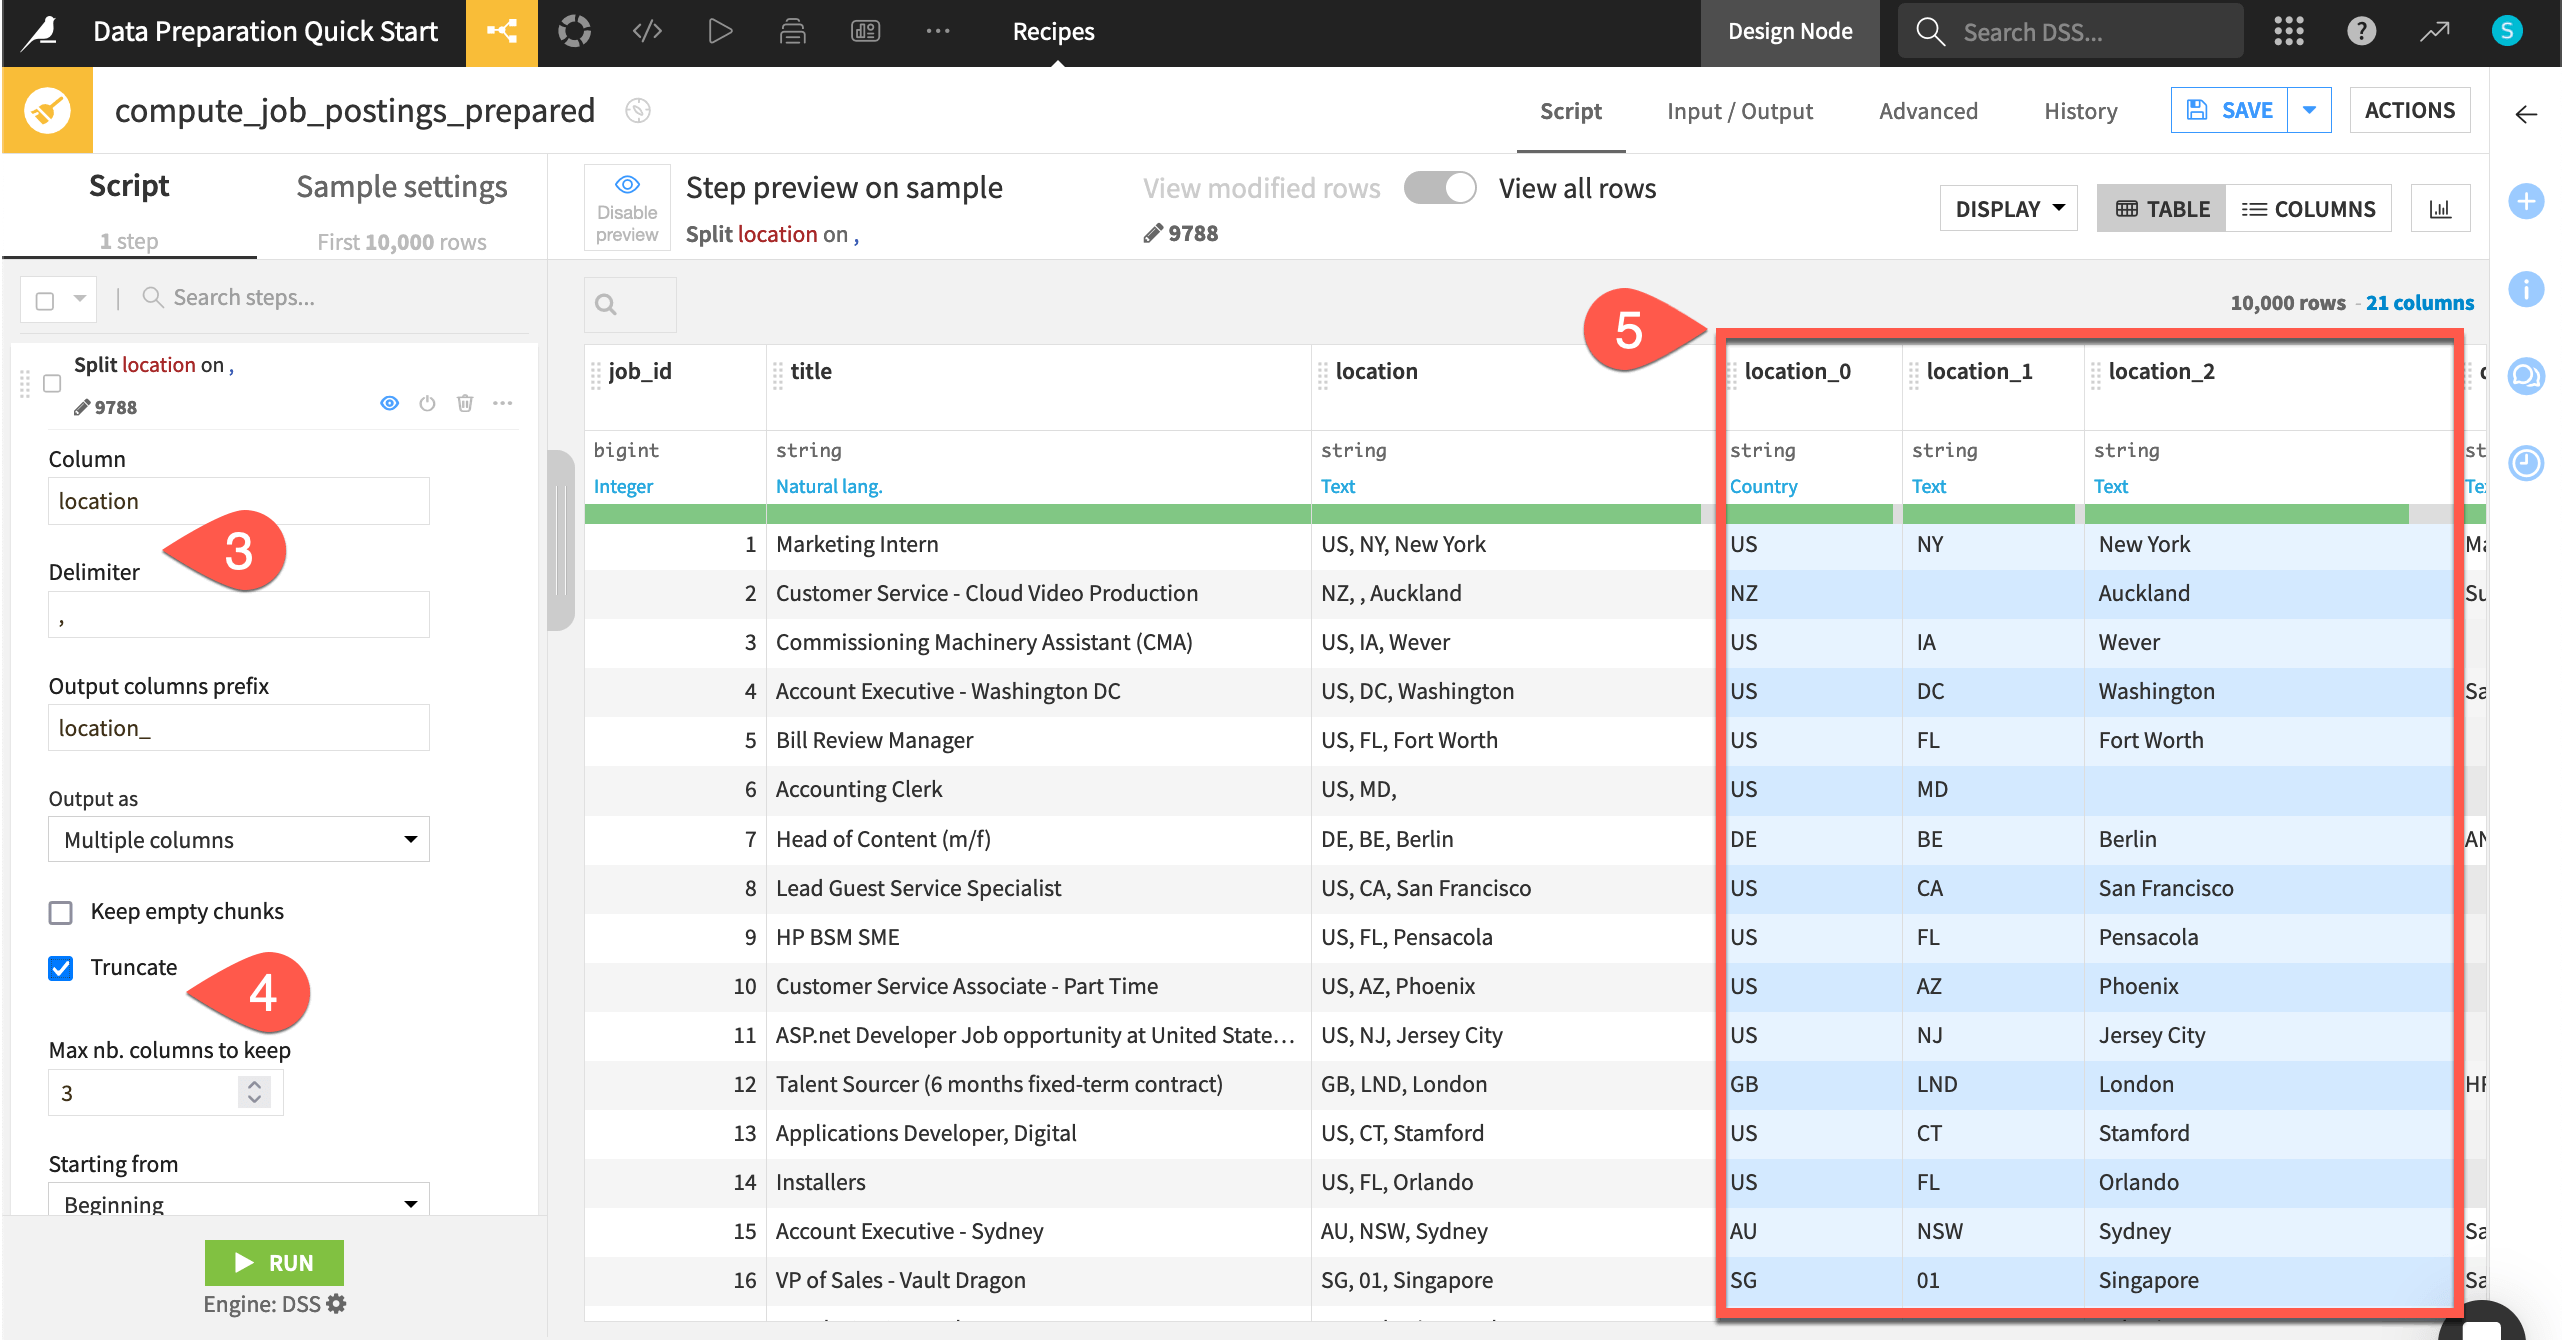
You can add steps to the empty script of the Prepare recipe in many different ways. Let’s start with the processor library, the complete collection of available data transformation steps.
Click + Add a New Step to open the processor library.
Search for and select the Split column processor.
In the step, provide
locationas the column and,as the delimiter.Check the box to Truncate, and set the maximum number of columns to keep to
3.Observe the preview output columns highlighted in blue.
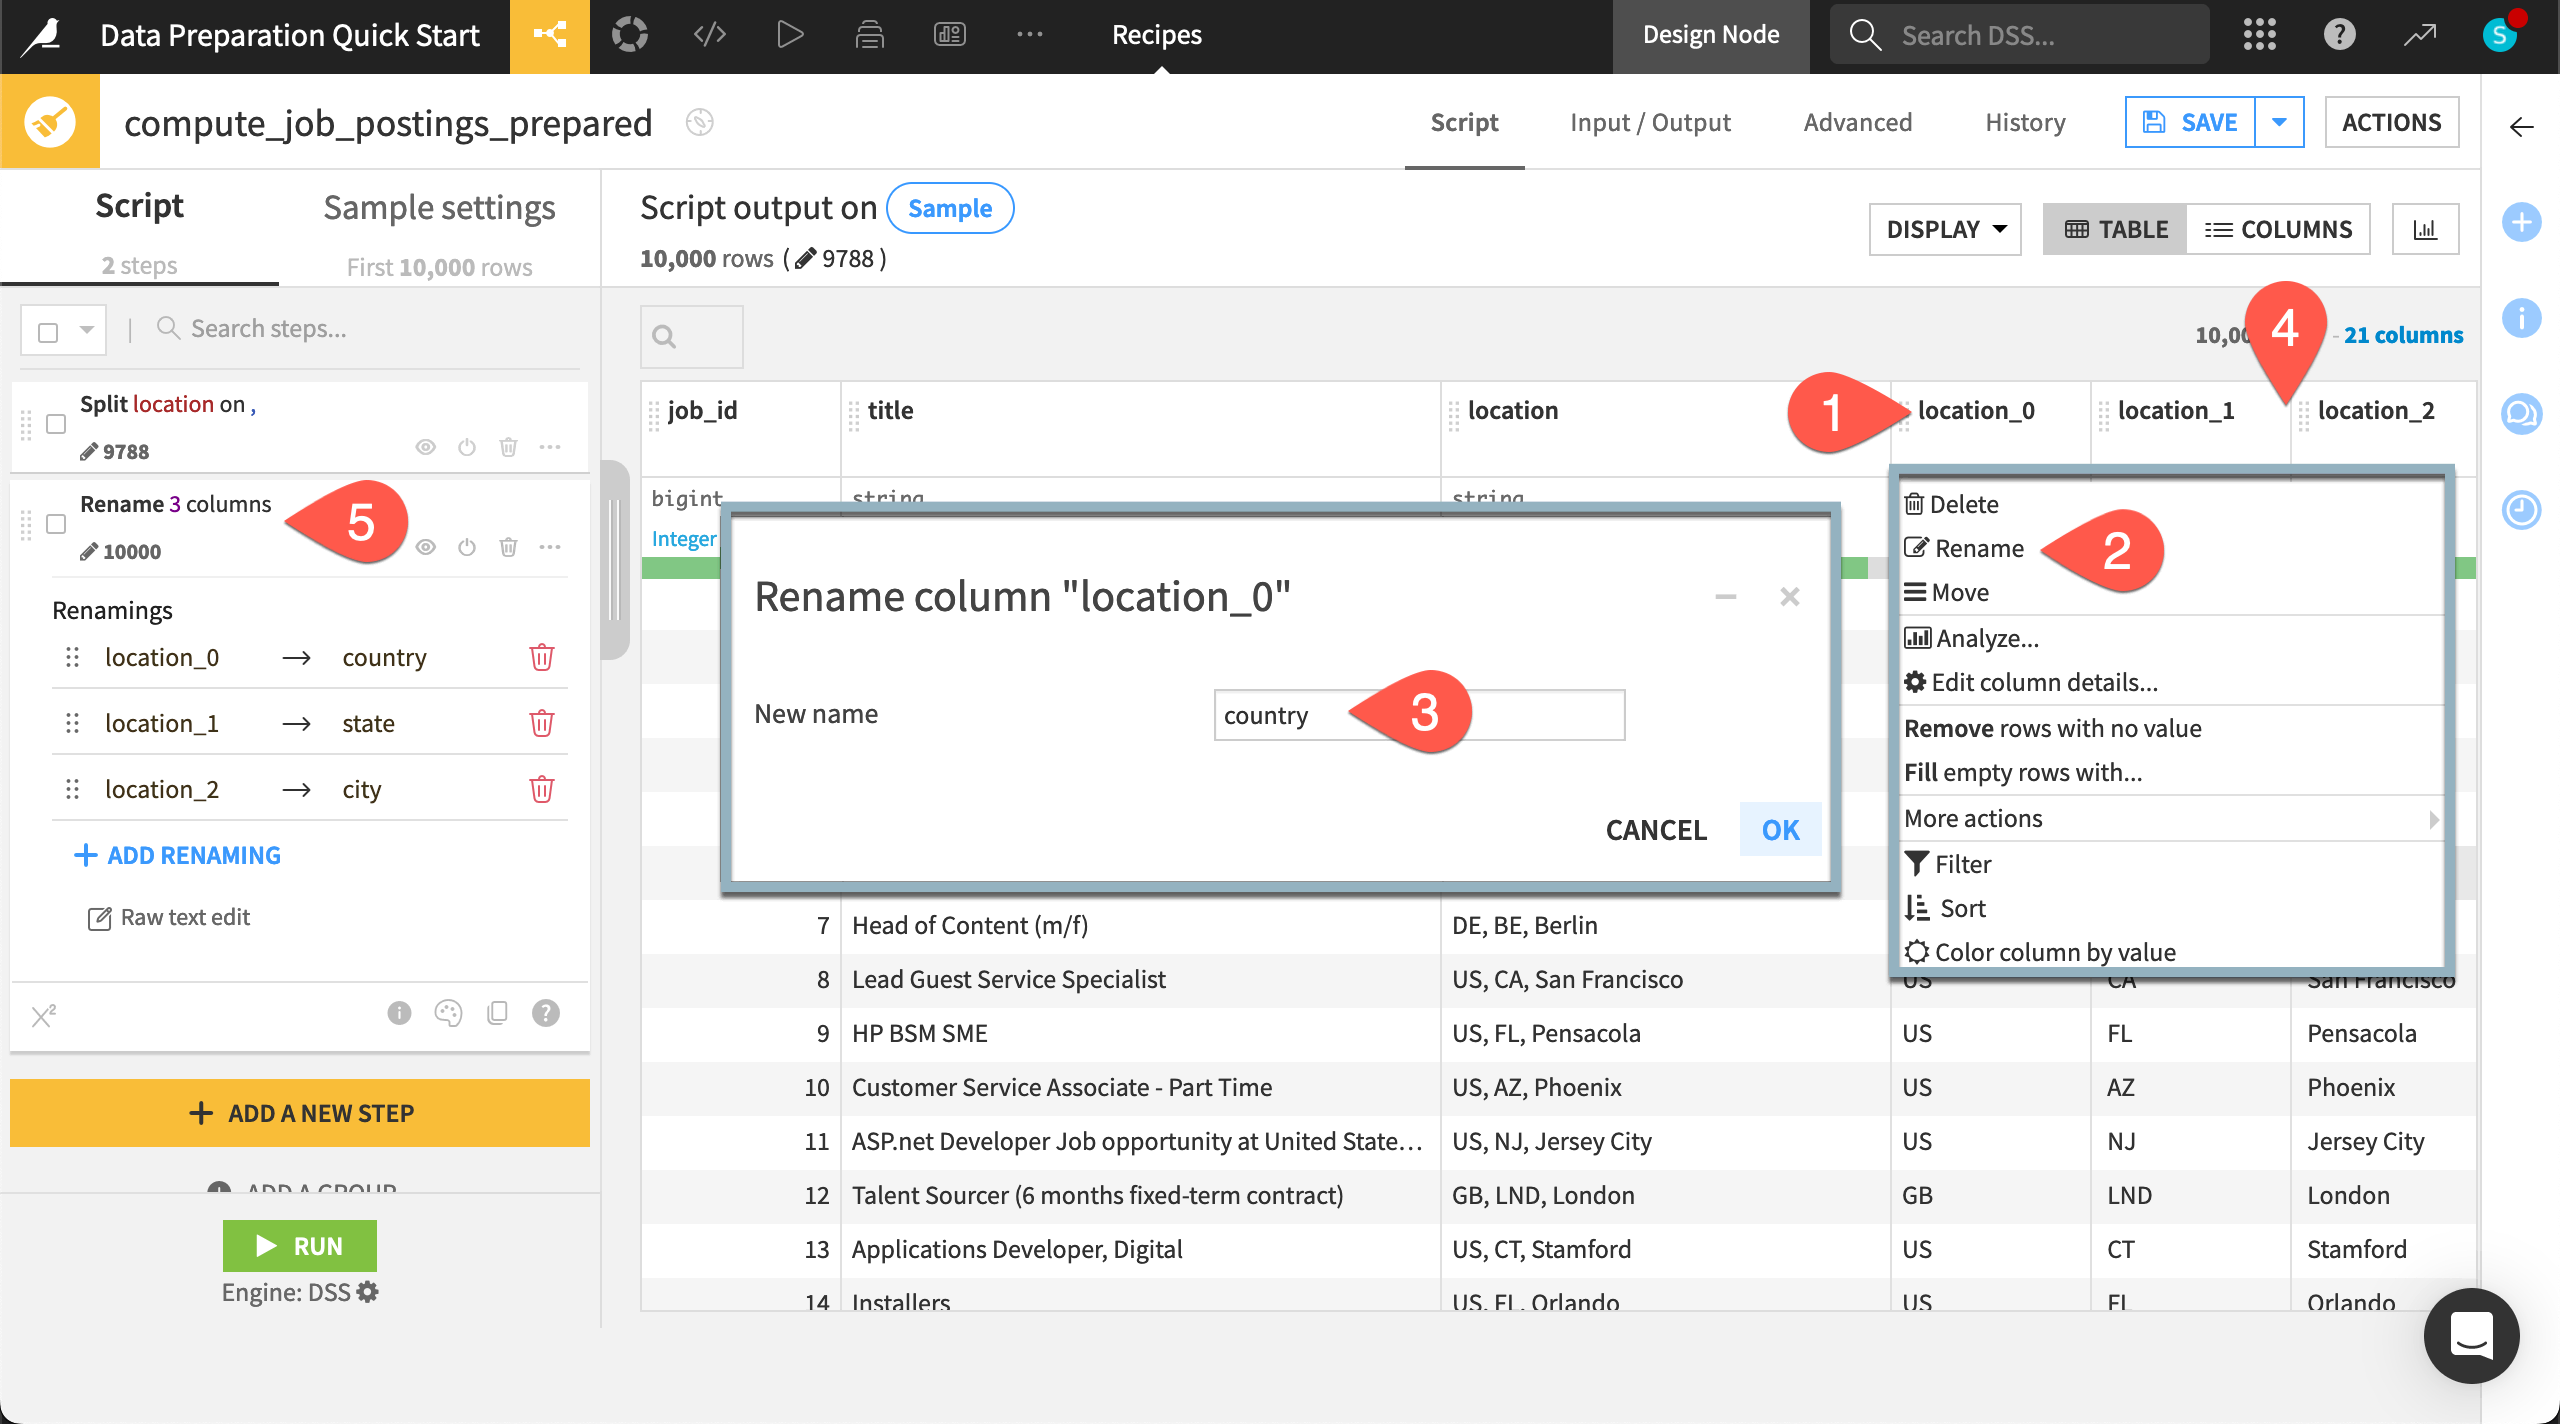
Add a step from the column header#
You can also add frequent and suggested steps directly from the column header.
Still in the Script tab of the Prepare recipe, click on the location_0 column header to open a dropdown menu of actions.
Select Rename.
Enter
countryas the new name, and click OK.Repeat this process for the columns location_1 and location_2, entering the new names
stateandcity.When finished, you’ll have one step with three renamed columns.
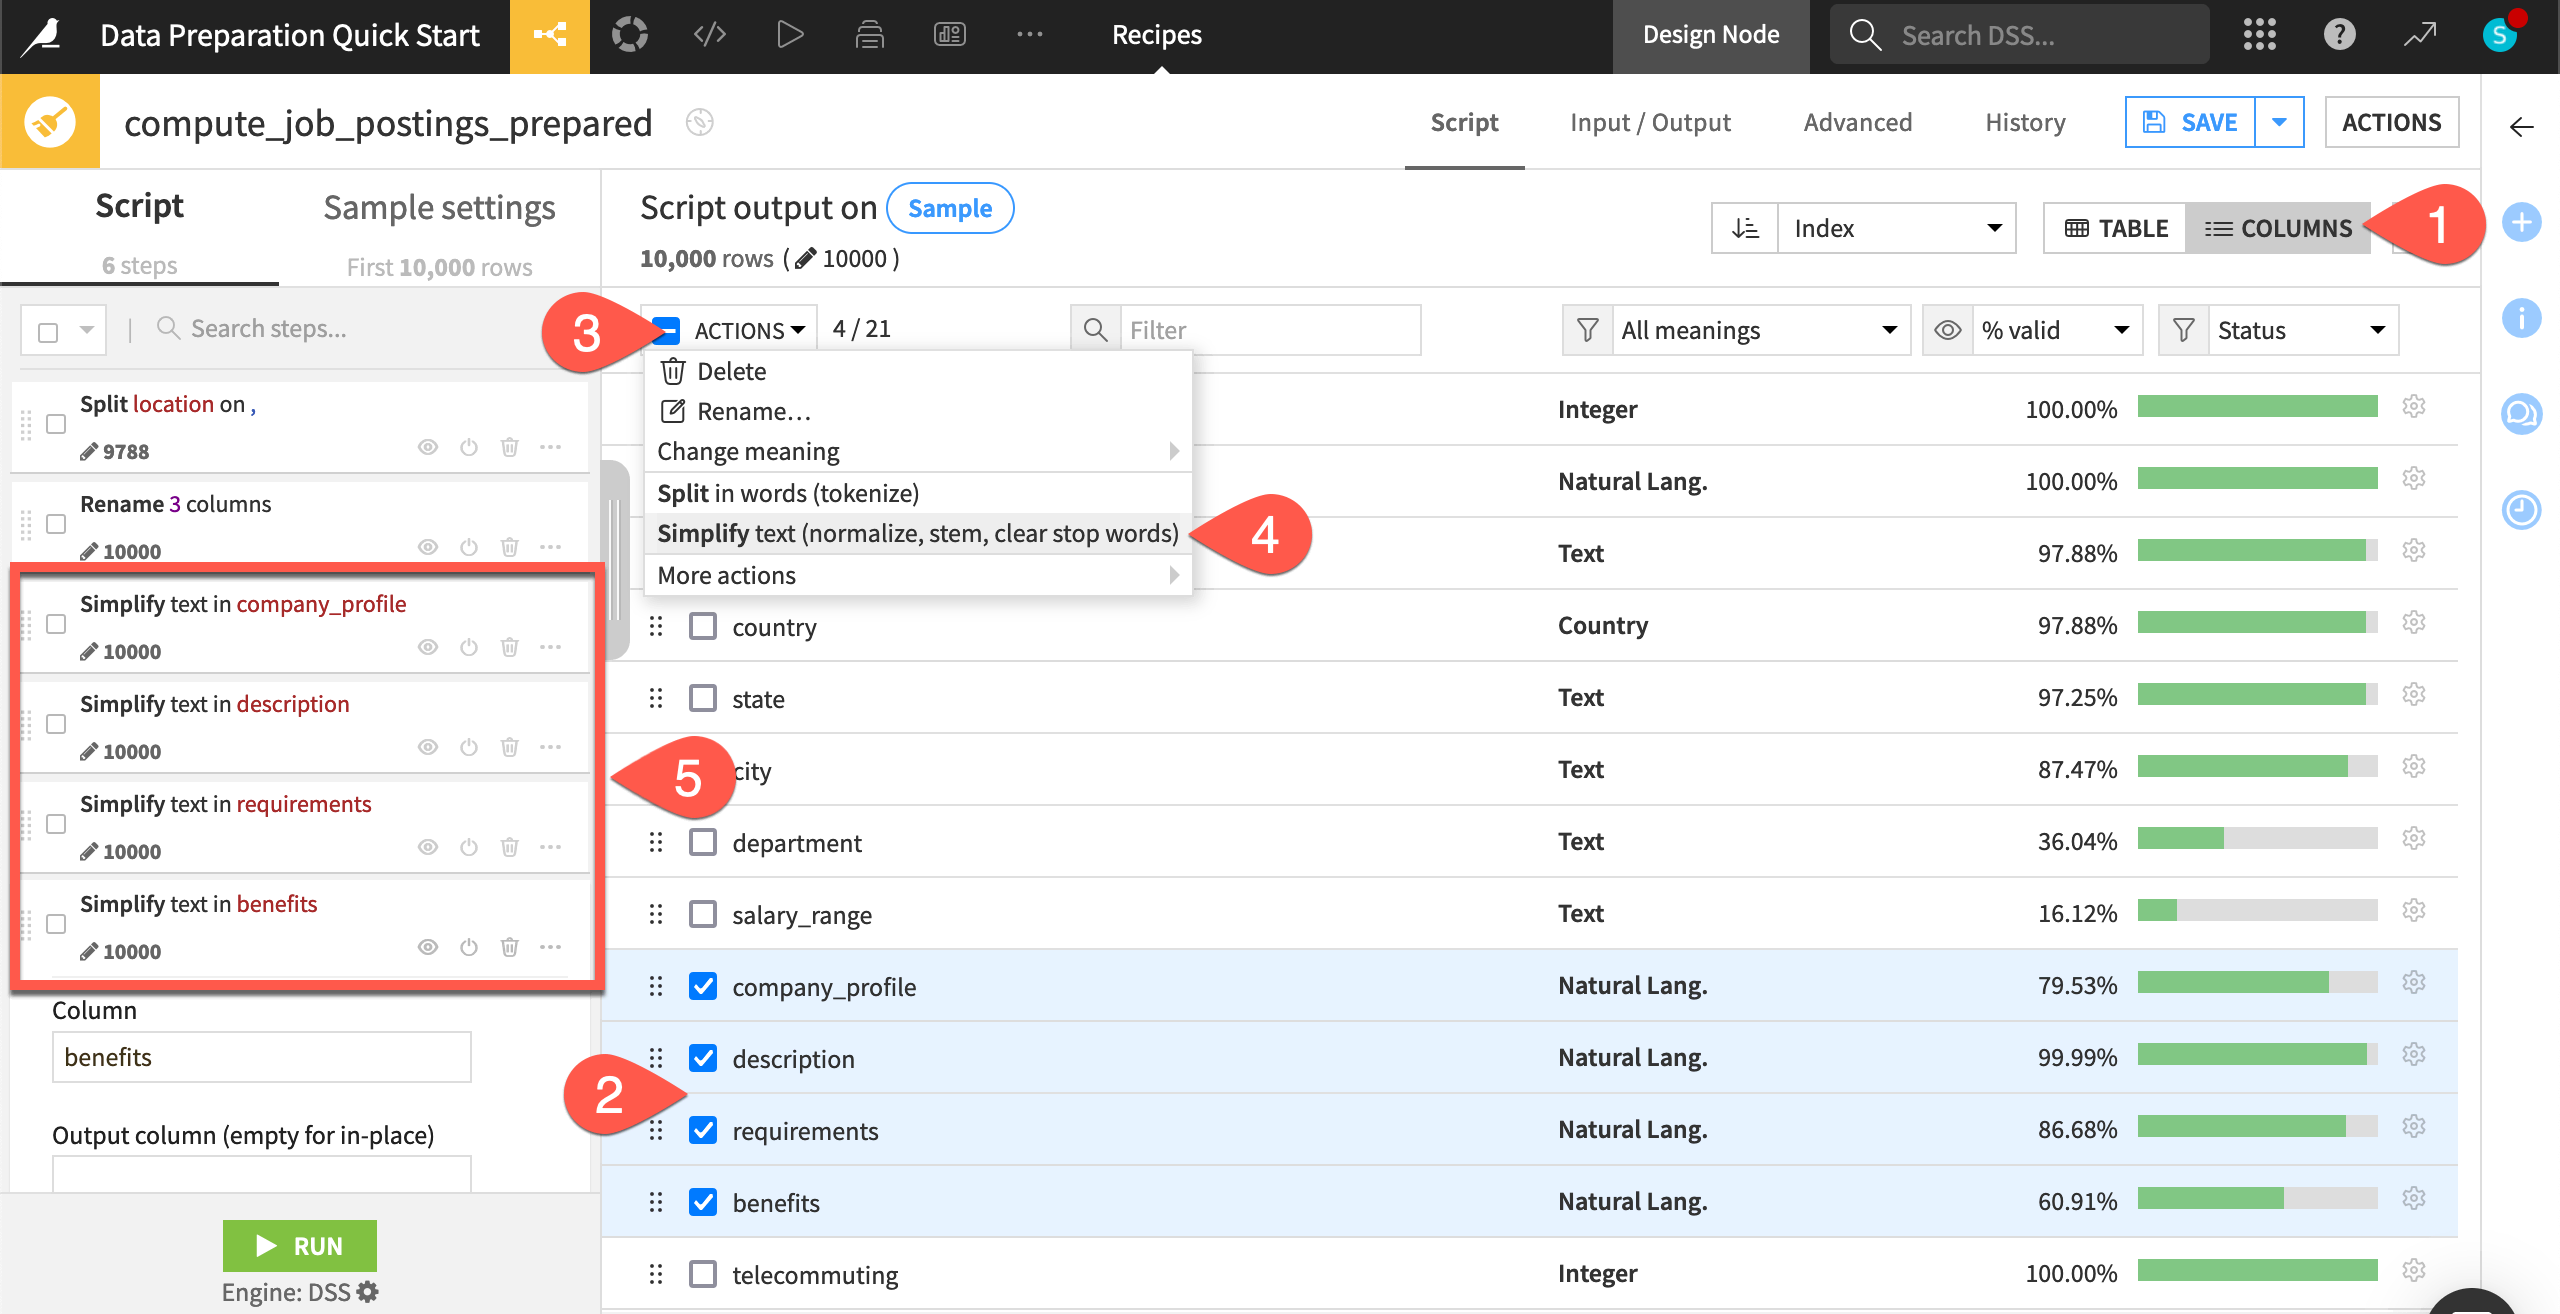
Add a step to multiple columns#
It’s also possible to add certain steps to multiple columns at once.
Switch from the Table view to the Columns view.
Check the box next to four natural language columns: company_profile, description, requirements, and benefits.
Click Actions to open the dropdown.
From the menu, choose Simplify text.
In the script, observe four new steps, each one normalizing a natural language column.
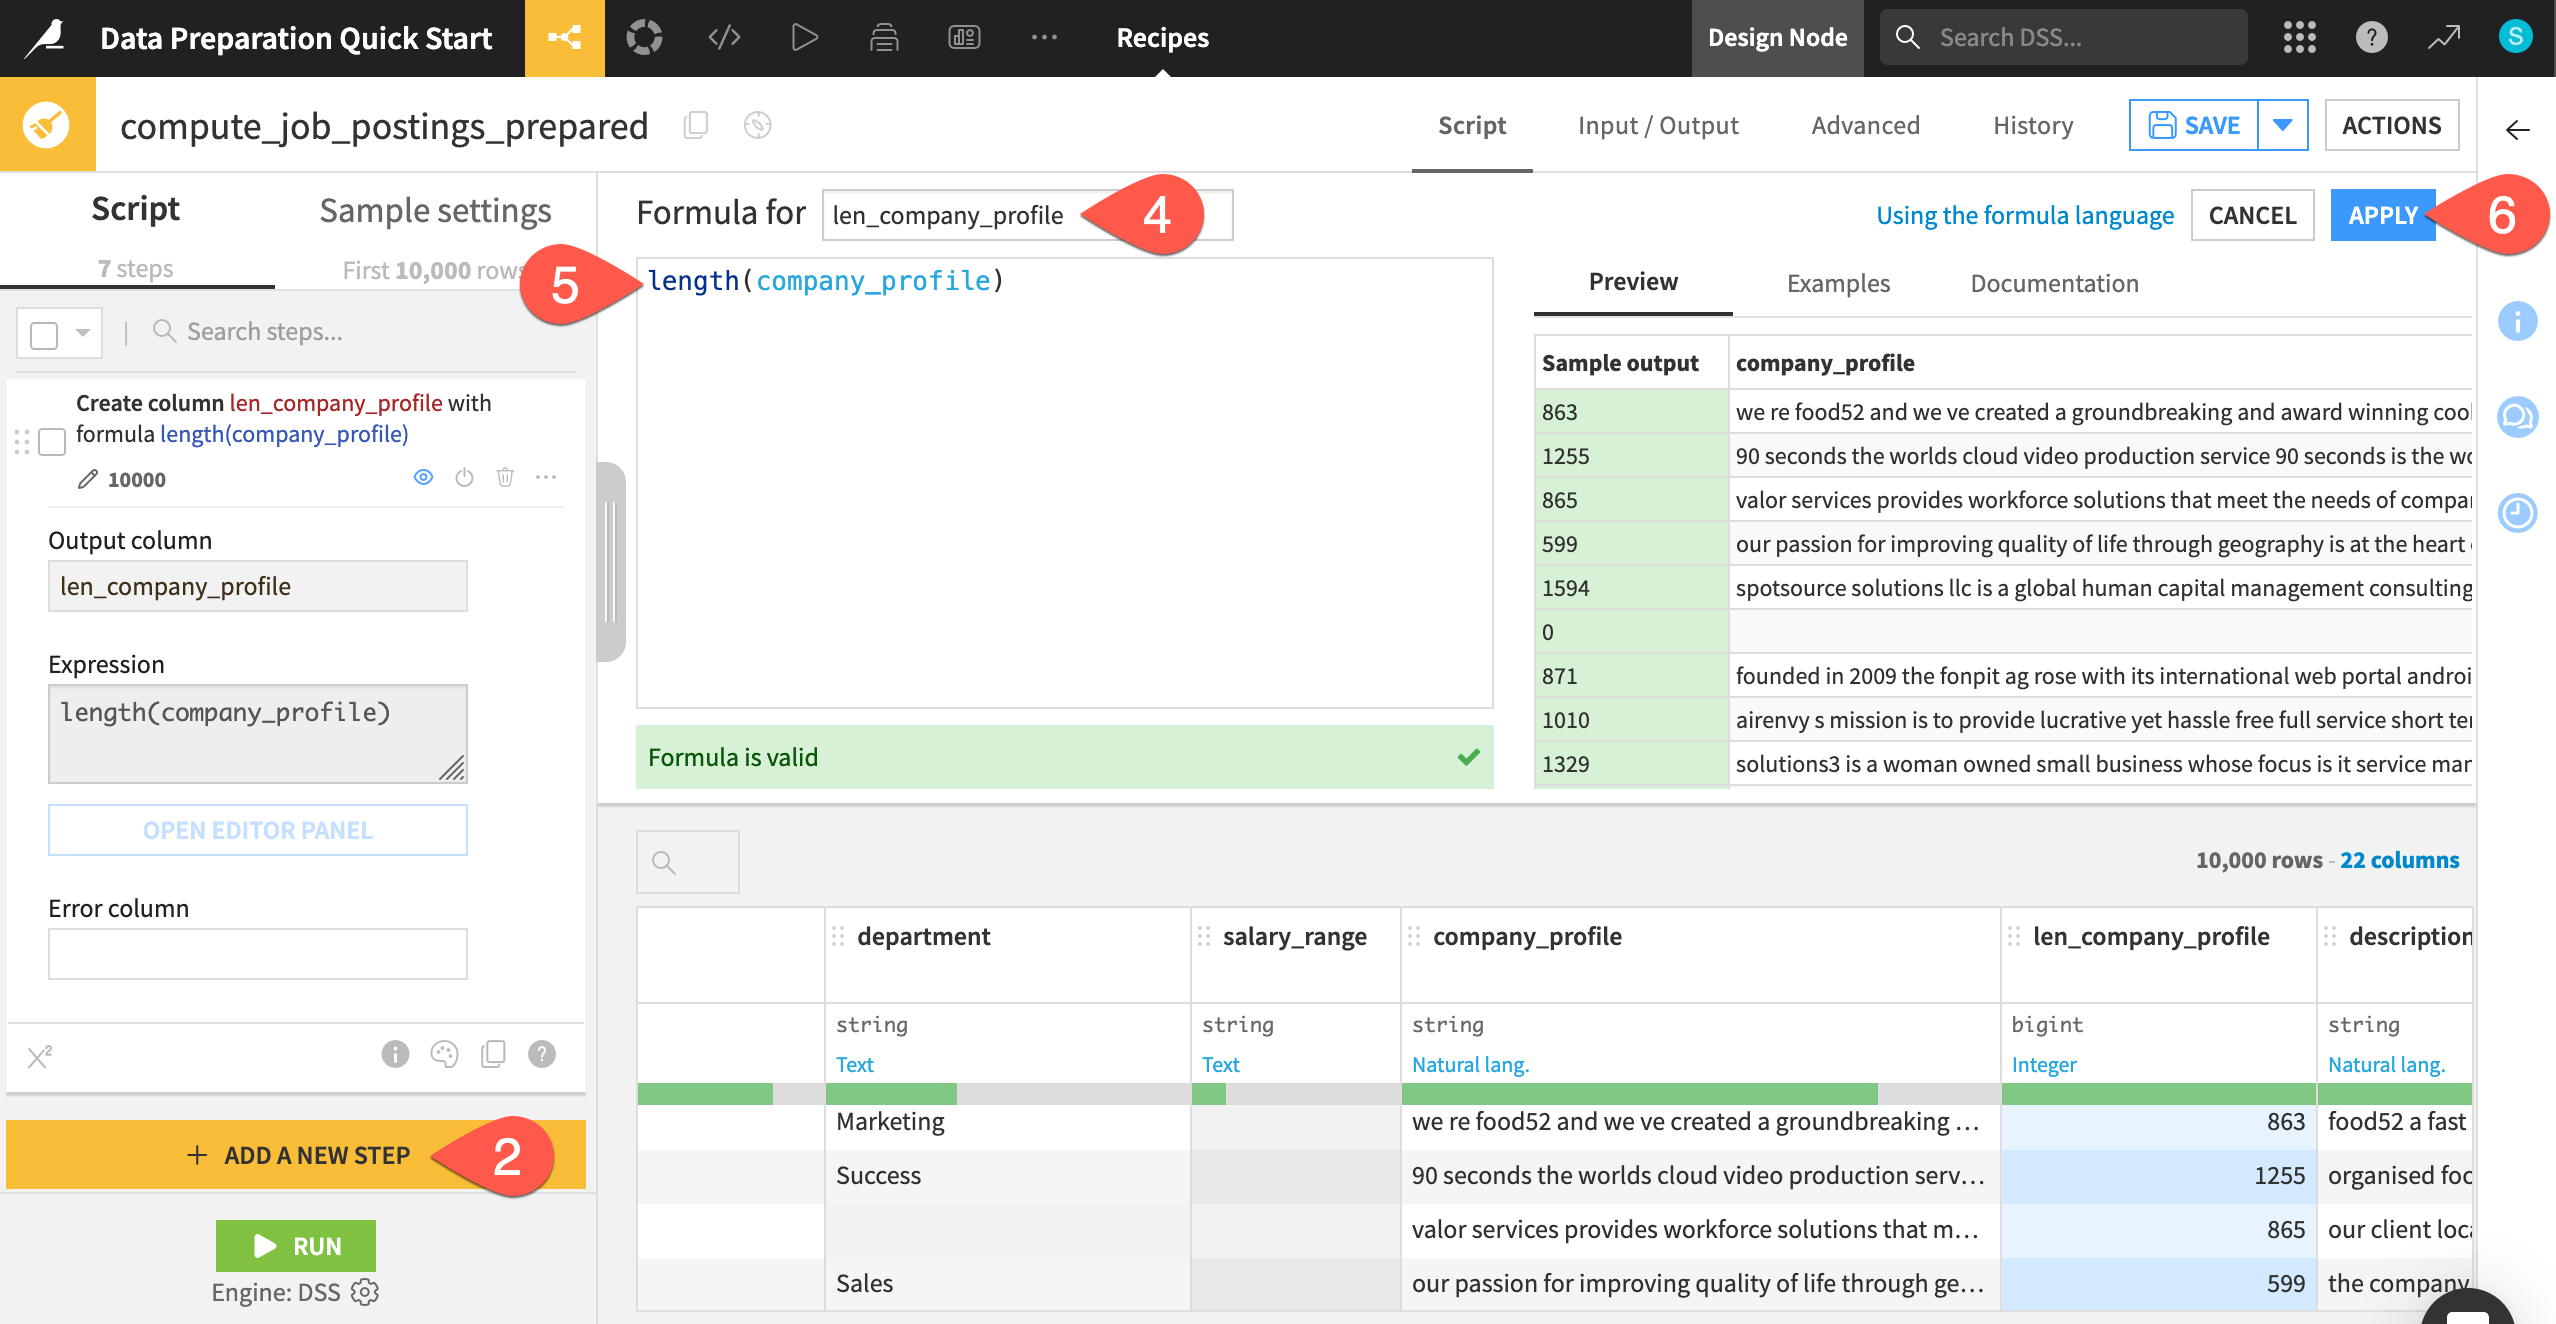
Add a Formula step#
Dataiku also has its own spreadsheet-like formula language. This formula language includes common mathematical and string operations, comparison and logical operators, and conditional statements that you can use to create new columns.
Switch back to the Table view.
Click + Add a New Step.
Search for and select a Formula step.
In the Formula for field, name the output column
len_company_profile.In the empty expression field, start typing
length(company_profile), noting the availability of auto-completion.Click Apply.
Observe the new column preview highlighted in blue.
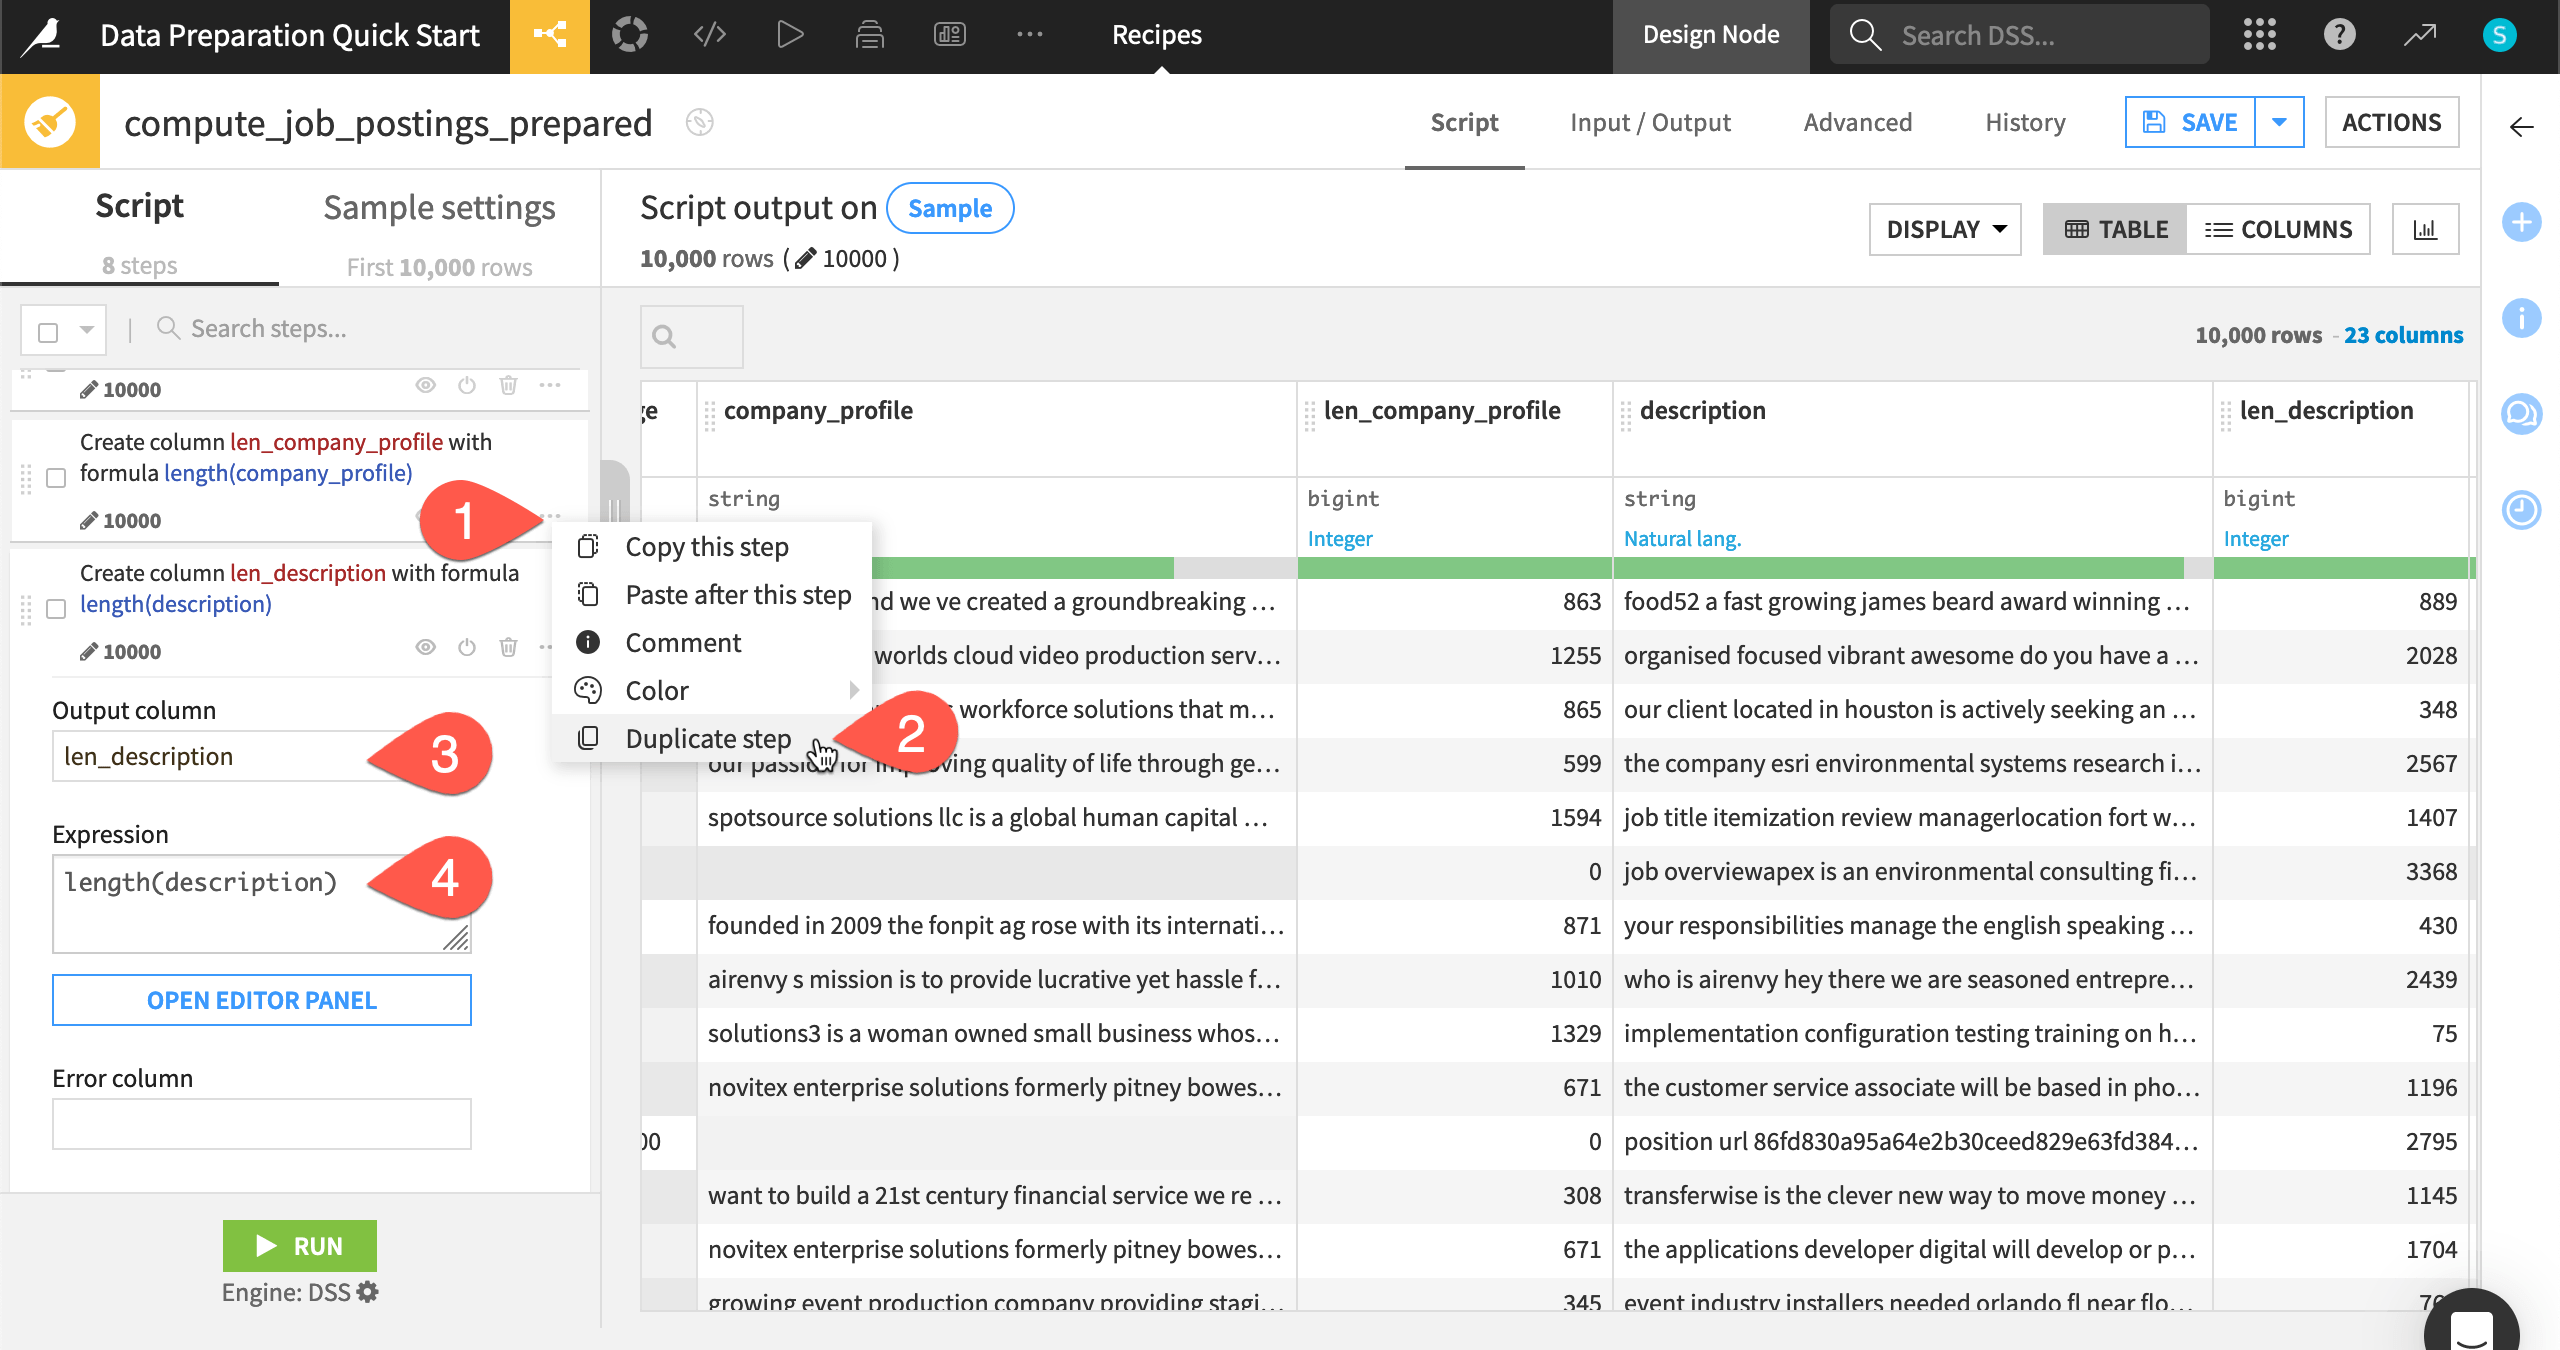
Duplicate a step#
The Prepare recipe has many other conveniences, such as grouping, coloring, commenting, duplicating, and copy-pasting steps.
Click the horizontal three dots (
 ) at the right of the last step.
Click Duplicate step.
Change the output column name to
len_description.Change the expression to
length(description).
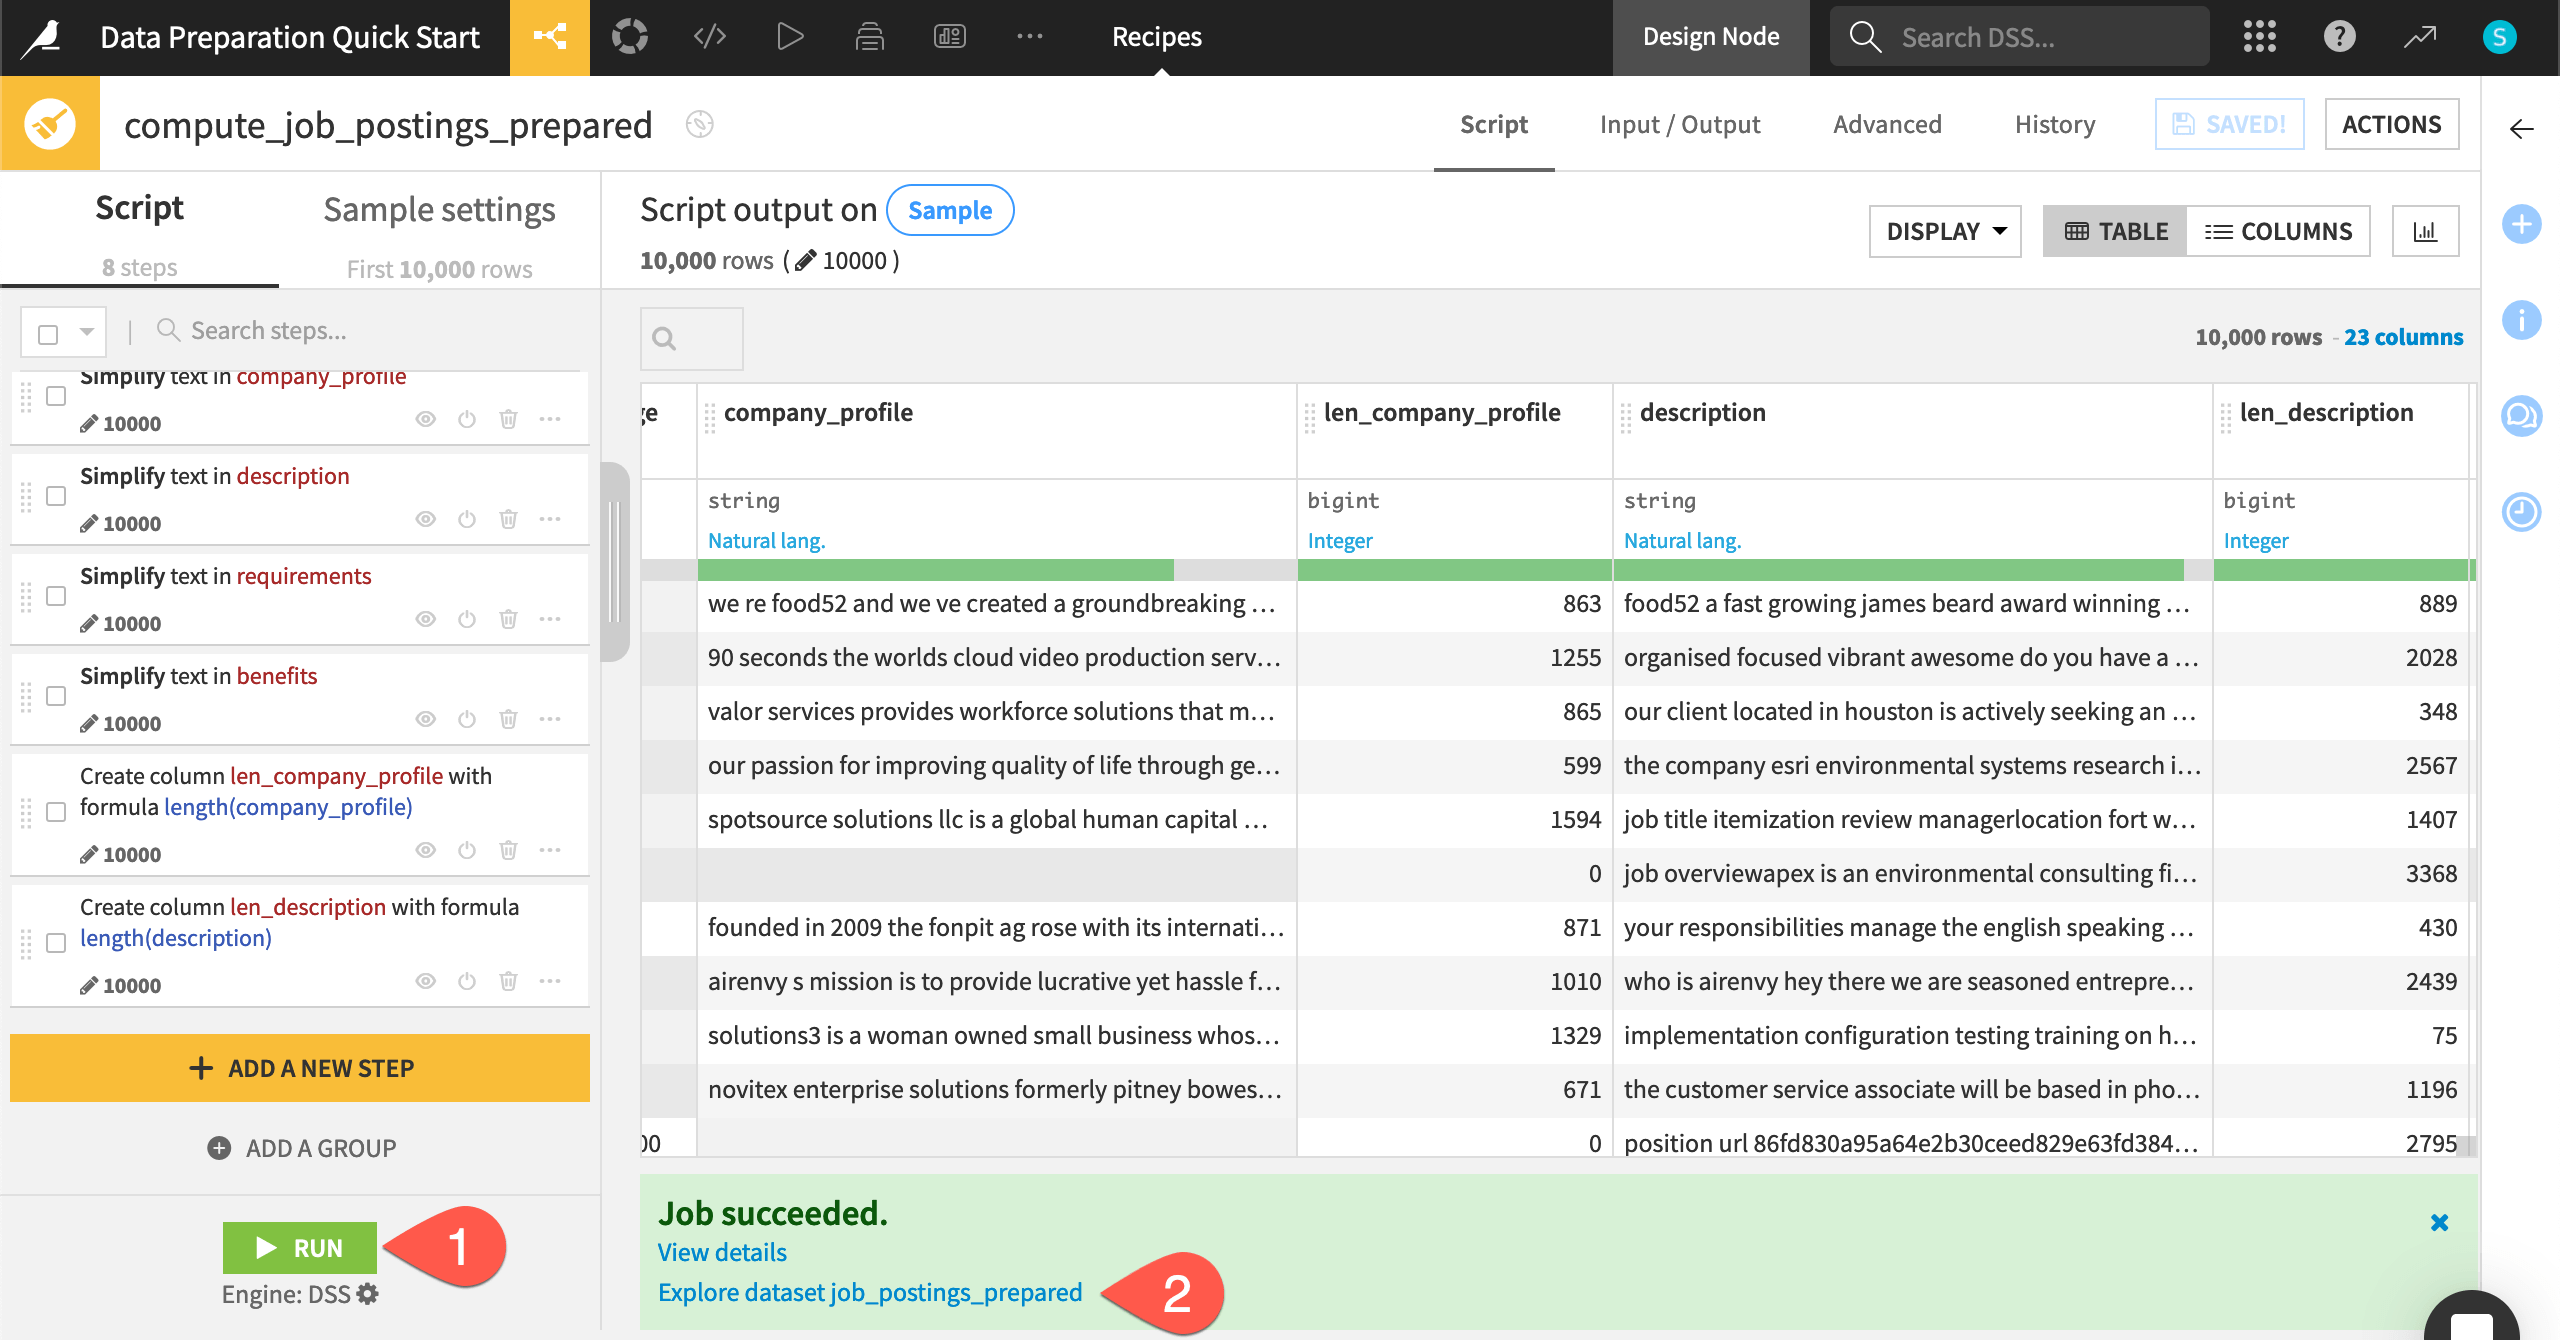
Run the Prepare recipe#
You could definitely keep preparing this dataset, but let’s stop here. This recipe is a repeatable record of transformation steps that you can apply to the entire input dataset whenever required.
Click the Run button (or type the keyboard shortcut
@+r+u+n).When the job finishes, click Explore dataset job_postings_prepared.
After inspecting the output dataset, navigate back to the Flow (
g+f).
Import data#
See a screencast covering this section’s steps
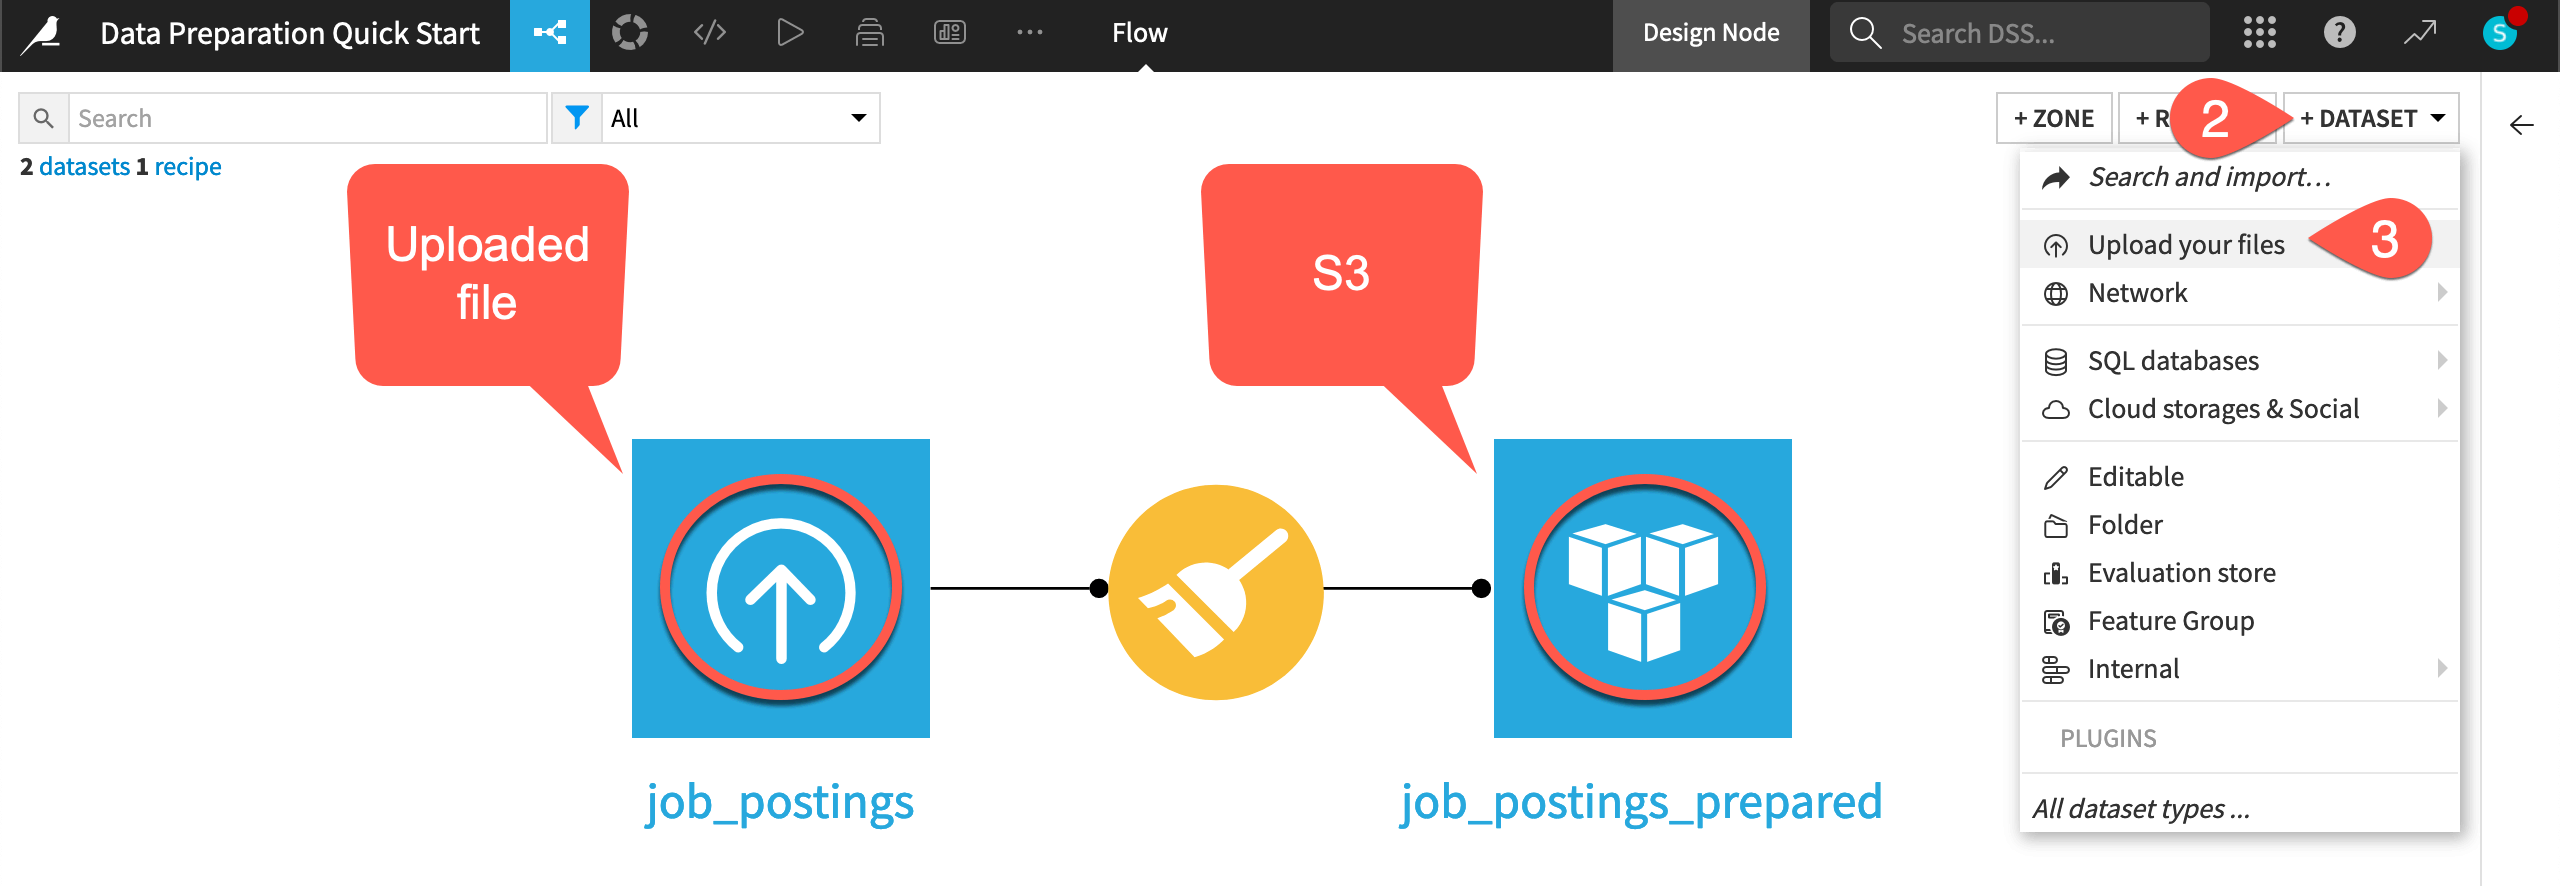
If you look at the Flow, you’ll notice different icons on the blue squares representing datasets. These icons represent the underlying storage connection for each dataset. Dataiku supports connections to many possible data sources that an instance administrator can manage.
For example, the initial job_postings dataset is an uploaded file (as indicated by its icon), but the output to the Prepare recipe is the default location on your instance. It might be cloud storage, an SQL database, or even a local filesystem.
Upload a file#
For now, let’s demonstrate importing a new dataset into Dataiku.
Download the earnings_by_education.csv file.
From the Flow, click + Dataset.
Select Upload your files.
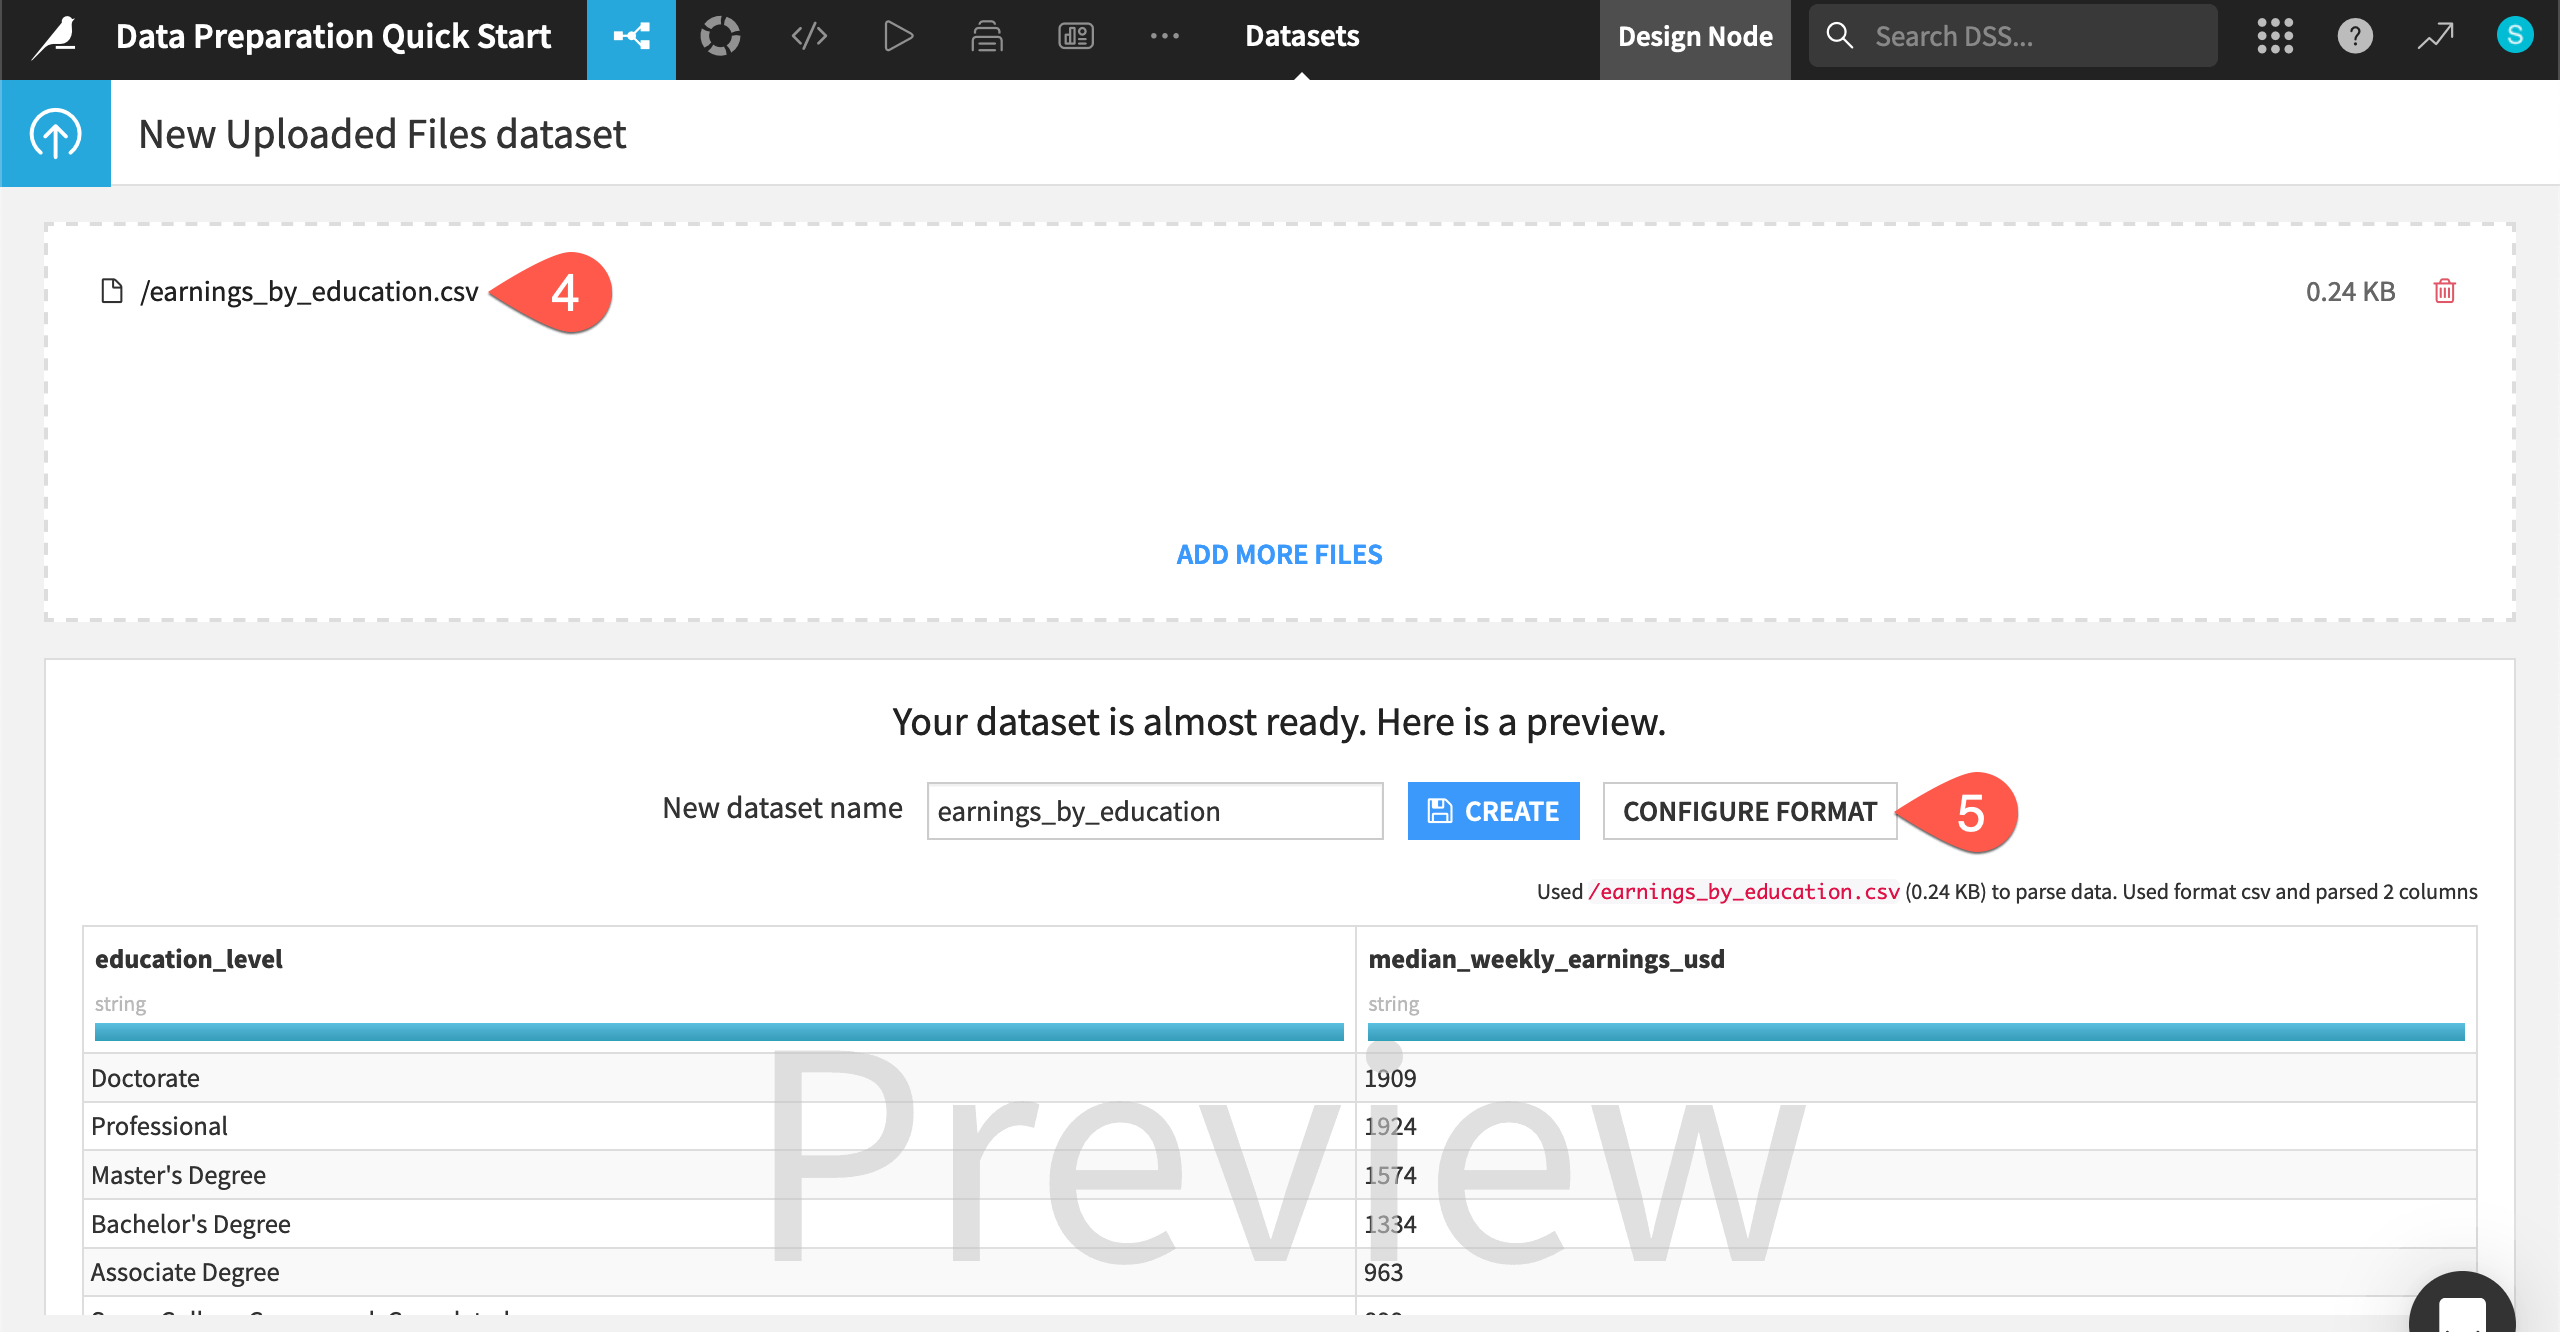
Click Select Files, and choose the earnings_by_education.csv file.
Before creating it, click Configure Format.
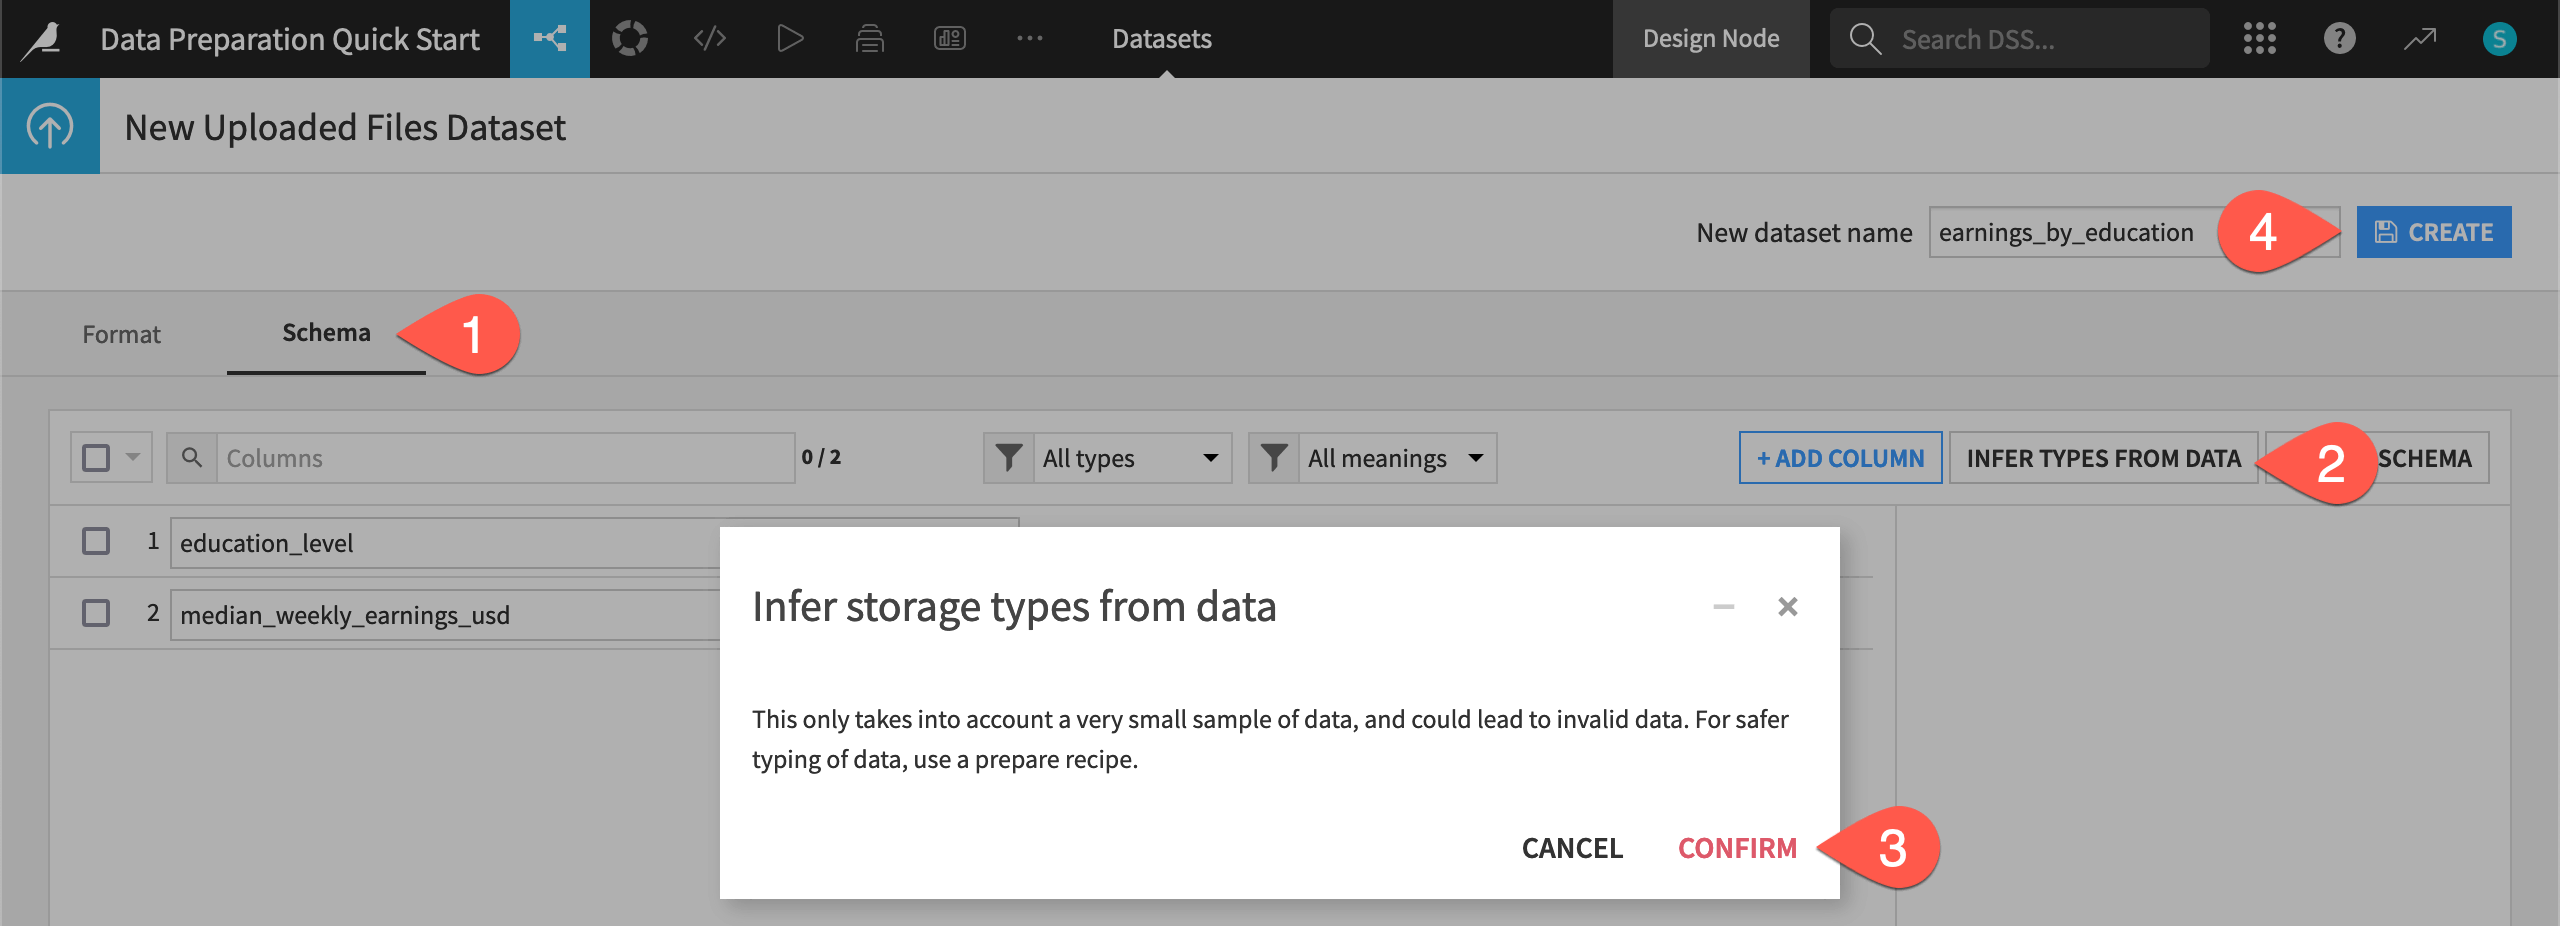
Infer the dataset’s schema#
Configuring the format allows you to adjust the dataset’s schema, or the name and storage type of columns in this context.
Navigate to the Schema tab.
Click Infer Types from Data so Dataiku can try to guess the correct storage types based on the current sample.
Click Confirm, and notice how the median_weekly_earnings_usd column changed from a string to an integer.
Click Create to finish importing the dataset.
After looking at the new dataset, navigate back to the Flow (
g+f).
Join data#
See a screencast covering this section’s steps

This second dataset documents the median weekly earnings in USD according to the U.S. Bureau of Labor Statistics.
The categories in the education_level column in the earnings_by_education dataset are the same as the categories in the required_education column in the job_postings_prepared dataset.
Create a Join recipe#
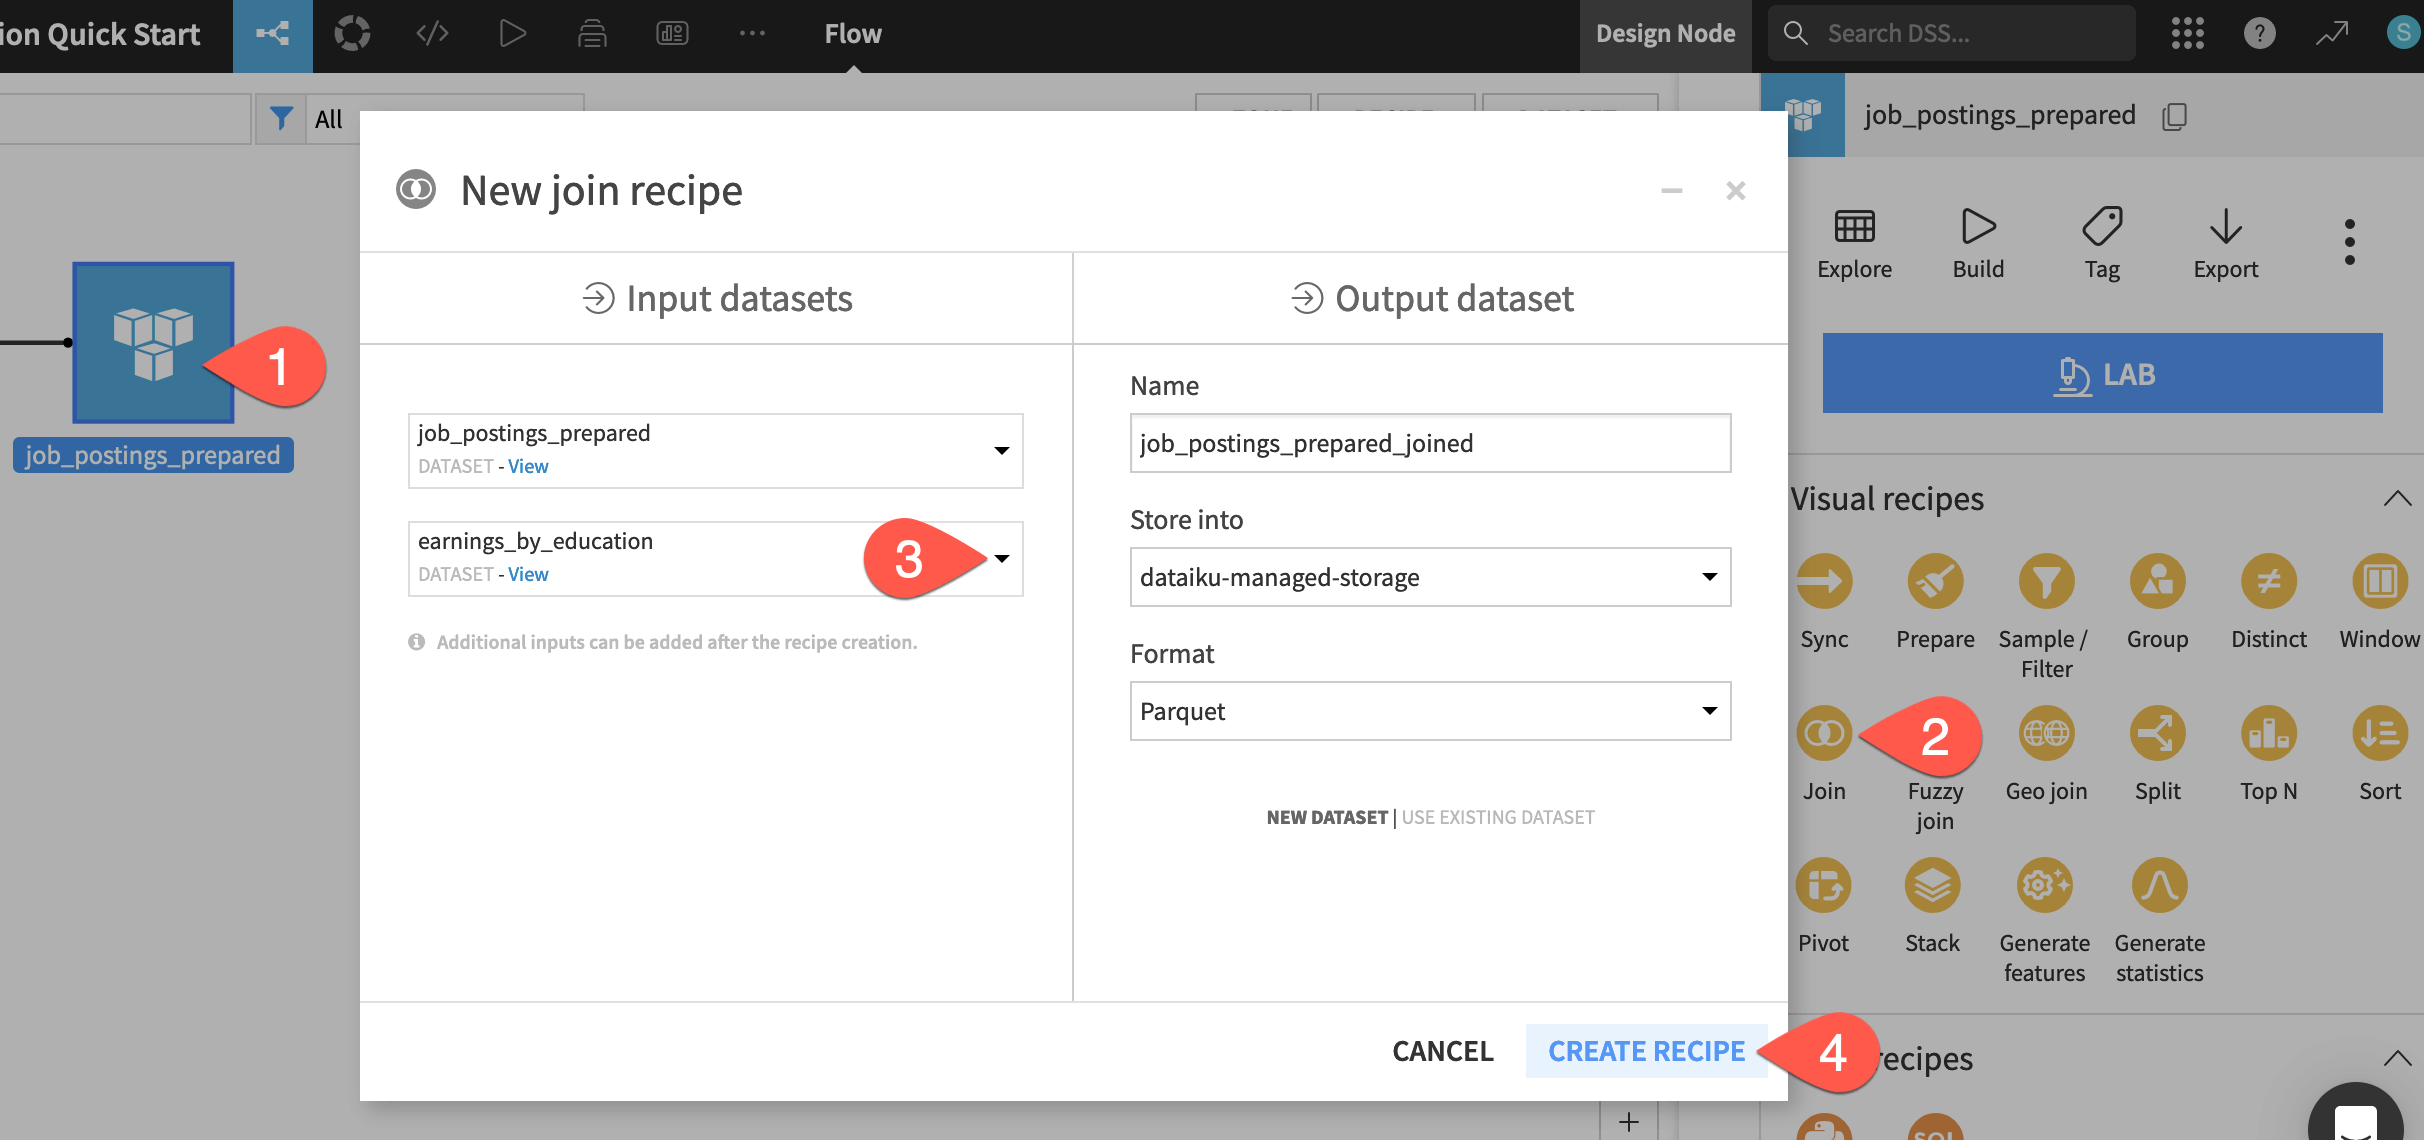
Based on this relationship, let’s enrich the job_postings_prepared dataset with the earnings data. Use another visual recipe: a Join recipe.
From the Flow, click to select job_postings_prepared. (This will be the “left” dataset).
Open the Actions (
) tab, and select Join from the menu of visual recipes.On the left hand side of the dialog, click No dataset selected, and provide earnings_by_education. (This will be the “right” dataset).
Click Create Recipe.
Configure the Join step#
You have a number of different options when deciding how to join datasets.
Choose a join type#
Dataiku can perform the standard types of joins familiar to SQL users depending on which matches between the datasets you wish to retain.
On the Join step, click on Left join to view the various join options.
Leave the default Left join so that the output dataset retains all records of job postings even if a matching education level isn’t found.

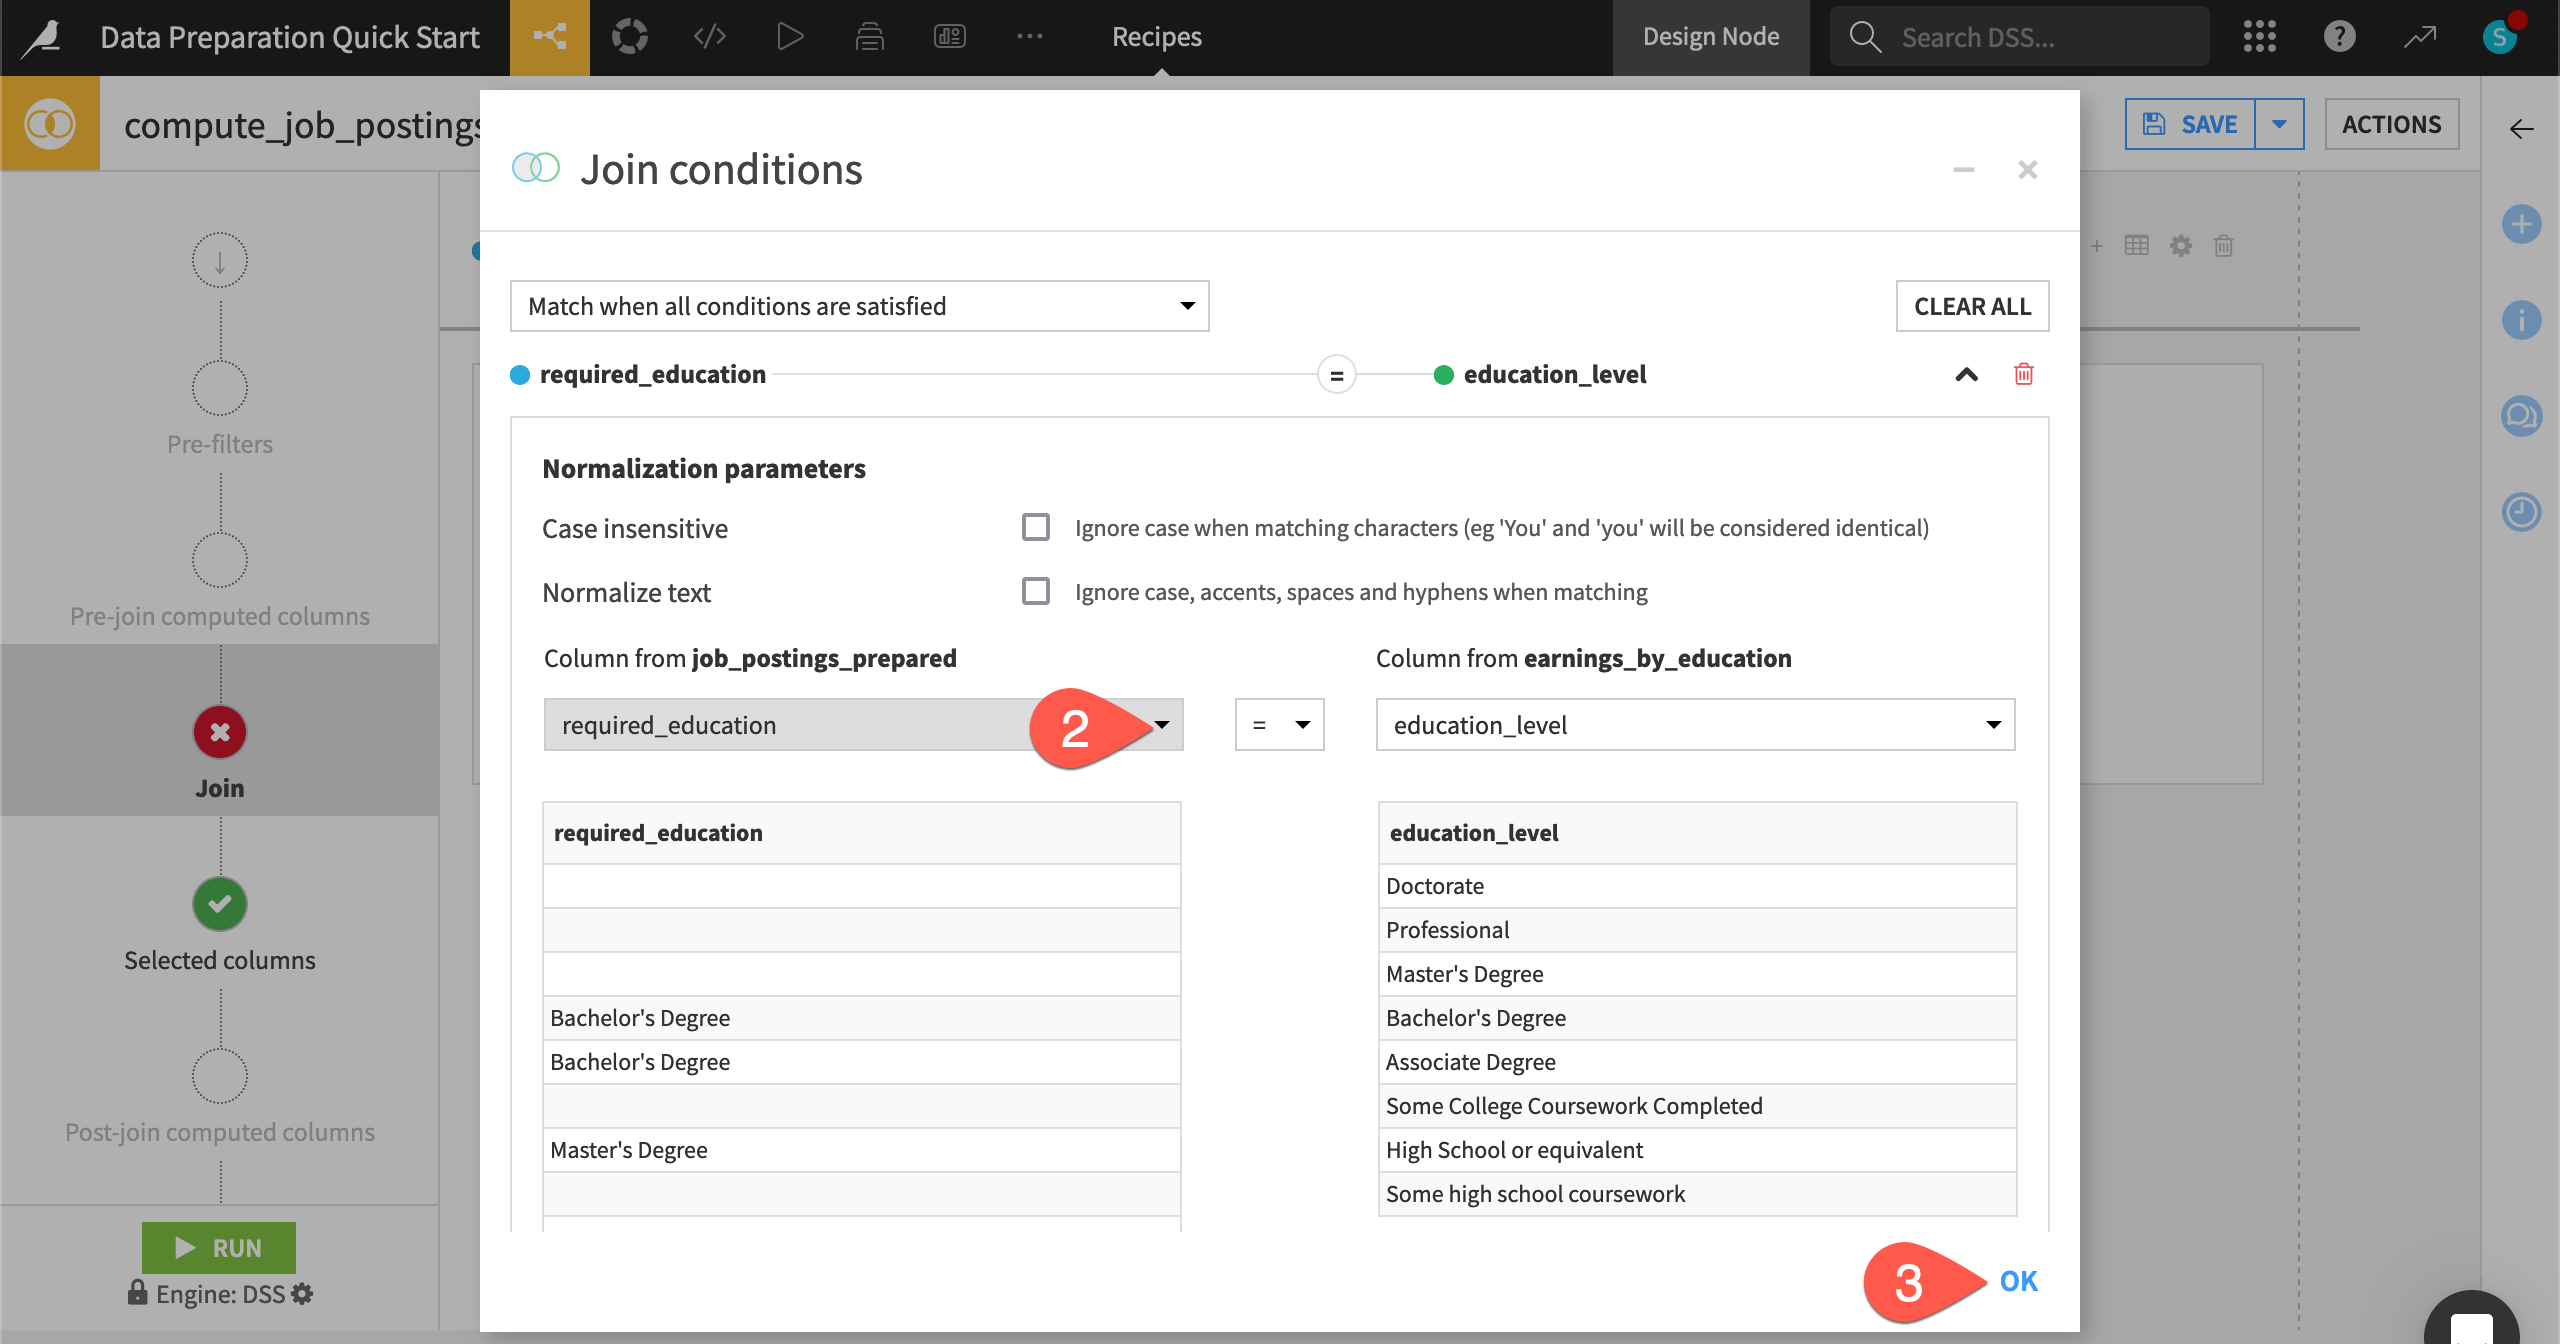
Add a join condition#
Once you know the type of join required for your use case, you can define the conditions for the join key.
On the Join step, click Add a Condition.
For the job_postings_prepared dataset on the left, change the join column to required_education.
Click OK.
Handle unmatched rows#
By default, the Join recipe drops any unmatched rows, but you can also send unmatched rows to another dataset by clicking the dropdown menu beneath the join key. This can be especially useful for verifying assumptions about the datasets, or, in general, anytime you want to handle unmatched rows in some particular way.
On the Join step, select the dropdown menu underneath the join condition.
Select Send unmatched rows to other output dataset(s).
Click + Add Dataset.
Give the name
unmatched.Click Use Dataset.

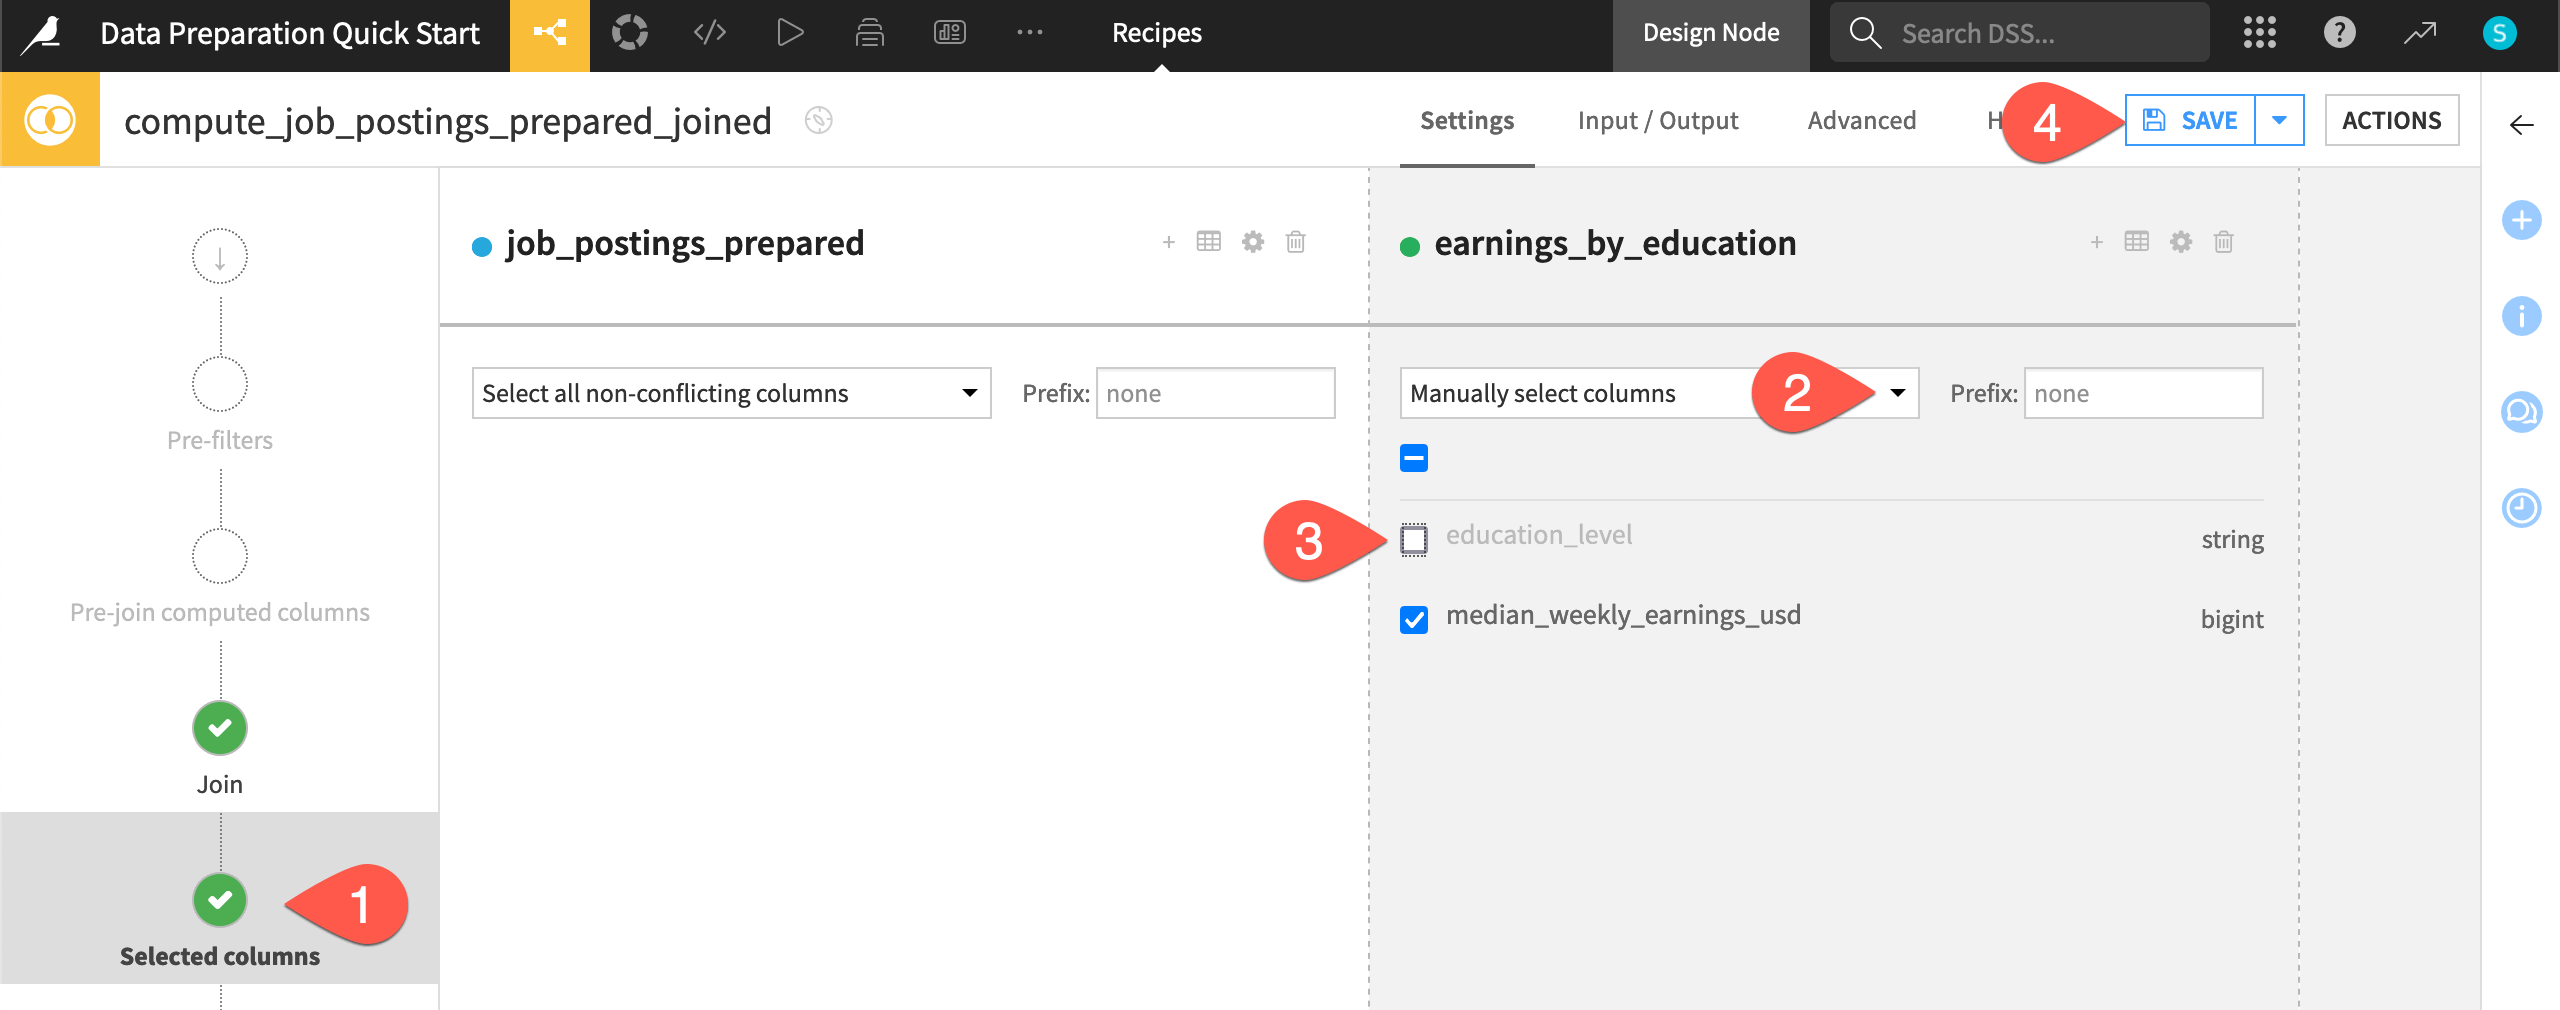
Select columns for the output dataset#
The next step is to choose which columns should appear in the output.
In the left hand panel, navigate to the Selected columns step.
Under earnings_by_education, open the dropdown menu, and choose Manually select columns.
Uncheck education_level since the required_education column of the left dataset contains the same information.
Click Save (or
Cmd/Ctrl+s).
Check the computation engine#
Before running the Join recipe, you may be curious where the actual computation will take place.
Click the gear (
 ) icon to open the recipe engine settings.
Click Show to view the non-selectable engines as well.
Click Close when finished reviewing this information.
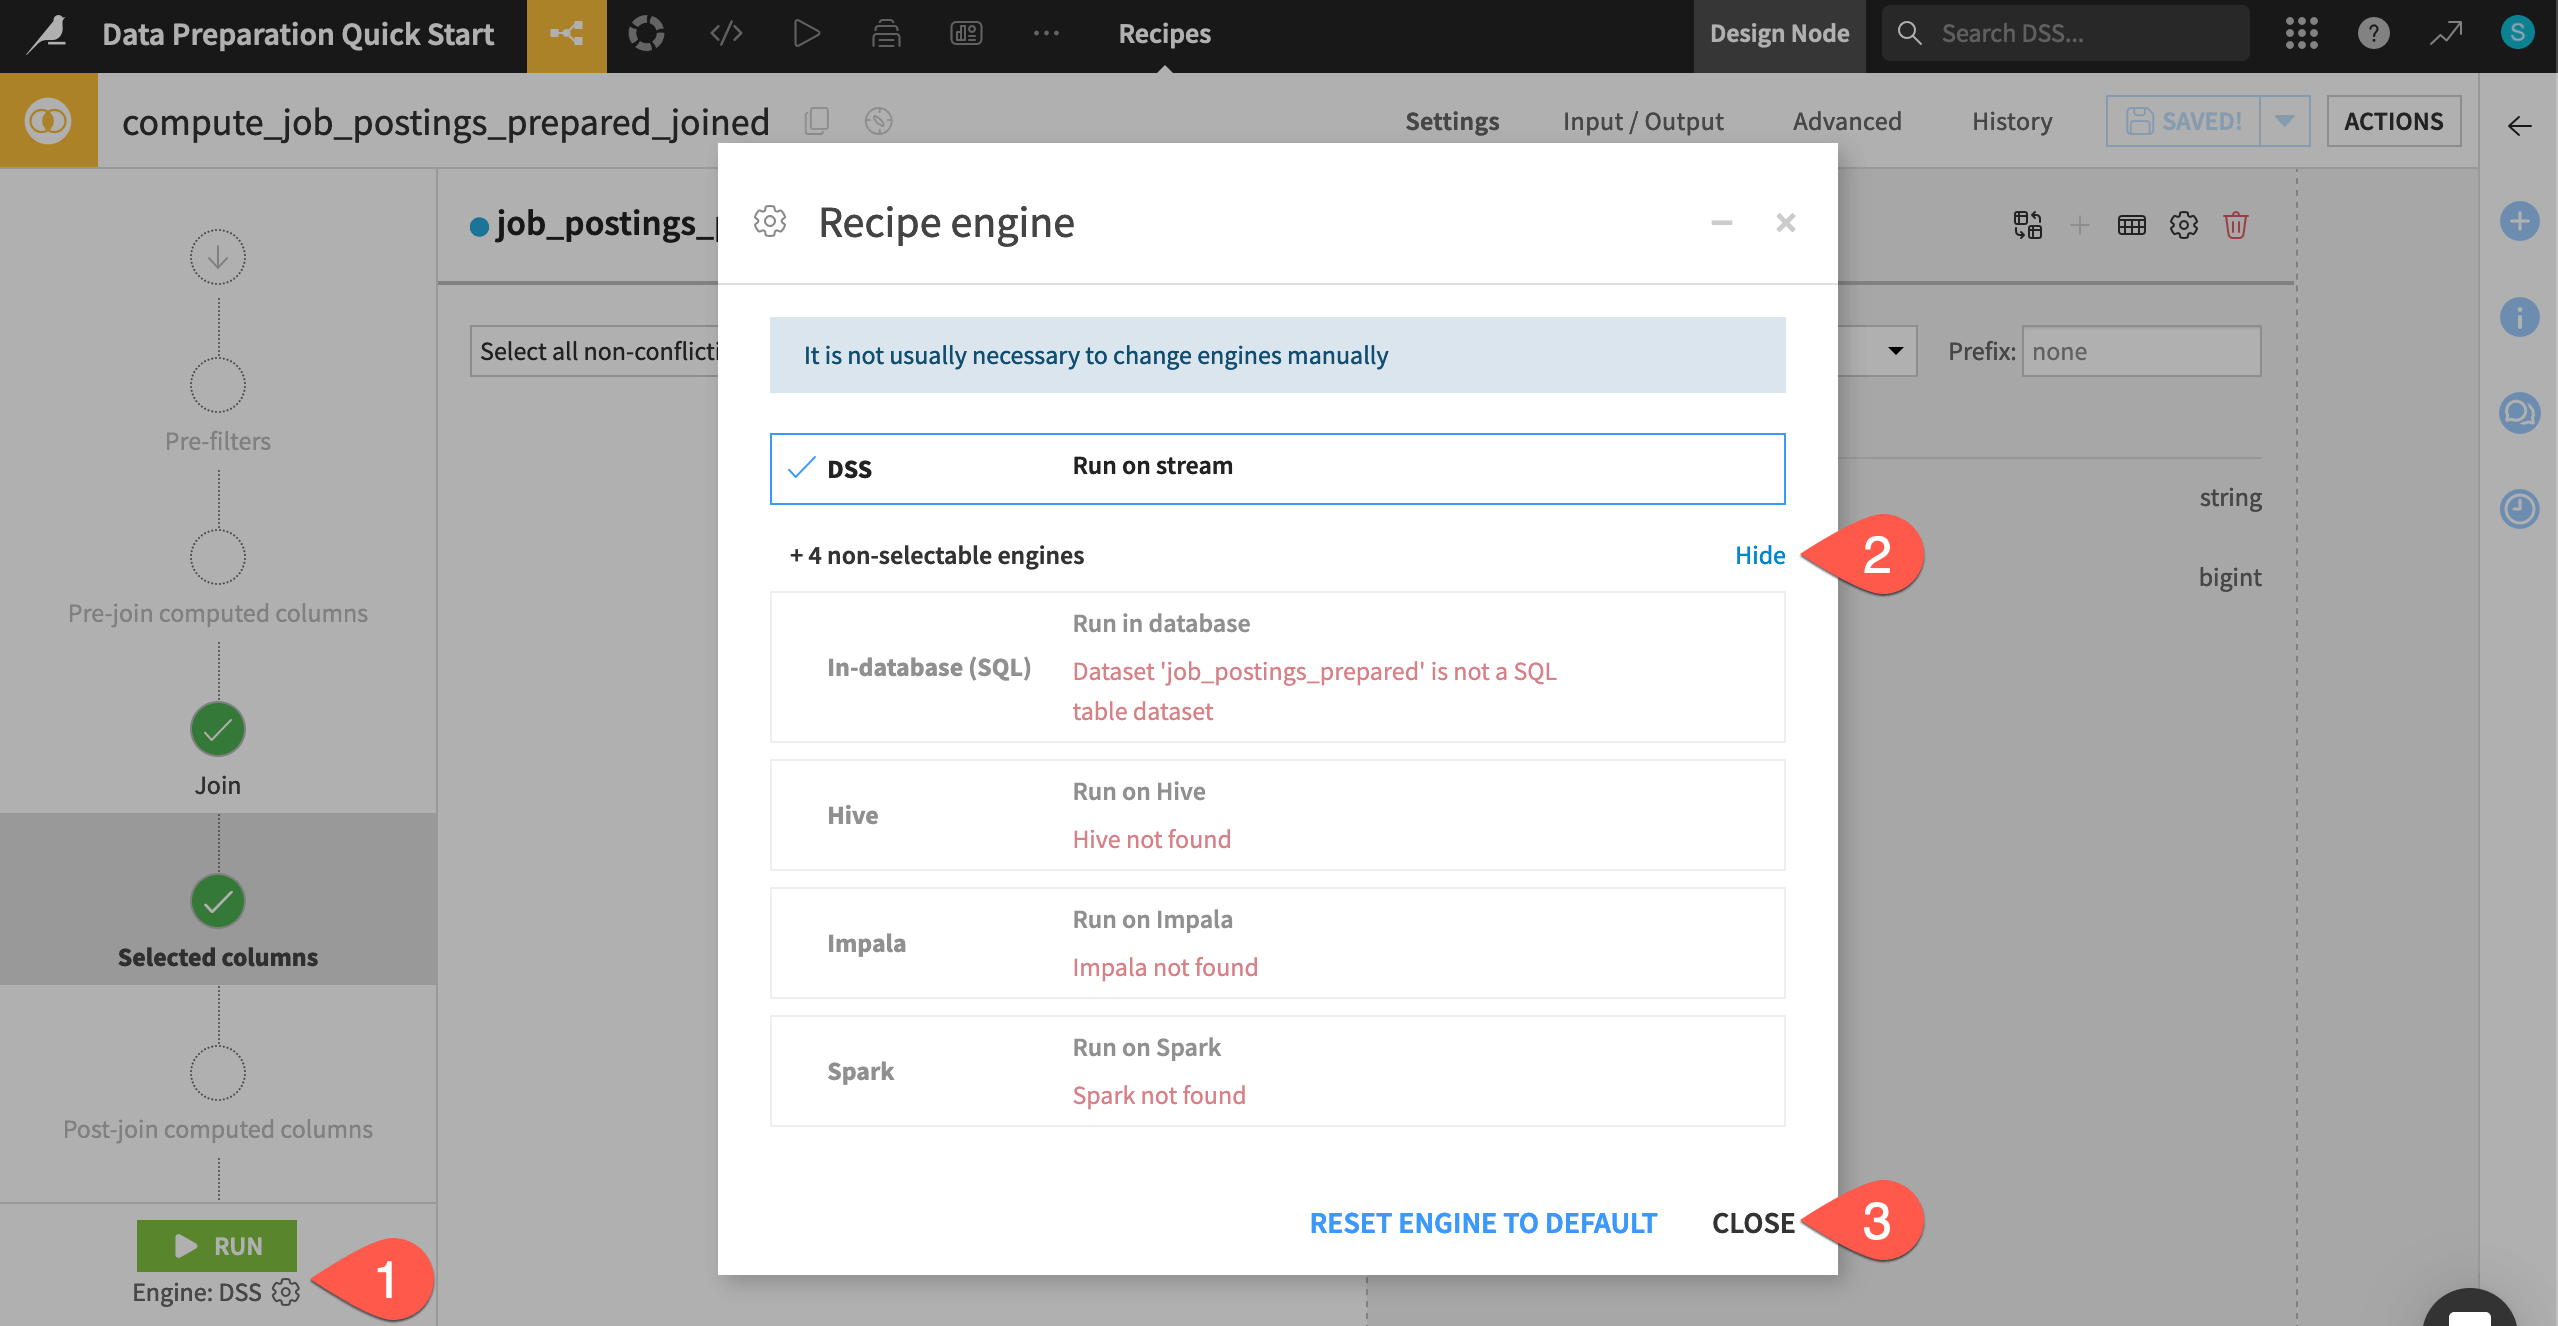
You usually won’t need to adjust the recipe engine setting manually, but it can be helpful to know what’s happening underneath Dataiku.
You can think of Dataiku as an orchestrator on top of your data infrastructure. Usually your instance administrator will create connections to this infrastructure. Then, you’ll manipulate data through recipes (visual, code, or even LLMs), but you often won’t need to move the data into Dataiku.
Tip
For this tutorial, your recipes will use the DSS engine. You could also use a Sync or Prepare recipe to move the data into other storage locations, such as SQL databases or cloud storage. Depending on the storage location, other engine options, such as the in-database SQL or Spark engines, may become available.
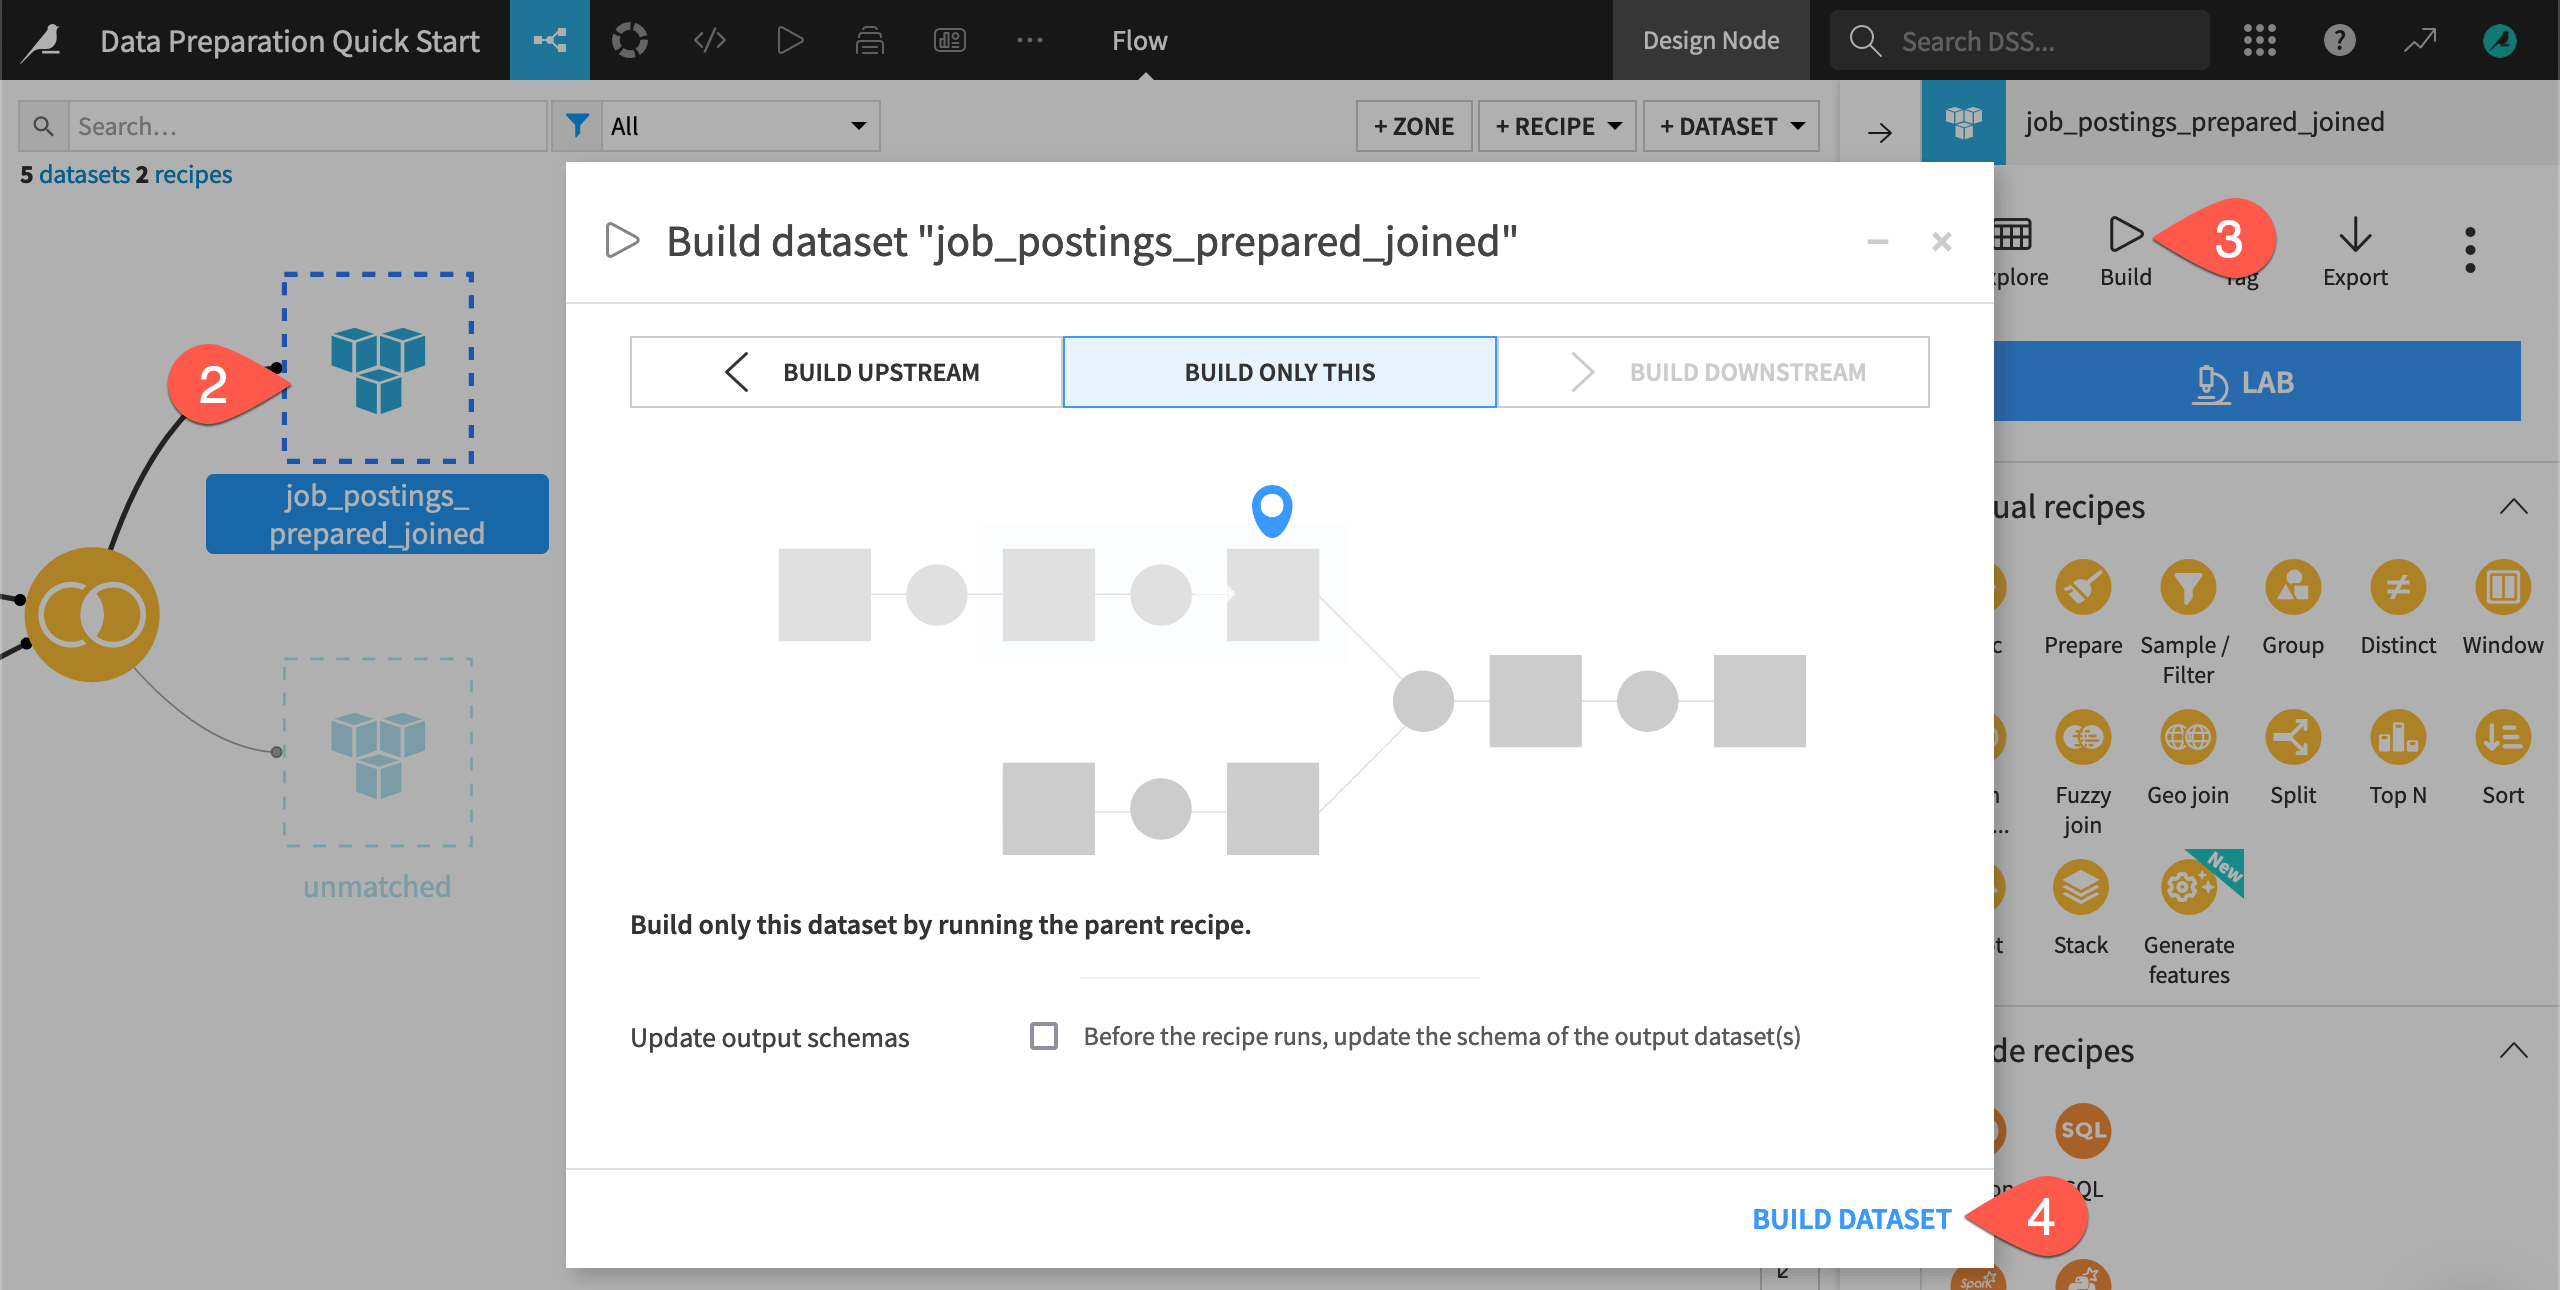
Build a dataset from the Flow#
Often you won’t want to open an individual recipe to run it. Instead, you can instruct Dataiku to build a dataset of interest, and Dataiku will run whatever recipes are necessary to make that happen.
Before running the Join recipe, navigate back to the Flow (
g+f).Click once to select the empty (unbuilt) job_postings_prepared_joined dataset.
In the Actions (
) tab, click Build.Since all build modes are the same in this case, leave the default “Build Only This” mode, and click Build Dataset.
See also
You’ll learn more about build modes and automating builds with scenarios in the Advanced Designer learning path.
Check unmatched rows#
In addition to the main output dataset, the Join recipe also created a dataset containing any unmatched rows.
When the job finishes, refresh the screen.
From the Flow, double click the unmatched dataset to open it.
Return to the Flow when finished viewing it.
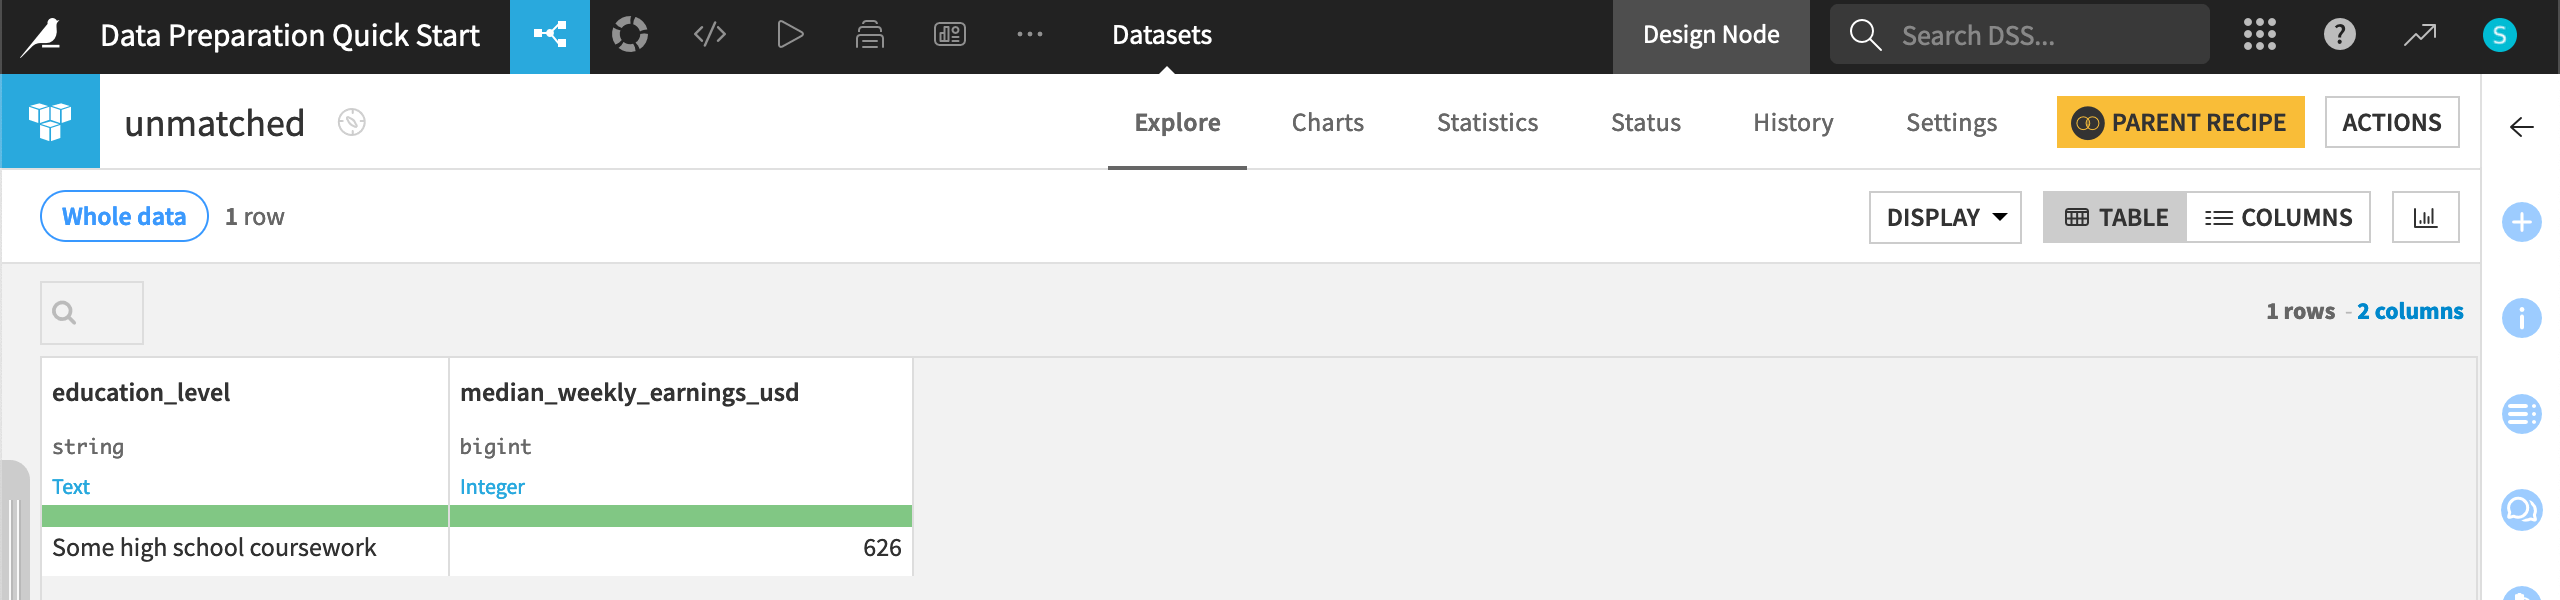
The value “Some high school coursework” in the earnings_by_education dataset didn’t have an exact match in the job_postings_prepared dataset, and so this row appears here.
Tip
Aside from changing the data values, you could fix this by returning to the join condition in the Join recipe, and checking the option for a Case insensitive match. Feel free to try this out yourself and re-run the Join recipe or move ahead!
Optional: Write code#
Important
If you don’t wish to get started coding with Dataiku, feel free to skip ahead to the conclusion.
See a screencast covering this section’s steps
Dataiku’s visual tools can handle a wide variety of data preparation tasks. They also enable team members with diverse skill sets to collaborate on the same platform. However, certain tasks might require a highly customized approach. On the other hand, sometimes you might just prefer to code! That choice is always yours.
Create a code notebook#
To create a code recipe, you’ll often start in a code notebook. Here you’ll use Python, but the process is similar for languages like R or SQL.
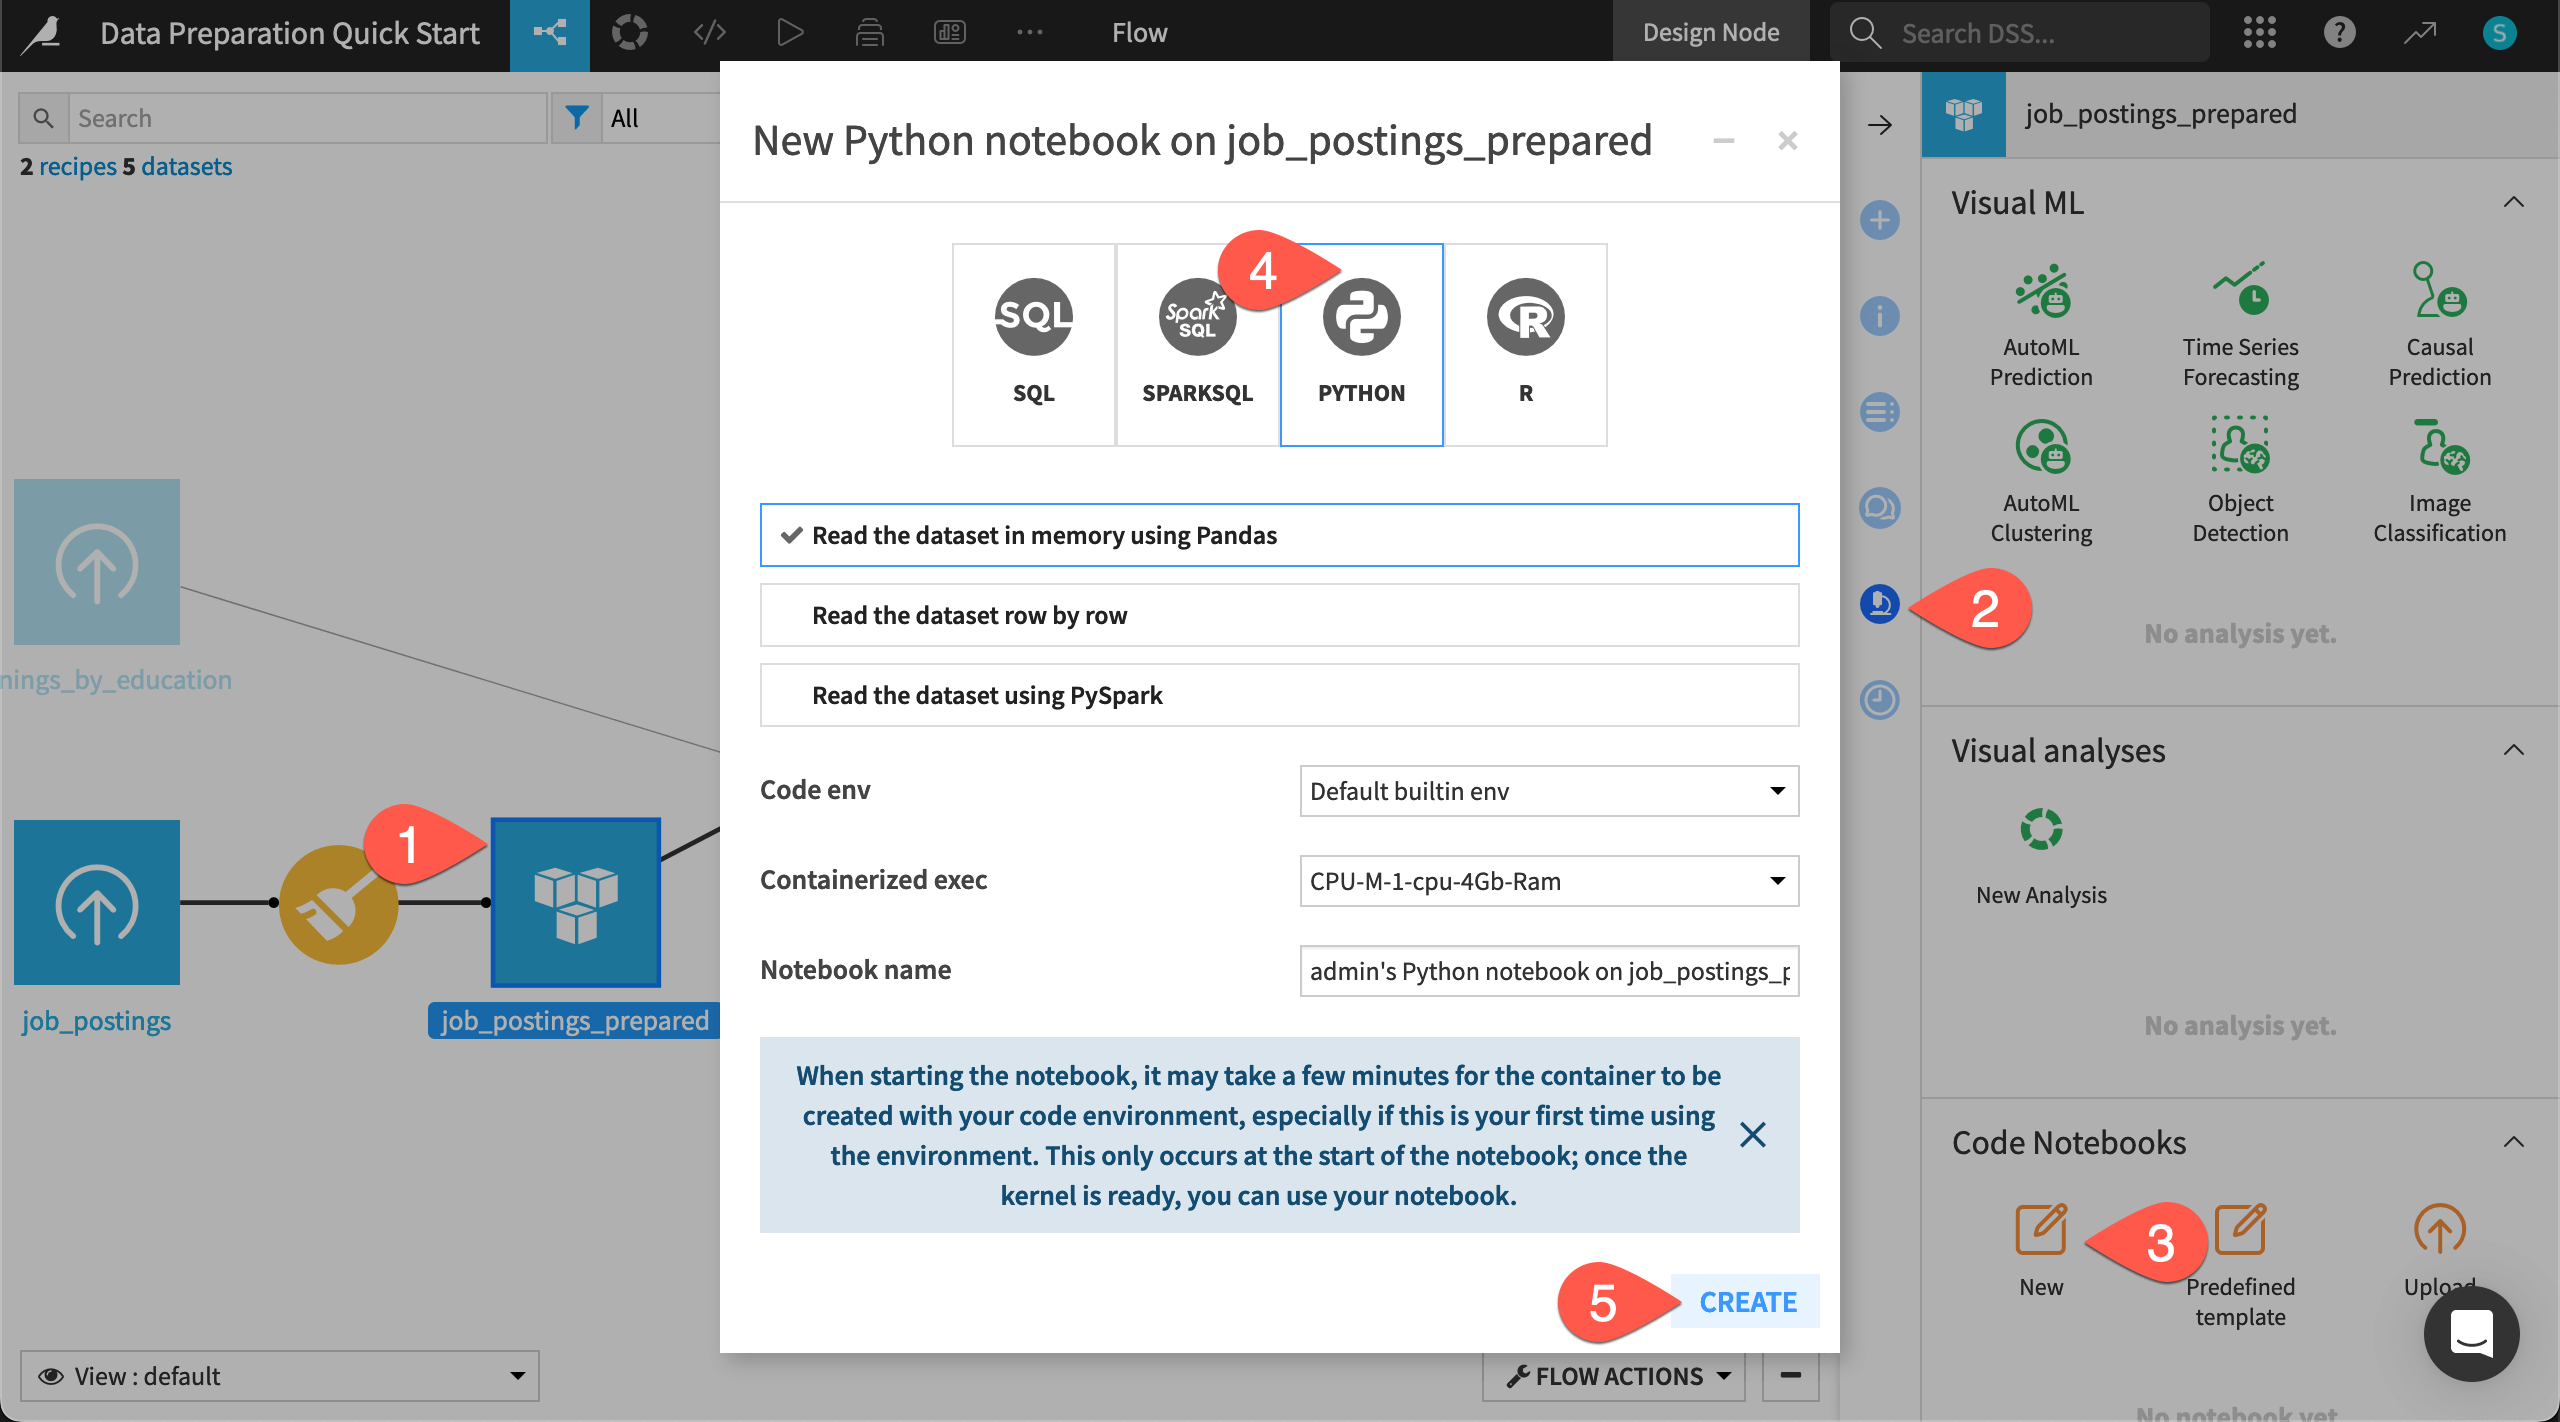
From the Flow, select the job_postings_prepared dataset (not the job_postings_prepared_joined dataset).
Navigate to the Lab (
 ) tab of the right side panel.
Under Code Notebooks, click New.
From the available types of notebooks, select Python.
Click Create with the default settings, including the built-in code environment.
Note
This notebook uses the built-in code environment. You can also create your own Python or R code environments with custom sets of packages.
Write code in a notebook#
You now have a Jupyter notebook. What’s special though is how the Dataiku API provides a direct way to a pandas DataFrame of the dataset. Regardless of the dataset’s storage location, this line of code is the same.
When the kernel is ready, run the starter cells in the notebook.
Replace the last cell with the following code block that creates a numeric feature min_salary out of the string feature salary_range:
# Define a function to extract the minimum salary
def extract_min_salary(salary_range):
    if pd.isna(salary_range):  # Keep missing values as missing
        return None
    try:
        min_salary = int(salary_range.split('-')[0])  # Extract minimum salary
        return min_salary
    except:
        return None  # Handle invalid values

# Apply the function to create the "min_salary" column
df['min_salary'] = df['salary_range'].apply(extract_min_salary).astype('Int64')
Note
This column could use more data preparation! Some values appear to round off (50 instead of 50,000). Is it dollars, euros, pounds, etc? A few values are dates. But you get the idea!
Convert a code notebook to a code recipe#
This code notebook only exists in the Lab, a space for experimental prototyping. To include it in the project’s Flow, you’ll need to convert the notebook into a recipe.
Click + Create Recipe, and click OK with the default Python recipe selected.
Under Outputs, click + Add, and name the output
job_postings_python.Click Create Dataset.
Click Create Recipe.

Once in the recipe interface, there is just one adjustment to make.
Edit the last line of code in the recipe to match the following:
job_postings_python.write_with_schema(df)
Click Run (or type
@+r+u+n).When the job finishes, navigate back to the Flow (
g+f) to see the code recipe and its output.
Note
As your project evolves, you’ll iterate back and forth between experimental work in a notebook and production work in a recipe. Once your code recipe stabilizes, you may consider turning it into a plugin. A plugin is a reusable component which wraps your code under a visual interface so more users can benefit from it.
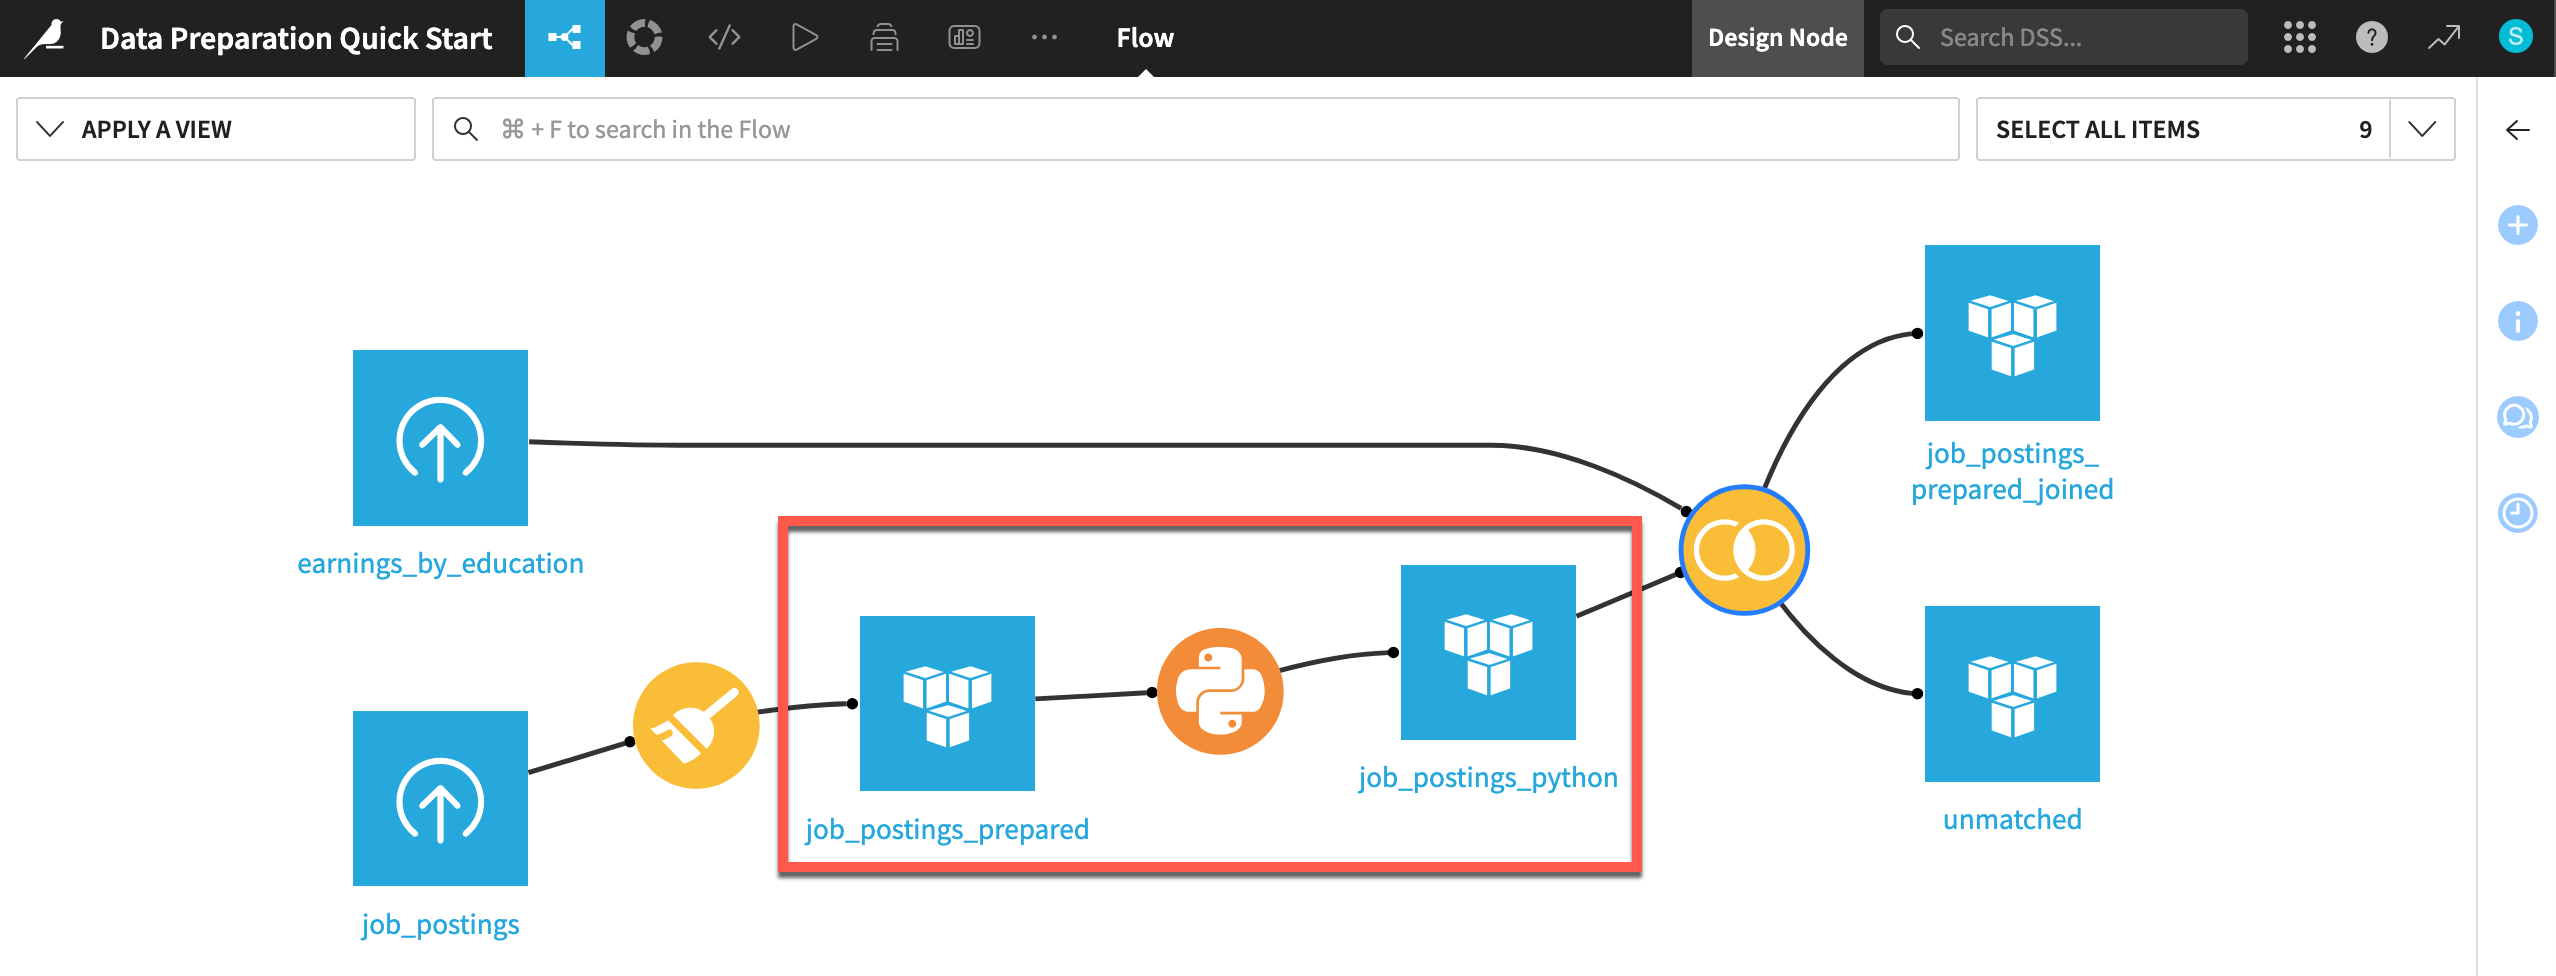
Adjust the Flow#
You now have converted exploratory code in a Lab notebook to production code in a Flow recipe! However, the input to the Join recipe needs to change to include this work in the existing data pipeline.
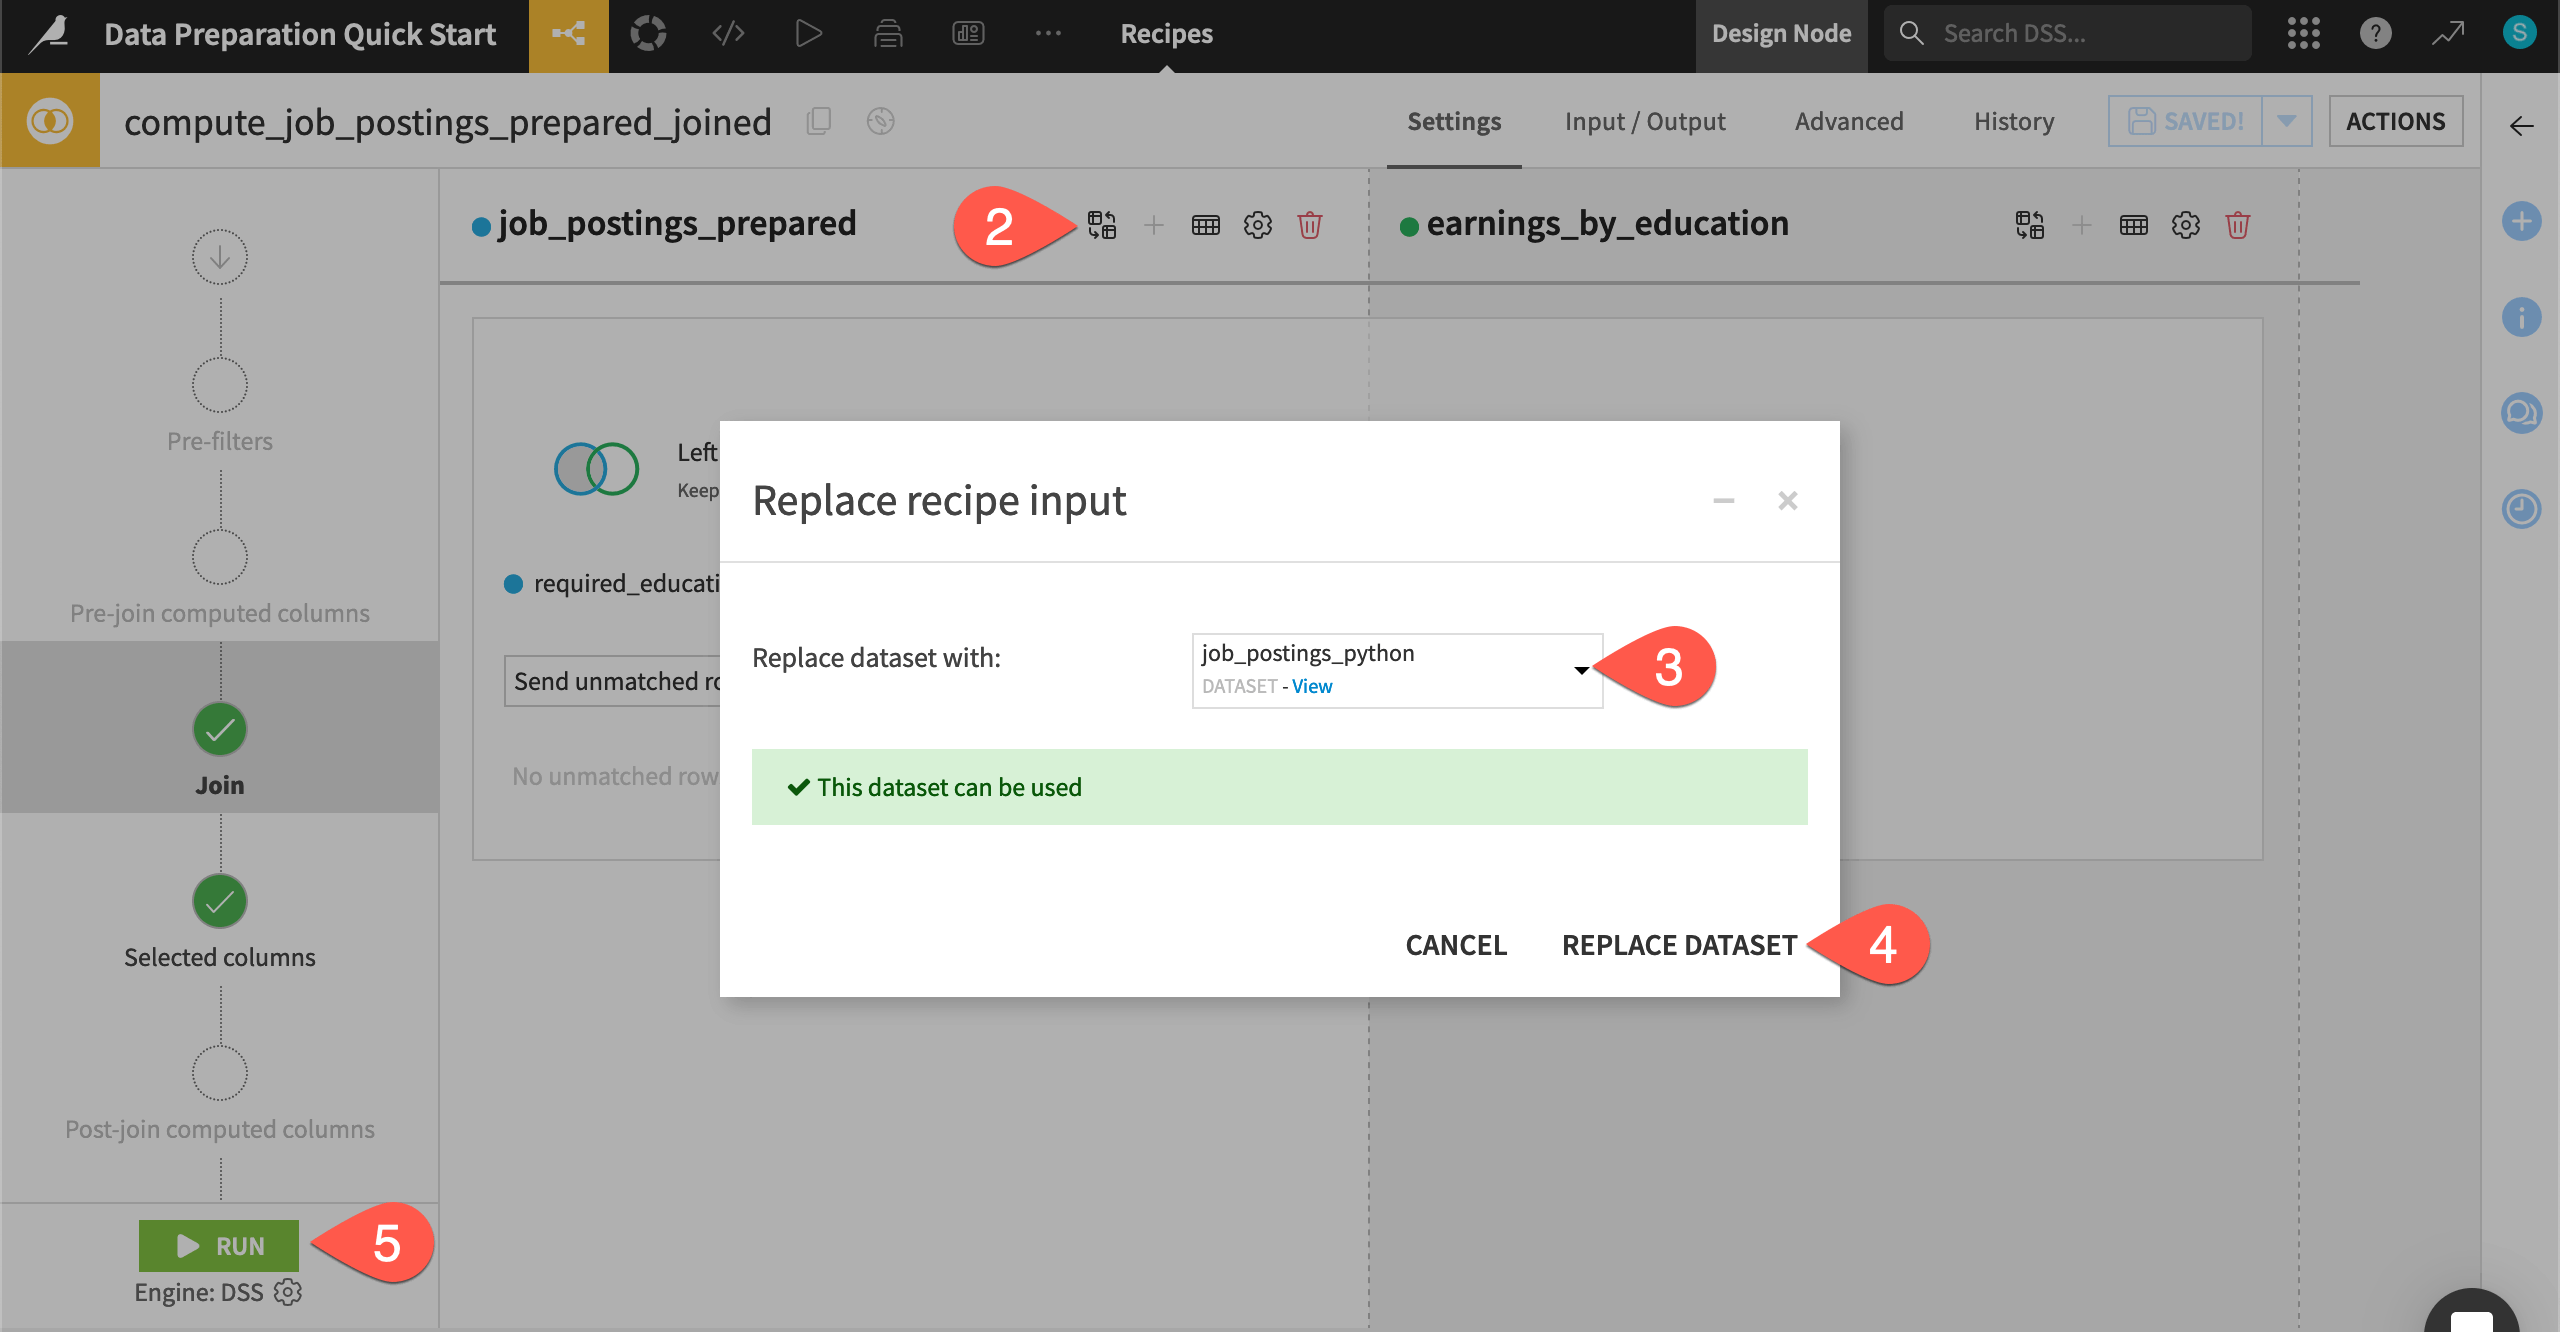
Double click on the Join recipe (
 ) to open it.
On the Join step, next to job_postings_prepared, click the Replace dataset (
 ) icon.
Choose job_postings_python as the replacement.
Click Replace Dataset.
Click Run, and navigate back to the Flow when the job finishes.
You now have inserted Python code into a visual Flow! Any user building a dataset like job_postings_prepared_joined is running this Python recipe too—regardless of whether they know Python.
See also
This was just the beginning of what Dataiku has to offer coders! To find more resources for coders, please see the Quickstart Tutorial in the Developer Guide or the Developer learning path in the Academy.
Next steps#
Congratulations! You’ve taken your first steps toward preparing data with Dataiku.
You’re now ready to begin the Core Designer learning path and challenge yourself to earn the Core Designer certificate.
Another option is to dive into the world of machine learning. In the Quick Start | Dataiku for machine learning, you can use the dataset you’ve just prepared to train a model that classifies job postings as real or fake.
See also
You can also find more resources on data preparation in the following spaces: