
An exported Java model scored externally#
Depending on the deployment context, you may wish to export a model designed in Dataiku so that it can run on an external system. For example, a model may need to run on an edge device, such as a drone. However, even if model scoring occurs externally, model monitoring can still occur within Dataiku.
This section presents how to monitor a model within Dataiku in situations where the model is exported to Java and scored externally.
Additional prerequisites#
In addition to the shared prerequisites, you’ll also need:
Basic knowledge of Java.
A JDK installed on your machine.
A Dataiku instance with the Java model export feature.
This tutorial used the IntelliJ IDEA Community edition, but other IDEs are possible.
Export the model#
For scoring to occur outside of Dataiku, you’ll first need to export the model used in the starter project.
Double click to open the saved model deployed to the Flow.
Open the report for the Active version by clicking on the model name Random forest (s1) - v3 at the top left of the tile.
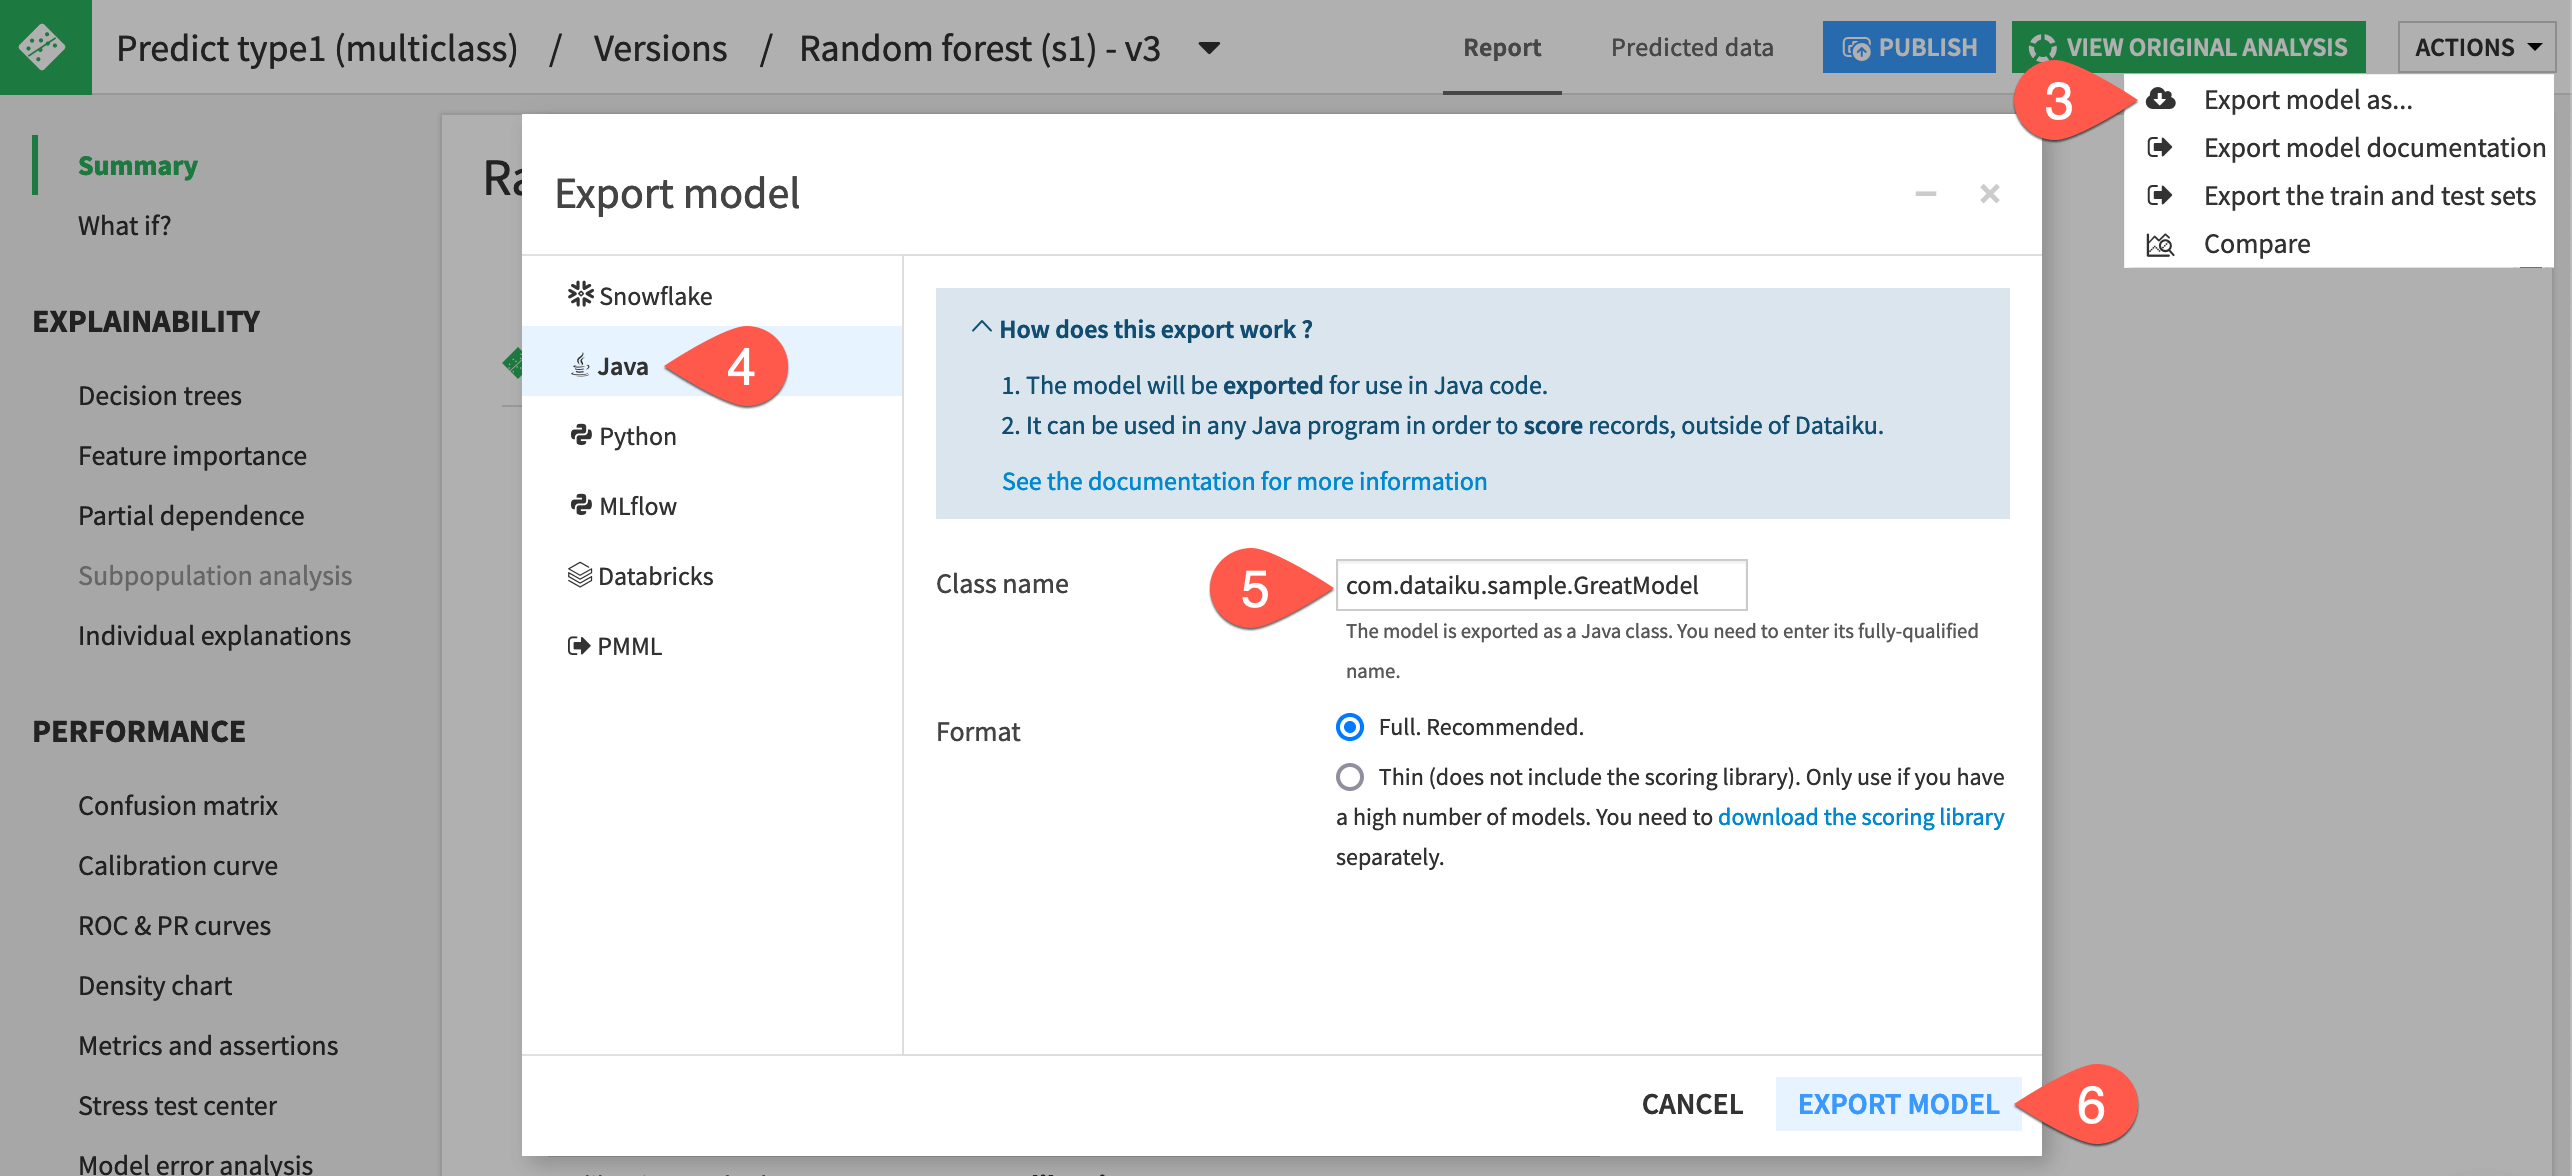
At the top right of the screen, click Actions > Export model as ….
Select the Java panel.
Enter the class name
com.dataiku.sample.GreatModel.With the default full format selected, click Export Model.
See also
See the reference documentation on Java model exports to understand the usage and limitations.
Run the model outside of Dataiku#
Now you have downloaded on your machine a .jar file containing the model and Dataiku Java scoring libraries. Running the model outside of Dataiku requires a Java program that loads the model, takes input data from a folder, scores it, and exports the result as a CSV file.
Import the project to an IDE#
The academy-samples Git repository includes a sample Java project in the monitoring-java folder that meets the above requirements.
Import this project into your favorite IDE. (This tutorial used IntelliJ IDEA Community edition for this test).
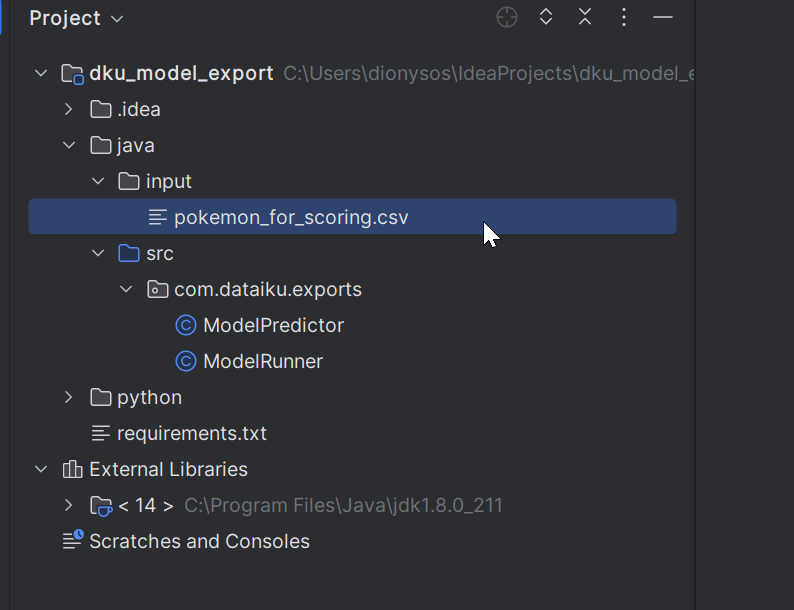
The program consists of two files:
java/src/com/dataiku/exports/ModelPredictor.javaloads the model and scores with it.java/src/com/dataiku/exports/ModelRunner.javaloads the input data, sends it for scoring, and saves the output as a CSV file.
The input data is expected within the project in the java/input folder. The starter project includes a sample file, but you could generate any file you want, provided you respect the schema.
Add the exported JAR file as a library to the project#
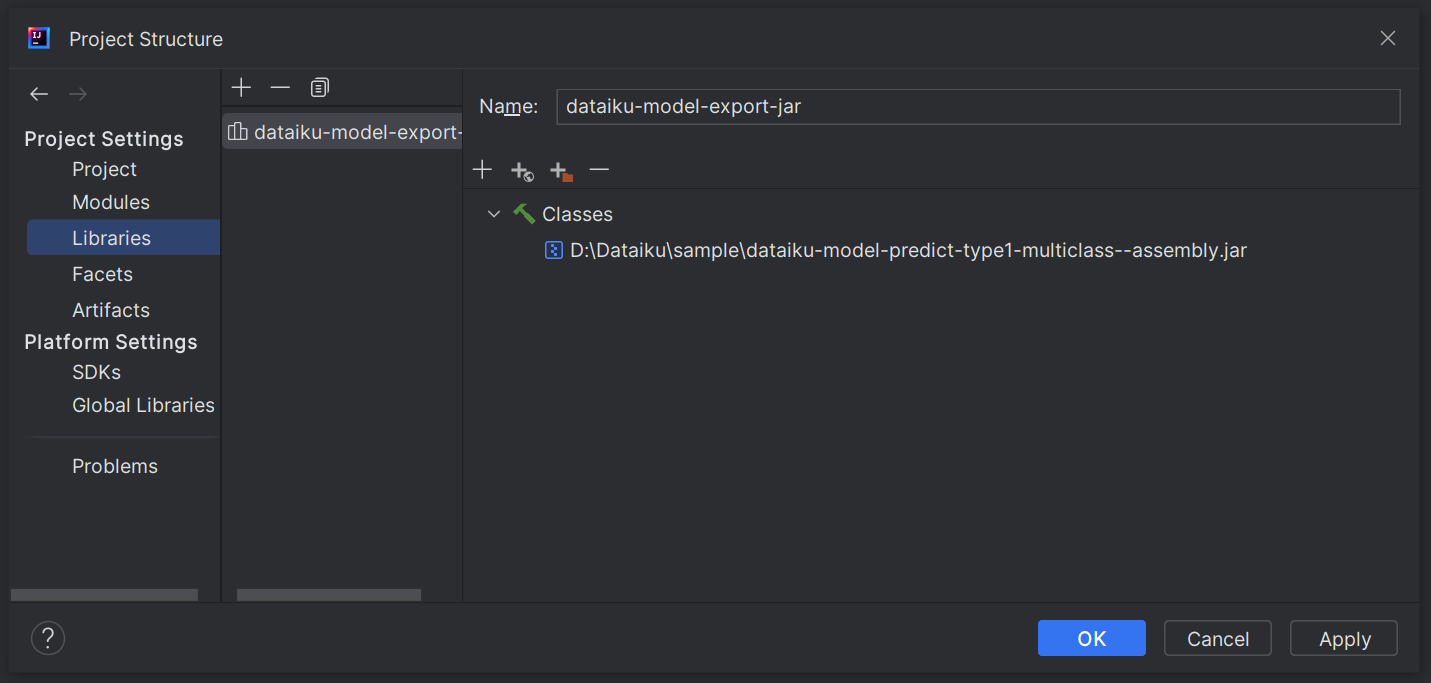
If using IntelliJ IDEA, the only missing part is the model itself and the scoring library: in other words, the .jar file previously exported from Dataiku.
Add the
.jarfile as a library in the project.
Run the program#
Now, you need to run the program to generate the prediction log.
In IntelliJ, right-click on ModelRunner.
Select Run ‘ModelRunner.main()’.
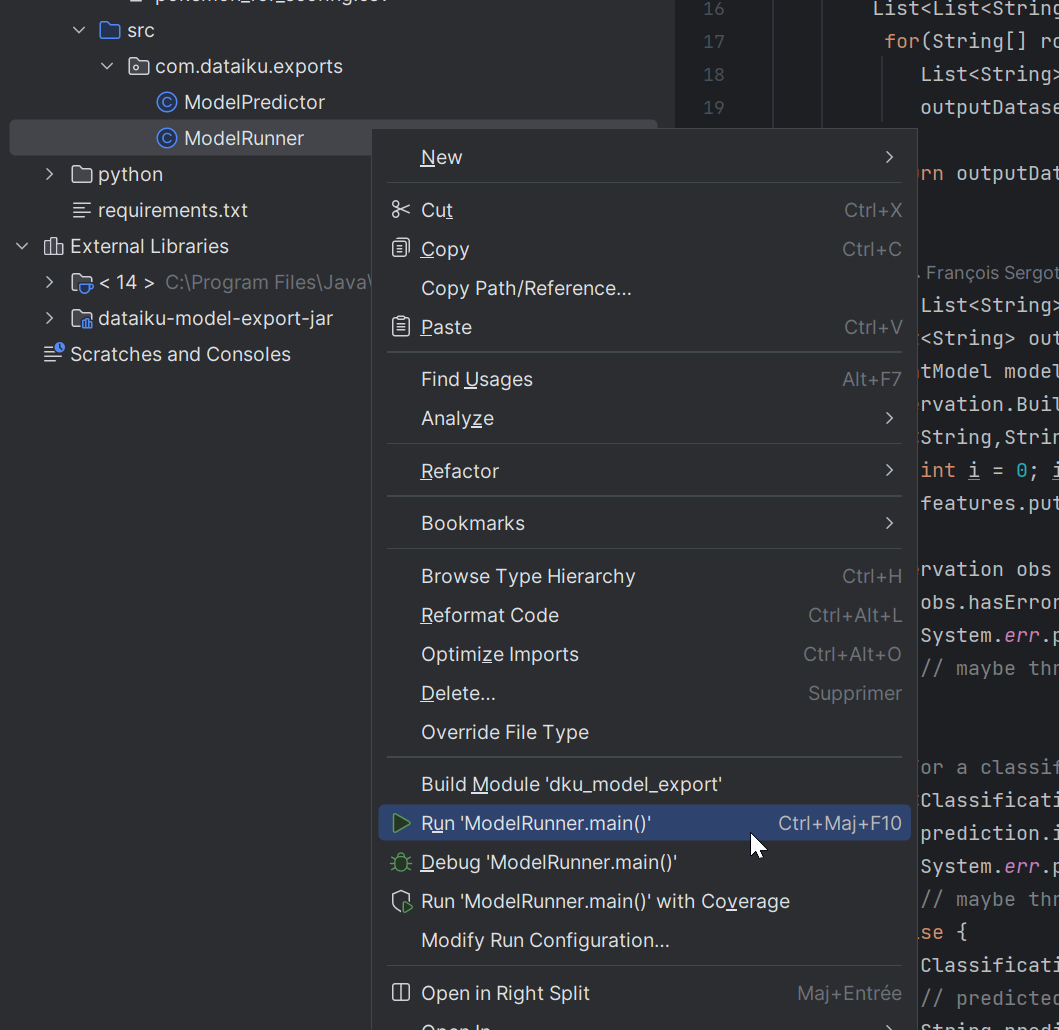
This action should create a CSV file of scored data called pokemon_scored_java.csv. The full path will be java/output/java/pokemon_scored_java.csv. This file is the only thing needed to compute drift monitoring in Dataiku.
Import prediction logs for monitoring#
You now have used the model to make predictions and exported these predictions in a usable format. Next, you need to import the prediction data into Dataiku so that you can monitor it in the usual way.
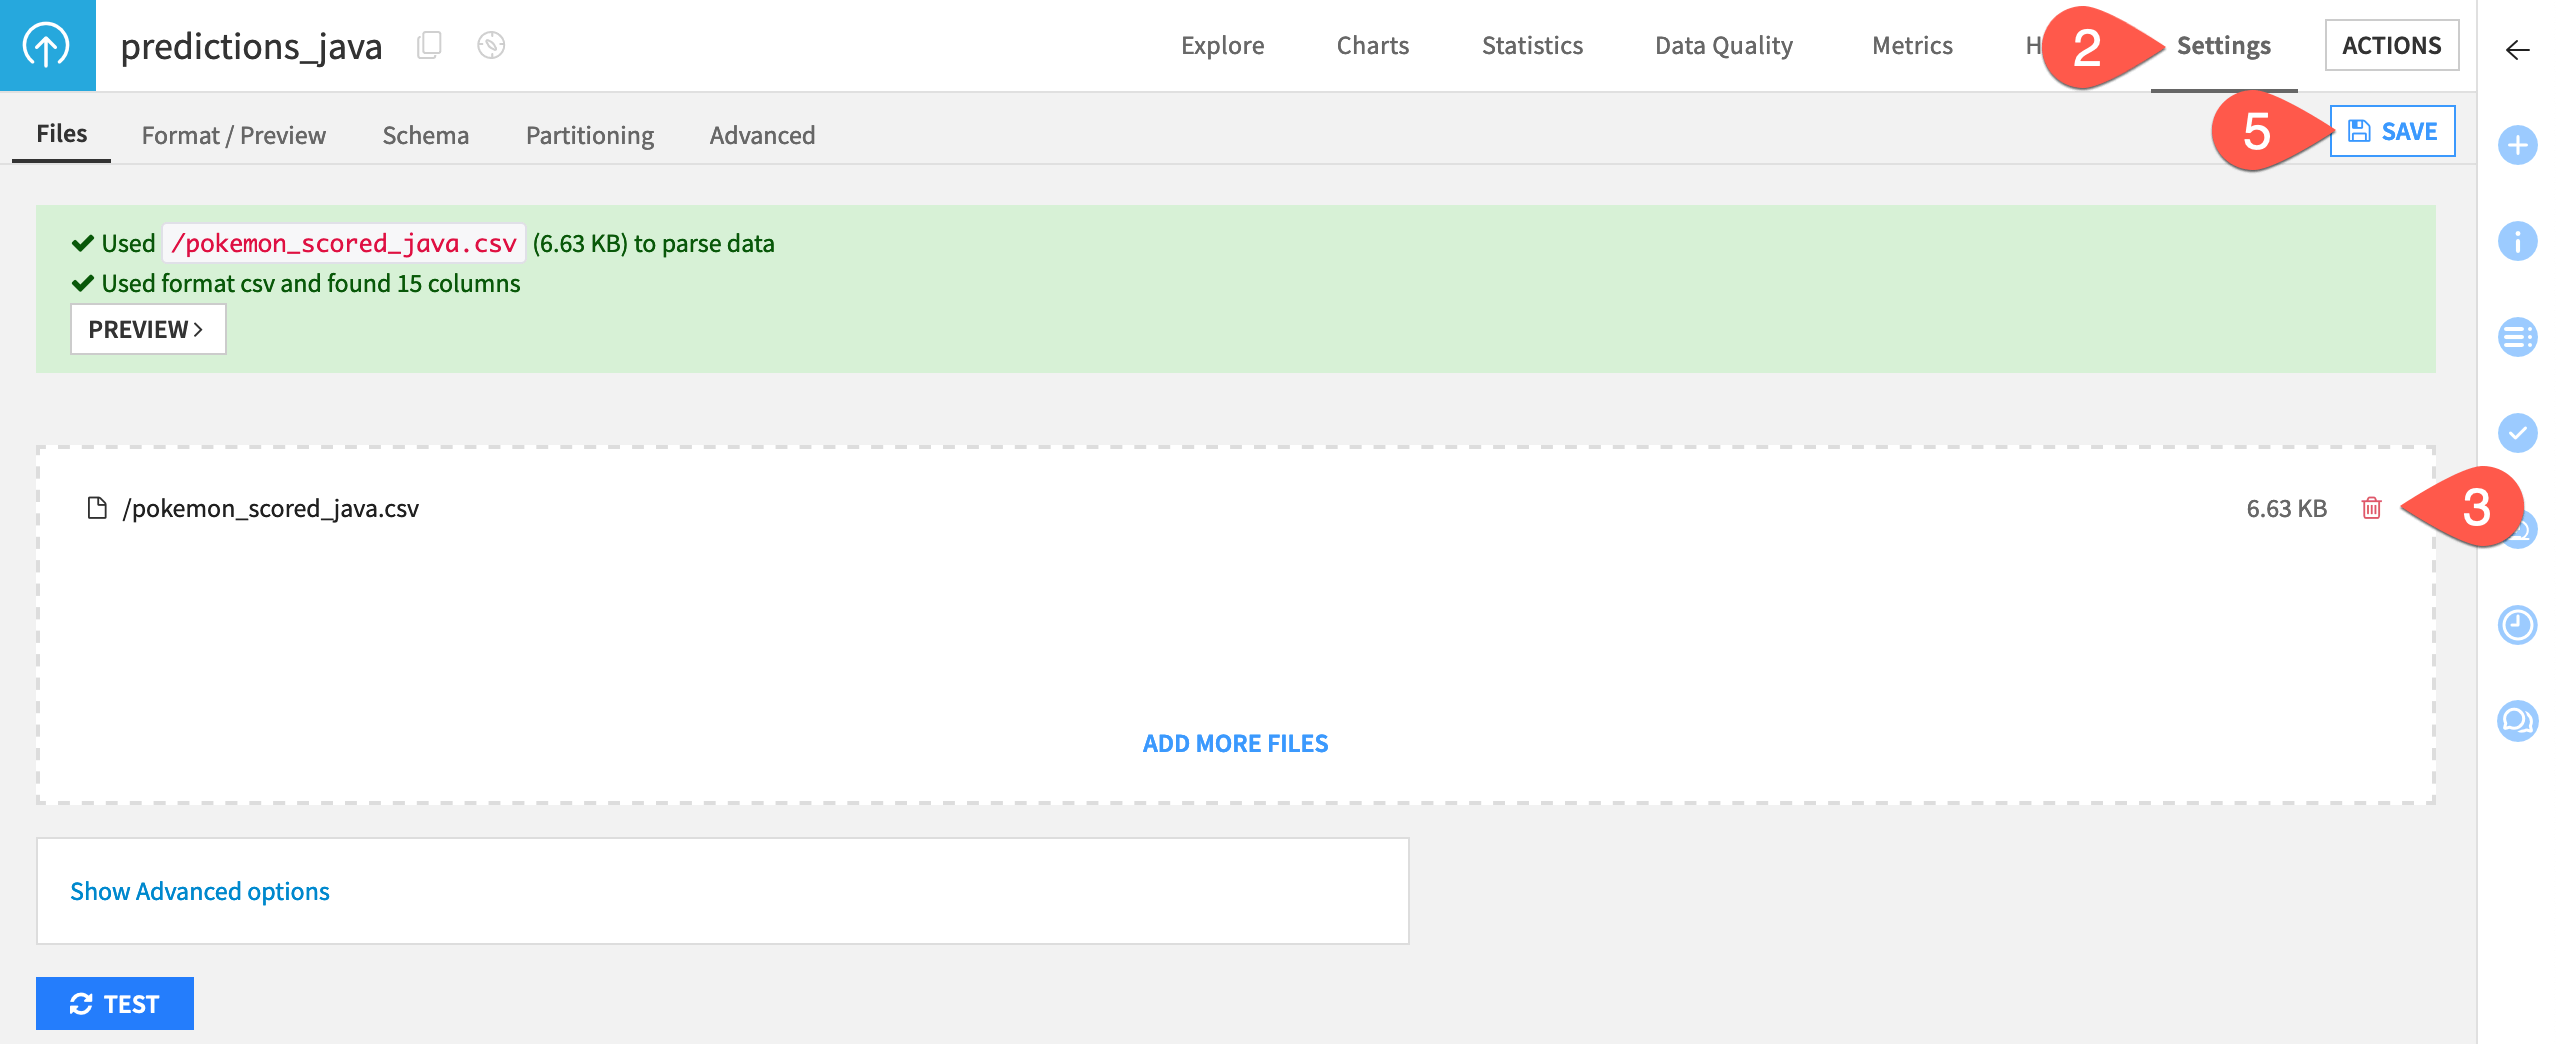
In the Python Monitoring Flow zone, open the predictions_python dataset.
Navigate to the Settings tab.
Delete the existing CSV file.
Click Select Files to replace it with the pokemon_scored_java.csv file that you just created.
Click Save to confirm.
Compute a model evaluation#
Like the other monitoring zones in this project, the Java Monitoring Flow zone includes:
An Evaluate recipe with two inputs: the saved model and a dataset of prediction logs (this time created externally with Java).
A model evaluation store as output computing standard drift metrics between the training dataset of the model and the actual predictions (this time done externally with Java).
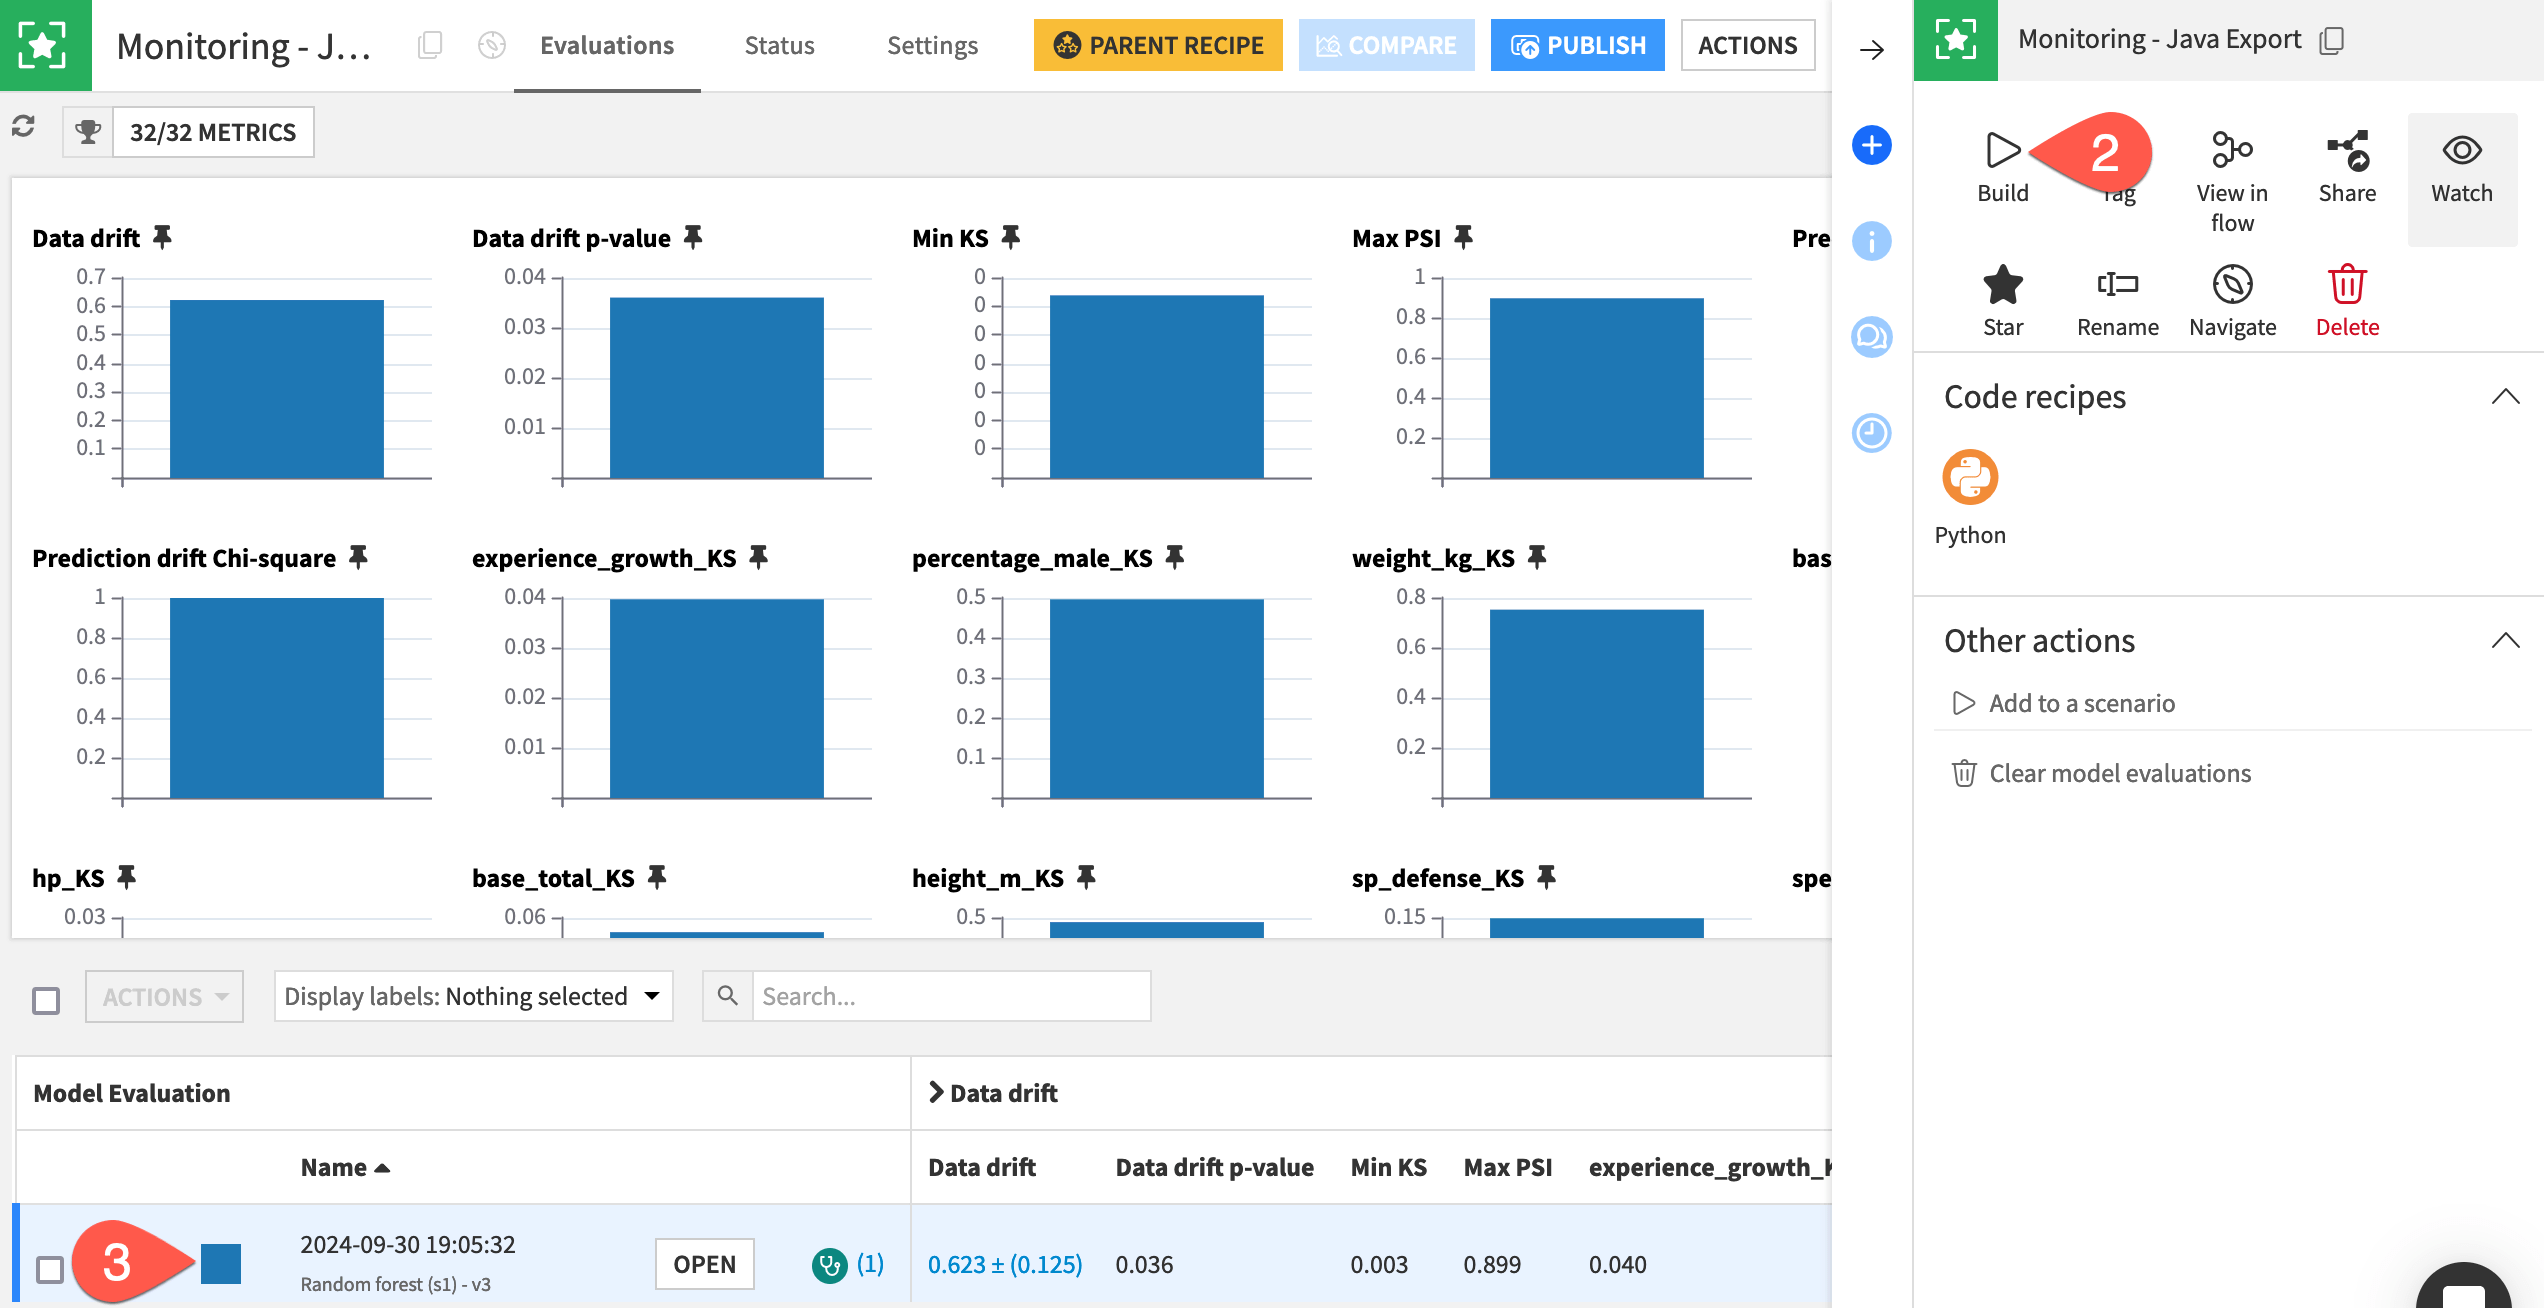
Finally, let’s build the model evaluation store to check the drift of the input data and predictions computed externally with Java.
In the Java Monitoring Flow zone, open the empty Monitoring - Java Export model evaluation store.
In the Actions tab, click Build > Build Evaluation Store with the default Build Only This setting.
When finished building, refresh the page to find the same set of metrics you’d find if you built the MES in other Flow zones.
Automate model monitoring#
At this point, you have seen an example of how a model export can generate a log file usable to compute monitoring metrics.
In a real use case, the first point to solve is how to automatically move the prediction file from where it’s generated to a place accessible to Dataiku. Possible solutions include sending it via FTP or directly pushing it to cloud storage. Rather than an all-around solution, this problem should be analyzed on a case-by-case basis.
Once you have configured the retrieval of logs in an accessible place, you can create a simple scenario to run the Evaluate recipe and generate a model evaluation, which you can then enrich with checks to automate alerts as done in this project’s Monitor batch job scenario or explained in more detail in Tutorial | Model monitoring with a model evaluation store.
Automate model deployment (optional)#
It’s perfectly acceptable to keep the deployment of the model as a manual process, as deploying a new model version might not be a frequent operation. However, if you want to do so, you can build a full deployment pipeline by leveraging Dataiku APIs, typically by training a new model version and then downloading the jar file.
Note
See the Developer Guide for a more detailed example that you can adapt for your needs.