Tutorial | Custom step-based scenarios#
Get started#
Scenarios are the main tool for automating actions, such as rebuilding datasets or retraining models, in Dataiku.
You can customize every scenario feature, such as triggers and steps, with Python code so you can adapt your automation to your specific use case.
Let’s see how they work!
Objectives#
In this tutorial, you will:
Add custom steps with Python code inside a step-based scenario.
Write custom scenario triggers with Python code.
Create custom scenario variables.
Note
This tutorial covers adding Python within a step-based scenario. For a scenario written entirely in Python code, please see Tutorial | Custom script scenarios.
Prerequisites#
To reproduce the steps in this tutorial, you’ll need:
Dataiku 12.0 or later.
An Advanced Analytics Designer or Full Designer user profile.
Basic knowledge of Dataiku (Core Designer level or equivalent).
Basic knowledge of Python code.
Note
The scenario is the basis for this tutorial. Thus, we encourage you to follow the Data Quality & Automation course.
Create the project#
From the Dataiku Design homepage, click + New Project.
Select Learning projects.
Search for and select Custom Step-based Scenarios.
If needed, change the folder into which the project will be installed, and click Create.
From the project homepage, click Go to Flow (or type
g+f).
From the Dataiku Design homepage, click + New Project.
Select DSS tutorials.
Filter by Developer.
Select Custom Step-based Scenarios.
From the project homepage, click Go to Flow (or type
g+f).
Note
You can also download the starter project from this website and import it as a ZIP file.
Add a custom Python step#
Consider the final dataset at the end of a pipeline. This dataset may be the key input to a dashboard, webapp, or Dataiku app. It may be routinely shared with other Dataiku projects or exported to other software tools.
It’s a common need to automate the rebuilding of a dataset like this as new data becomes available at the start of a pipeline. The project already includes such a scenario.
Note
This example rebuilds a dataset, but the logic works the same for other Dataiku objects such as retraining a model or refreshing a model evaluation store.
From the Jobs (
) menu in the top navigation bar, click Scenarios.
Open the Data Refresh scenario.
The scenario includes a visual step Dataset build that rebuilds the tx_windows dataset if the check on the upstream tx folder passes. Let’s assume a colleague has created this visual scenario. It works as expected, but we would like to add a specificity during the step.
Build a dataset with code#
Write the code to replace the visual step into a code step.
Navigate to the Steps tab of the Data Refresh scenario.
Click Add Step at the bottom left.
Select Execute Python code under Code.
Note
With a Python code step you have access to the Python API and can manage your scenario directly through it, which offers you a large panel of actions and possibilities.
Rename the step
Python Refresh.Copy-paste the code below.
from dataiku.scenario import Scenario

# The Scenario object is the main handle from which you initiate steps
s = Scenario()

# The dataset to be built
step = s.build_dataset("tx_windows", asynchronous=True)
Click Save (or
Cmd/Ctrl+S).
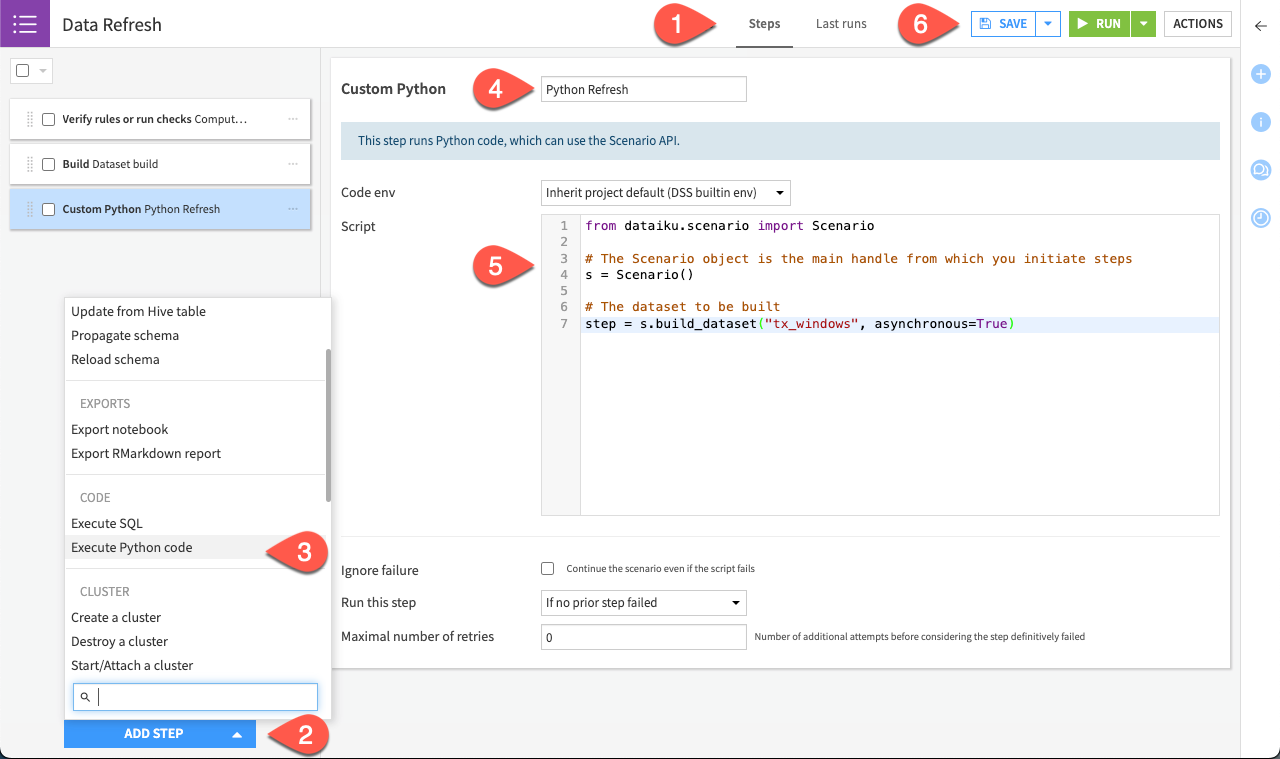
You now have the same scenario that found at the beginning but as a Python code step. Let’s add custom code to bring more flexibility to your step.
Add custom functionality#
Sometimes, the scenario takes too much time because of an error. To avoid this issue, you can set a time-out directly within the code step. To do so:
Replace the previous code with this complete one:
import dataiku
import time
from dataiku.scenario import Scenario
from dataiku.scenario import BuildFlowItemsStepDefHelper
from dataikuapi.dss.future import DSSFuture

# Setting the wanted timeout in second.
TIMEOUT_SECONDS = 3600

# Handling our scenario.
s = Scenario()

step = s.build_dataset("tx_windows", asynchronous=True)

start = time.time()
while not step.is_done():
   end = time.time()
   print("Duration: {}s".format(end-start))
   if end - start > TIMEOUT_SECONDS:
       f = DSSFuture(dataiku.api_client(), step.future_id)
       f.abort()
       raise Exception("Scenario was aborted because it took too much time.")
Click Save.
Your step is now complete. Disable the previous visual step:
Check the box of the Build datasets step card.
Click on Actions.
Select Toggle enable/disable.
Click Save.

To test the new Python step:
Click Run. You should soon have a notification that says the scenario and the job of building the dataset are completed.
Navigate to the Last runs tab of the scenario to see what happens in detail.
Optional: Trigger a scenario with custom Python code#
Important
Only certain user profiles, such as Advanced Analytics Designers and Full Designers, have access to custom triggers. If you don’t have this feature, skip ahead to Add scenario variables.
Let’s demonstrate the value of automating when actions occur by adding various kinds of triggers to the scenario. The custom trigger allows you to write a Python script to trigger your scenario when the situation requires a fully flexible approach. We want to trigger the scenario based on a check result of the tx folder.
Navigate to the Settings tab of the Data Refresh scenario.
Click Add Trigger.
Choose Custom trigger.
Name it
Ok check status.Copy-paste the following code block.
import dataiku
from dataiku.scenario import Trigger

# Call the Managed Folder "tx" where the check is computed.
folder = dataiku.Folder("tx")

# Get the last outcome of the check called "Empty folder".
checks_message = folder.get_last_check_values().get_check_by_name('Empty folder')['lastValues'][0]['outcome']

# Call the trigger.
t = Trigger()

# Set up the condition.
if checks_message == 'OK':
   t.fire()
Click Save.
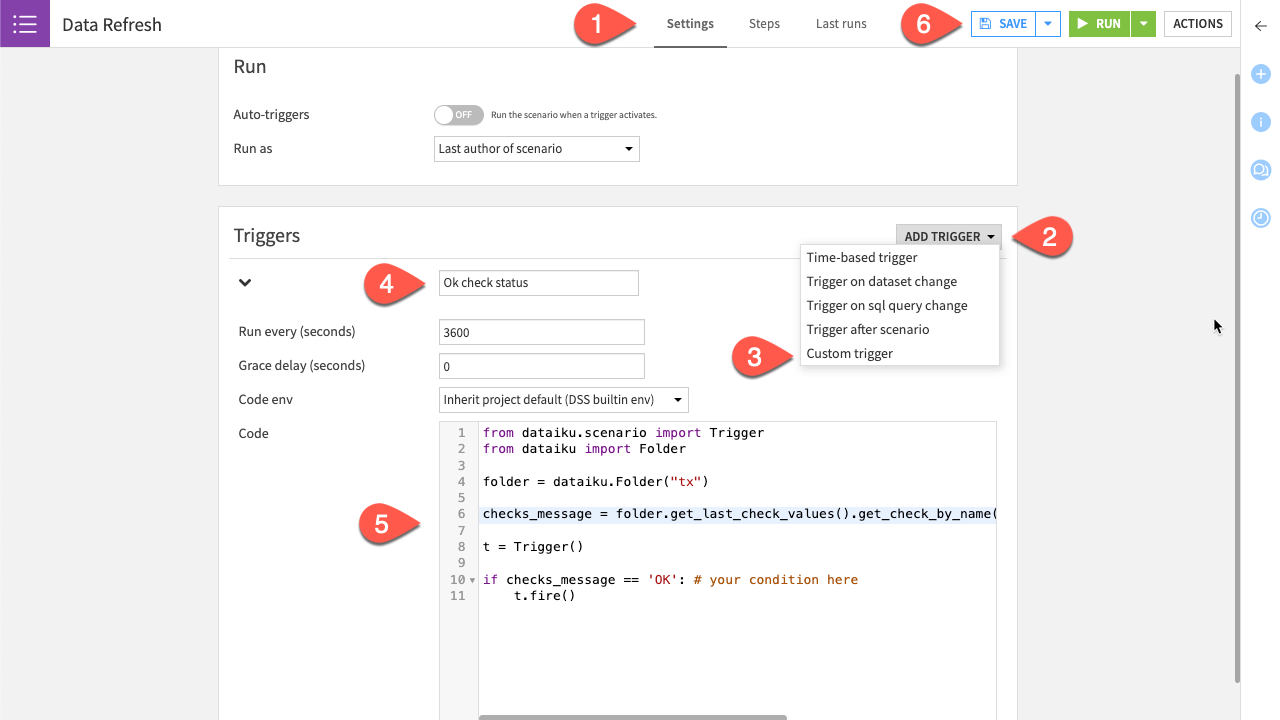
To test the trigger:
Enter
5in the Run every (seconds) input.Toggle on the Auto triggers in the Run panel.
Click Save.
Wait for the scenario to start and finish (Depending on your instance settings, you may see a pop-up notification.)
Toggle off the Auto triggers and click Save again to avoid unwanted runs.
Navigate to the Last runs tab of the scenario.
With the most recent scenario run selected, click to view the job it triggered.
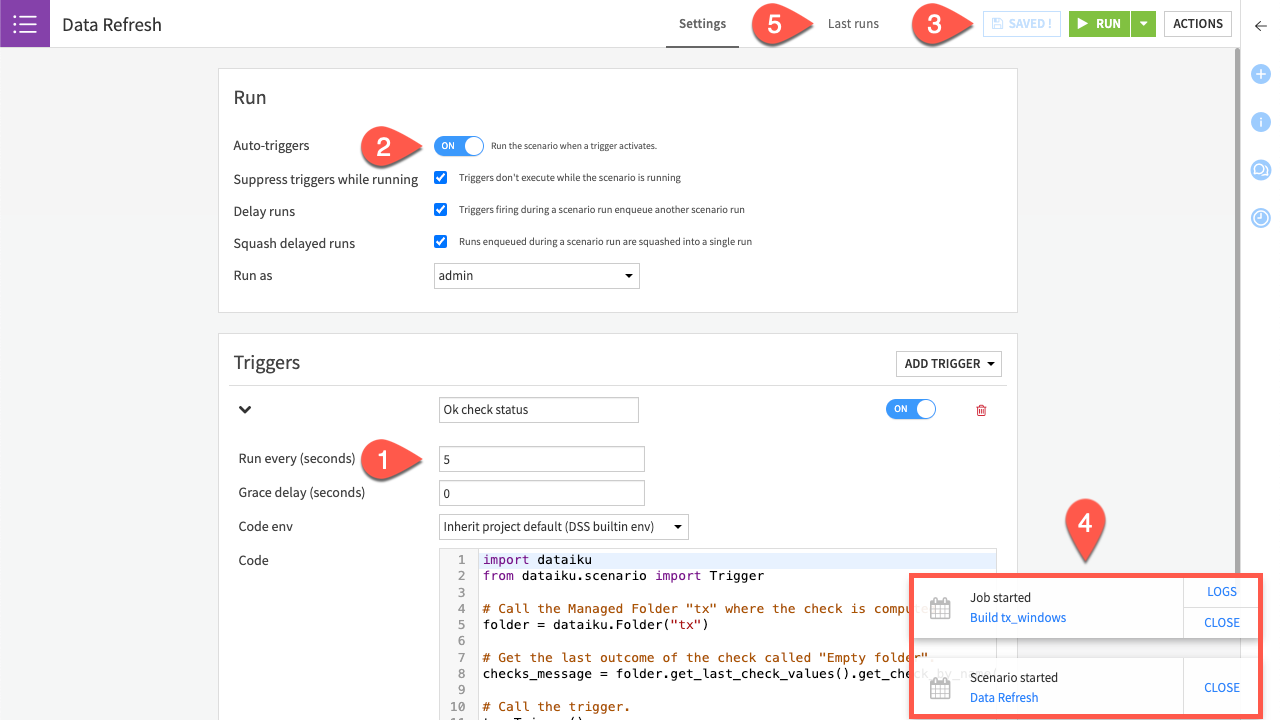
You can then decide to turn on or off the auto-trigger to fully automate or avoid unwanted runs, respectively, according to your needs.
Tip
Trigger logs aren’t recorded in the scenario logs.
If the trigger doesn’t actually run as expected, you can ask your admin to check the backend logs through waffle () > Administration > Maintenance > Log files > backend.log.
Add scenario variables#
It’s possible to add variables for use across the scenario. They allow access to information during the scenario run and even to all reporters executed at the end of the run. For example, you can set a variable that retrieves the trigger. The trigger passes data across the scenario that you can retrieve and use as a variable. We’re going to change the Timeout value in case the trigger fires manually.
Although you can define a variable in the UI with a Define Variable step, let’s use Python code because of its flexibility.
Navigate to the Steps tab.
Click Add Step > Execute Python code.
Drag the step card into the first position in the left panel (with the grip handle on the left of the card).
Rename the step
Set Variable.Copy-paste the code below:
from dataiku.scenario import Scenario

# Handling our scenario.
s = Scenario()

# Get the trigger type
trigger_type = s.get_trigger_type()

# trigger_var is now the name of the variable across the scenario
# and can be changed at your convenience.
s.set_scenario_variables(trigger_var = trigger_type)
Click Save.
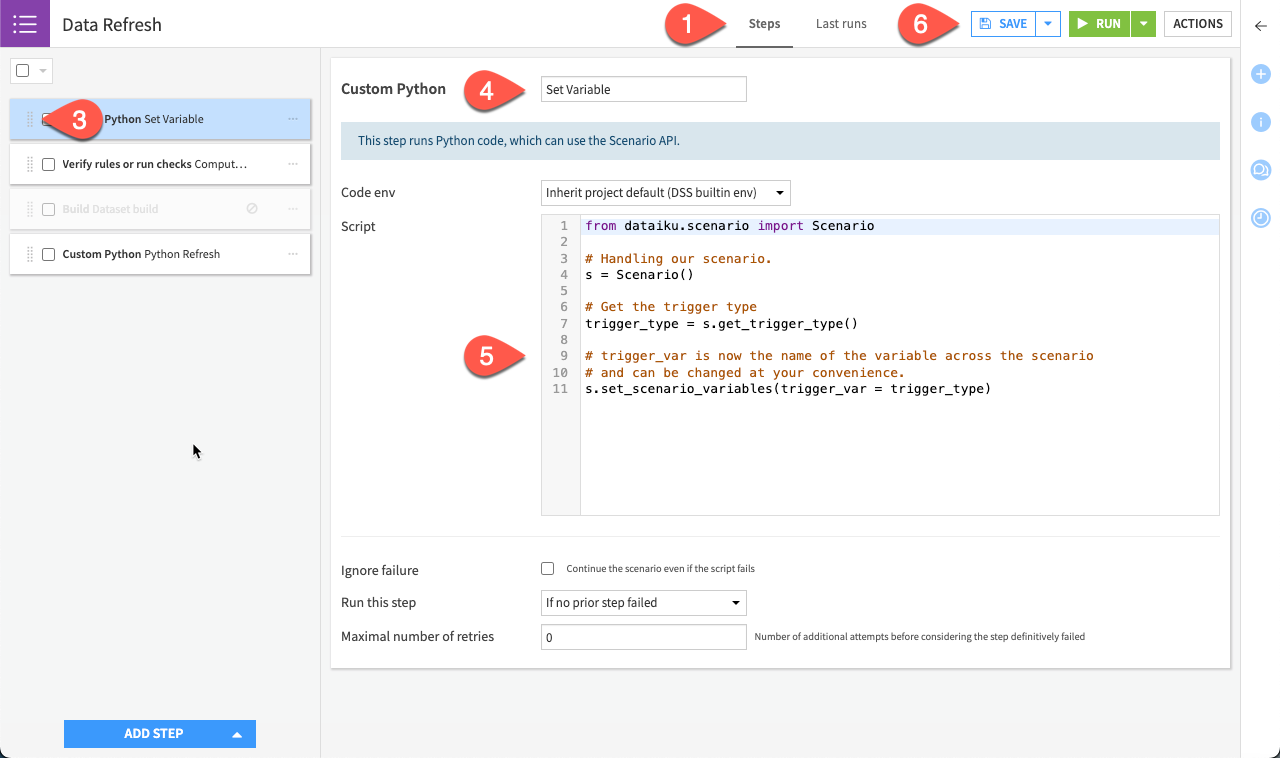
Now we have a scenario variable that we can call on every step after this one, either by code or within the UI. Let’s use it in our first Python code step Python Refresh. To do so,
Navigate back to the Python Refresh step.
Copy-paste the updated code below:
import dataiku
import time
from dataiku.scenario import Scenario
from dataiku.scenario import BuildFlowItemsStepDefHelper
from dataikuapi.dss.future import DSSFuture

# Handling our scenario.
s = Scenario()
# Call the previously set variable
TRIGGER_VAR = s.get_all_variables()['trigger_var']
# If the scenario was triggered manually
if TRIGGER_VAR == "manual":
    TIMEOUT_SECONDS = 120
else:
    TIMEOUT_SECONDS = 3600
step = s.build_dataset("tx_windows", asynchronous=True)
start = time.time()
while not step.is_done():
    end = time.time()
    print("Duration: {}s".format(end-start))
    if end - start > TIMEOUT_SECONDS:
        f = DSSFuture(dataiku.api_client(), step.future_id)
        f.abort()
        raise Exception("Scenario was aborted because it took too much time.")
Click Save.
This code decreases the timeout if the trigger is manual. For example, we can consider we don’t want to wait too much time if an error loops the scenario.
You can now test this scenario. To do so:
Click Run.
Navigate to the Last runs tab of the scenario to see what happens.
Tip
You can make checks and debugger with some print() among the code and see them after in the Step logs of the Last Runs tab.
Visualize your results#
The project provides a dataset that records the scenario results in a dataset. To check them you can create a reporter a link the scenario results into the dataset at the end of a scenario run. To do so:
Navigate to the Settings tab, click Add Reporter.
Select Send to dataset.
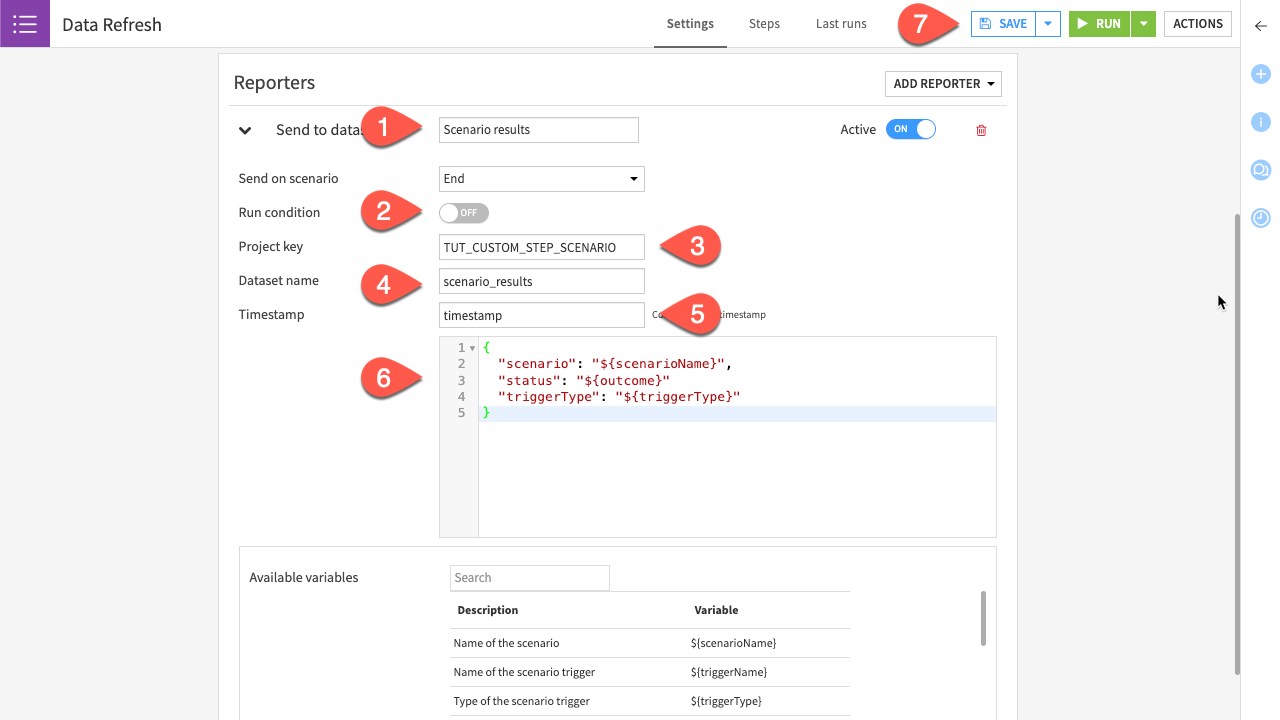
Configure a reporter#
Let’s configure the contents of the reporter next.
Name the reporter
Store scenario results.Turn Off the run condition to report all results, regardless of the scenario’s success or failure.
Provide the project key found in your URL.
Provide the dataset name
scenario_results.Provide
timestampas the name of the Timestamp column.Copy-paste the JSON below for the other two columns found in the schema.
{
  "scenario": "${scenarioName}",
  "status": "${outcome}",
  "triggerType": "${triggerType}"
}
Click Save to activate the reporter.
Check the results#
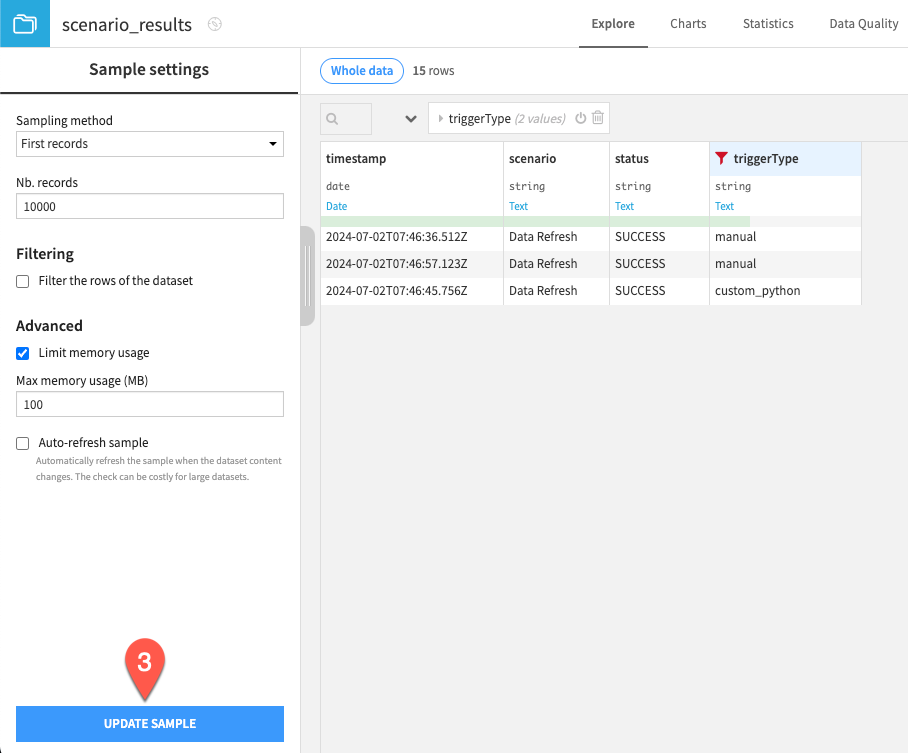
Once you’ve run the scenario a few times, you can check the results:
Navigate to the Flow.
Open the scenario_results dataset in the Results Flow zone.
Click on Update Sample to force the refresh and have the latest results from your test runs.
See also
To learn more about this feature, see Tutorial | Scenario reporters.
Next steps#
Congratulations on creating a custom step-based scenario to automate a routine action in Dataiku with the flexibility added by custom code!
Next, create a scenario entirely with Python in Tutorial | Custom script scenarios.
See also
You can learn more in the reference documentation on scenarios.

