
Tutorial | Custom script scenarios#
Get started#
In addition to inserting code into step-based scenarios, it’s also possible to create a scenario entirely with a Python script.
These custom script scenarios can execute everything that step-based scenarios can, while allowing you to fully configure it and integrate advanced logic capabilities.
Objectives#
In this tutorial, you will:
Create a custom script scenario to automate actions in Dataiku according to your needs.
Prerequisites#
To reproduce the steps in this tutorial, you’ll need:
Dataiku 12.0 or later.
An Advanced Analytics Designer or Full Designer user profile.
Basic knowledge of Dataiku (Core Designer level or equivalent).
Basic knowledge of Python.
A configured messaging channel and an admin access to it.
Create the project#
From the Dataiku Design homepage, click + New Project.
Select Learning projects.
Search for and select Custom Script Scenarios.
If needed, change the folder into which the project will be installed, and click Create.
From the project homepage, click Go to Flow (or type
g+f).
Note
You can also download the starter project from this website and import it as a ZIP file.
Create a custom script scenario#
Although it’s possible to do attach a reporter to a step-based scenario, the custom script scenario may be helpful for sending more customized reports based on performance or quality, for example.
Let’s create a scenario that sends a custom report based on a metric.
From the Jobs (
 ) menu in the top navigation bar, click Scenarios.
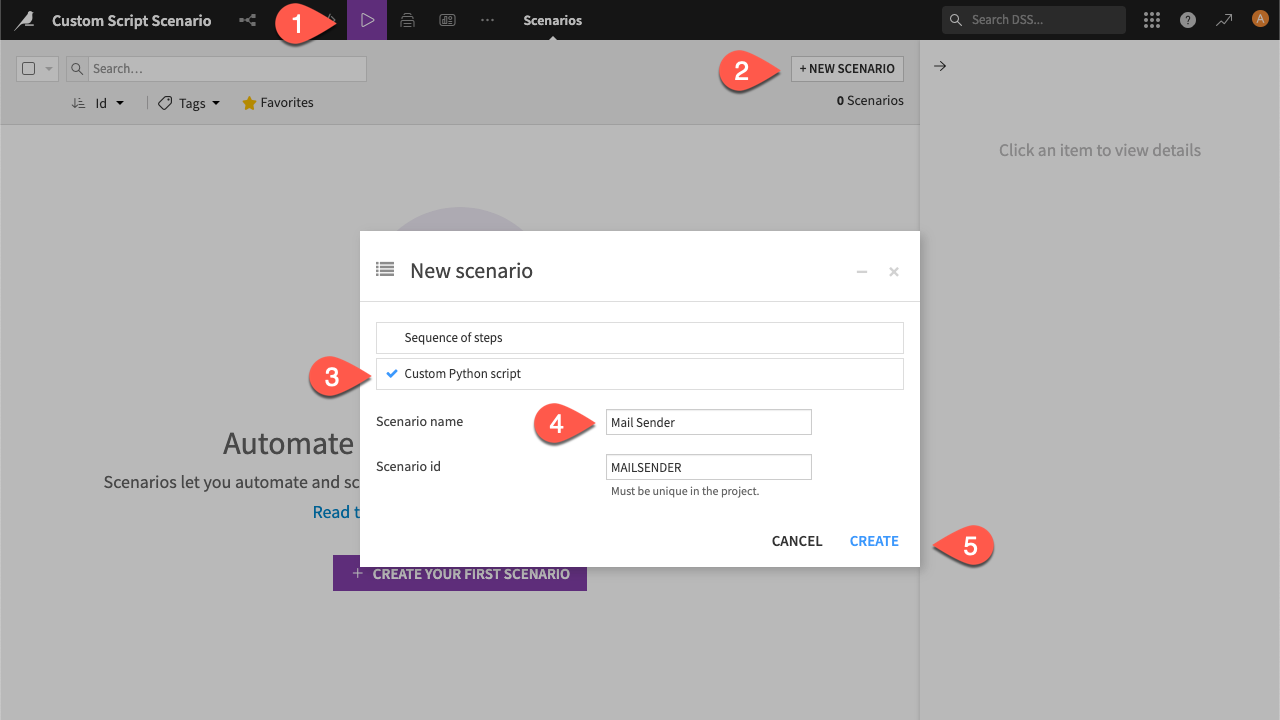
Click + New Scenario.
Select the Custom Python script option.
Name it
Mail Sender.Click Create.
Note
Notice that a Script tab has replaced the usual Steps tab.
Retrieve the data#
Let’s retrieve the data from the metric and check what’s of interest with the API.
Click on the Script tab.
Note
Dataiku already presents by default a code sample that sends a custom report based on a ROC curve result after a model training. Let’s build a script on top of it.
Delete the default code sample.
Copy-paste the code below:
from dataiku.scenario import Scenario
from dataiku import Dataset

# The Scenario object is the main handle from which you initiate steps
scenario = Scenario()

# Building a dataset
scenario.build_dataset("tx_prepared")
# Computing the metrics
scenario.compute_dataset_metrics("tx_prepared")

# Getting the metric
dataset = Dataset("tx_prepared")
metrics = dataset.get_last_metric_values()
max_auth_flag_metric = metrics.get_metric_by_id("col_stats:MAX:authorized_flag")['lastValues'][-1]['value']
This block should retrieve the last computed metric within the scenario. The next step is to build a sender.
Create the report sender#
Copy-paste this code block following the previous code:
# Calling the sender
sender = scenario.get_message_sender("messaging-channel-id")
sender.set_params(sender="[email protected]", recipient="[email protected]")
Replace the string parameters by your own parameters such as:
messaging-channel-id: the unique ID given the messaging channel.mail-from@your-company.com: the email address you want to send the message from.mail-to@your-company.com: the email addresses you want to send the message to. Note that you can add several addresses in the array.
Send the message#
You can now do a check on the retrieved metric and send the message according to the result:
Add the following code block into the end of your script:
# Checking on the metric
if int(max_auth_flag_metric) == 1:
   sender.send(subject="The scenario is doing well", message="All is good.")
else:
   sender.send(subject="Metric is inconsistent", message="There is a problem with the data, you should check it.")
Note
The condition is pretty simple: We expect the maximum of authorized flag as superior to 0. Hence, if it’s not the case, we send a report to our mail that the data may be inconsistent from what it should be. The message is basic but Dataiku allows you to send it with JSON to add variables and increase the customization. See Mail reporter in the reference documentation to learn more.
Click Run to trigger the scenario.
Navigate to the Last Runs tab as you would for a step-based scenario to view the run’s progress.
Note
You can’t set a reporting condition based on the outcome of the scenario directly in the script. Follow Tutorial | Scenario reporters to see how to do it through the UI.
Next steps#
Congratulations! You created your first custom scenario only based on a script. There are numerous automation possibilities thanks to the Python API.
See also
You can learn more in the reference documentation on scenarios.